Table of Contents
Advertisement
Advertisement
Table of Contents

Related Manuals for Kenwood KDC-220UI


Summary of Contents for Kenwood KDC-220UI
- Page 1 KDC-220UI KDC-153UM KDC-1030U KDC-120U CD-RECEIVER INSTRUCTION MANUAL © 2017 JVC KENWOOD Corporation B5A-2091-00 (MN/HN/M2N) JS_KWD_KDC_220UI_MN_C00_3.indd 1 JS_KWD_KDC_220UI_MN_C00_3.indd 1 6/14/2017 8:53:16 AM 6/14/2017 8:53:16 AM Data Size: B6L (182 mm x 128 mm) Book Size: B6L (182 mm x 128 mm)
-
Page 2: Table Of Contents
CONTENTS BEFORE USE BEFORE USE IMPORTANT • To ensure proper use, please read through this manual before using this product. It is especially important that you read and observe BASICS Warning and Caution in this manual. • Please keep the manual in a safe and accessible place for future reference. GETTING STARTED 1 Select the display language WARNING... -
Page 3: Basics
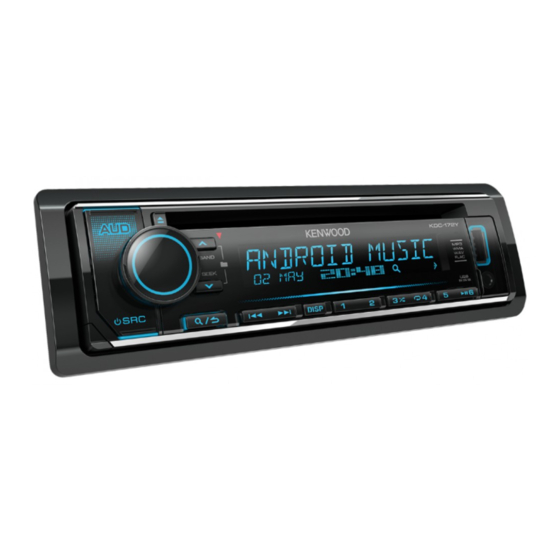
BASICS Faceplate Remote control (RC-406) Display window Loading slot Remote sensor (Do not expose to bright sunlight.) Volume knob Pull out the insulation sheet when using for * Not used the first time. : Can be remotely controlled with an Detach button Except for : Flashes when the unit... -
Page 4: Getting Started
GETTING STARTED To set the date Turn the volume knob to select [DATE FORMAT], then press the knob. Turn the volume knob to select [DD/MM/YY] or [MM/DD/YY], then press the knob. Turn the volume knob to select [DATE SET], then press the knob. Turn the volume knob to make the settings, then press the knob. - Page 5 • Refer to the illustration on page 13 for ZONE identification. For details on how to update the firmware, visit TUNER SETTING <www.kenwood.com/cs/ce/>. PRESET TYPE NORMAL: Memorizes one station for each preset button in each band CLOCK ( 6, RADIO). ; MIX: Memorizes one station for each preset button, CLOCK DISPLAY ON: The clock time is shown on the display even when the unit is turned...
-
Page 6: Radio
RADIO Other settings Press the volume knob to enter [FUNCTION]. Turn the volume knob to select an item (see the following table), then press the knob. Repeat step until the desired item is selected or activated. Press and hold to exit. Selectable band: To return to the previous setting item, press : FM1/FM2/FM3/AM/SW1/SW2... -
Page 7: Aux
RADIO Preparation: ON: Allows the unit to temporarily switch to Traffic Information if available Select [ON] for [BUILT-IN AUX] in [SOURCE SELECT]. ( 5) (“TI” lights up). ; OFF: Cancels. 1 Turn the volume knob to select the available Program Type, then press PTY SEARCH Start listening the knob. -
Page 8: Cd/Usb/Ipod/Android
When connecting an Android device, “Press [VIEW] to install KENWOOD MUSIC PLAY APP” is shown. Follow the instructions USB cable * to install the application. You can also install the latest version of KENWOOD MUSIC PLAY application on your Android device (commercially available) before connecting. - Page 9 While in ANDROID source, press 5 repeatedly. BROWSE MODE : Control Android device from this unit via Turn the volume knob quickly to browse through the list quickly. KENWOOD MUSIC PLAY application installed in the Android device. Skip Search (applicable only for iPod and ANDROID source)
-
Page 10: Pandora
Pandora® CD/USB/iPod/ANDROID (for Preparation: Direct Music Search (using the remote control) Install the latest version of the Pandora application on your device (iPhone/iPod Press DIRECT. touch), then create an account and log in to Pandora. • Select [ON] for [PANDORA SRC] in [SOURCE SELECT]. ( 5) Press the number buttons to enter a track/file number. - Page 11 Pandora® (for Create and save a new station Delete a station Press While listening to PANDORA... Turn the volume knob to select [NEW STATION], then press the knob. Press Turn the volume knob to select [FROM ARTIST] or [FROM TRACK], then Turn the volume knob to select [STATION DEL], then press the knob.
-
Page 12: Audio Settings
AUDIO SETTINGS While listening to any source... MID ADJUST MID CTR FRQ 0.5KHZ/1.0KHZ/1.5KHZ/2.5KHZ: Selects the Press AUD to enter [AUDIO CONTROL] directly. center frequency. Turn the volume knob to select an item (see the following table), MID LEVEL –8 to +8 (+1): Adjusts the level. then press the knob. -
Page 13: Display Settings
DISPLAY SETTINGS AUDIO SETTINGS Zone identification for color and brightness settings FADER R15 to F15 (0): Adjusts the rear and front speaker output balance. BALANCE L15 to R15 (0): Adjusts the left and right speaker output balance. VOLUME OFFSET For AUX: –8 to +8 (0) ; For other sources: –8 to 0: Preset the initial volume level of each source. -
Page 14: References
1 Select a zone. (See the illustration on page 13.) – Any other latest information 2 0 — 31: Select your preferred brightness level for the selected zone. Visit <www.kenwood.com/cs/ce/>. TEXT SCROLL AUTO/ONCE: Select whether to scroll the display information General automatically, or scroll only once. ;... - Page 15 – iPhone 4S, 5, 5S, 5C, 6, 6 Plus, 6S, 6S Plus, SE, 7, 7 Plus • You cannot operate iPod if “KENWOOD” or “ ” is displayed on iPod. • Depending on the version of the operating system of the iPod/iPhone, some functions may not operate on this unit.
- Page 16 REFERENCES Change the display information Each time you press DISP, the display information changes. • If the information is unavailable or not recorded, “NO TEXT”, “NO INFO”, or other information (eg. station name, playing time) appears. Display information Source name STANDBY Source name (Date/Clock) Source name...
-
Page 17: Troubleshooting
TROUBLESHOOTING Symptom Remedy Symptom Remedy • Adjust the volume to the optimum level. • This unit can only display uppercase letters, numbers, and a Sound cannot be heard. Correct characters are • Check the cords and connections. not displayed (e.g. limited number of symbols. - Page 18 Remedy Muting upon the reception of a phone call Connect the MUTE wire to your telephone using a commercial telephone accessory. • Make sure KENWOOD MUSIC PLAY APP is installed on the Cannot playback at ( 21, 22) [BROWSE MODE].
-
Page 19: Installation/Connection
INSTALLATION/CONNECTION Warning Part list for installation • The unit can only be used with a 12 V DC power supply, negative ground. • Disconnect the battery’s negative terminal before wiring and mounting. (A) Faceplate (B) Trim plate • Do not connect Battery wire (yellow) and Ignition wire (red) to the car chassis or Ground wire (black) to prevent a short circuit. - Page 20 INSTALLATION/CONNECTION Installing the unit (in-dash mounting) When installing without the mounting sleeve 1 Remove the mounting sleeve and trim plate from the unit. 2 Align the holes in the unit (on both sides) with the vehicle mounting bracket and secure the unit with screws (supplied). Do the required wiring.
- Page 21 To the terminal that is grounded when the To front speaker (right) Gray/Black (Mute control wire) telephone rings or during conversation Green ( 18) (To connect the Kenwood navigation system, To rear speaker (left) Green/Black refer your navigation manual.) Purple To rear speaker (right) Purple/Black...
- Page 22 Gray ] conversation ( 18) : Front speaker (right) (Mute control wire) Gray/black [ (To connect the Kenwood navigation White ] system, refer your navigations manual.) : Front speaker (left) White/black [ ISO connectors...
-
Page 23: Specifications
SPECIFICATIONS Frequency Range 87.5 MHz — 108.0 MHz (50 kHz space) Frequency Range 87.5 MHz — 108.0 MHz (50 kHz space) Usable Sensitivity (S/N = 26 dB) 8.2 dBf (0.71 μV/75 Ω) Usable Sensitivity (S/N = 26 dB) 0.71 μV/75 Ω Quieting Sensitivity 17.2 dBf (2.0 μV/75 Ω) Quieting Sensitivity 2.0 μV/75 Ω (DIN S/N = 46 dB) (DIN S/N = 46 dB) Frequency Response (±3 dB) - Page 24 SPECIFICATIONS Laser Diode GaAIAs Maximum Output Power 50 W × 4 Digital Filter (D/A) 8 times over sampling Full Bandwidth Power 22 W × 4 (at less than 1 % THD) Spindle Speed 500 rpm — 200 rpm (CLV) Speaker Impedance 4 Ω — 8 Ω Wow & Flutter Below measurable limit Tone Action Bass 100 Hz ±8 dB Frequency Response (±1 dB)
- Page 25 JS_KWD_KDC_220UI_MN_EN_3.indd 25 JS_KWD_KDC_220UI_MN_EN_3.indd 25 6/14/2017 8:59:33 AM 6/14/2017 8:59:33 AM...
- Page 26 The marking of products using lasers The label is attached to the chassis/case and says that the component uses laser beams that have been classified as Class 1. It means that the unit is utilizing laser beams that are of a weaker class. There is no danger of hazardous radiation outside the unit.
- Page 27 U.S. and other countries. Manufacturer: • Lightning is a trademark of Apple Inc. JVC KENWOOD Corporation • Pandora, the Pandora logo, and the Pandora trade dress are trademarks or registered trademarks of 3-12, Moriya-cho, Kanagawa-ku, Yokohama-shi, Kanagawa, 221-0022, JAPAN Pandora Media, Inc., used with permission.
- Page 28 KDC-153UM KDC-220UI KDC-120U KDC-1030U ﺟﻬﺎﺯ ﺭﺍﺩﻳﻮ ﻭﻣﺸﻐﻞ ﺃﺳﻄﻮﺍﻧﺎﺕ ﺩﻟﻴﻞ ﺍﻟﺘﻌﻠﻴﻤﺎﺕ JS_KWD_KDC_220UI_MN_C00_3.indd 2 JS_KWD_KDC_220UI_MN_C00_3.indd 2 6/14/2017 8:53:16 AM 6/14/2017 8:53:16 AM Data Size: B6L (182 mm x 128 mm) Book Size: B6L (182 mm x 128 mm)