
Related Manuals for Miele KM 6012


Summary of Contents for Miele KM 6012
- Page 1 Operating and installation instructions Ceramic hobs To avoid the risk of accidents or damage to the appliance it is essential to read these instructions before it is installed and used for the first time. en - GB M.-Nr. 09 710 060...
-
Page 2: Table Of Contents
Contents Warning and Safety instructions ........3 Caring for the environment . -
Page 3: Warning And Safety Instructions
They contain important notes on installation, safety, use and maintenance. Miele cannot be held liable for damage caused by non-compliance with these Warning and Safety instructions. - Page 4 Warning and Safety instructions Correct application This hob is not designed for commercial use. It is intended for use in domestic households and similar working and residential environments. The appliance is not intended for outdoor use. It is intended for domestic use only to cook food and keep it warm.
- Page 5 Warning and Safety instructions Safety with children Children under 8 years of age must be kept away from the appliance unless they are constantly supervised. Children 8 years and older may only use the appliance if they have been shown how to use it in a safe way and understand the hazards involved.
- Page 6 Warning and Safety instructions Technical safety Installation, maintenance and repairs may only be carried out by a Miele-authorised person. Installation, maintenance and repairs by unqualified persons could be dangerous. A damaged appliance can be dangerous. Check the appliance for visible signs of damage. Do not use a damaged appliance.
- Page 7 The manufacturer can only guarantee the safety of the appliance when original Miele replacement parts are used. Faulty components must only be replaced by genuine Miele original spare parts. The hob is not intended for use with an external timer switch or a remote control system.
- Page 8 Warning and Safety instructions Correct use Oil and fat can overheat and catch fire. Do not leave the appliance unattended when cooking with oil or fat. If oil or fat does catch fire, do not attempt to put out the flames with water.
- Page 9 Warning and Safety instructions The appliance gets hot when in use and remains hot for a while after being switched off. There is a danger of burning until the residual heat indicators go out. You could burn yourself on the hot hob. Protect your hands with heat-resistant pot holders or gloves when handling hot pots and pans.
- Page 10 Warning and Safety instructions Grains of salt, sugar and sand (e.g. from cleaning vegetables) can cause scratches if they get under pan bases. Make sure that the ceramic surface is clean before placing pans on it. Even a light object could cause damage in certain circumstances.
-
Page 11: Caring For The Environment
Caring for the environment Disposal of the packing Disposing of your old material appliance The transport and protective packing Electrical and electronic appliances has been selected from materials often contain materials which, if which are environmentally friendly for handled or disposed of incorrectly, disposal and should be recycled. -
Page 12: Guide To The Appliance
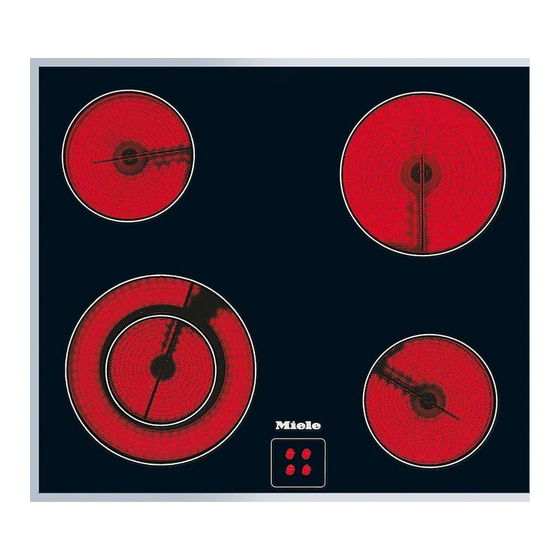
Guide to the appliance Double circle zone bcd Single circle zones Residual heat indicators Cooking zones C in cm Cooking zone Rating in watts for 230 V 12.0 / 21.0 750 / 2200 14.5 1200 18.0 1800 14.5 1200 Total: 6400... -
Page 13: Before Using For The First Time
Before using for the first time Heating up for the first time Please stick the extra data plate for the appliance supplied with this The metal components have a documentation in the space provided in protective coating which may give off a the "After sales service, data plate, slight smell when heated up for the first guarantee"... -
Page 14: How The Cooking Zones Work
How the cooking zones work Single circle cooking zones have one Single circle zone heating element, whilst double circle (vario) cooking zones and extended zones have two. Depending on the mo- del, the heating elements may be separated by an insulating ring. Each cooking zone has overheating protection (a temperature limiter), which stops the ceramic surface from... -
Page 15: Operation
Operation Switching on and off Residual heat indicator The cookers units have two different When a cooking zone is switched on, types of control dials for the cooking e.g. front left, the appropriate residual zones: heat indicator lights up when the zone has reached a certain temperature. -
Page 16: Settings
Operation Settings Cooking process Settings Melting butter, chocolate etc. 1 - 2 Dissolving gelatine Preparing yoghurt Thickening sauces containing egg yolk and butter 1 - 3 Warming small quantities of food/liquid Keeping warm food which sticks easily Cooking rice Warming liquid and semi-solid foods 3 - 5 Thickening sauces, e.g. -
Page 17: Pans
Pans – The best pans are those with a thick – Lift pans into position on the hob. base which is very slightly concave Sliding them into place can cause when cold. When heated, the base scuffs and scratches. flattens to rest evenly on the hob, –... -
Page 18: Tips On Saving Energy
Tips on saving energy – Use a pan lid whenever possible to – Use as little water as possible to minimise heat loss. cook with, and reduce the power setting once the water has come to the boil or the oil is hot enough to fry –... -
Page 19: Overheating Protection
Overheating protection Each cooking zone has a safety Overheating can be caused by: switch-off feature (internal temperature – a cooking zone being switched on limiter). This automatically switches off without a pan on it the heating elements in the cooking zone before it overheats. -
Page 20: Cleaning And Care
Cleaning and care For Miele branded cleaning and To avoid damaging the surface of conditioning products see "Optional your appliance, do not use: accessories". – washing-up liquid, Do not use a steam cleaning – cleaning agents containing soda, appliance to clean this appliance. - Page 21 Wipe all coarse soiling off using a damp cloth. Stubborn soiling may need to be removed with a shielded scraper blade. Then clean the hob with Miele ceramic and stainless steel hob cleaner (see "Optional accessories") applied with kitchen paper or a clean cloth. Do not apply cleaner whilst the hob is still hot, as this could result in marking.
-
Page 22: Problem Solving Guide
Do not attempt to open the casing of the appliance. Repairs and other work by unqualified persons could be dangerous and Miele cannot be held liable for unauthorised work. Problem Cause and solution After switching on, The mains fuse has tripped. -
Page 23: Optional Accessories
Optional accessories Miele offer a comprehensive range of useful accessories as well as cleaning and conditioning products for your appliance. These products can be ordered online: or from Miele (see back cover for contact details) Ceramic and stainless steel hob cleaner... -
Page 24: Safety Instructions For Installation
Safety instructions for installation After installing the hob, you need to To avoid the risk of damage fit the make sure that the underside of the wall units and extractor hood before appliance cannot be accessed or fitting the hob. touched. - Page 25 Safety instructions for installation Safety distance above the appliance When two or more appliances which have different safety distances are installed together below a cooker hood, you should observe the greater safety distance of the two. A minimum safety distance must be maintained between the appliance and the cooker hood above it.
- Page 26 Safety instructions for installation Safety distances to the sides and back of the hob Ideally the hob should be installed with plenty of space on either side. There may be a wall at the rear or a tall unit or wall on one side (right or left) (see illustrations).
- Page 27 Safety instructions for installation Safety distance when installing the appliance near a wall with additional niche cladding A minimum safety distance must be maintained between the worktop cut-out and any niche cladding to protect it from heat damage. If the niche cladding is made from a combustible material (e. g. wood) a minimum safety distance e of 50 mm must be maintained between the cut-out and the cladding.
-
Page 28: Building-In Dimensions
Building-in dimensions 5 0 4 5 7 4 ß 4 9 0 a Spring clamps b Casing depth c Front d Space for fixings and electrical cable... -
Page 29: Preparing The Worktop
Preparing the worktop ^ Make the worktop cut-out according Worktops made of wood to the dimensions given in the ^ Seal the cut surfaces with a suitable building-in diagram. Remember to heat-resistant sealant to avoid maintain the minimum safety swelling caused by moisture. distances (see "Safety instructions The materials used must be for installation"). - Page 30 Preparing the worktop Granite and marble worktops You will require double-sided tape and silicone (not supplied). ^ Apply silicone g to the side edges and the lower edges of the spring clamps. ^ Position the spring clamps a, and fix in place using heavy-duty double-sided tape f.
-
Page 31: Installing The Hob
Installing the hob ^ Feed the hob connection cable down through the cut-out. ^ Connect the hob to the cooker (see section "Connecting up to the cooker). ^ Position the hob on the spring clamps. ^ Using both hands, press down evenly on the sides of the hob until it clicks into position. - Page 32 Installing the hob Seal between the hob and the Tiled worktop worktop Grout lines a and the hatched area The sealing strip under the edge of the underneath the hob frame must be top part of the appliance provides a smooth and even.
-
Page 33: Protective Shelf
Protective shelf After installing the hob, you need to make sure that the underside of the appliance cannot be accessed or touched. A fascia panel and a protective shelf must be fitted if: – the appliance is wider than the oven/cooker/control unit. -
Page 34: Connecting Up To The Cooker Unit
Connecting up to the cooker unit The EMV earth cable - located The cable for the appliance has plug connectors at the end of it which must underneath the hob (not on every mo- be connected up to the cooker/control del) must be fixed to the cooker/control unit. -
Page 35: Electrical Connection
(including switch, with a special connection cable, fuses and relays). available from the Miele Spare Parts Department. Ensure power is not supplied to the appliance until after installation or repair work has been carried out. - Page 36 Electrical connection WARNING THIS APPLIANCE MUST BE EARTHED The electrical safety of this appliance can only be guaranteed when continuity is complete between it and an effective earthing system, which complies with current local and national safety regulations. It is most important that this basic safety requirement is present and regularly tested and where there is any doubt, the electrical wiring...
-
Page 37: After Sales Service, Data Plate
– your Miele dealer, or – Miele (see back cover for contact details). When contacting your Dealer or Miele, please quote the model and serial number of your appliance. These are given on the data plate. Space in which to stick the extra data plate supplied with the appliance. Ensure that the model number is the same as the one on the front of these instructions. - Page 40 KM 6012 en - GB M.-Nr. 09 710 060 / 00...