Table of Contents
Advertisement
Available languages
Available languages
Quick Links
Advertisement
Chapters
Table of Contents

Related Manuals for Haier HRB15N3


Summary of Contents for Haier HRB15N3
- Page 1 Installation and User Manual Instructions d’installation et Guide de l’utilisateur Instrucciones de instalación y Manual del usuario HRB15N3 Bottom Mount Refrigerator Réfrigérateur à congélateur inférieur Refrigerador de montaje inferior 49-1000580 Rev. 0 03-21 GEA...
- Page 2 49-1000580 Rev. 0...
-
Page 3: Table Of Contents
TABLE OF CONTENTS REFRIGERATOR SAFETY ..............................4 PARTS AND FEATURES ...............................6 INSTALLATION REQUIREMENTS ............................7 Location Requirements ................................... 7 Electrical Requirements................................... 7 INSTALLATION INSTRUCTIONS............................8 Step 1 - Unpack the Refrigerator ..............................8 Step 2 - Door Reversing ................................... 8 Step 3 - Complete the Installation ..............................13 Step 4 - Leveling and Door Adjustment ............................ -
Page 4: Refrigerator Safety
REFRIGERATOR SAFETY IMPORTANT SAFETY INSTRUCTIONS To reduce the risk of fire, explosion, electric shock, or injury when using your refrigerator, follow these WARNING basic safety precautions: This refrigerator must be properly installed and located To avoid serious injury or death, children should not in accordance with the Installation Instructions before it stand on, or play in or with the appliance. - Page 5 REFRIGERATOR SAFETY CONNECTING ELECTRICITY WARNING ELECTRICAL SHOCK HAZARD Plug into a grounded 3-prong outlet Do not use an extension cord. Do not remove the ground prong Failure to follow these instructions can result in death, Do not use an adapter fire, or electrical shock.
-
Page 6: Parts And Features
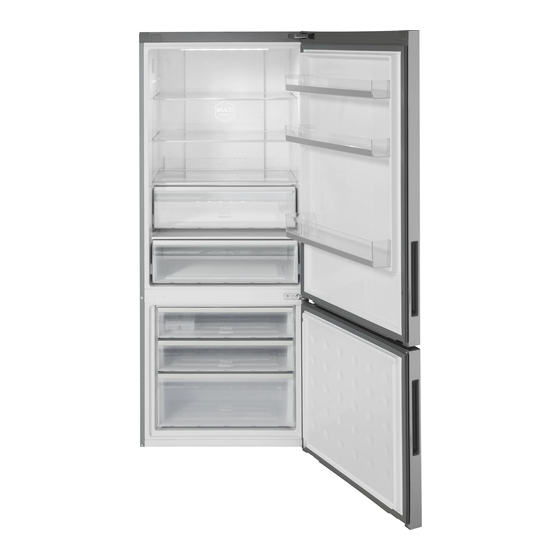
PARTS AND FEATURES LED Light Refrigerator Drawer Rating Plate My Zone Cover Glass Shelves (2) My Zone Drawer Refrigerator Door Bins (7) Freezer Storage Drawers (3) Refrigerator Drawer Cover Adjustable Leveling Legs (2) READ AND SAVE THESE INSTRUCTIONS 49-1000580 Rev. 0... -
Page 7: Installation Requirements
INSTALLATION REQUIREMENTS LOCATION REQUIREMENTS ELECTRICAL REQUIREMENTS WARNING WARNING Explosion and Fire Hazard Electrical Shock Hazard Keep flammable materials and vapors, such as gasoline, Plug into a grounded 3 prong outlet. away from appliance. Do not remove the ground prong from the power cord plug. Failure to do so can result in death, explosion or fire. -
Page 8: Installation Instructions
INSTALLATION INSTRUCTIONS STEP 1 - UNPACK THE Important information to know about glass shelves and covers: REFRIGERATOR Do not clean glass shelves or covers with warm water when they are cold. Shelves and covers may break if exposed to WARNING sudden temperature changes or impact, such as bumping. - Page 9 INSTALLATION INSTRUCTIONS 3. Using a Phillips screwdriver, remove the four screws 7. Using an 8 mm socket wrench, remove the two screws attaching the wiring cover to the top of the refrigerator attaching the top hinge to the cabinet. cabinet. Lift up on the wiring cover and allow it to rest on the top of the cabinet.
- Page 10 INSTALLATION INSTRUCTIONS 13. Move the door closure to the opposite side. Flip over 4. Using a Phillips screwdriver, remove the two screws the door closure so that the curved edge of the closure fastening the plastic door closure and the metal door is toward the center of the door.
- Page 11 INSTALLATION INSTRUCTIONS 8. Remove innermost screw. Fit the door closure on top 11. Remove the new bottom hinge from the accessory of the door stop screw, and fasten with the innermost bag. Using the three screws removed earlier, fasten the screw.
- Page 12 INSTALLATION INSTRUCTIONS 7. Remove the new hinge cover from the accessory 10. Connect the ends of both wire harnesses. bag. Insert the wiring cable through the clips on the NOTE: underside of the cover, and then fit the cover over the hinge.
-
Page 13: Step 3 - Complete The Installation
INSTALLATION INSTRUCTIONS STEP 3 - COMPLETE THE STEP 4 - LEVELING AND DOOR INSTALLATION ADJUSTMENT (IF NEEDED) The refrigerator must be level to maintain optimal WARNING performance and appearance. LEVELING 1. Move the refrigerator to its final location. 2. Turn the feet on the bottom, front of the cabinet to raise or lower that side of the refrigerator until the Electrical Shock Hazard refrigerator is level side-to-side. -
Page 14: Refrigerator Use
REFRIGERATOR USE USING THE CONTROLS To Lock the Control Panel: 1. Press and hold LOCK for 3 seconds. The Lock indicator will turn on. Fridge TEMPERATURE DISPLAY My Zone My Zone Fridge Freezer Freezer When no buttons or doors are operated for 30 seconds, all When a button is pressed or a door opened, the LEDs on Quick Cool display panel illuminate. - Page 15 REFRIGERATOR USE TEMPERATURE CONTROLS 2. Press the Freezer button to adjust the temperature. The temperature range for the refrigerator compartment is 34°F to 42°F (1°C to 6°C). The temperature range for the freezer compartment is -6°F to 4°F (-21°C to -16°C). The temperature range for the My Zone compartment is 27°F to Freezer 41°F (-3°C to 5°C).
-
Page 16: Features
REFRIGERATOR USE QUICK COOL SABBATH The Quick Cool feature accelerates the cooling of fresh food The Sabbath function is designed for those whose religious and protects the foods already stored from undesirable observances require turning off the lights. All interior lights warming. - Page 17 REFRIGERATOR USE REMOVABLE DOOR BINS REMOVABLE FREEZER STORAGE DRAWERS To Remove/Replace a Door Bin: IMPORTANT: Do not overload the drawers. 1. Place hands on both sides of the bin and lift upward, and To Remove and Replace a Freezer Drawer: pull out.
-
Page 18: Refrigerator Care
REFRIGERATOR CARE CLEANING WARNING Both the refrigerator and freezer sections defrost automatically. However, clean both sections about once a month to avoid buildup of odors. Wipe up spills immediately. Because air circulates between both sections, any odors formed in one section will transfer to the other. You must thoroughly Electrical Shock Hazard clean both sections to eliminate odors. -
Page 19: Lights
REFRIGERATOR CARE LIGHTS MOVING The interior lights of the refrigerator turn off when the doors WARNING are open for more than 7 minutes. IMPORTANT: Your refrigerator is equipped with LED Excessive Weight Hazard lighting. These lights are designed to last for the life of your Use two or more people to move and install refrigerator. -
Page 20: Troubleshooting
TROUBLESHOOTING First try the solutions suggested here to possibly avoid the cost of a service call. REFRIGERATOR IS NOT OPERATING PROBLEM POSSIBLE CAUSE(S) SOLUTION Refrigerator does not run. Refrigerator is unplugged. Plug into a grounded 3 prong outlet. Reset / Turn on breaker or replace fuse. blown. - Page 21 TROUBLESHOOTING TEMPERATURE AND MOISTURE PROBLEM POSSIBLE CAUSE(S) SOLUTION Refrigerator or freezer is Temperature control is not set low Adjust the compartment to a colder too warm. enough. setting;allow 12 hours for the temperature to adjust. Door opened frequently or left ajar. Limit door openings to maintain the internal temperature.
-
Page 22: Limited Warranty
To know what your legal rights are, consult your Warrantor US: GE Appliances, a Haier company Louisville, KY 40225 For Customers in Canada: This warranty is extended to the original purchaser and any succeeding owner for products purchased in Canada for home use within Canada. - Page 23 NOTES 49-1000580 Rev. 0...
- Page 24 NOTES 49-1000580 Rev. 0...
- Page 25 TABLE DES MATIÈRES SÉCURITÉ DU RÉFRIGÉRATEUR ............................26 PIÈCES ET CARACTÉRISTIQUES ............................28 EXIGENCES D’INSTALLATION ............................29 Exigences d’emplacement ................................29 Exigences électriques ..................................29 INSTRUCTIONS D’INSTALLATION ...........................30 Étape 1 – Déballage du réfrigérateur ............................30 Étape 2 – Inversion du sens d’ouverture des portes ........................30 Étape 3 –...
-
Page 26: Sécurité Du Réfrigérateur
REFRIGERATOR SAFETY CONSIGNES DE SÉCURITÉ IMPORTANTESS Pour réduire le risque d’incendie, d’explosion, de choc électrique ou de blessures lorsque vous utilisez votre AVERTISSEMENT réfrigérateurde , veuillez suivre ces consignes de sécurité : Ce réfrigérateur doit être correctement installé conformément Afin de prévenir les accidents graves ou la mort, les enfants ne aux Consignes d’Installation avant toute utilisation. - Page 27 REFRIGERATOR SAFETY CONNEXION DE L’ÉLECTRICITÉ AVERTISSEMENT RISQUE DE DÉCHARGES ÉLECTRIQUES Procédez au branchement dans une prise à trois broches N’utilisez pas de rallonge. mise à la terre La non-observation de ces instructions pourrait entraîner la N’enlevez pas la broche de mise à la terre mort, un incendie ou une décharge électrique.
-
Page 28: Pièces Et Caractéristiques
PIÈCES ET CARACTÉRISTIQUES Éclairage DEL Tiroir du réfrigérateur Plaque signalétique Couvercle du compartiment My Zone Clayettes en verre (2) Tiroirs du compartiment My zone Balconnets de porte du réfrigérateur (7) Tiroirs de rangement du congélateur (3) Couvercle de tiroir du réfrigérateur Pieds de nivellement ajustables (2) LIRE ET CONSERVER CES INSTRUCTIONS 49-1000580 Rev. -
Page 29: Exigences D'installation
EXIGENCES D’INSTALLATION EXIGENCES D’EMPLACEMENT SPÉCIFICATIONS ÉLECTRIQUES WARNING AVERTISSEMENT Risque d’explosion ou Incendie Risque de choc électrique Garder les matériaux et les vapeurs inflammables, telles que Brancher sur une prise à 3 alvéoles reliée à la terre. l’essence, loin de l’appareil. Ne pas enlever la broche de liaison à... -
Page 30: Instructions D'installation
INSTRUCTIONS D’INSTALLATION ÉTAPE 1 - DÉBALLAGE DU Informations importantes à propos des tablettes et des couvercles en verre : RÉFRIGÉRATEUR Ne pas nettoyer les tablettes ou les couvercles de verre avec de l’eau tiède lorsqu’ils sont froids. Les tablettes et couvercles WARNING peuvent se briser s’ils sont exposés à... - Page 31 INSTRUCTIONS D’INSTALLATION 7. À l’aide d’une clé à douille de 8 mm, retirer les deux vis fixant la 3. À l’aide d’un tournevis Phillips, retirer les quatre vis fixant le charnière supérieure à la caisse. couvercle du logement des câbles électriques au sommet de la caisse du réfrigérateur.
- Page 32 INSTRUCTIONS D’INSTALLATION 13. Déplacer le dispositif de fermeture de la porte de l’autre côté 4. À l’aide d’un tournevis Phillips, retirer les deux vis fixant le Retourner le dispositif de fermeture de la porte de sorte que le dispositif de fermeture en plastique de la porte, ainsi que la côté...
- Page 33 INSTRUCTIONS D’INSTALLATION 8. Retirer la vis située le plus à l’intérieur. Placer le dispositif de 11. Sortir la nouvelle charnière inférieure du sachet fermeture par-dessus la vis de la butée de porte, puis serrer d’accessoires. Au moyen des trois vis retirées précédemment, avec la vis située le plus à...
- Page 34 INSTRUCTIONS D’INSTALLATION 7. Sortir le nouveau couvre-charnière du sachet d’accessoires. 10. Raccorder les extrémités des deux faisceaux de câbles. Faire passer le fil de câblage dans les attaches situées sur REMARQUE: S’assurer que les câbles sont bien enfoncés dans la partie inférieure du couvercle du logement des câbles électriques, puis fixer le couvercle par-dessus la charnière.
-
Page 35: Étape 3 - Achever L'installation
INSTRUCTIONS D’INSTALLATION ÉTAPE 3 - ACHEVER L’INSTALLATION ÉTAPE 4 - NIVELLEMENT ET AJUSTEMENT DES PORTES (SI WARNING NÉCESSAIRE) Le réfrigérateur doit être d’aplomb pour une performance et un aspect optimaux. NIVELLEMENT 1. Déplacer le réfrigérateur jusqu’à son emplacement définitif. Risque de choc électrique 2. -
Page 36: Utilisation Du Réfrigérateur
UTILISATION DU RÉFRIGÉRATEUR UTILISATION DES COMMANDES Pour déverrouiller le tableau de commande: 1. Appuyer sans relâcher sur la touche LOCK (verrouillage) pendant 3 secondes. Le voyant “Lock” (verrouillage) s’allume. Fridge AFFICHAGE DE LA TEMPÉRATURE My Zone My Zone Fridge Freezer Freezer Lorsqu’aucun bouton ou porte n’est actionné(e) pendant 30 s’éteignent. - Page 37 UTILISATION DU RÉFRIGÉRATEUR 2. Appuyer sur le bouton Freezer (congélateur) pour régler la COMMANDES DE TEMPÉRATURE température. La température du compartiment de réfrigération se situe entre 34 °F et 42 °F (entre 1 °C et 6 °C). La température du compartiment de congélation se situe entre -6 °F et 4 °F (entre -21 °C et -16 °C).
-
Page 38: Caractéristiques
UTILISATION DU RÉFRIGÉRATEUR QUICK COOL SABBAT La fonction Quick Cool (refroidissement rapide) accélère le La fonction Sabbath (mode Sabbat) est conçue pour les personnes refroidissement des aliments frais et maintient les aliments déjà dont les pratiques religieuses requièrent l’extinction des lumières. entreposés à... - Page 39 UTILISATION DU RÉFRIGÉRATEUR BALCONNETS AMOVIBLES TIROIRS DE RANGEMENT AMOVIBLE DU CONGÉLATEUR Retrait et réinstallation d’un balconnet: 1. Placer les mains de chaque côté du balconnet, soulever vers le IMPORTANT: Ne pas surcharger les tiroirs. haut, puis tirer pour le sortir. Retrait et réinstallation d’un tiroir de congélation: 2.
-
Page 40: Entretien Du Réfrigérateur
ENTRETIEN DU RÉFRIGÉRATEUR NETTOYAGE WARNING Les sections de réfrigération et de congélation se dégivrent automatiquement. Toutefois, nettoyer les deux compartiments environ une fois par mois afin d’éviter une accumulation d’odeurs. Essuyer les renversements immédiatement. Comme l’air circule entre les deux sections, toutes les odeurs Risque de choc électrique formées dans une section seront transférées à... -
Page 41: Éclairage
ENTRETIEN DU RÉFRIGÉRATEUR ÉCLAIRAGE DÉMÉNAGEMENT Les lampes intérieures du réfrigérateur s’éteignent si les WARNING portes sont ouvertes pendant plus de 7 minutes. IMPORTANT: Le réfrigérateur est équipé d’un éclairage à Risque du poids excessif DEL. Cet éclairage est conçu pour durer pendant toute la Utiliser deux ou plus de personnes pour déplacer et durée de vie utile du réfrigérateur. -
Page 42: Dépannage
DÉPANNAGE Essayez tout d’abord les solutions suggérées ici et évitez les coûts pour le service de réparation. EL REFRIGERADOR NO FUNCIONA PROBLÈME CAUSE(S) POSSIBLE(S) SOLUTION Le réfrigérateur ne Le réfrigérateur est débranché. Brancher le réfrigérateur sur une prise à 3 alvéoles fonctionne pas reliée à... - Page 43 DÉPANNAGE TEMPÉRATURE ET HUMIDITÉ PROBLÈME CAUSE(S) POSSIBLE(S) SOLUTION Le réfrigérateur ou le congéla- Régler la température du compartiment à un réglable La commande de la température n’est pas teur est trop chaud plus froid; attendre 24 heures que la température placée à...
-
Page 44: Garantie Limitée
Pour connaître vos droits Garant US: GE Appliances, a Haier company Louisville, KY 40225 Pour les clients des Canada : Cette garantie est étendue à l’acheteur d’origine et aux propriétaires suivants pour tout produit acheté aux Canada pour une utilisation domestique aux Canada. - Page 45 ÍNDICE SEGURIDAD DEL REFRIGERADOR............................46 PIEZAS Y FUNCIONES ..............................48 REQUISITOS DE INSTALACIÓN ............................49 Requisitos de Ubicación ................................. 49 Requisitos Eléctricos ..................................49 INSTRUCCIONES DE INSTALACIÓN ..........................50 Paso 1 – Desembale el Refrigerador ............................. 50 Paso 2 – Inversión de la Puerta ..............................50 Paso 3 - Complete la Instalación ..............................
-
Page 46: Seguridad Del Refrigerador
SEGURIDAD DEL REFRIGERADOR A fin de reducir el riesgo de incendio, explosión, descargas eléctricas o lesiones al usar su ADVERTENCIA refrigerador, siga estas precauciones básicas de seguridad: Este refrigerador se deberá instalar y ubicar adecuadamente Los niños y las personas con capacidad física, sensorial o de acuerdo con las Instrucciones de Instalación antes de ser mental reducida o con falta de experiencia y conocimiento usado. - Page 47 SEGURIDAD DEL REFRIGERADOR CONEXIÓN DE LA ELECTRICIDAD ADVERTENCIA RIESGO DE DESCARGA ELÉCTRICA Enchufe el electrodoméstico en un tomacorriente con conexión No use un prolongador. a tierra de 3 cables. Si no se siguen estas instrucciones, se podrá producir la muerte, No elimine el cable de conexión a tierra.
-
Page 48: Piezas Y Funciones
PIEZAS Y CARACTERÍSTICAS Luz LED Cajón del Refrigerador Tapa de My Zone Repisas de Vidrio (2) Cajones de My Zone Estantes de la Puerta del Refrigerador (7) Cajones de Almacenamiento en el Freezer (3) Tapa del Cajón del Refrigerador Patas Niveladoras Ajustables (2) LEA Y GUARDE ESTAS INSTRUCCIONES 49-1000580 Rev. -
Page 49: Requisitos De Instalación
REQUISITOS DE INSTALACIÓN REQUISITOS DE UBICACIÓN REQUISITOS ELÉCTRICOS WARNING WARNING Peligro de Explosión Peligro de Choque Eléctrico Keep flammable materials and vapors, such as gasoline, Conecte a un contacto de pared de conexión a tierra de 3 away from appliance. terminales. -
Page 50: Instrucciones De Instalación
INSTRUCCIONES DE INSTALACIÓN PASO 1 - DESEMPAQUE EL Información importante acerca de los estantes y tapas de vidrio: REFRIGERADOR No limpie los estantes y tapas de vidrio con agua caliente mientras estén fríos. Los estantes y tapas pueden romperse WARNING si se exponen a cambios bruscos de temperatura o a impactos como golpes bruscos. - Page 51 INSTRUCCIONES DE INSTALACIÓN 3. Con un destornillador Phillips, quite los cuatro tornillos que 7. Utilice una llave de cubo de 8 mm para quitar los dos tornillos sujetan la cubierta de cableado a la parte superior del gabinete que sujetan la bisagra superior al gabinete. del refrigerador.
- Page 52 INSTRUCCIONES DE INSTALACIÓN 13. Traslade el cierre de la puerta hacia el lado opuesto. Invierta 4. Con un destornillador Phillips, quite los dos tornillos que la posición del cierre de la puerta de manera que el lado curvo sujetan el cierre plástico de la puerta y el tope de metal de la del cierre quede hacia el centro de la puerta.
- Page 53 INSTRUCCIONES DE INSTALACIÓN 8. Quite el tornillo interno. Acomode el cierre de la puerta en la 11. Saque una nueva bisagra inferior de la bolsa de accesorios. parte superior del tornillo del tope de la puerta y sujételo con el Utilice los tres tornillos que quitó...
- Page 54 INSTRUCCIONES DE INSTALACIÓN 7. Saque la nueva cubierta de la bisagra de la bolsa de accesorios. 10. Conecte los extremos de ambos arneses de cableado. Inserte el cable en los sujetadores en el lado inferior de la NOTA: Asegúrese de que el cableado está presionado de cubierta y, luego, acomode la cubierta sobre la bisagra.
-
Page 55: Paso 3 - Complete La Instalación
INSTRUCCIONES DE INSTALACIÓN PASO 3 - FINALIZACIÓN DE LA PASO 4 - NIVELACIÓN Y AJUSTE INSTALACIÓN DE LA PUERTA (SI ES NECESARIO) El refrigerador debe estar nivelado para mantener un WARNING mejor desempeño y apariencia. NIVELACIÓN 1. Mueva el refrigerador a su ubicación final. 2. -
Page 56: Uso Del Refrigerador
USO DE SU REFRIGERADOR USO DE LOS CONTROLES Para desbloquear el panel de control: 1. Mantenga presionado LOCK (Bloqueo) durante 3 segundos. El indicador de bloqueo se encenderá. Fridge PANTALLA DE TEMPERATURA My Zone Freezer My Zone Fridge Freezer Cuando no se utilicen los botones ni las puertas durante 30 segundos, se apagarán todas las luces LED en la pantalla del panel. - Page 57 USO DE SU REFRIGERADOR CONTROLES DE TEMPERATURA 2. Presione el botón Freezer (Congelador) para regular la temperatura. El rango de temperatura para el compartimiento del refrigerador es de 34 °F a 42 °F (1 °C a 6 °C). El rango de temperatura para el compartimiento del congelador es de -6 °F a 4 °F (-21 °C a -16 °C).
-
Page 58: Funcione
USO DE SU REFRIGERADOR QUICK COOL SABBATH La función Quick Cool (Enfriamiento rápido) acelera el La función Sabbath (Día de descanso) ha sido diseñada para aquellas enfriamiento de los alimentos frescos y protege los alimentos ya personas cuyas prácticas religiosas requieren apagar las luces. Se almacenados del calentamiento no deseado. - Page 59 USO DE SU REFRIGERADOR RECIPIENTES DE LA PUERTA CAJÓNES DEL DEPÓSITO DEL CONGELADOR DESMONTABLES DESMONTABLE Para quitar y volver a colocar un recipiente de la puerta: IMPORTANTE: No sobrecargue los cajones. 1. Coloque las manos a ambos lados del recipiente y levántelo hacia Para quitar y volver a colocar un cajón del congelador: arriba para sacarlo.
-
Page 60: Cuidado Del Refrigerador
CUIDADO DEL REFRIGERADOR LIMPIEZA ADVERTENCIA Tanto las secciones del refrigerador como la del congelador se descongelan automáticamente. No obstante, limpie ambas secciones más o menos una vez al mes para evitar la acumulación de olores. Limpie los derrames de inmediato. Debido a que el aire circula entre ambas secciones, cualquier Peligro de choque eléctrico olor que se forma en una sección pasará... -
Page 61: Luces
CUIDADO DEL REFRIGERADOR LUCES MUDANZA Las luces del interior del refrigerador se apagan cuando las ADVERTENCIA puertas están abiertas durante más de 7 minutos. IMPORTANTE: El refrigerador está equipado con luces Excessive Weight Hazard LED. Estas luces se diseñaron para durar toda la vida útil del Use two or more people to move and install refrigerator. -
Page 62: Solución De Problemas
SOLUCIÓN DE PROBLEMAS Pruebe las soluciones sugeridas aquí y posiblemente se evite el gasto de una visita de servicio técnico. EL REFRIGERADOR NO FUNCIONA PROBLEMA CAUSAS POSIBLES SOLUCIÓN El refrigerador no funciona El refrigerador no está enchufado. Enchufe el refrigerador en un tomacorriente de pared de 3 terminales con conexión a tierra. - Page 63 SOLUCIÓN DE PROBLEMAS TEMPERATURA Y HUMEDAD PROBLEMA CAUSAS POSIBLES SOLUCIÓN Refrigerador o congelador El control de temperatura no está en un Ajuste el compartimiento a un ajuste más frío; espere demasiado caliente 12 horas para que se ajuste la temperatura. Las puertas se abren con frecuencia o Limite la cantidad de aperturas de la puerta para quedan abiertas.
-
Page 64: Garantía Limitada
Para conocer cuáles son sus derechos legales, consulte a la Garanter US: GE Appliances, a Haier company Louisville, KY 40225 Para Clientes en Canadá: Esta garantía se extiende al comprador original y a cualquier dueño subsiguiente de productos comprados para uso hogareño dentro de Canadá.