Sony SPP-Q110 Operating Instructions Manual
Hide thumbs
Also See for SPP-Q110:
- Operating instructions manual (9 pages) ,
- Operating instructions manual (6 pages)
Advertisement
Available languages
Available languages
Quick Links
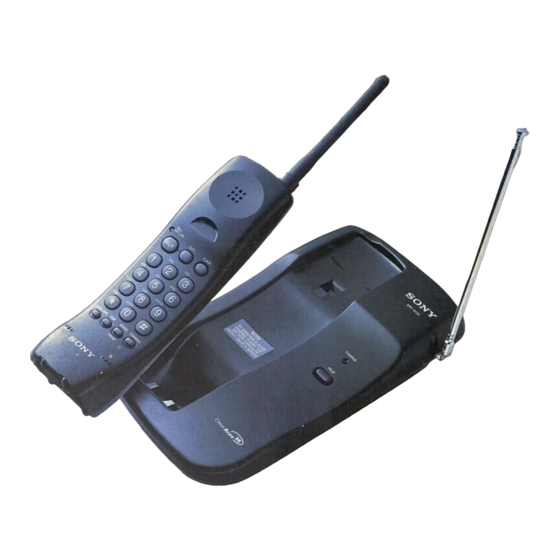
Cordless Telephone
Operating Instructions
Manual de instrucciones (reverso)
SPP-Q110
Sony Corporation © 1997
Printed in Taiwan
WARNING
To prevent fire or shock hazard, do not expose the unit to rain or
moisture.
To avoid electrical shock, do not open the cabinet. Refer servicing to
qualified personnel only.
Precautions
• Do not install the phone in a location near a heat source such as radiators or
airducts, or in a place subject to direct sunlight, excessive dust, moisture, rain,
mechanical vibration, or shock.
• If trouble is experienced with this equipment, for repair or warranty
information, please contact your local Sony dealer.
• Do not unnaturally bend or crimp the telephone line cord, and do not place
heavy objects on it.
• Do not connect any other AC power adaptor into the DC IN 9V (external
power input) jack.
• Keep the battery pack away from fire.
• Do not short the battery terminals.
• Do not disassemble the battery pack.
If you have any question or problem concerning your telephone that is
not covered in this manual, please consult the nearest Sony Service
Station authorized to service telephone terminal equipment.
CAUTION
The cordless telephone operates at a frequency that may cause
interference to nearby TVs and VCRs; the base unit should not be placed
near or on the top of a TV or VCR; and, if interference is experienced,
moving the cordless telephone farther away from the TV or VCR will
often reduce or eliminate the interference.
Template for mounting the phone on the wall
To determine the positions for the screws, cut out the template below and use it as a
guide. Consider the weight of the phone when you choose the place to hang it.
Positions for screws
3-856-344-51(1)
Setting up the phone
Connect the base unit
If you want to hang the base unit on the wall, mount the unit first (see below).
1
To telephone outlet
3
To AC outlet
2
AC power adaptor
(supplied)
1
Connect the telephone line cord to the LINE jack and to a telephone
outlet.
2
Using a screw driver, set the voltage selector of the supplied AC
power adaptor to either 110–120 or 220–240V position according to
your local power supply.
3
Connect the AC power adaptor to the DC IN 9V jack and to an AC
outlet, using the supplied AC plug adaptor if necessary.
4
Fully extend the antenna. Make sure it points toward the ceiling.
Notes
• Use only the supplied AC-T37 AC power adaptor. Do not
use any other AC power adaptor.
• Connect the AC power adaptor to a continuous power
supply.
• Place the base unit close to the AC outlet so that you can
unplug the AC power adaptor easily.
Tip
If your telephone outlet is not modular, contact your telephone service
company for assistance.
If you mount your phone on the wall
1
Remove the hang-up tab.
2
Reverse the hang-up tab and insert it back.
3
Plug one end of the telephone line cord to the LINE jack and the AC
power adaptor cord to the DC IN 9V jack.
Then attach each cord to the base unit.
4
Attach the screws (supplied) to the wall.
5
Hook the base unit to the screws as illustrated.
6
Using a screw driver, set the voltage selector of the supplied AC
power adaptor to either 110–120 or 220–240V position according to
your local power supply.
7
Plug the other end of the telephone line cord into the telephone
outlet and the AC power adaptor into the AC outlet (using the AC
plug adaptor if necessary). Then fully extend the antenna.
1, 2
Telephone line cord
(supplied)
4
To LINE
jack
To DC IN 9V
3
4
5
6
Hook
Polarity of the plug
Modular
10 cm
7
Advertisement

Related Manuals for Sony SPP-Q110


Summary of Contents for Sony SPP-Q110
- Page 1 Then fully extend the antenna. If you have any question or problem concerning your telephone that is not covered in this manual, please consult the nearest Sony Service 1, 2 Station authorized to service telephone terminal equipment.
-
Page 2: Making And Receiving Calls
If the battery lasts only a few minutes even after 12 hours of charging, the usable life You can dial with a touch of a few keys by storing a phone number on a dialing of the battery has expired and needs replacement. Contact your local Sony authorized key. -
Page 3: Maintenance
To store a number to be dialed via Private Branch Exchange (PBX) If you have any questions or problems concerning your phone, please consult your nearest Sony dealer. Before entering a phone number in Step 4, do as follows: Enter the outside line access digit (e.g., 9). -
Page 4: Instalación Del Teléfono
Retire la lengüeta de pared. • Si el equipo presenta fallos, póngase en contacto con un proveedor Sony local para obtener información relativa a la garantía o a la asistencia técnica. Dele la vuelta a la lengüeta de pared y vuelva a insertarla. -
Page 5: Marcación Rápida
12 horas, será necesario sustituirlo. Póngase en contacto Presione (REDIAL/PAUSE) dos veces. con su proveedor local autorizado Sony o con el centro de asistencia técnica para adquirir un paquete de pilas recargable Sony BP-T16. El número se borrará de la memoria y se escuchará un pitido largo de confirmación. -
Page 6: Mantenimiento
Si tiene cualquier pregunta o problema relacionado con su teléfono, póngase en Para almacenar números de teléfono que se van a marcar por medio contacto con su proveedor Sony local. del tablero conmutador de abonado (PBX) Antes de introducir los números de teléfono en el paso 4, realice lo siguiente: Marque el dígito de acceso a la línea exterior (por ejemplo, 9).