Table of Contents
Advertisement
Available languages
Available languages
USER' S GUIDE & INSTALLATION INSTRUCTIONS
Read and follow all safety rules and instructions
DESHUMIDIFICADOR
MANUAL DE USUARIO E INSTRUCCIONES
Por favor, conserve el manual de usuario para
instrucciones antes de utilizar este producto.
P/No. MFL47379701
All manuals and user guides at all-guides.com
DEHUMIDIFIER
Please retain this ownerʼs manual for future
before using this product.
DE INSTALACIÓN
futuras referencias.
Lea y siga todas las reglas de seguridad e
Model/Modelo
LD25EL
reference.
To contact LG Electronics, 24 hours a day,
7 days a week:
1-800-243-0000 (US)
1-888-542-2623 (Canada)
Or visit us on the Web at: us.lge.com
Para contactar con LG Electronics, 24
horas al día, 7 días a la semana:
1-800-243-0000 (EE.UU.)
1-888-542-2623 (Canadá)
Visite nuestra Web: us.lge.com
Advertisement
Chapters
Table of Contents

Related Manuals for LG LD25EL


Summary of Contents for LG LD25EL
- Page 1 All manuals and user guides at all-guides.com To contact LG Electronics, 24 hours a day, 7 days a week: 1-800-243-0000 (US) 1-888-542-2623 (Canada) Or visit us on the Web at: us.lge.com Para contactar con LG Electronics, 24 horas al día, 7 días a la semana: 1-800-243-0000 (EE.UU.)
-
Page 2: Table Of Contents
Control Panel ......9, 10 and welcome to the LG family. HOW TO USE Before Using Your Dehumidifirer . -
Page 3: Important Safety Instructions
All manuals and user guides at all-guides.com I M P O RTA N T S A F E T Y I N S T RU C T I O N S READ ALL INSTRUCTIONS BEFORE USE Your safety and the safety of others is very important. We have provided many important safety messages in this manual and on your appliance. - Page 4 All manuals and user guides at all-guides.com I M P O RTA N T S A F E T Y I N S T RU C T I O N S READ ALL INSTRUCTIONS BEFORE USE BASIC SAFETY PRECAUTIONS CAUTION To reduce the risk of fire, electric shock, or injury to persons when using this appliance, follow basic precautions, including the following: •...
-
Page 5: Electrical Safety
All manuals and user guides at all-guides.com I M P O RTA N T S A F E T Y I N S T RU C T I O N S READ ALL INSTRUCTIONS BEFORE USE ELECTRICAL SAFETY WARNING • This dehumidifier must be plugged into a grounded 60 Hz, 120 VAC outlet protected by a 15A time delay fuse Electrical Shock Hazard... - Page 6 All manuals and user guides at all-guides.com I M P O RTA N T S A F E T Y I N S T RU C T I O N S READ ALL INSTRUCTIONS BEFORE USE ELECTRICAL SAFETY PREFERRED TEMPORARY GROUNDING GROUNDING METHOD METHOD...
-
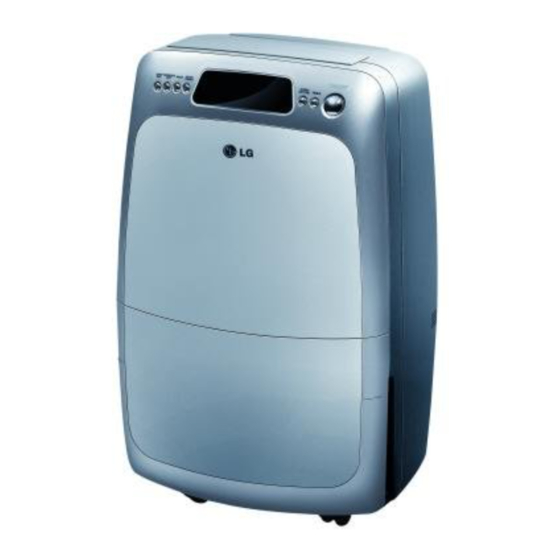
Page 7: Parts And Features
All manuals and user guides at all-guides.com PA RT S A N D F E AT U R E S KEY PARTS AND COMPONENTS MOTORIZED AIR DISCHARGE BUCKET HANDLE (AUTO SWING) FLOAT The adjustable louvered air discharge opens Float checks bucket water level. automatically when the dehumidifier is turned on, and closes when it is turned off. - Page 8 All manuals and user guides at all-guides.com PA RT S A N D F E AT U R E S KEY PARTS AND COMPONENTS FILTER COVER POWER SUPPLY CORD HOLDER HOSE & HOSE COVER EXTENSION HOSE When setting Spot Dry mode, pull the hose Extension Hose can be connected to Hose and open the hose cover.
-
Page 9: Control Panel
All manuals and user guides at all-guides.com PA RT S A N D F E AT U R E S CONTROL PANEL For detailed instructions on each TIMER function, see the following pages. Set the time that dehumidifier will automatically turn off. - Page 10 All manuals and user guides at all-guides.com PA RT S A N D F E AT U R E S CONTROL PANEL FULL BUCKET INDICATOR AUTOMATIC DEHUMIDIFICATION INDICATOR When bucket is full, red light will turn on. QUIET OPERATION INDICATOR DEFROST INDICATOR Operates at Low Fan speed.
-
Page 11: How To Use
All manuals and user guides at all-guides.com H O W TO U S E BEFORE USING YOUR DEHUMIDIFIER PREPARING FOR OPERATION UNPACKING THE DEHUMIDIFIER Refer to the Instructions included in this manual Remove and store packing materials for reuse. before using the dehumidifier. Once the Remove any shipping tape before using the dehumidifier has been properly assembled and dehumidifier. - Page 12 43~90°F (6~32°C) All manuals and user guides at all-guides.com H O W TO U S E BEFORE USING YOUR DEHUMIDIFIER Operate at room temperature between Connect the Power Cord to BEFORE OPERATING 43~90°F(6~32°C). the wall outlet. 43~90°F (6~32°C) 43~90°F (6~32°C) Wait 3 minutes when operating 43~90°F dehumidification.
-
Page 13: Using The Control
All manuals and user guides at all-guides.com H O W TO U S E USING THE CONTROL POWER MODE Press the POWER button to turn the Press the MODE button to select the operating dehumidifier ON or OFF. When you turn the mode (Automatic Dehumidification, Quiet dehumidifier on, an ascending Operation, Condensation... - Page 14 All manuals and user guides at all-guides.com H O W TO U S E Hose Extension Hose USING THE CONTROLS SPOT DRY Pull out the hose. Open the Hose Cover. Manguera Hose Extension Manguera Hose de extensión Hose Extension Hose Press the Spot Dry button, lamp will light.
- Page 15 All manuals and user guides at all-guides.com H O W TO U S E USING THE CONTROLS CONTINUOUS DRY AUTO SWING Dehumidifier will run non-stop irrespective of By rotating Air Discharge, air flow direction can room humidity level. be changed. Depending on the airflow direction, the sound level is varied.
- Page 16 All manuals and user guides at all-guides.com H O W TO U S E USING THE CONTROLS HUMIDITY CONTROL TIMER In Automatic Dehumidification Mode, Humidity Be sure to check if the unit is running. Control button adjusts the set humidity level up to 70% or down to 30% in 10% increments.
-
Page 17: Defrost Operation/Full Bucket Indication
All manuals and user guides at all-guides.com H O W TO U S E DEFROST OPERATION/FULL BUCKET INDICATION DEFROST OPERATION FULL BUCKET INDICATOR When the water bucket is full, the dehumidifier During Operation, "( )" is displayed and stops and FULL BUCKET Indicator lamp lights. defrosting starts automatically. -
Page 18: Emptying Collected Water
All manuals and user guides at all-guides.com H O W TO U S E EMPTYING COLLECTED WATER Replace the bucket. • Make sure that the slots on the cover of bucket are positioned correctly. • Push the bucket securely with both hands. If the bucket is not in the proper position, FULL Sensor will activate and the dehumidifier will not operate. -
Page 19: Continuous Drain Operation
All manuals and user guides at all-guides.com H O W TO U S E CONTINUOUS DRAIN OPERATION Supplied PRECAUTIONS DURING CONTINUOUS DRAIN OPERATION • This Dehumidifier is only for residential use. Every two weeks, check for filter contamination and drain hose clogging. -
Page 20: Transport
All manuals and user guides at all-guides.com H O W TO U S E Do not Over Do not immerse in 4”(10cm) bend. water. TRANSPORT You can move it in all directions. Do not Más de Do not immerse in 10 cm (4") 0cm) bend. -
Page 21: Care And Cleaning
C A R E A N D C L E A N I N G For maximum efficiency, it is recommended Your local LG Authorized Service Center can that you have the coils inspected and cleaned provide this inspection and cleaning service for annually. -
Page 22: Normal Maintenance
Deod Float All manuals and user guides at all-guides.com Sponge, etc. C A R E A N D C L E A N I N G Deodor Float Soft Cloth Sponge, etc. NORMAL MAINTENANCE CHECK PERIODICALLY In order to use safely, check the followings at MAINTENANCE OF DRAIN BUCKET Clean the bucket with water. -
Page 23: Troubleshooting
All manuals and user guides at all-guides.com T RO U B L E S H O OT I N G BEFORE CALLING FOR SERVICE Before you call for service, review this list. It may save you time and expense. This list includes common occurrences that are not the result of a defect in workmanship or materials. - Page 24 All manuals and user guides at all-guides.com T RO U B L E S H O OT I N G BEFORE CALLING FOR SERVICE The follwing symptoms are normal Review the chart below first and you may not need call for service. Problem Possible Causes •...
-
Page 25: Product Registration Information
DEHUMIDIFIER LIMITED WARRANTY — USA Should your LG Dehumidifier prove to be defective in material or workmanship under normal use during the warranty period listed below, effective from the date of original consumer purchase of the product, LG Electronics will replace the defective part(s). Replacement parts will meet intended fit and function of the original part. - Page 26 Felicidades por su compra y Panel de control ......33, 34 bienvenido a la familia LG. INSTRUCCIONES DE USO Siguiendo las instrucciones de Antes de utilizar su deshumidificador .
-
Page 27: Instrucciones Importantes De Seguridad
All manuals and user guides at all-guides.com I N S T RU C C I O N E S I M P O RTA N T E S D E S E G U R I DA D LEA TODAS LAS INSTRUCCIONES ANTES DE USAR LA UNIDAD Su propia seguridad y la seguridad de terceros es muy importante. - Page 28 All manuals and user guides at all-guides.com I N S T RU C C I O N E S I M P O RTA N T E S D E S E G U R I DA D LEA TODAS LAS INSTRUCCIONES ANTES DE USAR LA UNIDAD PRECAUCIONES BÁSICAS DE SEGURIDAD PRECAUCIÓN A fin de reducir el riesgo de incendio, descargas eléctricas o...
-
Page 29: Seguridad Eléctrica
All manuals and user guides at all-guides.com INSTRUCCIONES IMPORTANTES DE SEGURIDAD LEA TODAS LAS INSTRUCCIONES ANTES DE USAR LA UNIDAD SEGURIDAD ELÉCTRICA • Este deshumidificador debe enchufarse a ADVERTENCIA una toma de pared con puesta a tierra de 60 Hz, con una salida de 120 V de CA, protegida Peligro de descarga eléctrica mediante un fusible de retardo o un No acatar estas instrucciones puede suponer... - Page 30 All manuals and user guides at all-guides.com I N S T RU C C I O N E S I M P O RTA N T E S D E S E G U R I DA D LEA TODAS LAS INSTRUCCIONES ANTES DE USAR LA UNIDAD SEGURIDAD ELÉCTRICA MÉTODO DE MÉTODO DE PUESTA A TIERRA...
-
Page 31: Piezas Y Componentes Significativos
All manuals and user guides at all-guides.com I N S TRU C CI O NE S I M P O RTA N T E S D E S E G U RI DA D PIEZAS Y COMPONENTES SIGNIFICATIVOS SALIDA DE AIRE FORZADA ASA DEL DEPÓSITO (FUNCIÓN AUTO SWING DE BOYA... - Page 32 All manuals and user guides at all-guides.com P I E Z A S Y F U N C I O N E S PIEZAS Y COMPONENTES SIGNIFICATIVOS CUBIERTA DEL FILTRO CABLE DE ALIMENTACIÓN MANGUERA Y TAPA DE LA SOPORTE DEL CABLE DE MANGUERA ALIMENTACIÓN Al ajustar el modo Spot Dry, empuje la...
-
Page 33: Panel De Control
All manuals and user guides at all-guides.com P I E Z A S Y F U N C I O N E S PANEL DE CONTROL Consulte las páginas siguientes para TIMER (TEMPORIZADOR) obtener información detallada acerca de Ajusta el tiempo para la desconexión automática del deshumidificador. - Page 34 All manuals and user guides at all-guides.com P I E Z A S Y F U N C I O N E S PANEL DE CONTROL INDICADOR DE DEPÓSITO LLENO INDICADOR DEL MODO Al llenarse el depósito, se iluminará en rojo. DESHUMIDIFICACIÓN AUTOMÁTICA INDICADOR DEL MODO FUNCIONAMIENTO INDICADOR DE DESCONGELACIÓN...
-
Page 35: Instrucciones De Uso
All manuals and user guides at all-guides.com I N S T RU C C I O N E S D E U S O ANTES DE UTILIZAR SU DESHUMIDIFICADOR PREPARATIVOS PARA LA UTILIZACIÓN DESEMBALANDO EL Consulte las instrucciones incluidas en este DESHUMIDIFICADOR Retire y guarde los materiales de embalaje para manual antes de utilizar el deshumidificador. - Page 36 All manuals and user guides at all-guides.com I N S T RU C C I O N E S D E U S O ANTES DE UTILIZAR SU DESHUMIDIFICADOR La unidad funciona con una temperatura Conectar el cable de alimentación a la ANTES DE PONERLO EN FUNCIONAMIENTO ambiental comprendida entre 6~32°C toma de pared.
- Page 37 All manuals and user guides at all-guides.com I N S T RU C C I O N E S D E U S O UTILIZACIÓN DEL CONTROL POWER MODE (MODO) Presione el botón POWER para apagar o Presione el botón MODE para seleccionar el encender el deshumidificador.
-
Page 38: Utilización De Los Controles
All manuals and user guides at all-guides.com I N S T RU C C I O N E S D E U S O Hose Extension Hose UTILIZACIÓN DE LOS CONTROLES SPOT DRY (SECADO LOCALIZADO) Extraiga la manguera. Quite la tapa de la manguera. Manguera Manguera de extensión... - Page 39 All manuals and user guides at all-guides.com I N S T RU C C I O N E S D E U S O UTILIZACIÓN DE LOS CONTROLES CONTINUOUS DRY (SECADO CONTINUO) AUTO SWING (OSCILACIÓN AUTOMÁTICA) El deshumidificador no parará Puede cambiarse la dirección del flujo de aire independientemente del nivel de humedad mediante el giro de la salida de aire.
- Page 40 All manuals and user guides at all-guides.com I N S T RU C C I O N E S D E U S O UTILIZACIÓN DE LOS CONTROLES HUMIDITY CONTROL TIMER (TEMPORIZADOR) (CONTROL DE HUMEDAD) En el modo de Deshumidificación automática, el Asegúrese de que la unidad está...
-
Page 41: Función De Descongelación/Indicación De Depósito Lleno
All manuals and user guides at all-guides.com I N S T RU C C I O N E S D E U S O FUNCIÓN DE DESCONGELACIÓN/INDICACIÓN DE DEPÓSITO LLENO FUNCIÓN DE DESCONGELACIÓN INDICACIÓN DE DEPÓSITO LLENO Al llenarse el depósito de agua, el Durante el funcionamiento, se muestra deshumidificador se detiene y el testigo "... -
Page 42: Vaciado Del Agua Recogida
All manuals and user guides at all-guides.com I N S T RU C C I O N E S D E U S O VACIADO DEL AGUA RECOJIDA Vuelva a colocar el depósito. Asegúrese de que las ranuras de la cubierta del depósito están colocadas correctamente. -
Page 43: Funcionamiento En Drenaje Continuo
All manuals and user guides at all-guides.com I N S T RU C C I O N E S D E U S O FUNCIONAMIENTO EN DRENAJE CONTINUO • Este deshumidificador está destinado exclusivamente a uso doméstico. Cada dos semanas, y MEDIDAS DE PRECAUCIÓN A SEGUIR DURANTE EL FUNCIONAMIENTO EN DRENAJE CONTINUO Supplied compruebe la contaminación del filtro y posibles obstrucciones en la manguera de drenaje. -
Page 44: Transporte
All manuals and user guides at all-guides.com I N S T RU C C I O N E S D E U S O Do not Over Do not immerse in 4”(10cm) bend. water. TRANSPORTE You can move Puede desplazarlo it in all directions. -
Page 45: Cuidado Y Limpieza
C U I DA D O Y L I M P I E Z A Para obtener un máximo rendimiento, es Su servicio técnico autorizado LG habitual aconsejable que realice inspecciones y puede realizar dicha inspección y limpieza a un limpiezas anuales de los serpentines. -
Page 46: Mantenimiento Regular
All manuals and user guides at all-guides.com C U I DA D O Y L I M P I E Z A Boya Soft Cloth Boya SpongeLimpiar con esponja, etc.etc. SpongeLimpiar con esponja, etc.etc. MANTENIMIENTO REGULAR COMPROBACIÓN PERIÓDICA Compruebe los siguientes puntos al menos cada MANTENIMIENTO DEL DEPÓSITO DE 6 meses o un año para un uso seguro del DRENAJE... -
Page 47: Antes De Solicitar Asistencia Técnica
All manuals and user guides at all-guides.com S O L U C I ÓN D E P RO B L E M A S ANTES DE SOLICITAR ASISTENCIA TÉCNICA Antes de llamar solicitando asistencia, repase esta lista. Esto le ahorrará tiempo y dinero. Esta lista contiene problemas comunes que no son debidas a defectos en la mano de obra o materiales. - Page 48 All manuals and user guides at all-guides.com S O L U C I ÓN D E P RO B L E M A S ANTES DE SOLICITAR ASISTENCIA TÉCNICA Los siguientes síntomas son normales Consulte primero el siguiente gráfico y puede que no sea necesario solicitar asistencia técnica. Problema Causas probables •...
-
Page 49: Información De Registro Del Producto
GARANTÍA LIMITADA DEL DESHUMIDIFICADOR - USA Si su deshumidificador de LG resultara ser defectuoso en aspectos de material o mano de obra tras un uso normal durante el período de garantía recogido a continuación y en vigor desde la fecha de compra original, LG Electronics se compromete a sustituir la pieza(s) defectuosa. Las piezas de repuesto se adaptarán exactamente a la función de la pieza original.