
Related Manuals for Acer V55LA-2


Summary of Contents for Acer V55LA-2
- Page 1 User’s Guide...
- Page 2 Copyright 1997 by this company. All rights reserved. No part of this publication may be reproduced, transmitted, transcribed, stored in a retrieval system, or translated into any language or computer language, in any form or by any means, electronic, mechanical, magnetic, optical, chemical, manual or otherwise, without the prior written permission of this company.
- Page 3 Read these instructions carefully. future reference. Follow all warnings and instructions marked on the product. Unplug this product from the wall outlet before cleaning. Do not use liquid cleaners or aerosol cleaners. Use a damp cloth for cleaning. Do not use this product near water. Do not place this product on an unstable cart, stand, or table.
- Page 4 Do not allow anything to rest on the power cord. Do not locate this product where persons will walk on the cord. 10. If an extension cord is used with this product, make sure that the total ampere rating of the equipment plugged into the extension cord does not exceed the extension cord ampere rating.
- Page 5 14. Replace battery with the same type as the product's battery we recommend. Use of another battery may present a risk of fire or explosion. Refer battery replacement to a qualified serviceman. 15. Warning! Battery may explode if not handled properly. Do not recharge, disassemble or dispose of in fire.
- Page 6 Note: This equipment has been tested and found to comply with the limits for a Class B digital device, pursuant to Part 15 of FCC Rules. These limits are designed to provide reasonable protection against harmful interference in a residential installation. This equipment generates, uses, and can radiate radio frequency energy and, if not installed and used in accordance with the instructions, may cause harmful interference to radio communications.
-
Page 7: Manual Structure
Purpose This user’s guide aims to give you all the necessary information to enable you to operate the system properly. Manual Structure This user’s guide consists of two chapters. Chapter 1 System Board This chapter describes the system board and all its major components. - Page 8 Conventions The following are the conventions used in this manual: Text entered by user Screen messages , etc. viii Represents text input by the user. Denotes actual messages that appear on the screen. Represent the actual keys that you have to press on the keyboard. NOTE Gives bits and pieces of additional information related to the current...
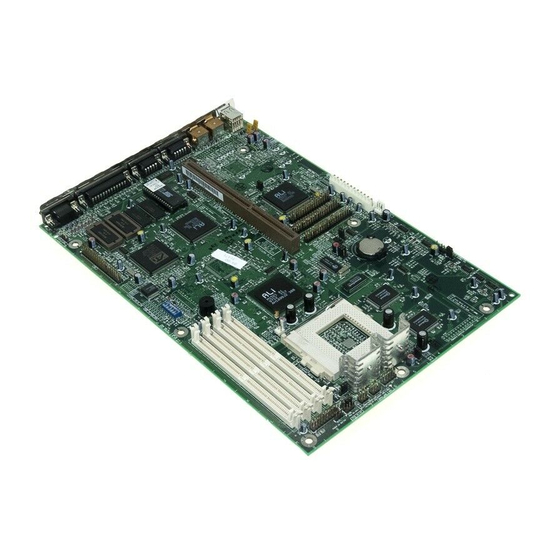
- Page 9 Chapter 1 System Board Major Features ...1-2 1.1.1 System Board ...1-3 1.1.2 Slot Boards ...1-4 Jumpers and Connectors ...1-5 1.2.1 Jumper and Connector Locations ...1-5 1.2.2 Jumper Settings...1-6 1.2.3 Connector Functions ...1-9 ESD Precautions ...1-10 Memory Upgrade ...1-11 1.4.1 Installing a SIMM ...1-13 1.4.2 Removing a SIMM ...1-14 1.4.3...
- Page 10 1.10.2 QuickStart Mode Operation ... 1-27 1.11 Installing ISA Cards ... 1-28 1.12 Error Messages... 1-29 1.12.1 Software Error Messages ... 1-29 1.12.2 System Error Messages ... 1-29 1.12.3 Correcting Error Conditions ... 1-32 Chapter 2 BIOS Utility Entering Setup ... 2-2 Basic System Configuration...
- Page 11 Power Saving Configuration ...2-13 2.4.1 Power Management Mode ...2-14 2.4.2 Monitored Activities ...2-15 2.4.3 QuickStart State Timer ...2-15 2.4.4 Point Device Location...2-15 System Security Setup ...2-16 2.5.1 Disk Drive Control...2-16 2.5.2 Onboard Communication Ports ...2-18 2.5.3 Onboard PS/2 Mouse (IRQ 12) ...2-21 2.5.4 Setup Password ...2-21 2.5.5...
- Page 12 List of Figures System Board Layout ... 1-3 2-PCI/3-ISA Slot Board (for Aspire desktop systems)... 1-4 3-PCI/4-ISA Slot Board (for Aspire minitower systems)... 1-4 System Board Jumper and Connector Locations... 1-5 Installing a SIMM... 1-13 Removing a SIMM... 1-14 Installing a Pentium CPU ... 1-16 Installing a Video Memory Chip...
- Page 13 List of Tables System Board Jumper Settings ...1-6 SW2, JP7, JP43, and JP44 Settings ...1-7 SW2 Settings (Onboard Sound Chip)...1-8 SW2 Settings (Password Security) ...1-8 Connector Functions...1-9 Memory Configurations (64-bit) ...1-11 Memory Configurations (32-bit) ...1-12 IDE Hard Disk Configuration...1-15 Second-level Cache Configurations...1-18 1-10 System Error Messages...1-30 Drive Control Settings ...2-17...