Table of Contents
Advertisement
Available languages
Available languages
Quick Links
Advertisement
Chapters
Table of Contents

Related Manuals for Toshiba PA3778U-1PRP dynadock V


Summary of Contents for Toshiba PA3778U-1PRP dynadock V
- Page 1 dynadock™ V User’s Manual English/Español GMAA00208010 01/10...
-
Page 2: Safety Icons
Safety icons This manual contains safety instructions that must be observed to avoid potential hazards that could result in personal injuries, damage to your equipment, or loss of data. These safety cautions have been classified according to the seriousness of the risk, and icons highlight these instructions as follows: Indicates an imminently hazardous situation which, if not avoided, will result in death or serious injury. -
Page 3: Safety Instructions
Safety instructions Always read the safety instructions carefully: Do not disassemble, modify, tamper with or repair the product ❖ Do not attempt to disassemble, modify, tamper with or repair the product (including the AC adaptor). Disassembly, modification, tampering or repairing the product could cause fire or electric shock, possibly resulting in serious injury. - Page 4 ❖ Always use the TOSHIBA AC adaptor that may have been provided with your product, or use AC adaptors specified by TOSHIBA to avoid any risk of fire or other damage to the product. Use of an incompatible AC adaptor could cause fire or damage to the product, possibly resulting in serious injury.
-
Page 5: Fcc Information
Never place your product in locations with excess heat ❖ Never place your product where it will be exposed to excess heat, such as in direct sunlight, in an unventilated vehicle or near a heater. This may result in a system failure, malfunction, loss of data or damage to the product. -
Page 6: Regulatory Statements
CE Compliance Copyright statement This guide is copyrighted by Toshiba Corporation with all rights reserved. Under the copyright laws, this guide cannot be reproduced in any form without the prior written permission of Toshiba. No patent liability is assumed, however, with respect to the use of the information contained herein. - Page 7 Trademarks dynadock is a trademark of Toshiba Corporation. Adobe and Reader are either registered trademarks or trademarks of Adobe Systems Incorporated in the United States and/or other countries. AMD, AMD K6, Athlon and Duron are registered trademarks or trademarks of Advanced Micro Devices Incorporated.
-
Page 8: Table Of Contents
Contents Safety icons ...2 Safety instructions ...3 FCC information ...5 Regulatory statements ...6 Introduction... 11 Overview ...12 Features ...12 Box contents ...12 Quick Tour ...13 Front view ...13 Back view...15 Computer requirements ...17 Chapter 1: Setting Up the dynadock™ and Connecting Peripherals... - Page 9 Chapter 2: Using the dynadock™ and Adjusting Settings ... 26 Undocking your computer ...26 Using the dynadock™ V software...27 The background utility ...27 Using the TOSHIBA dynadock™ V Utility ...27 Using the TOSHIBA Video Dock Utility...29 Adjusting video settings...32 Selecting Extended mode or Mirror mode ...32 Supported display modes ...33...
- Page 10 Contents Toshiba Support ...47 Before you call ...47 Contacting Toshiba ...48 Toshiba’s technical support Web site...48 Toshiba voice contact ...48 Appendix A: Specifications... 49 Specifications ...49 Index... 51...
-
Page 11: Introduction
® through a single USB cable to just about any Windows -based computer. We recommend that you keep your dynadock™ up-to-date with the latest technological advances: visit pcsupport.toshiba.com periodically to download updated software drivers. -
Page 12: Overview
❖ Hot-swappable: add or remove most devices without rebooting the computer ❖ Includes the TOSHIBA dynadock™ V Utility for customizing dynadock™ settings ❖ Charges your USB peripherals with the front powered USB port even when the connected computer is off... -
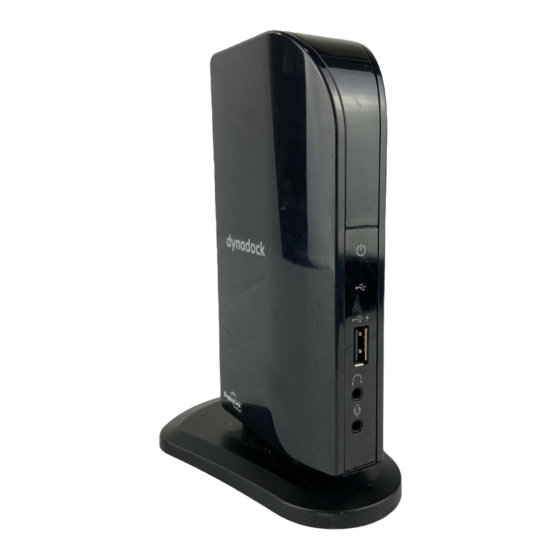
Page 13: Quick Tour
Quick Tour This section identifies the various components of the dynadock™. For a description of each component, please refer to the table beneath each illustration. Front view (Sample Illustration) Lights and connectors on the front of the dynadock™ Introduction Quick Tour Power light USB activity light Powered USB 2.0 port... - Page 14 Introduction Quick Tour Component Power light USB activity light Powered USB 2.0 port (USB Sleep and Charge port) Headphone jack Microphone jack Description Glows blue when power is being supplied from the AC Adaptor. Glows green when a USB device is connected to the dynadock.
-
Page 15: Back View
Back view Security lock slot (on side of dynadock™) (Sample Illustration) Connections on the back of the dynadock™ Introduction Quick Tour USB 2.0 ports Network port DVI-I video port USB Type B connector DC-IN... - Page 16 Note: The dynadock™ requires an external power supply, as it does not draw power from the computer’s USB bus. Secures the dynadock™ to a heavy object such as your desk. For more information on purchasing an optional security lock, visit accessories.toshiba.com.
-
Page 17: Computer Requirements
Computer requirements Component Memory USB interface Disk space Operating system Computer requirements Description 1.2 GHz or higher processor (Intel ® family, or AMD K6 /AMD Athlon™/AMD Duron™ family, or compatible processor recommended. Intel 2.0 GHz or higher processor recommended for optimal video performance.) 512 MB memory or higher (1 GB memory or higher ®... -
Page 18: Peripherals
Chapter 1 Setting Up the dynadock™ and Connecting Peripherals Setting up the dynadock™ This section provides instructions on setting up the dynadock™. You will need to perform the following steps in the order shown: Assemble the dynadock™ Connect the power adaptor Install the software Connect the dynadock™... -
Page 19: Connect The Power Adaptor
Setting Up the dynadock™ and Connecting Peripherals Connect the power adaptor Plug the AC adaptor into the DC-IN on the back of the dynadock™. (Sample Illustration) Connecting the AC adaptor to the dynadock™ Connect the AC adaptor to a live electrical outlet. The power light on the front panel glows blue when the dynadock™... - Page 20 Setting Up the dynadock™ and Connecting Peripherals Setting up the dynadock™ NOTE You may need to temporarily disable anti-spyware or anti-virus programs while installing the software. It is also recommended that all other applications are closed, as you will need to restart your computer after the software is installed.
-
Page 21: Connect The Dynadock™ To Your Computer
Restart your computer when prompted. Setting up the dynadock™ Driver Name ASIX AX88772A USB Multimedia Audio Device TOSHIBA dynadock video (DisplayLink™ Corp. software) Description USB and audio control Video control ® automatically detects the device and installs the... -
Page 22: Connecting Your Peripherals
Setting Up the dynadock™ and Connecting Peripherals Connecting your peripherals NOTE The dynadock™ should be connected to a USB 2.0 port for optimal video performance. The dynadock™ will work when connected to a USB 1.1 port, but video performance will be compromised. NOTE Restarting may take longer than usual if the computer's operating system is configured to create a system restore point after a new... -
Page 23: Connecting A Monitor
DVI component. Adjust the resolution of the external monitor until an image is shown. For more information, see “Using the TOSHIBA Video Dock Utility” on page You can customize the video settings of the dynadock™. See “Adjusting video settings”... -
Page 24: Connecting Audio Devices
Setting Up the dynadock™ and Connecting Peripherals Connecting your peripherals Connecting audio devices The dynadock™ provides two audio ports, as shown in the following illustration. (Sample Illustration) dynadock™ audio ports The following table indicates which port to use for each type of audio activity. -
Page 25: Connecting Usb Devices
Setting Up the dynadock™ and Connecting Peripherals Connecting USB devices The dynadock™ provides four USB 2.0 ports for connecting peripheral devices: three on the back and one on the front. This section provides basic instructions for connecting most USB devices to the dynadock™. Please check the documentation that came with your USB device for any special instructions. -
Page 26: Chapter 2: Using The Dynadock™ And Adjusting Settings
To undock your computer: Click the TOSHIBA dynadock Utility icon in the system tray/ notification area of your Windows icon is not visible, click on the Show hidden icons button ( in the system tray/notification area. -
Page 27: Using The Dynadock™ V Software
You can also refer to this section to learn how to uninstall the software. The background utility After the TOSHIBA dynadock™ V Utility is installed and the computer is restarted, a program named TosDockApp.exe will run automatically in the background. This program will be listed in the ®... - Page 28 User’s Manual About NOTE If the TOSHIBA dynadock™ V Utility icon is not visible in your system tray/notification area, make sure the dynadock™ is connected and docked, and then click the Show Hidden Icons button [ necessary, to display hidden icons.
-
Page 29: Using The Toshiba Video Dock Utility
Click OK. Using the TOSHIBA Video Dock Utility Use the TOSHIBA Video Dock Utility to adjust the settings for the monitor connected to the dynadock™. With this utility, you can select Mirror mode or Extended mode, and select screen resolution, color quality, and refresh rates. - Page 30 Using the dynadock™ and Adjusting Settings Using the dynadock™ V software NOTE If the icon is not visible in your system tray/notification area, make sure the dynadock™ is connected and docked, and then click the Show Hidden Icons button [ icons.
- Page 31 Using the dynadock™ and Adjusting Settings Option Notebook Monitor Mirror Optimize for Video Advanced... ❖ ® Windows 7: Select one of the following options from the menu: (Sample Illustration) DisplayLink Manager for Windows Option Check for update... Optimize for video Advanced...
-
Page 32: Adjusting Video Settings
Extended mode, connect an external monitor to the dynadock™ as described in the section then follow the steps below: Right-click the TOSHIBA Video Dock icon in the system tray/notification area of your Windows (Sample Image) TOSHIBA Video Dock icon NOTE If the icon is not visible in your system tray/notification area, make sure the dynadock™... -
Page 33: Supported Display Modes
Using the dynadock™ and Adjusting Settings (Sample Image) DisplayLink Manager Select Extend or Mirror from the menu. NOTE If you notice certain windows or other parts of your display are missing when you disconnect your computer from the dynadock™, you may need to de-select the Extend my Windows this monitor checkbox in your Windows box to return the entire image to your primary screen. - Page 34 Using the dynadock™ and Adjusting Settings Adjusting video settings The dynadock™ supports the following display modes: Resolution 640 x 480 720 x 400 720 x 480 768 x 576 800 x 480 800 x 600 832 x 624 848 x 480 1024 x 600 1024 x 768 1152 x 864...
-
Page 35: Adjusting Audio Settings
Configuring audio playback ports Click the TOSHIBA dynadock Utility icon in the system tray/ notification area of your Windows (Sample Image) TOSHIBA dynadock™ V Utility icon... - Page 36 You may need to restart your media player for the audio changes to take effect. Configuring audio recording ports (Microphone) Click the TOSHIBA dynadock Utility icon in the system tray/ notification area of your Windows (Sample Image) TOSHIBA dynadock™ V Utility icon...
-
Page 37: Charging Usb Devices
Using the dynadock™ and Adjusting Settings Charging USB devices You can charge select USB devices (such as PDAs, MP3 players, and cellular phones) using the dynadock's front USB port (USB Sleep and Charge port) even when your computer is undocked or disconnected from the dynadock™, or your computer is off. -
Page 38: Uninstalling The Software
Using the dynadock™ and Adjusting Settings Using standby/sleep/hibernation modes with the dynadock™ ❖ In Extended mode, windows that were previously on the external monitor may appear on the computer's built-in display when the computer resumes from standby/sleep/hibernation. You may need to reposition the windows by dragging them to the external desktop again. -
Page 39: Chapter 3: Troubleshooting And Support
If you need to contact Toshiba, you will find information regarding Toshiba’s support services at the end of this section. Before you contact Toshiba, please read the troubleshooting advice in this manual, in your computer’s user’s guide and/or in any... -
Page 40: Power
Troubleshooting and Support Troubleshooting NOTE Due to USB bandwidth limitations, you may notice performance issues if you are performing several resource-intensive tasks simultaneously (such as playing audio while simultaneously recording audio, transferring large files and using a high-definition web camera). This type of activity is common when running instant messaging applications. -
Page 41: Display/Video
Refer also to the computer user’s manual and to the external monitor’s documentation. Try adjusting the resolution, contrast and or brightness controls on the external monitor. Make sure the external display is not set to Off in the TOSHIBA Video Dock Utility. For more information, see TOSHIBA Video Dock Utility. - Page 42 This is not a malfunction of the dynadock™. For optimal video playback performance, use your computer’s display. Click on the TOSHIBA video dock icon and select "Optimize for Video” for optimal full screen video playback on the external monitor connected to the dynadock™.
- Page 43 .This designation will not affect the functionality of the device. Transient Multi-Monitor Manager (TMM) in Windows Vista not supported by this product. Use the TOSHIBA Video Dock Utility instead to configure your computer for using an external monitor connected to the dynadock™.
- Page 44 Settings tab to match the physical arrangement of your monitors. In the Toshiba Video Dock Utility, make sure the "Extend to" setting matches the physical arrangement of your monitors. For example, if the external monitor is to the right of the computer display, select "Extend to right."...
-
Page 45: Audio/Sound
Audio/sound Problem(s) There is no sound coming from the external audio device connected to the dynadock™. There is no sound coming from the computer’s internal speakers, or from the headphones/headset connected directly to the docked computer. No sound outputs from the dynadock™... -
Page 46: Connection/Docking
Make sure the dynadock™ is connected to your computer with a USB cable and the computer is docked. If the problem is related to the dynadock™ hardware, see the “Toshiba Support” on page Solution(s) Make sure the dynadock™ is connected to your computer and the computer is docked. -
Page 47: Other
Toshiba Support If you require additional help or are still having problems operating the dynadock™, you may need to contact Toshiba for additional technical assistance. Before you call Since some problems may be related to software or the operating system, it is important that you investigate other sources of assistance first. -
Page 48: Contacting Toshiba
Toshiba’s technical support Web site For technical support, or to stay current on the most recent software and hardware options for your dynadock™ and for other product information, be sure to regularly check the Toshiba Web site at pcsupport.toshiba.com. Toshiba voice contact Before calling Toshiba, make sure you have: ❖... -
Page 49: Appendix A: Specifications
Appendix A Specifications Specifications This section summarizes the dynadock’s technical specifications.* Physical dimensions Weight Size Environmental requirements Conditions Operating Non-operating Thermal Gradient Wet-bulb Temperature Power requirements AC adaptor dynadock™ *Specifications are subject to change without further notice. 285g/10.1 ounces (including the Base) 75.4(w) x 34(d) x 145(h) mm (3(w) x 1.3(d) x 5.7(h) in.) (not including the parts that extend beyond the main body) 110(w) x 86(d) x 157.7(h) mm (4.3(w) x 3.4(d) x 6.2(h) in.) - Page 50 Specifications General specifications Computer Interface Ports and Connectors Computer security lock slot Supported Video Display modes (Depending on operating system) USB 2.0 3 x USB 2.0 ports in the back 1 x USB 2.0 Powered port in front 1 x Ethernet Port (RJ-45 10 Base-T/100BASE-TX Ethernet Port) DVI-I x 1 (Digital 29-pin Female Connector) 1 x microphone (3.5 mm mono audio in)
-
Page 51: Index
Index AC power connection 19 adjusting audio settings 35 video settings 32 assemble dynadock™ 18 audio devices connecting 24 audio ports configuring 35 audio settings adjusting 35 audio/sound issues 45 back view Quick Tour 15 background utility 27 box contents 12 charging USB devices 37 computer... - Page 52 Index USB Type B connector 16 contacting Toshiba 48 DC-IN connection 19 DC-IN port 16 display/video issues 41 DisplayLink™ video control 21 DisplayLink™ Manager 33 dynadock™ assemble 18 environmental requirements 49 general specifications 50 physical dimensions 49 power requirements 49 setting up 18 dynadock™...
- Page 53 46 USB 2.0 (USB Sleep and Charge port) USB activity light 14 USB devices charging 37 connecting 25 using dynadock™ V software 27 TOSHIBA dynadock™ V Utility TOSHIBA Video Dock Utility 29 video settings adjusting 32 Web site Toshiba 48...
- Page 54 dynadock™ V Manual del usuario...
-
Page 55: Conos De Seguridad
Íconos de seguridad Este manual contiene instrucciones de seguridad que deben seguirse a fin de evitar posibles peligros que podrían tener como consecuencia lesiones personales, daños al equipo o pérdida de datos. Son advertencias de seguridad que están clasificadas de acuerdo con la gravedad del peligro y están representadas por íconos que distinguen cada instrucción como se muestra a continuación:... -
Page 56: Instrucciones De Seguridad
Instrucciones de seguridad Siempre lea cuidadosamente las instrucciones de seguridad: No desarme, modifique, altere o repare el producto A D V E R T E N C I A ❖ No intente desarmar, modificar, alterar o reparar el producto (incluyendo el adaptador de CA), ya que esto podría provocar un incendio o un choque eléctrico, que podría ocasionar lesiones graves. - Page 57 Use sólo el adaptador de CA de TOSHIBA ❖ Siempre use el adaptador de CA de TOSHIBA que podría venir incluido con su producto o use los adaptadores de CA recomendados por TOSHIBA para evitar cualquier riesgo de incendio u otro daño al producto.
- Page 58 Nunca coloque el producto en sitios donde haya calor excesivo ❖ Nunca coloque el producto en lugares en los que quedaría expuesto a calor excesivo, como por ejemplo, a la luz directa del sol, en un vehículo sin ventilación o cerca de un calefactor. Esto podría provocar fallas en el sistema, mal funcionamiento, pérdida de datos o daños al producto.
-
Page 59: Declaraciones Reglamentarias
Declaración de conformidad CE Declaración de derechos de autor Los derechos de autor de este manual son propiedad de Toshiba Corporation, quien se reserva todos los derechos. De acuerdo con las leyes de derechos de autor este manual no se puede reproducir en forma alguna sin permiso previo y por escrito de Toshiba. - Page 60 Enero 2010, Rev1.0 Marcas registradas dynadock es una marca comercial de Toshiba Corporation. Adobe y Reader son marcas registradas o marcas comerciales de Adobe Systems Incorporated en Estados Unidos y/u otros países. AMD, AMD K6, Athlon y Duron son marcas registradas o marcas comerciales de Advanced Micro Devices Incorporated.
- Page 61 Contenido Íconos de seguridad ...2 Instrucciones de seguridad...3 Información de la Comisión Federal de Comunicaciones de Estados Unidos (FCC) ...5 Declaraciones reglamentarias ...6 Introducción... 11 Descripción general ...12 Características ...12 Contenido de la caja...12 Referencia rápida ...13 Vista frontal ...13 Parte posterior ...15 Requisitos de la computadora ...17 Capítulo 1: Instalación del dynadock™...
- Page 62 Cómo desacoplar la computadora ...26 Uso del software dynadock™ V...27 La utilidad de fondo ...27 Uso de la utilidad TOSHIBA dynadock™ V ...27 Uso de la utilidad TOSHIBA Video Dock...29 Ajuste de las configuraciones de video ...32 Selección del modo Extendido o del modo Modos de visualización compatibles...34...
- Page 63 Contenido Asistencia técnica de Toshiba ...49 Antes de contactar a Toshiba ...49 Contacto con Toshiba ...50 Sitio web de asistencia técnica de Toshiba ...50 Contacto telefónico con Toshiba ...50 Apéndice A: Especificaciones... 51 Especificaciones ...51 Índice... 53...
- Page 64 V que le permite conectar periféricos a prácticamente ® cualquier computadora basada en Windows , utilizando un solo cable USB. Le recomendamos que mantenga su dynadock™ actualizado con los últimos avances tecnológicos: visite el sitio pcsupport.toshiba.com periódicamente para descargar actualizaciones de controladores de software.
-
Page 65: Descripción General
Cambio durante el funcionamiento: conecte o desconecte la mayoría de los dispositivos si tener que reiniciar la computadora ❖ Incluye la utilidad TOSHIBA dynadock™ V para personalizar la configuración del dynadock™ ❖ Carga los periféricos USB a través del puerto USB con alimentación, ubicado en la parte frontal, aún cuando la... -
Page 66: Referencia Rápida
Referencia rápida En esta sección se identifican los distintos componentes del ™ dynadock . Para una descripción de cada componente, consulte la siguiente tabla. Vista frontal (Ilustración de muestra) Luces y conectores en la parte frontal del dynadock™ Introducción Referencia rápida Luz de encendido Luz de actividad USB Puerto USB 2.0 con alimentación... - Page 67 Introducción Referencia rápida Componente Luz de encendido Luz de actividad Puerto USB con alimentación (Inactividad y carga USB) Conector de audífonos Conector de micrófono Descripción Se ilumina de color azul cuando el dynadock™ está recibiendo alimentación del adaptador de CA. Se ilumina de color verde cuando se conecta un dispositivo USB al dynadock™.
-
Page 68: Parte Posterior
Parte posterior Ranura para bloqueo de seguridad (en el costado del dynadock™) (Ilustración de muestra) Conexiones en la parte posterior del dynadock™ Introducción Referencia rápida Puertos USB 2.0 Puerto de red Puerto de video DVI-I Conector USB tipo B Corriente continua (DC-IN) - Page 69 Nota: El dynadock™ requiere una fuente de alimentación externa, ya que no obtiene alimentación del bus USB de la computadora. Asegura el dynadock™ a un objeto pesado, por ejemplo un escritorio. Para obtener información adicional sobre la compra de un candado de seguridad opcional, visite accessories.toshiba.com.
-
Page 70: Requisitos De La Computadora
Requisitos de la computadora Componente Memoria Interfaz USB Espacio de disco Sistema operativo Requisitos de la computadora Descripción Procesador de 1,2 GHz o superior (familia Intel ® ® Pentium /Celeron o familia AMD K6 Duron™, o un procesador recomendado compatible. Para un funcionamiento óptimo del video se recomienda un ®... -
Page 71: Instalación Del Dynadock
Capítulo 1 Instalación del dynadock™ y conexión de periféricos Instalación del dynadock™ En esta sección se dan instrucciones para la instalación del dynadock™. Debe seguir los pasos en el orden en el que aparecen a continuación: Montaje del dynadock™ Conexión del adaptador de CA Instalación del software Conexión del dynadock™... - Page 72 Instalación del dynadock™ y conexión de periféricos Conexión del adaptador de CA Conecte el cable del adaptador de CA al conector de entrada continua (DC-IN) ubicado en la parte posterior del dynadock™. (Ilustración de muestra) Cómo conectar el adaptador de CA al dynadock™...
- Page 73 Instalación del dynadock™ y conexión de periféricos Instalación del dynadock™ N O T A Mientras instala el software podría ser necesario desactivar provisionalmente los programas de espionaje o antivirus. También se recomienda cerrar todas las demás aplicaciones, ya que será necesario reiniciar la computadora después de instalar el software.
- Page 74 Reinicie la computadora cuando se lo soliciten. Instalación del dynadock™ Nombre de controlador ASIX AX88772A Dispositivo USB de audio multimedia TOSHIBA dynadock video (software DisplayLink™ Corp.) Descripción USB y control de audio Control de video ® detecta automáticamente el dispositivo e instala los...
-
Page 75: Conexión A Una Red
Instalación del dynadock™ y conexión de periféricos Conexión de periféricos N O T A Para un funcionamiento óptimo del video se debe conectar el dynadock™ a un puerto USB 2.0. El dynadock™ funciona cuando está conectado a un puerto USB 1.1, pero se compromete el funcionamiento del video. -
Page 76: Conexión De Un Monitor
Las configuraciones de video del dynadock™ se pueden personalizar. Para obtener información adicional, consulte de las configuraciones de video” en la página Conexión de periféricos ® 7 Starter Edition. “Uso de la utilidad TOSHIBA Video Dock” en la ® , no mostrará “Ajuste... -
Page 77: Conexión De Dispositivos De Audio
Instalación del dynadock™ y conexión de periféricos Conexión de periféricos Conexión de dispositivos de audio El dynadock™ tiene dos puertos de audio, que aparecen en la siguiente ilustración. (Ilustración de muestra) Puertos de audio del dynadock™ En la siguiente tabla se muestra el puerto que se usa para cada tipo de actividad de audio. -
Page 78: Conexión De Dispositivos Usb
Instalación del dynadock™ y conexión de periféricos Conexión de dispositivos USB El dynadock™ suministra cuatro puertos USB 2.0 para la conexión de dispositivos periféricos: tres en la parte posterior y uno en la parte delantera. En esta sección se dan instrucciones básicas para la conexión de casi todos los dispositivos USB al dynadock™. -
Page 79: Cómo Desacoplar La Computadora
Para desacoplar la computadora: Haga clic en el ícono de la utilidad TOSHIBA dynadock ubicado en la bandeja del sistema/área de notificación del escritorio de Windows visible, haga clic en botón Mostrar íconos ocultos ( bandeja del sistema/área de notificación. -
Page 80: Uso Del Software Dynadock™ V
Puede consultar esta sección para obtener información relativa a la desinstalación del software. La utilidad de fondo Después de que se instala la utilidad TOSHIBA dynadock™ V y se reinicia la computadora, un programa llamado TosDockApp.exe se empieza a ejecutar automáticamente en el fondo. Este programa aparecerá... - Page 81 Acerca de N O T A Si el ícono de la utilidad TOSHIBA dynadock™ V no está visible en la bandeja del sistema/área de notificación, asegúrese de que el dynadock™ esté conectado y acoplado, y luego haga clic en el botón Mostrar íconos ocultos [...
-
Page 82: Uso De La Utilidad Toshiba Video Dock
Para acceder a la utilidad Video Dock: ❖ Haga clic con el botón derecho en el ícono de TOSHIBA Video Dock ubicado en la bandeja del sistema/área de notificación del escritorio de Windows (Imagen de muestra) Ícono de la utilidad TOSHIBA Video Dock Uso del software dynadock™... - Page 83 Uso del dynadock™ y ajuste de las configuraciones Uso del software dynadock™ V N O T A Si el ícono de la utilidad no está visible en la bandeja del sistema/ área de notificación, asegúrese de que el dynadock™ esté conectado y acoplado, y luego haga clic en el botón Mostrar íconos ocultos ], si es necesario, para mostrar los íconos ocultos.
- Page 84 Uso del dynadock™ y ajuste de las configuraciones Opción Utilice esta opción para: Extend Para ampliar el espacio del escritorio a través de monitores (Extender) múltiples, de tal manera que pueda mostrar información diferente en cada uno de los monitores conectados a la computadora.
-
Page 85: Ajuste De Las Configuraciones De Video
En el modo Espejo, el dynadock™ ajusta automáticamente las configuraciones de la ® 7 Starter Edition. “Uso de la utilidad TOSHIBA Video Dock” en la... - Page 86 Espejo o el modo Extendido, conecte un monitor externo al dynadock™ como se describe en la sección monitor” en la página Haga clic con el botón derecho en el ícono de TOSHIBA Video Dock ubicado en la bandeja del sistema/área de notificación del escritorio de Windows (Imagen de muestra) Ícono de la utilidad TOSHIBA Video Dock...
-
Page 87: Modos De Visualización Compatibles
Uso del dynadock™ y ajuste de las configuraciones Ajuste de las configuraciones de video N O T A Si nota que faltan algunas ventanas u otras partes de la pantalla cuando desconecta la computadora del dynadock™, podría ser necesario deseleccionar la casilla de verificación “Extend my Windows Windows pantalla de Windows... - Page 88 Uso del dynadock™ y ajuste de las configuraciones Ajuste de las configuraciones de video El dynadock™ admite los siguientes modos de visualización: Frecuencia de actualización Resolución (Hz) 640 x 480 60, 67, 72, 75, 85 720 x 400 70, 85, 88 720 x 480 50, 60 768 x 576...
-
Page 89: Ajuste De Las Configuraciones De Audio
Configuración de los puertos de reproducción de audio Haga clic en el ícono de la utilidad TOSHIBA dynadock ubicado en la bandeja del sistema/área de notificación del escritorio de Windows (Imagen de muestra) Ícono de la utilidad TOSHIBA dynadock™ V ®... - Page 90 Podría ser necesario reiniciar el reproductor de medios para que los cambios del audio surtan efecto. Configuración de los puertos de grabación de audio (micrófono) Haga clic en el ícono de la utilidad TOSHIBA dynadock ubicado en la bandeja del sistema/área de notificación del escritorio de Windows (Imagen de muestra) Ícono de la utilidad TOSHIBA dynadock™...
-
Page 91: Carga De Dispositivos Usb
Uso del dynadock™ y ajuste de las configuraciones Carga de dispositivos USB En el menú seleccione Select Sound Device… (Seleccionar dispositivo de audio). En la ficha Grabación, en el cuadro de diálogo, seleccione uno de los siguientes: ❖ Para utilizar el conector de micrófono del dynadock, seleccione USB Multi-Channel Audio Device (Dispositivo USB de audio de canales múltiples). -
Page 92: Desinstalación Del Software
Uso del dynadock™ y ajuste de las configuraciones Uso de los modos de espera/suspensión/hibernación con el de alta velocidad, el acceso a la red no está disponible hasta que la computadora se reactive desde el estado de espera/suspensión/ hibernación. Además, tenga presente la información importante que se presenta a continuación, sobre el efecto del modo de espera/suspensión/ hibernación en los monitores externos conectados al dynadock™: ❖... -
Page 93: Y Asistencia Técnica
Toshiba, al final de esta sección encontrará información sobre los servicios de asistencia técnica de Toshiba. Antes de contactar a Toshiba por favor consulte los consejos para la solución de problemas que se brindan en este manual, en el manual del usuario de su computadora y/o en los manuales incluidos con sus dispositivos periféricos opcionales. -
Page 94: Alimentación Eléctrica
N O T A Debido a limitaciones del ancho de banda USB, se pueden presentar problemas con el funcionamiento si se están llevando a cabo simultáneamente varias tareas que requieran muchos recursos (tales como reproducir audio mientras que simultáneamente se graba audio, se transfieren archivos grandes y se usa una cámara web de alta definición). -
Page 95: Pantalla/Video
Trate de ajustar los controles de resolución, contraste y/o brillo del monitor externo. Asegúrese de que la pantalla externa no esté desactivada en la utilidad TOSHIBA Video Dock. Para obtener información adicional, consulte Uso de la utilidad TOSHIBA Video Compruebe que el dynadock™ esté conectado a la computadora con un cable USB. - Page 96 Para una reproducción de video óptima utilice la pantalla de la computadora. Haga clic en el ícono de TOSHIBA Video Dock y seleccione Optimize for Video (Optimizar para video) para una reproducción de video óptima, de pantalla completa, en el monitor externo conectado al dynadock™.
- Page 97 El dynadock™ no admite algunas versiones del Centro de control del catalizador ATI. En su lugar, utilice las Propiedades de pantalla de Windows y la utilidad TOSHIBA Video Dock para controlar su(s) pantalla(s). El nombre de monitor que aparece en el Administrador de ®...
- Page 98 Problema(s) Cuando desacoplo la computadora, ventanas que antes aparecían en el escritorio extendido no regresan a la pantalla principal. No puedo utilizar el modo DOS de pantalla completa en un monitor externo conectado al dynadock™. La pantalla integrada de la computadora no se apaga cuando se establece como monitor principal el monitor...
-
Page 99: Audio/Sonido
Configuración para que coincidan con la forma como están colocados físicamente sus monitores. En la utilidad TOSHIBA Video Dock, asegúrese de que la configuración "Extender hacia" coincida con la colocación física de los monitores. Por ejemplo, si el monitor externo está... -
Page 100: Conexión/Acoplamiento
Problema(s) No sale ningún sonido de los parlantes integrados de la computadora, o de los audífonos/auriculares conectados directamente a la computadora acoplada. No sale audio de los puertos de audio del dynadock™ después de que reinicio la computadora o después de que ésta se reactiva desde el modo de espera/ suspensión/hibernación. -
Page 101: Red
USB y que la computadora esté acoplada. Si el problema está relacionado con el hardware del dynadock™, consulte “Asistencia técnica de Toshiba” en la página Solución/Soluciones Asegúrese de que el dynadock™ esté conectado a la computadora y que ésta esté acoplada. -
Page 102: Otros
Puesto que algunos problemas pueden estar relacionados con el sistema operativo o con el software, es conveniente que recurra primero a otras fuentes de asistencia técnica. Intente lo siguiente antes de contactar a Toshiba: ❖ Consulte el manual del usuario y/o las secciones sobre la solución de problemas en la documentación suministrada... -
Page 103: Contacto Con Toshiba
Web de Toshiba en pcsupport.toshiba.com. Contacto telefónico con Toshiba Antes de llamar a Toshiba, compruebe que dispone de lo siguiente: ❖ El número de serie del dynadock ❖... -
Page 104: Especificaciones
Apéndice A Especificaciones Especificaciones En este sección se resumen las especificaciones técnicas del dynadock.* Dimensiones físicas Peso Tamaño (Anc. x Prof. x Alt.): Requisitos ambientales Condiciones En funcionamiento Apagado Gradiente térmica Temperatura de termómetro de ampolla húmeda Requisitos eléctricos Adaptador de CA dynadock™... - Page 105 Especificaciones Especificaciones generales Interfaz de la computadora Puertos y conectores Ranura para candado de seguridad Modos de visualización de video compatibles (dependiendo del sistema operativo) USB 2.0 3 x puertos USB 2.0 en la parte posterior 1 x puerto USB 2.0 con alimentación en la parte frontal 1 x Puerto Ethernet (RJ-45 Puerto Ethernet 10 Base-T/ 100BASE-TX) DVI-I x 1 (Conector hembra digital de 29 clavijas)
-
Page 106: Índice
Índice ajuste de configuraciones de audio 36 configuraciones de video 32 alimentación problemas 41 alimentación de CA conexión 19 Asistencia técnica de Toshiba 49 audio/sonido problemas 46 carga dispositivos USB 38 computadora desacoplar 26 conector USB Tipo B 16 conector de audífonos 14 conector del micrófono 14... - Page 107 Índice dimensiones físicas dynadock™ 51 DisplayLink™ control de video 21 DisplayLink™ Manager 33 dispositivos de audio conexión 24 dispositivos USB carga 38 conexión 25 dynadock™ dimensiones físicas 51 especificaciones generales 52 instalación 18 montaje del 18 requisitos ambientales 51 requisitos eléctricos 51 dynadock™...
- Page 108 USB) 14 software dynadock™ V 27 utilidad TOSHIBA dynadock™ V 27 utilidad TOSHIBA Video Dock 29 utilidad de fondo 27 utilidad dynadock™ V 21 utilidad TOSHIBA dynadock™ V uso 27 utilidad TOSHIBA Video Dock uso 29 vista frontal referencia rápida 13...