Sony HXR-MC1 Service Manual
Digital hd video camera recorder
Hide thumbs
Also See for HXR-MC1:
- Operating manual (96 pages) ,
- Specifications (8 pages) ,
- Important safety instructions (2 pages)
Table of Contents
Advertisement
Quick Links
SERVICE MANUAL
Ver. 1.1 2009.01
Revision History
Revision History
Revised-1
Replace the previously issued
SERVICE MANUAL 9-852-639-11
with this manual.
Link
Link
SPECIFICATIONS
MODEL INFORMATION TABLE
SERVICE NOTE
DISASSEMBLY
• Precaution on Replacing the VC-546 Board
The components identified by
mark 0 or dotted line with
mark 0 are critical for safety.
Replace only with part num-
ber specified.
HXR-MC1/MC1P
9-852-639-12
HXR-MC1/MC1P
BLOCK DIAGRAMS
FRAME SCHEMATIC DIAGRAM
SCHEMATIC DIAGRAMS
Les composants identifiés par une
marque 0 sont critiques pour la
sécurité.
Ne les remplacer que par une pièce
portant le numéro spécifié.
DIGITAL HD VIDEO CAMERA RECORDER
Sony EMCS Co.
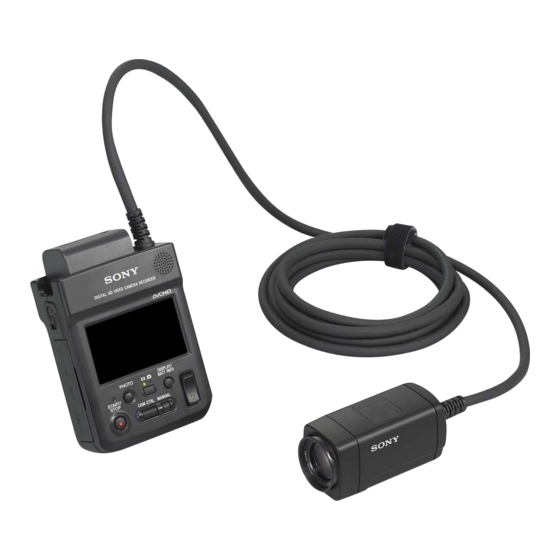
Photo: HXR-MC1
US Model
Canadian Model
AEP Model
Chinese Model
Japanese Model
PRINTED WIRING BOARDS
REPAIR PARTS LIST
INSTRUCTION MANUAL
Published by Kohda TEC
2009A0500-1
© 2009.1
Advertisement
Table of Contents

Related Manuals for Sony HXR-MC1


Summary of Contents for Sony HXR-MC1
- Page 1 AEP Model Revision History Revision History Chinese Model Revised-1 Japanese Model Replace the previously issued SERVICE MANUAL 9-852-639-11 with this manual. Photo: HXR-MC1 Link Link SPECIFICATIONS BLOCK DIAGRAMS PRINTED WIRING BOARDS MODEL INFORMATION TABLE FRAME SCHEMATIC DIAGRAM REPAIR PARTS LIST...
- Page 2 “Memory Stick PRO Duo” media such as your camcorder’s setting information at the time of recording. The unique pixel array of Sony’s ClearVid and the image processing system allow still image resolution equivalent to the sizes described.
- Page 3 “Memory Stick PRO Duo” media such as your camcorder’s setting information at the time of recording. The unique pixel array of Sony’s ClearVid and the image processing system allow still image resolution equivalent to the sizes described.
- Page 4 AUTO SLW 最低被写体照度 : ( ルクス) ( [ ラフック、 メモリースティック デュオ 含 SHUTTR 1/30 ] [ ] 、 シャッタースピード 秒) む) JEITA (社) 電子情報技術産業協会 ( ) にて 制定された、 撮影情報などの付帯情報を追 加することができる静止画用のファイル フォーマット。 ソニー独自のクリアビッド画素配列と画 像処理システムにより、 静止画は表記の記 録サイズを実現しています。 広角画素読み出しによる実動作値 HXR-MC1/MC1P — 4 —...
- Page 5 Model information table Model HXR-MC1 HXR-MC1P Destination US, CND, J AEP, CH Color system NTSC • Abbreviation AR : Argentine model AUS : Australian model BR : Brazilian model CH : Chinese model CND : Canadian model : East European model...
- Page 6 CRITIQUES POUR LA SÉCURITÉ DE FONCTIONNEMENT. NE COMPONENTS WITH SONY PARTS WHOSE PART NUMBERS REMPLACER CES COMPOSANTS QUE PAR DES PIÈSES SONY APPEAR AS SHOWN IN THIS MANUAL OR IN SUPPLEMENTS DONT LES NUMÉROS SONT DONNÉS DANS CE MANUEL OU PUBLISHED BY SONY.
- Page 7 無鉛半田には,以下の特性があります。 • 融点が従来の半田よりも約40℃高い。 り,プリント基板から浮かして取付けた部品がありま す。また内部配線は引きまわしやクランパによって発 従来の半田こてをそのまま使用することは可能です が,少し長めにこてを当てる必要があります。 熱部品や高圧部品に接近しないよう配慮されています ので,これらは必ずもとどおりにして下さい。 温度調節機能のついた半田こてを使用する場合,約 4. サービス後は安全点検を 350℃に設定して下さい。 注意: 半田こてを長く当てすぎると,基板のパター サービスのために取外したネジ,部品,配線がもとど おりになっているか,またサービスした個所の周辺を ン(銅箔)がはがれてしまうことがあります ので,注意して下さい。 劣化させてしまったところがないかなどを点検し,安 • 粘性が強い 全性が確保されていることを確認して下さい。 5. チップ部品交換時の注意 従来の半田よりも粘性が強いため,IC端子などが半田 • 取外した部品は再使用しないで下さい。 ブリッジしないように注意して下さい。 • 従来の半田と混ぜて使用可能 • タンタルコンデンサのマイナス側は熱に弱いため交 換時は注意して下さい。 無鉛半田には無鉛半田を追加するのが最適ですが, 従来の半田を追加しても構いません。 HXR-MC1/MC1P — 7 —...
- Page 8 C : Corrected by customer Indicates the appropriate Refer to “1-3-3. Self-diagnosis Code Table”. H : Corrected by dealer step to be taken. E : Corrected by service E.g. engineer 31 ..Reload the tape. 32 ..Turn on power again. HXR-MC1/MC1P...
- Page 9 Check both C : 32 : 60 and E : 61 : 10 of the self-diagnosis code. initialization of the zoom lens occurred simultaneously. Fault of writing to or erasing the flash Inspect the flash memory (IC2101 on the VC-546 board). memory Note: Refer to Service manual ADJ (“1-3. DESTINATION DATA WRITE”). HXR-MC1/MC1P...
- Page 10 LCD画面 C : 3 1 : 1 1 3.2Hz点滅 詳細コード 対応者分類 ブロック分類 C :お客さま自身で対応 対応方法の違いにより分類 「1 -3 -3 . 自己診断コード表」 H :販売店で対応 を参照 例 31 ・・ ・ テープを入れ直す E :サービスエンジニア 32 ・・ ・ 電源を入れ直す で対応 HXR-MC1/MC1P...
- Page 11 インフォリチウムバッテリを使用する。 フォーマットしていない メモリー メモリーステック デュオ をフォーマットする。 ステック デュオ を入れた メモリーステック デュオ が壊 新しい メモリーステック デュオ に交換する。 れている アクセスエラー 電源を外し,再度入れ直してから操作する。 操作スイッチの電源を入れ直す。 復帰しない場合,レンズブロックのフォーカスMRセンサ フォーカスが合いにくい (LD-235基板CN5202 1,2ピン)を点検する。異常なけ (フォーカスの初期化ができない) ればフォーカスモータ駆動回路(LD-235基板IC5201)を 点検する。 フラッシュメモリが書き換えられて フラッシュメモリのデータを元の値に戻す。(注) いる ズームレバーを操作したときにズーム動作をすれば,レン ズーム動作の異常(ズームレンズの ズブロックのズームリセットセンサ(LD-235基板CN5202 初期化ができない) wfピン)を点検する。ズーム動作をしなければズームモー タ駆動回路(LD-235基板IC5201)を点検する。 自己診断コードC:32:60とE:61:10の両方を点検す フォーカス,ズーム異常 る。 フラッシュメモリの書込み/消去動 フラッシュメモリ(VC-546基板IC2101)を点検する。 作不良 注:ADJ編(「1-3. DESTINATION DATA WRITE」)を参照してください。 HXR-MC1/MC1P 1-4E...
- Page 12 • When remove a connector, don’t pull at wire of connector. It is possible that a wire is snapped. • When installing a connector, don’t press down at wire of connector. It is possible that a wire is snapped. HXR-MC1/MC1P...
- Page 13 2-2-5. BASE FRAME SECTION Cabinet (T) Jack Cabinet ⋅ JK-378 Board ⋅ Base Frame ⋅ Control Switch Block (AD93700) 2-2-7. CAMERA BLOCK SECTION 2-2-6. LCD SECTION ⋅ Cabinet (RE) ⋅ PD-374 Board ⋅ Lens Block ⋅ LCD ⋅ CC-109 Board ⋅ Speaker HXR-MC1/MC1P...
- Page 14 1 Cabinet (B) (1-1 to 1-2) 2 Camera Block (2-1 to 2-10) 1 Cabinet (B) 1-2E (#2) (#2) HELP01 2-9 (#69) 2-10E HELP02 2 Camera Block (See Page 2-9) Caution: (#2) Don't cut harness. BT Panel Section (See Page 2-4) 2-7 (#69) HXR-MC1/MC1P...
- Page 15 1 BT Panel (1-1 to 1-2) 2 Jack Cabinet (2-1 to 2-2) 3 LM-069 Board (3-1 to 3-5) 1 BT Panel 1-2E (#9) HELP03 (#3) 3-5E 3-4 (Claw) (Open) 3 LM-069 Board MD Board Section (See Page 2-5) 2-2E 2 Jack Cabinet (#2) HXR-MC1/MC1P...
- Page 16 Follow the disassembly in the numerical order given. 1 MS-408 Board (1-1 to 1-9) 2 MD-142 Board (2-1 to 2-9) (#3) 1 MS-408 Board 1-9E (#69) (#69) HELP05 (Claw) (#3) 2 MD-142 Board HELP04 2-9E VC Board Section (See Page 2-6) HXR-MC1/MC1P...
- Page 17 Follow the disassembly in the numerical order given. 1 CV-037 Board (1-1 to 1-3) 2 VC-546 Board (2-1 to 2-7) 1 CV-037 Board (#69) (#3) - 0 3 1-3E (#3) (#3) 2-7E 2 VC-546 Board HELP06 Base Frame Section (See Page 2-7) HXR-MC1/MC1P...
- Page 18 1 JK-378 Board (1-1 to 1-4) 2 Base Frame (2-1 to 2-2) 3 Control Switch Block (AD93700) (3-1 to 3-2) HELP07 (#3) 1-4E 1 JK-378 Board 2-2E (#9) 2 Base Frame 3-2E HELP08 (#9) 3 Control Switch Block (AD93700) LCD Section (See Page 2-8) HXR-MC1/MC1P...
- Page 19 HARDWARE LIST Follow the disassembly in the numerical order given. 1 PD-374 Board (1-1 to 1-6) 2 LCD (2-1 to 2-2) 3 Speaker (3-1 to 3-3) (#9) 1 PD-374 Board (#9) HELP09 3 Speaker 1-6E 3-3E 2 LCD 2-2E HXR-MC1/MC1P...
- Page 20 Cabinet (RE). 1 Cabinet (RE) Note 2 HELP11 2 Lens Block HELP11 Note 1 Note 1 2-2 (#11) 3-2E 1-3E(#11) Caution: Don't cut harness. - 1 0 HELP10 2-12 3 CC-109 Board 2-11 (#69) 2-13E (#3) 2-10 (#3) HXR-MC1/MC1P 2-9E...
- Page 21 HELP03: Radiation Sheet (01) Battery Connector Harness Battery Connector Harness Radiation Sheet (01) Radiation Sheet (01) HELP02: HELP04: Cable Protector Radiation Sheet (N) Radiation Sheet (N) Cable Protector Base Frame Cable Protector MD-142 Board Cable Protector Base Frame HXR-MC1/MC1P HELP...
- Page 22 Radiation Sheet (A), AG Copy Sheet SP Cushion Radiation Sheet (A) AG Copy Sheet SP Cushion SP Holder AG Copy Sheet VC-546 Board HELP07: HELP10: FPC Tape Tape (ASX2) Camera Cable Base Frame CC-109 Board JK Sheet Tape (ASX2) FPC Tape HXR-MC1/MC1P HELP...
- Page 23 HELP11: Install the Cabinet (RE) Mic Harness 1 Put away the 2 Rotate the Cabinet (RE) 1 time and put away the Harness. HXR-MC1/MC1P HELP...
- Page 24 OVERALL BLOCK DIAGRAM (7/7) OVERALL BLOCK DIAGRAM (2/7) POWER BLOCK DIAGRAM (1/4) OVERALL BLOCK DIAGRAM (3/7) POWER BLOCK DIAGRAM (2/4) OVERALL BLOCK DIAGRAM (4/7) POWER BLOCK DIAGRAM (3/4) POWER BLOCK DIAGRAM (4/4) OVERALL BLOCK DIAGRAM (5/7) OVERALL BLOCK DIAGRAM (6/7) HXR-MC1/MC1P...
- Page 25 ZOOM MOTOR ZOOM_XA, ZOOM_XB EN1, DIRA1, DIRB1 EN1, DIRA1, DIRB1 EN1, DIRA1, DIRB1 EN1, DIRA1, DIRB1 EN1, DIRA1, DIRB1 ZOOM MOTOR DRIVE ZM_RST_SENS ZM_RST_SENS ZM_RST_SENS ZM_RST_SENS ZM_RST_SENS ZM_RST_SENS ZOOM RESET SENSOR LENS_TEMP_OUT LENS_TEMP_AD LENS_TEMP_AD LENS_TEMP_AD LENS_TEMP_AD LENS_TEMP_AD LENS TEMP SENSOR HXR-MC1/MC1P...
- Page 26 PCI_AD0 – PCI_AD31 ZM_RST_SENS AF24 PCI_XBE0 – PCI_XBE3 LENS_TEMP_AD AE11 PCI_XRESET PCI_XRESET PCI_CLK PCI_CLK PCI_CLKRUN PCI_CLKRUN AA17 DIAL_B AF13 DIAL_A SPDIF_O OVERALL (6/7) AE13 (PAGE 3-6) IC1705 OVERALL (3/7) CLK_SYS_OUT_CEC (PAGE 3-3) BUFFER (4/12) XSYS_RST OVERALL (6/7) (PAGE 3-6) HXR-MC1/MC1P...
- Page 27 CN9022 CN9101 CN1101 (1/3) (1/3) (1/3) (1/3) SPDIF_O SPDIF_O SPDIF_O CLK_SYS_OUT_CEC CLK_SYS_OUT_CEC CLK_SYS_OUT_CEC OVERALL (2/7) (PAGE 3-2) I2C_SDA, I2C_SCK I2C_SDA, I2C_SCK I2C_SDA, I2C_SCK I2C_SDA, I2C_SCK SDA, SCL CEC_INT CEC_INT CEC_INT CEC_INT Q2704 LEVEL SHIFT HDMI_JACK_IN OVERALL (4/7) (PAGE 3-4) HXR-MC1/MC1P...
- Page 28 CN5402 CN5404 INT_MIC_F INT_MIC_F INT_MIC_PREOUT_F INT_MIC_PREOUT_F INT_MIC_F MIC AMP (FRONT) INT_MIC_L INT_MIC_L INT_MIC_PREOUT_L INT_MIC_PREOUT_L INT_MIC_L IC5401 FP-1004 FLEXIBLE INT_MIC_R INT_MIC_R INT_MIC_PREOUT_R INT_MIC_PREOUT_R INT_MIC_R MIC AMP BOARD (1/2) CN1027 CN5003 CN5506 (1/2) (1/2) SP± SP± SP± SP(+), SP(-) SP901 SPEAKER HXR-MC1/MC1P...
- Page 29 MSX_BIO0 – MSX_BIO3 MSX_BIO0 – MSX_BIO3 MSDATA0 – MSDATA3 MSX_BS MSX_BS MSBS AM31 MSX_CLK MSX_CLK MS_SCLK AR32 MEMORY FP-916 FLEXIBLE STICK BOARD (2/3) CN4006 (2/3) OVERALL (3/7) BB_SI, BB_SO, XBB_SCK (PAGE 3-3) BL_CONT BL_CONT XMS_IN XMS_IN OVERALL (7/7) (PAGE 3-7) HXR-MC1/MC1P...
- Page 30 FP-1005 FLEXIBLE BOARD PHOTO_FREEZE S007 CN5005 (PHOTO_FREEZE) XPOWER_SW XPOWER_SW S008 XMODE_SW XMODE_SW XMODE_SW STILL/MOVIE SELECT XPON_SW S009 MANUAL OVERALL (7/7) D001 XCHARGE_LED XCHARGE_LED XCHARGE_LED (PAGE 3-7) D002 XPHOTO_LED (STILL) D003 XCAM_LED XCAM_LED XCAM_LED (MOVIE) D004 XTALLY_LED XTALLY_LED XTALLY_LED (REC) HXR-MC1/MC1P...
- Page 31 CN1110 (PAGE 3-6) XLANC_ON (4/4) FR_XRESET XMS_IN XMS_IN BATT_LI_3V XLANC_PWR_ON OVERALL (5/7) BL_CONT BL_CONT (PAGE 3-5) A_1.2V, D_1.2V, IC_1301_D_1.2V, IC_2201_D_1.2V D_1.5V A_2.8V, AU_2.8V, D_2.8V, EP_2.8V, CMOS_D_2.8V A_4.6V, AU_4.6V, EP_4.6V D_1.8V, A1.8V D_3.3V, CMOS_A_3.3V, USB_3.3V MT_5.0V EP_8.5V BL_-V EVER_3.0V LANC_DC HXR-MC1/MC1P...
- Page 32 D4702 B8 A8 SENSEb VCH R2 LANC_DC R4708 LANC_DC BATT_LI_3V LANC_DC(5.6V) VBATT R1 IC4701 VREF (2.5V) P5 EP_8.5V XMODE_SW DC CONTROL, VOUT3 B2 RESET, LANC DRIVE XFLASH_RST (6/7) XSYS_RST POWER (4/4) (PAGE 3-11) XSYS_RST FR_XRESET POWER (2/4) (PAGE 3-9) HXR-MC1/MC1P...
- Page 33 CN9034 CN1037 A_4.6V (9/12) (4/12) USB_3.3V (1/2) (1/2) (1/2) (1/2) A_1.8V A_1.2V A_1.2V D_1.8V IC1601 IC1705 D_1.8V A_2.8V POWER (4/4) D_1.8V D_1.8V D_3.3V (PAGE 3-11) 256M SDRAM BUFFER CMOS_A_3.3V (3/12) (4/12) USB_3.3V IC_1301_D_1.2V D_2.8V MT_5.0V D4_-2.8V IC_2201_D_1.2V IC_2201_D_1.2V BATT_LI_3V HXR-MC1/MC1P...
- Page 34 CN5005 BOARD D_2.8 D_2.8V D_2.8V_VR RV001 (ZOOM) R5002 D_2.8V XTALLY_LED_VDD D004 (REC) R5001 D003 D_2.8V MODE_LED_VDD (MOVIE) D002 (STILL) POWER (1/4) CHARGE_LED_VDD CHARGE_LED_VDD CHARGE_LED_VDD D001 (PAGE 3-8) S008 XMODE_SW XMODE_SW XMODE_SW STILL/MOVIE SELECT XPOWER_SW XPOWER_SW XPOWER_SW S005 POWER HXR-MC1/MC1P 3-10...
- Page 35 (PAGE 3-9) D_1.5V A_4.6V A_1.2V AU_4.6V D_1.2V EP_4.6V IC_2201_D_1.2V A_1.8V D_2.8V POWER (1/4) D_1.8V A_2.8V (PAGE 3-8) D_3.3V A_4.6V CMOS_A_3.3V A_1.8V USB_3.3V D_1.8V IC_1301_D_1.2V POWER (2/4) D_3.3V (PAGE 3-9) MT_5.0V CMOS_A_3.3V USB_3.3V BL_-V IC_1301_D_1.2V BL_CONT MT_5.0V BATT_LI_3V EP_8.5V BATT_LI_3V HXR-MC1/MC1P 3-11E...
- Page 36 FP-916 FP-1005 FLEXIBLE CN4004 FLEXIBLE JK-378 BOARD MEMORY STICK BOARD BOARD CONNECTOR CONTROL CN7702 SWITCH BLOCK (PS93700) CN5003 J7701 CN7703 CN7702 DC IN A/V R CONNECTOR MS-408 BOARD MS-408 BOARD CONTROL (SIDE B) (SIDE A) SWITCH BLOCK (AD93700) HXR-MC1/MC1P FRAME...
- Page 37 VC-546 BOARD (7/12) (SDRAM, NAND) (DC IN, AV/USB CONNECTOR) PD-374 BOARD (LCD DRIVE) VC-546 BOARD (8/12) (AUDIO/VIDEO CODEC) FP-902 FLEXIBLE BOARD VC-546 BOARD (9/12) (SDRAM) (VC-MD CONNECTION) FP-903 FLEXIBLE BOARD VC-546 BOARD (10/12) (D/A CONVERTER) (VC-MD CONNECTION) COMMON NOTE FOR SCHEMATIC DIAGRAMS HXR-MC1/MC1P...
- Page 38 FP-1004 FLEXIBLE BOARD (MD-MS CONNECTION) (VC-MS CONNECTION) FP-994 FLEXIBLE BOARD FP-1005 FLEXIBLE BOARD (MD-JK CONNECTION) (MD-MS CONNECTION) FP-997 FLEXIBLE BOARD CONTROL SWITCH BLOCK (PS93700) (VC-LM CONNECTION) FP-1000 FLEXIBLE BOARD CONTROL SWITCH BLOCK (AD93700) (LC-LD CONNECTION) COMMON NOTE FOR SCHEMATIC DIAGRAMS HXR-MC1/MC1P...
- Page 39 In addition, ensure that the receiver is not covered with Replace only with part number specified. dusts nor exposed to strong light. Les composants identifiés par une marque 0 sont critiques pour la sécurité. Ne les remplacer que par une pièce portant le numéro spécifie. HXR-MC1/MC1P...
- Page 40 ン 白 緑 ダ 赤 XEDIT → EDIT PB/XREC → PB/REC 青 ・2は不燃性抵抗。 ・1はヒューズ抵抗。 ・Cはパネル表示名称。 ・AはB+ライン。 ・BはB−ライン。 ・JはBライン(+,−)の入出力方向を示す。 図a(映像入出力端子出力波形) ・Cは調整名称。 電子ビーム走査線 【電圧・波形測定条件ノート】 ・電圧値及び信号波形はパターンボックスのカラーバーチャート を被写体としたときの測定点対アース間の参考値。 (デジタルマルチメータ;入力インピーダンス DC10MΩ使 ブラウン管の画像枠 用) ・使用テスタの入力インピーダンスにより電圧値が多少異なりま す。 図b(テレビモニタの映像) イメージャ交換時の注意 ・イメージャを交換した場合は,カメラ部の全調整を 行ってください。 0印の部品,または0印付きの点線で囲まれた部品は, ・イメージャは構造上,静電気により破壊される恐れが 安全性を維持するために重要な部品です。 あるため,MOS ICと同様に注意して取り扱ってくだ 従って交換時は,必ず指定の部品を使用して下さい。 さい。 お願い また,受光部にはゴミの付着,および強い光がはいる 図面番号で部品を指定するときは基板名又はブロック ことのないように注意してください。 を併せて指定して下さい。 HXR-MC1/MC1P...
- Page 41 I/O_1.8V I/O_1.8V CMOS_A_3.3V CMOS_A_3.3V D6902 EDZ-TE61-5.6B I/O_1.8V CMOS_A_3.3V REG_GND REG_GND REG_GND INCK R6916 R6915 R6914 IC_1301_SDO R6913 R6910 R6911 R6912 XCLR CM-107 BOARD C6936 C6937 C6939 C6938 C6934 C6933 CMOS IMAGER XX MARK:NO MOUNT REG_GND NO MARK:REC/PB MODE HXR-MC1/MC1P CM-107...
- Page 42 I_HALL- ZM_RST_SENS ZM_RST_SENS ZM_GND REG_GND LENS_DETE LENS_DETE ZM_VCC ZM_VCC ZM_VCC LENS BLOCK is replaced as block, LENS so that PRINTED WIRING BOARD BLOCK and SCHEMATIC DIAGRAM are omitted. LD-235 BOARD LENS DRIVE XX MARK:NO MOUNT NO MARK:REC/PB MODE HXR-MC1/MC1P LD-235...
- Page 43 I/O_1.8V I/O_1.8V I/O_1.8V I/O_1.8V D_1.8V D_1.8V D_1.8V CC-109 D_1.8V CN7003 REG_GND Through the Harness (CC-002) XCLR XCLR (Page 4-7) REG_GND IC_1301_SDO C7102 IC_1301_SDO 120p REG_GND INCK INCK REG_GND C7101 150p REG_GND CV-037 BOARD REG_GND CONNECTOR XX MARK:NO MOUNT HXR-MC1/MC1P CV-037...
- Page 44 C7002 0.1u D_1.8V 0.1u 0.1u CV-037 D_1.8V CN7103 Through the REG_GND REG_GND Harness (CC-002) (Page 4-6) XCLR XCLR REG_GND IC_1301_SDO IC_1301_SDO REG_GND INCK INCK REG_GND REG_GND R7019 D7016 RB521CS-30T2R C7005 0.1u REG_GND CC-109 BOARD CONNECTOR XX MARK:NO MOUNT HXR-MC1/MC1P CC-109...
- Page 45 R5407 0.068u INT_MIC_F INT_MIC_L R5409 R5408 2200 INT_MIC_R C5409 R5410 0.068u R5404 R5402 2200 INT_MIC_PREOUT_R C5407 C5412 R5405 0.068u R5417 C5402 C5403 C5401 INT_MIC_PREOUT_F C5411 C5421 LC-096 BOARD C5426 C5414 MIC AMP XX MARK:NO MOUNT NO MARK:REC/PB MODE HXR-MC1/MC1P LC-096...
- Page 46 REG_GND CN5502 MT_5.0V MT_5.0V MT_5.0V MT_5.0V MT_GND LC-096 MT_GND MT_GND CN5402 INT_MIC_PREOUT_F INT_MIC_PREOUT_F Through the Harness A_4.6V A_4.6V (CC-002) INT_MIC_PREOUT_L INT_MIC_PREOUT_L (Page 4-8) MIC_GND MIC_GND INT_MIC_PREOUT_R INT_MIC_PREOUT_R MIC_GND MIC_GND C5501 1000p REG_GND LM-069 BOARD CONNECTOR XX MARK:NO MOUNT HXR-MC1/MC1P LM-069...
- Page 47 ADC_IN9 ADC_IN8 ADC_IN7 R1333 100k ADC_IN6 R1334 100k R1381 AF10 ADC_IN5 AE10 ADC_IN4 ADC_IN3 D_1.8V R1336 100k ADC_IN2 AF11 ADC_IN1 MC1P LENS_TEMP_AD AE11 ADC_IN0 R1314 VC-546 BOARD (1/12) CAMERA CONTROL XX MARK:NO MOUNT NO MARK:REC/PB MODE HXR-MC1/MC1P VC-546 (1/12) 4-10...
- Page 48 AB23 IOVDDP_DDR0 AE25 IOVDDP_DDR0 AE26 IOVDDP_DDR0 AF25 IOVDDP_DDR0 AG28 AH29 IOVDDP_DDR0 AG29 C1517 IOVDDP_DDR0 AH27 IOVDDP_DDR0 AF29 0.1u 6.3V AH28 AJ28 IOVDDP_DDR0 AJ27 AJ29 IOVDDP_DDR0 AB21 IOVDDP_DDR0(TEST) AJ22 REG_GND VC-546 BOARD (2/12) CAMERA CONTROL (POWER SUPPLY) HXR-MC1/MC1P VC-546 (2/12) 4-11...
- Page 49 DQ10 IC_1301_DDR2_CLK IC_1301_DDR2_DATA_9 IC_1301_DDR2_DCLKN IC_1301_DDR2_DATA_8 IC_1301_DDR2_DQM_0 R1 F9 A1 R3 P9 N1 M9 L1 E1 D9 C1 B9 A3 R8 P7 P8 N7 N8 M7 M8 L7 L8 REG_GND VC-546 BOARD (3/12) SDRAM XX MARK:NO MOUNT HXR-MC1/MC1P VC-546 (3/12) 4-12...
- Page 50 CPU, CAMERA DSP, BRK2A/EN2 AV SIGNAL PROCESS, LENS CONTROL, BRK2B MODE CONTROL SENS1A SENS1B AE32 SENS0 AF32 SENS2 AE35 FG1A AE34 FG1B REG_GND VC-546 BOARD (4/12) CPU (SIGNAL PROCESS 1) XX MARK:NO MOUNT NO MARK:REC/PB MODE HXR-MC1/MC1P VC-546 (4/12) 4-13...
- Page 51 MODE CONTROL PCI_CLKEN AN19 R1835 PCI_CLKIN AR16 PCI_CLKOUT AR17 PCI_CLK PCI_CLKRUN AM19 PCI_CLKRUN R1844 PCI_INTA AR20 PCI_XINTA_AN PCI_INTB AM21 PCI_XINTB_AR R1845 0 PCI_INTC AP20 PCI_INTD AN21 VC-546 BOARD (5/12) CPU (SIGNAL PROCESS 2) XX MARK:NO MOUNT HXR-MC1/MC1P VC-546 (5/12) 4-14...
- Page 52 LCDIOVDD VINIOVDD COREGND COREGND LCDIOVDD COREGND COREGND D_1.2V_EX MPGCOREVDDT COREGND COREGND AR30 MPGCOREVDDT COREGND COREGND AR31 MPGCOREVDDT AR35 COREGND COREGND AR33 MPGCOREVDDT COREGND COREGND AR34 REG_GND VC-546 BOARD (6/12) CPU (SIGNAL PROCESS 3) XX MARK:NO MOUNT HXR-MC1/MC1P VC-546 (6/12) 4-15...
- Page 53 D_1.8V_EMC EMC_CKE C2106 C2107 R2105 EMC_CKE 4.7u EMC_XRAS B 6.3V EMC_XRAS 6.3V EMC_RDY0 D_1.8V_SDRAM EMC_RDY0 EMC_XRESET_OUT D_1.8V_SDRAM EMC_XRESET_OUT D_1.8V_EMC R2104 C2104 4.7u B 6.3V R2109 100k R2107 R2108 VC-546 BOARD (7/12) SDRAM, NAND XX MARK:NO MOUNT HXR-MC1/MC1P VC-546 (7/12) 4-16...
- Page 54 IC_2201_DDR_A07 IC_2201_DDR_D02 IC_2201_DDR_A07 IC_2201_DDR_D02 IC_2201_DDR_A06 IC_2201_DDR_D01 IC_2201_DDR_A06 IC_2201_DDR_D01 IC_2201_LRCK IC_2201_DDR_A05 IC_2201_DDR_D00 IC_2201_DDR_A05 IC_2201_DDR_D00 IC_2201_MCK IC_2201_DDR_A04 IC_2201_DDR_A04 IC_2201_ADATA IC_2201_DDR_A03 IC_2201_DDR_A03 IC_2201_DDR_A02 IC_2201_DDR_A02 R2214 IC_2201_DDR_A01 IC_2201_DDR_A01 R2215 IC_2201_DDR_A00 SPDIF_O IC_2201_DDR_A00 VC-546 BOARD (8/12) AUDIO/VIDEO CODEC XX MARK:NO MOUNT HXR-MC1/MC1P VC-546 (8/12) 4-17...
- Page 55 IC_2201_DDR_DQM0 R2302 IC2301 K4X56323PI-8GC6TJR R1 F9 A1 R3 P9 N1 M9 L1 E1 D9 C1 B9 A3 R8 P7 P8 N7 N8 M7 M8 L7 L8 512M SDRAM REG_GND VC-546 BOARD (9/12) SDRAM XX MARK:NO MOUNT HXR-MC1/MC1P VC-546 (9/12) 4-18...
- Page 56 ALADCVRTB PNDARDT 2SA207900AS0 R2420 PANEL_G Q2405 2SA207900AS0 PANEL_R C2432 C2431 0.001u 0.1u 6.3V Q2403-Q2405 BUFFER D_1.2V A_2.8V D_2.8V D_2.8V BB_SO XBB_SCK XCS_IC_2401 BB_SI PANEL_HD PANEL_VD VC-546 BOARD (10/12) D/A CONVERTER XX MARK:NO MOUNT NO MARK:REC/PB MODE HXR-MC1/MC1P VC-546 (10/12) 4-19...
- Page 57 N.C. C2516 PGND N.C. N.C. N.C. E2 D3 E3 D4 E4 E5 MT_5.0V L2504 MT_5.0V C2517 6.3V REG_GND VC-546 BOARD (11/12) COMPONENT OUT AMP, D-TERMINAL DRIVE XX MARK:NO MOUNT NO MARK:REC/PB MODE R:REC MODE P:PB MODE HXR-MC1/MC1P VC-546 (11/12) 4-20...
- Page 58 PANEL_B PANEL_B IC_5201_SO IC_5201_SO PANEL_R PANEL_R IC_55201_SCK IC_5201_SCK CN1035 D_2.8V D_2.8V (For Check) BOOT_MODE_PORT0 BOOT_MODE_PORT0 OBERON_EXT(N.C) HOST_RXD UART2_SI HOST_TXD UART2_SO AV_RXD UART3_SI AV_TXD UART3_SO REG_GND REG_GND VC-546 BOARD (12/12) CONNECTOR XX MARK:NO MOUNT NO MARK:REC/PB MODE HXR-MC1/MC1P VC-546 (12/12) 4-21...
- Page 59 D21_HDMI VDDS(3.0V) VDDC(1.5V) VSS2 C2611 VDDC(1.5V) D6_HDMI VSS2 D8_HDMI VDDS(3.0V) D10_HDMI BB_SI D12_HDMI BB_SO D14_HDMI HM_R6 HM_R6 D16_HDMI D18_HDMI HM_Y1 HM_Y1 ADAO1 D20_HDMI ADA_SIA0 VSS2 D22_HDMI VSS2 MD-142 BOARD (1/7) HDMI SIGNAL PROCESS XX MARK:NO MOUNT HXR-MC1/MC1P MD-142 (1/7) 4-22...
- Page 60 IC2703 D_2.8V 256FS_HDMI TK11150CSCL-G C2712 ADAO2_HDMI 5V REG ADAO2_HDMI ADAO1_HDMI ADAO1_HDMI C2714 0.001u FS_HDMI FS_HDMI Q2704 64FS_HDMI 64FS_HDMI NP043A300AS0 LEVEL SHIFT R2741 R2754 CLK_SYS_OUT_CEC HDMI_JACK_IN MD-142 BOARD (2/7) HDMI TRANSMITTER XX MARK:NO MOUNT NO MARK:REC/PB MODE HXR-MC1/MC1P MD-142 (2/7) 4-23...
- Page 61 R2802 R2803 C2845 AU_4.6V 4700 0.01u C2842 4.7u A_2.8V L2803 10uH C2826 C2827 REG_GND C2840 C2841 0.1u 6.3V R2827 C_TO_PB V_TO_PR AUDIO_L_I/O Y_TO_Y AUDIO_R_I/O R2828 MD-142 BOARD (3/7) VIDEO/AUDIO I/O XX MARK:NO MOUNT NO MARK:REC/PB MODE HXR-MC1/MC1P MD-142 (3/7) 4-24...
- Page 62 R4933 XCS_DD IC4905 C4917 0.01u R4934 100k R4930 1.8/3VCTRL VTR_UNREG 1.8/3VCTRL BATT_UNREG FAST_CHARGE FAST_CHARGE INIT_CHARGE_ON INIT_CHARGE_ON XSYS_RST XFLASH_RST FR_XRESET FR_XRESET LANC_IN LANC_IN LANC_OUT LANC_OUT XLANC_PWR_ON XLANC_PWR_ON XLANC_ON XLANC_ON MD-142 BOARD (4/7) HI CONTROL XX MARK:NO MOUNT HXR-MC1/MC1P MD-142 (4/7) 4-25...
- Page 63 F4604 Q4604 DTC144EMFS6T2L (0.25A/24V) BATT_UNREG_CN BATT_UNREG C4609 0.022u R4604 Q4602 REG_GND 2SC5658FS6T2LQ/R (BATT_GND_CN) C4601 C4602 C4603 CHARGE CONTROL REG_GND BATT/XEXT_CN REG_GND (MT_GND) VTR_UNREG REG_GND (ST_GND) MD-142 BOARD (5/7) DC IN,CHARGE XX MARK:NO MOUNT NO MARK:REC/PB MODE HXR-MC1/MC1P MD-142 (5/7) 4-26...
- Page 64 R4726 UNR91ABG08S0 R4719 EP_8.5V 270k R4729 1M Q4702 MD-142 BOARD (6/7) EP_4.6V DTC144EMFS6T2L DC/DC CONVERTER 1.8/3VCTRL BL_CONT Q4701 EMD12T2R XX MARK:NO MOUNT POWER ON/OFF R4703 NO MARK:REC/PB MODE C4701 0.0022u 1.8/3V_GATE_CTRL C4702 R4704 0.22u 100k REG_GND HXR-MC1/MC1P MD-142 (6/7) 4-27...
- Page 65 REG_GND REG_GND TMDS_CLOCK+ TMDS_CLOCK+ TMDS_CLOCK- TMDS_CLOCK- REG_GND REG_GND REG_GND REG_GND +5V_POWER +5V_POWER +5V_POWER +5V_POWER REG_GND R1136 REG_GND XVBUS_DET CN1106 USB_VCC Q1103 UNR32A3G0LS0 USB DETECT C1126 MD-142 BOARD (7/7) REG_GND CONNECTOR XX MARK:NO MOUNT NO MARK:REC/PB MODE HXR-MC1/MC1P MD-142 (7/7) 4-28...
- Page 66 KEY_AD1 KEY_AD_1 REG_GND XTALLY_LED XTALLY_LED D_2.8V XTALLY_LED_VDD R5002 DIAL_A DIAL_A CONTROL DIAL_A SWITCH REG_GND BLOCK REG_GND (AD93700) (Page 4-39) DIAL_B DIAL_B DIAL_B CN5004 FP-995 FLEXIBLE BOARD MS-408 BOARD (1/2) CONNECTOR HDMI CONNECTOR XX MARK:NO MOUNT HXR-MC1/MC1P FP-995, MS-408 (1/2) 4-29...
- Page 67 HDMI_JACK_IN HDMI_JACK_IN START/STOP START/STOP XPHOTO_LED XPHOTO_LED N.C. N.C. XHOT_STBY XHOT_STBY JACK_AD JACK_AD XVBUS_DET XVBUS_DET N.C. XMS_ACC_LED XMS_ACC_LED XCS_LCD XCS_LCD REG_GND REG_GND MS-408 BOARD (2/2) REG_GND PANEL_G PANEL_G PANEL_B PANEL_B MS CONNECTOR PANEL_R PANEL_R XX MARK:NO MOUNT HXR-MC1/MC1P MS-408 (2/2) 4-30...
- Page 68 S_C_I/O S_Y/D3_Y S_Y/D3_Y USB_VCC S_Y_i/O R7722 0 USB_GND R7726 1k C7708 C7709 220p 220p R7725 USB_D- USB_D+ USB_GND ACV_GND C7707 ACV_GND ACV_GND R7716 ACV_GND ACV_GND CN7703 LF7704 (USB) JK-378 BOARD DC IN, AV/USB CONNECTOR XX MARK:NO MOUNT HXR-MC1/MC1P JK-378 4-31...
- Page 69 TP_Y UNIT TP_L TP_Y TP_R TP_R TP_SEL1 872942737 CN6102 Q6101 XP411F-TXE D_2.8V D6101 Q6101, Q6102 Q6102 TOUCH PANEL I/F XP421F-TXE 872942767 VD6103 C6101 C6102 0.0047u 0.0047u PD-374 BOARD REG_GND LCD DRIVE XX MARK:NO MOUNT NO MARK:REC/PB MODE HXR-MC1/MC1P PD-374 4-32...
- Page 70 CEC_INT CEC_INT REG_GND REG_GND XTALLY_LED ADA_BCK XQUICKREC_LED ADA_BCK XQUICKREC_LED XTALLY_LED ADA_BCK ADA_BCK REG_GND REG_GND ADA_LRCK ADA_LRCK REG_GND REG_GND ADA_LRCK ADA_LRCK ADA_FCK REG_GND REG_GND ADA_FCK REG_GND ADA_FCK REG_GND ADA_FCK CN9101 50P REG_GND REG_GND FP-902 FLEXIBLE BOARD VC-MD CONNECTION HXR-MC1/MC1P FP-902 4-33...
- Page 71 D_1.8V REG_GND REG_GND D_1.8V D_1.8V REG_GND REG_GND D_1.8V D_1.8V REG_GND REG_GND A_1.2V A_1.2V REG_GND REG_GND A_1.2V A_1.2V MS_PWR_ON MS_PWR_ON MS_PWR_ON MS_PWR_ON SYS_SOUND SYS_SOUND BOOT_MODE_PORT0 BOOT_MODE_PORT0 SYS_SOUND SYS_SOUND BOOT_MODE_PORT0 BOOT_MODE_PORT0 CN9102 REG_GND REG_GND FP-903 FLEXIBLE BOARD VC-MD CONNECTION HXR-MC1/MC1P FP-903 4-34...
- Page 72 (12/12) (2/2) (2/2) (7/7) CN1035 CN4005 CN4006 CN1110 (Page 4-21) (Page 4-30) (Page 4-28) (Page 4-30) FP-916 FLEXIBLE BOARD FP-913 FLEXIBLE BOARD MD-MS CONNECTION VC-MS CONNECTION (PRINTED WIRING BOARD is omitted.) (PRINTED WIRING BOARD is omitted.) HXR-MC1/MC1P FP-913, FP-916 4-35...
- Page 73 REG_GND USB_D+ USB_D+ ACV_GND ACV_GND ACV_GND USB_GND ACV_GND ACV_GND ACV_GND ACV_GND ACV_GND ACV_GND ACV_GND 1PIN ACV_GND ACV_GND ACV_GND ACV_GND REG_GND REG_GND REG_GND REG_GND REG_GND REG_GND REG_GND CN0001 MD-142 (7/7) CN1111 (Page 4-28) FP-994 FLEXIBLE BOARD MD-JK CONNECTION HXR-MC1/MC1P FP-994 4-36...
- Page 74 LND038 MT_5.0V MT_5.0V LND077 MT_5.0V MT_5.0V LND039 LND078 MT_5.0V LND039 MT_5.0V LND078 39PIN 1PIN 39PIN 1PIN FP-997 FLEXIBLE BOARD FP-1000 FLEXIBLE BOARD VC-LM CONNECTION LC-LD CONNECTION (PRINTED WIRING BOARD is omitted.) (PRINTED WIRING BOARD is omitted,) HXR-MC1/MC1P FP-997, FP-1000 4-37...
- Page 75 N.C. LND010 LND022 D_2.8V D_2.8V LND011 REG_GND REG_GND LND023 LND012 LND024 N.C. N.C. 12PIN 1PIN FP-1005 FLEXIBLE BOARD MD-MS CONNECTION (PRINTED WIRING BOARD is omitted.) FP-1001 FLEXIBLE BOARD MS-PD CONNECTION (PRINTED WIRING BOARD is omitted.) HXR-MC1/MC1P FP-1001, FP-1004, FP-1005 4-38...
- Page 76 D_2.8V_VR ZOOM_VR RESET REG_GND XPOWER_SW 1PIN S003 MS-408 RESET (1/2) RV001 CN5002 S005 (Page 4-29) POWER (ZOOM) CONTROL SWITCH BLOCK (PS93700) CONTROL SWITCH BLOCK (PS93700) is replaced as block, so that PRINTED WIRING BOARD is omitted. HXR-MC1/MC1P PS93700, AD93700 4-39...
- Page 77 CM-107 BOARD MD-142 BOARD LD-235 BOARD PD-374 BOARD CV-037 BOARD FP-995 FLEXIBLE BOARD CC-109 BOARD JK-378 BOARD LC-096 BOARD FP-902 FLEXIBLE BOARD LM-069 BOARD FP-903 FLEXIBLE BOARD MS-408 BOARD FP-994 FLEXIBLE BOARD VC-546 BOARD COMMON NOTE FOR PRINTED WIRING BOARDS HXR-MC1/MC1P...
- Page 78 • Through hole is omitted. • There are a few cases that the part printed on diagram isn’t mounted in this model. • C: panel designation (JAPANESE) プリント図共通ノート 【プリント図ノート】 ・ :無鉛半田を使用しています。 ・ :基板 :フレキシブル配線板 見ている面側のパターン。 :裏側のパターン (他のパターンについては表示されていません) ・スルーホールは省略。 ・プリント図には,本機で使用していない部品が記載されている 場合があります。 ・Cはパネル表示名称。 HXR-MC1/MC1P 4-40...
- Page 79 C6909 C6924 C6940 C6923 C6925 R6944 C6926 C6920 R6942 C6930 R6946 R6918 IC6904 C6929 C6928 C6931 R6951 C6927 D6901 Note: IC6904 (CMOS imager) is not supplied, but this is included in CM-107 complete board. 1-878-643- 11 1-878-643- HXR-MC1/MC1P CM-107 4-41...
- Page 80 CC-109 BOARD (SIDE A) CC-109 BOARD (SIDE B) R5232 C5204 C5206 C5208 MT_5.0V R5230 CN5202 R5226 C5207 CN7003 1-874-693- R7019 D7015 CV-037 BOARD (SIDE A) CN7101 CN7102 1-878-628- 11 CV-037 BOARD (SIDE B) 1-878-627- 1-878-627- CN7103 C7101 1-878-628- HXR-MC1/MC1P LD-235, CV-037, CC-109 4-42...
- Page 81 CN5505 CN5503 R5503 1-878-630- 11 MS-408 BOARD (SIDE A) MS-408 BOARD (SIDE B) CN4003 VDR001 VDR002 LND402 CN5005 C5001 CN4006 R4007 MEMORY STICK R4006 CN4005 C5004 C5003 (ACCESS) 1-878-641- 11 CN5002 CN5004 LND401 CN4007 1-878-641- HXR-MC1/MC1P LC-096, LM-069, MS-408 4-43...
- Page 82 C2419 A2 B2 R2408 R2411 R2409 CL2414 CL2413 L2504 A1 B1 C1 D1 E1 Q2408 Q2406 Q2407 C2512 AA10 AA11 AA12 AA13 AA14 AA15 AA16 AA17 AA18 AA19 AA20 AA21 R2450 R2452 R2451 1-878-640- 11 1-878-640- 11 HXR-MC1/MC1P VC-546 4-44...
- Page 83 D_1.8V R2727 CL4908 X4901 C2709 IC4905 R2716 D2701 A_2.8V C4604 C2719 C2821 C2848 C2601 C2604 R2604 R4609 CL2705 D_3.3V C2847 C2820 C2841 C2845 R2818 C2835 C2842 R2819 CN1101 CN1102 CN1111 C2815 R2804 R2805 1-878-642- 11 1-878-642- 11 HXR-MC1/MC1P MD-142 4-45...
- Page 84 R6154 C6118 C6117 C6104 R6112 R6152 R6140 RB6101 R6145 R6150 R6146 C6116 CN6101 Q6115 R6155 Q6113 R6110 R6109 R6138 Q6109 R6108 R6107 R6144 R6143 R6134 LD6101 1-878-631- 11 PD-374 BOARD (SIDE B) D6106-D6108 (LCD BACKLIGT) 1-878-631- 11 HXR-MC1/MC1P PD-374 4-46...
- Page 85 R7718 FB7705 R7723 FB7706 R7724 1-878-633- 11 CN7703 CN7702 J7701 (USB) R7725 DC IN A/V R Note: J7701 is not supplied, but this is 1-878-632- 11 included in JK-378 complete board. 1-878-632- 11 HXR-MC1/MC1P FP-995, JK-378, FP-902, FP-903, FP-994 4-47E...
- Page 86 ELECTRICAL PARTS LIST Link Link ACCESSORIES LM-069 BOARD CC-109 BOARD FP-994 FLEXIBLE BOARD MD-142 BOARD CM-107 BOARD FP-995 FLEXIBLE BOARD MS-408 BOARD CV-037 BOARD JK-378 BOARD FP-902 FLEXIBLE BOARD PD-374 BOARD LC-096 BOARD FP-903 FLEXIBLE BOARD VC-546 BOARD LD-235 BOARD HXR-MC1/MC1P...
- Page 87 : Brazilian model : Chinese model CND : Canadian model : East European model HK : Hong Kong model : Japanese model : Tourist model : Korea model : North European model TW : Taiwan model : Thai model HXR-MC1/MC1P...
- Page 88 Part No. Description Ref. No. Part No. Description X-2345-358-1 CABINET (B) ASSY 4-132-601-01 SHEET (01), RADIATION 4-132-542-11 SCREW, TRIPOD 4-133-936-01 RETAINER, CABLE 4-135-345-01 SHEET, TRIPOD 2-635-562-31 SCREW (M1.7) (Black) X-2345-360-1 LID ASSY, MS 2-599-475-21 SCREW (M1.7) (Silver) 4-132-603-01 PROTECTOR, CABLE HXR-MC1/MC1P...
- Page 89 0 BT901 1-780-692-11 BATTERY CONNECTOR HARNESS A-1665-149-A LM-069 BOARD, COMPLETE 2-635-562-31 SCREW (M1.7) (Black) 1-836-120-11 FLEXIBLE FLAT CABLE (FFC-178) 2-660-401-01 SCREW (M1.7), NEW TRU-STAR, P2 (Red) X-2345-365-1 CABINET ASSY, JACK 3-078-890-21 SCREW, TAPPING (Silver) 0 BH5501 1-756-615-61 HOLDER, BATTERY (Note) HXR-MC1/MC1P...
- Page 90 1-875-837-11 FP-916 FLEXIBLE BOARD A-1665-360-A MD-142 BOARD, COMPLETE (SERVICE) X-2345-359-1 CABINET ASSY, MS 3-300-092-01 SHEET (N), RADIATION A-1665-147-A MS-408 BOARD, COMPLETE 1-878-639-11 FP-1005 FLEXIBLE BOARD 2-660-401-01 SCREW (M1.7), NEW TRU-STAR, P2 (Red) 4-124-827-01 LABEL, FUSE REPLACEMENT CAUTION 2-599-475-21 SCREW (M1.7) (Silver) HXR-MC1/MC1P...
- Page 91 1-878-635-11 FP-997 FLEXIBLE BOARD A-1528-452-A FP-902 FLEXIBLE BOARD, COMPLETE A-1528-464-A FP-903 FLEXIBLE BOARD, COMPLETE 1-878-638-11 FP-1004 FLEXIBLE BOARD * 161 4-137-996-01 SPACER, CV 3-300-101-01 SHEET, AG COPY 2-660-401-01 SCREW (M1.7), NEW TRU-STAR, P2 (Red) 3-300-091-01 SHEET (A), RADIATION 2-599-475-21 SCREW (M1.7) (Silver) HXR-MC1/MC1P...
- Page 92 1-487-116-11 SWITCH BLOCK, CONTROL (PS93700) 3-300-099-01 SPACER, CR * 203 3-452-954-01 SHEET (MD), CONDUCTIVE A-1665-150-A JK-378 BOARD, COMPLETE * 204 4-132-599-01 FRAME, BASE 2-660-401-01 SCREW (M1.7), NEW TRU-STAR, P2 (Red) * 205 4-132-604-01 SHEET, JK 3-078-890-21 SCREW, TAPPING (Silver) HXR-MC1/MC1P...
- Page 93 4-136-658-01 SHEET, LIGHT INTERCEPTION 2-694-513-01 PRISM SHEET H (2.7) * 267 4-141-380-01 CUSHION, SP 2-694-514-01 DIFFUSION SHEET (2.7) LCD901 A-1202-058-A TP BLOCK ASSY (27ESHMG07) 2-666-801-01 LIGHT GUIDE (2.7) SP901 1-825-260-51 LOUD SPEAKER (1.6CM) 2-694-515-01 REFLECTION SHEET (2.7) 3-078-890-21 SCREW, TAPPING (Silver) HXR-MC1/MC1P...
- Page 94 X-2345-355-1 CABINET (C) ASSY 3-078-890-21 SCREW, TAPPING (Silver) 4-132-542-01 SCREW, TRIPOD 4-132-560-01 O RING (RE) (Note) 3-078-890-11 SCREW, TAPPING (Silver) 3-080-204-21 SCREW, TAPPING, P2 (Black) 4-132-561-01 O RING (CABLE) (Note) 2-599-475-21 SCREW (M1.7) (Silver) 4-132-559-01 CABINET (RE) #157 4-132-562-01 STEP TP1.7X5 (Black) HXR-MC1/MC1P...
- Page 95 4-132-551-01 FRAME (L), LENS 1-788-737-11 OPTICAL FILTER BLOCK (OFB-05-06) 2-635-562-11 SCREW (M1.7) (Black) 2-660-401-01 SCREW (M1.7), NEW TRU-STAR, P2 (Red) 3-279-478-01 RUBBER (CH001), SEAL 3-080-204-01 SCREW, TAPPING, P2 (Black) A-1665-272-A CM-107 BOARD, COMPLETE 3-078-890-21 SCREW, TAPPING (Silver) (including IC6904 (CMOS imager)) (Note) HXR-MC1/MC1P...
- Page 96 Note: Be sure to read “Precautions for Replacement of C6912 1-125-777-11 CERAMIC CHIP 0.1uF Imager” on page 4-2 when changing the imager. C6913 1-112-717-91 CERAMIC CHIP 6.3V C6914 1-165-884-11 CERAMIC CHIP 2.2uF 6.3V Note: イメージャの交換時は4 - 3 ページの イメージャ交 C6915 1-112-717-91 CERAMIC CHIP 6.3V 換時の注意 を必ずお読みください。 HXR-MC1/MC1P 5-10...
- Page 97 * CN9102 1-821-894-11 CONNECTOR, BOARD TO BOARD 80P R7725 1-218-990-81 SHORT CHIP R7726 1-218-953-11 METAL CHIP 1/16W < VARISTOR > * VDR702 1-802-251-21 CHIP VARISTOR * VDR703 1-802-251-21 CHIP VARISTOR * VDR704 1-802-251-21 CHIP VARISTOR • Refer to page 5-1 for mark 0. HXR-MC1/MC1P 5-11...
- Page 98 1-125-777-11 CERAMIC CHIP 0.1uF C5219 1-125-777-11 CERAMIC CHIP 0.1uF L5401 1-400-353-21 INDUCTOR 22uH C5221 1-100-902-91 TANTAL. CHIP 10uF < TRANSISTOR > C5222 1-100-902-91 TANTAL. CHIP 10uF C5223 1-125-777-11 CERAMIC CHIP 0.1uF Q5401 8-729-427-72 TRANSISTOR XP4501 C5224 1-125-777-11 CERAMIC CHIP 0.1uF HXR-MC1/MC1P 5-12...
- Page 99 Note: LM-069 基板のリチウム電池(BT5501)を交換する場合は バッテリホルダ (BH5501) も同時に新品に交換してくださ R5243 1-208-943-11 METAL CHIP 220K 0.5% 1/16W い。 (一度使用したバッテリホルダは再使用できません。 ) R5244 1-208-911-11 METAL CHIP 0.5% 1/16W 部品取り付けの際は,先にバッテリホルダを取り付けてか R5245 1-208-909-11 METAL CHIP 8.2K 0.5% 1/16W らリチウム電池を装着してください。 • Refer to page 5-1 for mark 0. HXR-MC1/MC1P 5-13...
- Page 100 C2850 1-112-717-91 CERAMIC CHIP 6.3V C4767 1-165-989-11 CERAMIC CHIP 10uF 6.3V * C2851 1-112-746-11 CERAMIC CHIP 4.7uF 6.3V C4770 1-114-292-91 CERAMIC CHIP 22uF C4601 1-165-875-11 CERAMIC CHIP 10uF C4602 1-165-875-11 CERAMIC CHIP 10uF C4771 1-100-566-91 CERAMIC CHIP 0.1uF HXR-MC1/MC1P 5-14...
- Page 101 6-551-930-01 TRANSISTOR US5U35TR * IC1104 6-708-445-01 IC R1114Q291D-TR-FA Q4707 6-551-536-01 TRANSISTOR ECH8402-S-TL-E IC2601 6-711-003-01 IC T6UL2XBG-0002 (EO2) Q4708 6-551-536-01 TRANSISTOR ECH8402-S-TL-E * IC2701 6-712-123-01 IC ADV7520NKBBCZRL-80 Q4709 6-551-536-01 TRANSISTOR ECH8402-S-TL-E • Refer to page 5-1 for mark 0. HXR-MC1/MC1P 5-15...
- Page 102 1/20W R4606 1-218-953-11 METAL CHIP 1/16W R4936 1-240-695-91 METAL CHIP 1/20W R4937 1-240-695-91 METAL CHIP 1/20W R4607 1-218-961-11 METAL CHIP 4.7K 1/16W R4938 1-240-718-91 METAL CHIP 100K 1/20W R4608 1-218-990-81 SHORT CHIP R4940 1-218-961-11 METAL CHIP 4.7K 1/16W HXR-MC1/MC1P 5-16...
- Page 103 Q6110 8-729-053-84 TRANSISTOR SSM3KO9FU (T5LSONY1) R4008 1-218-949-11 METAL CHIP 1/16W Q6111 6-551-184-01 TRANSISTOR MCH6305-TL-E-S R4009 1-218-969-11 METAL CHIP 1/16W Q6112 6-551-184-01 TRANSISTOR MCH6305-TL-E-S R4010 1-218-969-11 METAL CHIP 1/16W * Q6113 6-551-870-01 TRANSISTOR UP04601G08S0 * Q6114 6-551-846-01 TRANSISTOR UP04401G08S0 HXR-MC1/MC1P 5-17...
- Page 104 1-112-716-11 CERAMIC CHIP 0.1uF 6.3V * C1512 1-112-716-11 CERAMIC CHIP 0.1uF 6.3V C2023 1-125-777-11 CERAMIC CHIP 0.1uF * C1513 1-112-716-11 CERAMIC CHIP 0.1uF 6.3V * C2024 1-112-716-11 CERAMIC CHIP 0.1uF 6.3V * C1514 1-112-716-11 CERAMIC CHIP 0.1uF 6.3V HXR-MC1/MC1P 5-18...
- Page 105 1-125-777-11 CERAMIC CHIP 0.1uF C2416 1-125-777-11 CERAMIC CHIP 0.1uF < COIL > C2417 1-125-777-11 CERAMIC CHIP 0.1uF L1301 1-400-588-11 INDUCTOR 10uH C2419 1-125-777-11 CERAMIC CHIP 0.1uF L1302 1-400-353-21 INDUCTOR 22uH C2426 1-165-884-11 CERAMIC CHIP 2.2uF 6.3V L1501 1-400-588-11 INDUCTOR 10uH HXR-MC1/MC1P 5-19...
- Page 106 R1502 1-216-864-11 SHORT CHIP R2010 1-218-990-81 SHORT CHIP R1503 1-216-864-11 SHORT CHIP R2011 1-218-990-81 SHORT CHIP R1504 1-216-864-11 SHORT CHIP R1505 1-216-864-11 SHORT CHIP Note: Ferrite bead is mounted to the location where R1384 is printed. Note: R1384にはフェライトビーズがマウントされています。 HXR-MC1/MC1P 5-20...
- Page 107 R2412 1-240-702-91 METAL CHIP 3.9K 1/20W R2417 1-240-810-11 METAL CHIP 0.5% 1/20W R2418 1-240-770-11 METAL CHIP 0.5% 1/20W R2419 1-240-770-11 METAL CHIP 0.5% 1/20W R2420 1-240-770-11 METAL CHIP 0.5% 1/20W R2443 1-694-535-91 SHORT CHIP R2444 1-694-535-91 SHORT CHIP HXR-MC1/MC1P 5-21...
- Page 108 4-121-565-21 (SIMPLIFIED CHINESE) (PMB (Picture Motion Browser) ∗ 4-121-565-31 (FRENCH) One-touch Tape including PMB Guide) ∗ 4-121-565-41 (SPANISH) 4-132-611-01 4-133-505-01 ∗ 4-121-565-51 (ITALIAN) ∗ 4-121-565-61 (GERMAN) Cable Holder (Note) Cable Clamper X-2345-369-1 • Refer to page 5-1 for mark 0. HXR-MC1/MC1P 5-22...
- Page 109 1-823-156-51 「Manuals for Digital HD Video Camera Recorder」 4-121-562-01 USBケーブル リチャージャブルバッテリー 1-829-868-31 パック NP-FH60 0 A-1201-665-A 取扱説明書 (PDF) 取扱説明書.pdfは全ての言語が付属品のCD-ROMに含まれています。 CD-ROM内の取扱説明書(PDF)につきましては印刷しての供給は 対応しておりません。 コントローラフック CD-ROM 「Video Camera Application X-2345-368-1 Software」 (PMB (ソフトウェア, ワンタッチテープ 「PMBガイド」を含む)) 4-132-611-01 4-133-505-01 ケーブルホルダ (Note) ケーブルクランパー X-2345-369-1 • 0マークについては,5-1ページを参照して下さい。 HXR-MC1/MC1P 5-23E...
- Page 110 4-121-565-11(1) Digital HD Video Camera Recorder Operating Guide Before operating the unit, please read this manual thoroughly, and retain it for future reference HXR-MC1P © 2009 Sony Corporation...
-
Page 111: Read This Before Operating Your Camcorder
Read this before operating your camcorder Before operating the unit, please read this • “Memory Stick PRO Duo” media can be manual thoroughly, and retain it for future used only with “Memory Stick PRO” reference. media compatible equipment. • Do not attach a label or the like on “Memory Stick PRO Duo”... - Page 112 • Do not do any of the following when the (Movie)/ (Still) mode lamps (p. 12) or the access lamp (p. 14) is lit or flashing. Otherwise, the media may be damaged, recorded images may be lost or other malfunctions could occur. –...
- Page 113 In such a case, save your images Zeiss lens, which was developed jointly by on some type of external media first, and Carl Zeiss, in Germany, and Sony then perform [MEDIA FORMAT] (p. 45). Corporation, and produces superior images.
-
Page 114: Table Of Contents
Table of Contents Read this before operating your camcorder ..........2 Getting Started Step 1: Checking supplied items ..............8 Step 2: Charging the battery pack ............9 Step 3: Turning the power on, and setting the date and time ....12 Changing the language setting ............13 Step 4: Inserting “Memory Stick PRO Duo”... - Page 115 Utilizing Media (MANAGE MEDIA) category ............44 Setting the image quality ................ 44 Checking the “Memory Stick PRO Duo” media information ....45 Deleting all images (Formatting) ............45 Repairing the image database file ............46 Customizing Your Camcorder What you can do with the (SETTINGS) category of the HOME MENU ...................
- Page 116 Warning indicators and messages ............74 Additional Information Files/folder structure on the “Memory Stick PRO Duo” media ....77 Maintenance and precautions ..............78 About the AVCHD format ..............78 About the “Memory Stick” media ............78 About the “InfoLITHIUM” battery pack ..........79 About handling of your camcorder ............
-
Page 117: Getting Started
Getting Started Step 1: Checking supplied items Make sure that you have the following Controller hook (1) (p. 89) items supplied with your camcorder. The number in the parentheses indicates the number of that item supplied. AC Adaptor (1) (p. 9) Cable clamper (1) (p. -
Page 118: Step 2: Charging The Battery Pack
Step 2: Charging the battery pack Battery pack CHG (charge) lamp DC IN jack DC plug Jack cover Power cord POWER switch (Mains lead) To the wall outlet (wall socket) AC Adaptor You can charge the “InfoLITHIUM” Slide the POWER switch to OFF battery pack H series (p. - Page 119 To remove the battery pack Slide the POWER switch to OFF. Slide the BATT RELEASE lever and remove the battery pack. DISPLAY/BATT INFO BATT RELEASE After a while, the approximate recordable lever time and battery information appear for about 7 seconds. You can view the battery information for up to 20 seconds by b Notes pressing DISPLAY/BATT INFO again...
- Page 120 Approximate available recording time On the battery pack • When you remove the battery pack, turn off Approximate time (min.) available when your camcorder, and turn off the (Movie) you use a fully charged battery pack. lamp/ (Still) lamp (p. 12)/access lamp “HD”...
-
Page 121: Step 3: Turning The Power On, And Setting The Date And Time
Step 3: Turning the power on, and setting the date and time Set the date and time when using this camcorder for the first time. Touch (HOME) t If you do not set the date and time, the (SETTINGS) t [CLOCK/ [CLOCK SET] screen appears every time LANG] t [CLOCK SET]. -
Page 122: Changing The Language Setting
Changing the language setting Make sure that the clock is correctly set, then touch You can change the on-screen displays to show messages in a specified language. To The clock starts. select the screen language, touch You can set any year up to the year (HOME) t (SETTINGS) t [CLOCK/ 2037. -
Page 123: Step 4: Inserting "Memory Stick Pro Duo" Media
Step 4: Inserting “Memory Stick PRO Duo” media See page 2 on the “Memory Stick” media you can use with your camcorder. z Tips • See following pages on the recordable time of movies and recordable number of still images. –... - Page 124 Expected recording time of • When using “Memory Stick PRO Duo” media movies made by Sony Corporation. The recordable time for movies varies depending on the recording The recording time depends on the capacity conditions, subject conditions, and the type of of “Memory Stick PRO Duo”...
-
Page 125: Recording/Playback
Recording/Playback Using the HOME MENU You can change the recording functions and the operating settings for your convenience. Touch the desired item. Example: [EDIT] While pressing the green button, slide the POWER switch to ON. Follow the guide on the screen for POWER switch further operation. - Page 126 3 Touch the item you want to learn more about. When you touch an item, its explanation appears on the screen. To apply the option, touch [YES], otherwise, touch [NO]. z Tips • To deactivate the HELP, touch (HELP) again in step 2.
-
Page 127: Recording
Recording In the default setting, the image quality is set to HD (high definition). To change the image quality, refer to “Setting the image quality” (p. 44). (HOME) A (Movie) lamp (Still) lamp START/STOP B PHOTO C (Movie)/ (Still) select button E HOLD. - Page 128 Recording movies Recording still images While pressing the green button, While pressing the green button, slide the POWER switch to ON to slide the POWER switch to ON. turn on the (Movie) lamp. Press the (Movie)/ (Still) Press START/STOP B. select button E until the (Still) lamp lights up.
-
Page 129: Preventing Operation Errors
Preventing operation errors Zooming If you slide the HOLD. switch to the You can magnify images up to 10 times the right, the buttons cannot function. Use this original size with the power zoom lever. function to prevent pressing incorrect buttons. -
Page 130: Recording High Quality Still Images During Movie Recording (Dual Rec)
2 Press START/STOP. Recording high quality still A 3-second movie (approx.) is recorded as images during movie recording a 12 second-slow-motion-movie. (Dual Rec) [Recording···] disappears, when recording is finished. You can record high quality still images during movie recording by pressing Touch to cancel the smooth slow PHOTO. -
Page 131: Controlling The Image Settings Manually With The Cam Ctrl Dial
Controlling the image settings manually with the CAM CTRL dial You can assign one menu item you use often to the CAM CTRL dial. Since the focus adjustment is assigned to 2 Rotate the CAM CTRL dial and select the the CAM CTRL dial in the default settings, item to be assigned. -
Page 132: Playback
Playback (HOME) A (VIEW IMAGES) B Power zoom lever C While pressing the green button, then slide the POWER switch to ON to turn on your camcorder. Touch (VIEW IMAGES) B. The VISUAL INDEX screen appears on the LCD screen (It may take some time to display the thumbnails). - Page 133 :Goes to the Film Roll Index screen (p. 26). :Goes to the Face Index screen (p. 26). :Displays movies with HD (high definition) image quality.* :Displays still images. appears when you select the movie with SD (standard definition) image quality in SET] (p.
- Page 134 Viewing still images Touch the tab, then select the desired still image to play back. Return (to the VISUAL INDEX screen) Slide show (p. 28) Goes to the VISUAL INDEX (OPTION) screen Previous/Next z Tips (HOME) A t (VIEW IMAGES) t •...
-
Page 135: Searching For Desired Scene By Pinpoint (Film Roll Index)
Searching for desired scene by Searching for desired scene by pinpoint (Film Roll Index) face (Face Index) Movies can be divided by a set time and the The face images detected during movie first scene of each division is displayed on recording are displayed on the index screen. -
Page 136: Searching For Desired Images By Date (Date Index)
b Notes Touch to select the date of • Faces may not be detected depending on recording conditions. the desired movie, then touch Example: People wearing glasses or hats, or who do not face towards the camera. The movies of the selected date are z Tips displayed on the VISUAL INDEX screen. -
Page 137: Playing Back A Series Of Still Images (Slide Show)
Playing the image on a TV Playing back a series of still images (Slide show) Connection methods and quality of the image viewed on the TV screen differ depending on what type of TV is connected, and the connectors used. Use the supplied AC Adaptor as the power source (p. - Page 138 Connecting to a high definition TV Images recorded with HD (high definition) image quality are played back with HD (high definition) image quality. Images recorded with SD (standard definition) image quality are played back with SD (standard definition) image quality. t (p.
- Page 139 : Signal flow Type Camcorder Cable HOME MENU setting HDMI cable (sold separately) • Use an HDMI cable with the HDMI logo. • Images are not output from the HDMI OUT jack of your camcorder, if copyright protection signals are recorded in the images.
- Page 140 : Signal flow Type Camcorder Cable HOME MENU setting (SETTINGS) t Component A/V cable [OUTPUT SETTINGS] (supplied) t [COMPONENT] t [576i] (p. 56) (Green) Y (Blue) P (SETTINGS) t (Red) P [OUTPUT SETTINGS] t [TV TYPE] t [16:9]/ (White) [4:3]* (p. 56) (Red) •...
- Page 141 If your TV/VCR has a 21-pin adaptor (EUROCONNECTOR) You need the 21-pin adaptor (sold separately) to connect your camcorder to a TV for viewing recorded images (for models with the mark printed on the bottom surface only). This adaptor is designed for output use only.
-
Page 142: Saving Images
Saving images Recorded images are stored on the “Memory Stick PRO Duo” media. Due to the limited capacity of the “Memory Stick PRO Duo” media, make sure that you save the image data to some type of external media such as a DVD-R or a computer. You can save the images recorded on the camcorder as described below. -
Page 143: Editing
Editing (OTHERS) category Deleting images This category enables you to edit the You can delete images recorded on the images on the “Memory Stick PRO Duo” “Memory Stick PRO Duo” media using media. Also, you can enjoy your camcorder your camcorder. by connecting to other devices. - Page 144 b Notes Touch the movie to be deleted. • If the deleted movie is included in the Playlist (p. 38), the movie added to the Playlist is deleted also from the Playlist. Deleting still images (HOME) t Touch The selected movie is marked with (OTHERS) t [DELETE].
-
Page 145: Capturing A Still Image From A Movie
Capturing a still image from a movie To continue capturing You can save a selected frame from a recorded movie as a still image. Select the Touch , then follow the steps 3 to 4. image quality of the movies to be captured To capture a still image from another before the operation (p. -
Page 146: Dividing A Movie
Dividing a movie • Do not remove the battery pack or the AC Select the image quality of the movie you Adaptor, or eject the “Memory Stick PRO Duo” want to divide before the operation (p. 44). media from your camcorder while dividing the movie. -
Page 147: Creating The Playlist
Creating the Playlist To add all the movies recorded on the The Playlist is a list showing thumbnails of the movies that you have selected. same day at one time The original movies are not changed even if 1 In step 2, touch [ ADD by date]/ you edit or delete the movies added to the ADD by date]. - Page 148 Press and hold the movie on the LCD Playing the Playlist screen to confirm the movie. Touch to return to the previous Select the image quality of the movie you screen. want to create, play, or edit a Playlist before the operation (p.
-
Page 149: Dubbing To Other Devices
Dubbing to other devices Connecting with the A/V connecting cable You can dub images played back on your camcorder to other recording devices, such as VCRs or DVD/HDD recorders. Connect the device in either of the following ways. Connect your camcorder to the wall outlet (wall socket) using the supplied AC Adaptor for this operation (p. - Page 150 b Notes When dubbing is finished, stop • You cannot dub to recorders connected with an HDMI cable. the recording device, and then • To hide the screen indicators (such as a counter, your camcorder. etc.) on the screen of the monitor device connected, touch (HOME) t (SETTINGS) t [OUTPUT SETTINGS] t...
-
Page 151: Printing Recorded Images (Pictbridge Compliant Printer)
Printing recorded images (PictBridge compliant Touch [ USB CONNECT]. printer) You can print out still images using a Operate the device to be PictBridge compliant printer, without connected, and start recording. connecting the camcorder to a computer. For details, refer to the instruction manuals supplied with the device to be Connect your camcorder to the AC Adaptor connected. - Page 152 • Refer also to the instruction manual of the printer to be used. Touch the still image to be • Do not attempt the following operations when printed. is on the screen. The operations may not be performed properly. – Slide the POWER switch to OFF –...
-
Page 153: Utilizing Media
Utilizing Media (MANAGE MEDIA) Setting the image category quality This category enables you to use the You can select the image quality for “Memory Stick PRO Duo” media for recording/playback/editing on your various purposes. camcorder. In the default setting, the image quality is set to HD (high definition). -
Page 154: Checking The "Memory Stick Pro Duo" Media Information
Checking the Deleting all images “Memory Stick PRO (Formatting) Duo” media Formatting deletes all the images to recover recordable free space. information To avoid the loss of important images, you should save them before formatting. You can check the remaining recordable Connect your camcorder to the wall outlet time for each [REC MODE] (p. -
Page 155: Repairing The Image Database File
Repairing the image database file • Do not attempt the following operations when This function checks the management [Executing...] is on the screen: information and the consistency of movies/ – Operate the POWER switch or buttons still images in the “Memory Stick PRO –... -
Page 156: Customizing Your Camcorder
Customizing Your Camcorder What you can do with the (SETTINGS) category of the HOME MENU Using the HOME MENU Touch the desired setup item. If the item is not on the screen, touch to change the page. Turn on your camcorder, then touch (HOME). -
Page 157: List Of The (Settings) Category Items
SOUND/DISP SET (p. 55) List of the (SETTINGS) category items Items Page VOLUME MOVIE SETTINGS (p. 49) BEEP Items Page LCD BRIGHT REC MODE LCD BL LEVEL AE SHIFT LCD COLOR WB SHIFT WIDE SELECT OUTPUT SETTINGS (p. 56) DIGITAL ZOOM Items Page AUTO SLW SHUTTR... -
Page 158: Movie Settings
MOVIE SETTINGS (Items for recording movies) SD SP ( Records in standard quality mode. (SD 6M (SP)). SD LP ( Increases the recording time (Long Play). (SD 3M (LP)) Touch 1, then 2. b Notes If the item is not on the screen, touch •... - Page 159 WIDE SELECT AUTO SLW SHUTTR (Auto Slow Shutter) When recording with SD (standard definition) image quality, you can select the When recording in dark places, the shutter horizontal to vertical ratio according to the speed is automatically reduced to 1/25 TV connected.
- Page 160 setting, is displayed. The zebra pattern SUB-T DATE (Subtitle is not recorded. date) B OFF When you set to [ON] (the default setting), The zebra pattern is not displayed. you can display the recording date and time while playing back the images recorded on your camcorder, on devices compatible The zebra pattern appears at a screen brightness level of about 70 IRE.
-
Page 161: (Items For Recording Movies) Photo Settings
“Memory Stick” 1.9M ( media. Allows you to record more still images in • The unique pixel array of Sony’s ClearVid and relatively clear quality (1,600 × 1,200). the image processing system allow still image resolution equivalent to the sizes described. -
Page 162: (Items For Recording Still Images)
VIEW IMAGES SET (Items to customize the display) RESET Assigns file numbers in sequence, following the largest file number existing on the current recording “Memory Stick PRO Duo” media. AE SHIFT Touch 1, then 2. See page 49. If the item is not on the screen, touch to change the page. - Page 163 CAMERA DATA 12IMAGES Displays thumbnails of 12 images. Movie Still image C SteadyShot off D Brightness E White balance F Gain G Shutter speed H Aperture value I Exposure z Tips • The data code is displayed on the TV screen if you connect your camcorder to a TV.
-
Page 164: Sound/Disp Set
SOUND/DISP SET (Items to adjust the sound and the screen) LCD BL LEVEL (LCD backlight level) You can adjust the brightness of the LCD screen’s backlight. B NORMAL Standard brightness. Touch 1, then 2. If the item is not on the screen, touch BRIGHT to change the page. -
Page 165: (Items To Adjust The Sound And The Screen) Output Settings
OUTPUT SETTINGS (Items for when connecting other devices) DISP OUTPUT B LCD PANEL Shows displays such as the time code on the LCD screen. V-OUT/PANEL Shows displays such as the time code on Touch 1, then 2. the TV screen and the LCD screen. If the item is not on the screen, touch to change the page. -
Page 166: (Items For When Connecting Other Devices) Clock/ Lang
CLOCK/ LANG GENERAL SET (Items to set clock and language) (Other setup items) Touch 1, then 2. Touch 1, then 2. If the item is not on the screen, touch If the item is not on the screen, touch to change the page. to change the page. - Page 167 CTRL FOR HDMI (Control for HDMI) The default setting is [ON], allowing you to do the playback operation with the remote commander of your TV by connecting your camcorder to a “BRAVIA” Sync compatible TV with the HDMI cable. z Tips •...
-
Page 168: Activating Functions Using The
Activating functions using the OPTION MENU OPTION MENU appears just like the pop-up window that appears when you Change the setting, then touch right-click the mouse on a computer. Various available functions are displayed. Using the OPTION MENU b Notes •... -
Page 169: Recording Items On The Option Menu
Recording items on the OPTION Viewing items on the OPTION MENU MENU Items Page Items Page FOCUS DELETE – SPOT FOCUS DELETE by date – TELE MACRO DELETE ALL – EXPOSURE – SPOT METER – AE SHIFT DIVIDE SCENE SELECTION ERASE ALL –... -
Page 170: Functions Set In The
Functions set in the OPTION MENU • You can also adjust the focus manually using Items you can set only on the OPTION the CAM CTRL dial (p. 22). MENU will be described below. The default settings are marked with B. SPOT FOCUS FOCUS You can select and adjust the focal point to... - Page 171 b Notes EXPOSURE • If you set [SPOT METER], [EXPOSURE] is automatically set to [MANUAL]. You can fix the brightness of a picture manually. Adjust the brightness when the SCENE SELECTION subject is too bright or too dark. You can record images effectively in various situations.
- Page 172 LANDSCAPE*( WHITE BAL. (White Select to shoot distant subjects clearly. balance) This setting also prevents your camcorder from focusing on glass or metal mesh in You can adjust the color balance to the windows that comes in between the recording environment. camcorder and the subject.
- Page 173 • flashes slowly if [ONE PUSH] could not To cancel the fader before starting the be set. operation, touch [OFF] in step 1. • When [ONE PUSH] was selected, if keeps If you press START/STOP, the setting is flashing after touching , set [WHITE BAL.] canceled.
- Page 174 BLT-IN ZOOM MIC (Built- in zoom microphone) When you set [BLT-IN ZOOM MIC] to [ON] ( ), you can record a movie with directional sound as you move the power zoom lever (The default setting is [OFF]). MICREF LEVEL (Microphone reference level) You can select the microphone level for recording sound.
-
Page 175: Enjoying With A Computer
AVCHD format discs. 50 GB camcorder, see the following website for maximum may be necessary when details. creating Blu-ray discs.) http://guide.d-imaging.sony.co.jp/mac/ms/us/ Display: Minimum 1,024 × 768 dots Installing “PMB” Others: USB port (this must be provided as standard, Hi-Speed USB (USB 2.0... - Page 176 • You can read images recorded on “Memory 5 Select the language for the application to Stick PRO Duo” media in “Memory Stick” be installed, then click [Next]. media slot of a computer. However, in the 6 As the screen to confirm the connection following cases, do not use the “Memory Stick”...
- Page 177 2 Touch [END] t [YES] on the screen of your camcorder. 3 Disconnect the USB cable. To operate “PMB” To start “PMB,” click [Start] t [All Programs] t [Sony Picture Utility] t [PMB]. To see “PMB Guide” To find out how to use “PMB,” see “PMB Guide.”...
-
Page 178: Troubleshooting
(p. 9). If the problem persists, disconnect the power source and contact • Disconnect the AC Adaptor from the wall your Sony dealer. The battery pack may be outlet (wall socket) or remove the battery damaged. pack, then reconnect it after about 1 minute. - Page 179 • The battery pack has not been charged You cannot delete images stored on enough. Fully charge the battery again. If or format the “Memory Stick PRO the problem persists, replace the battery Duo” media. pack with a new one (p. 9). •...
- Page 180 You cannot record a still image. The auto focus does not function. • You cannot record a still image together • Set [FOCUS] to [AUTO] (p. 61). with: • The recording conditions are not suitable – [SMTH SLW REC] for auto focus. Adjust the focus manually –...
- Page 181 Playing back images Editing images on your camcorder An image cannot be found for playback. Unable to edit. • Select the image quality of a movie you • Unable to edit because of the condition of want to play back by touching the image.
- Page 182 • When you are using the S VIDEO plug, “PMB” does not work correctly. make sure the red and white plugs of the A/V connecting cable are connected • Quit “PMB” and restart your computer. (p. 31). Functions that cannot be used The image appears distorted on the simultaneously 4:3 TV.
-
Page 183: Warning Indicators And Messages
20 minutes remaining. tried to fix a couple of times, contact your Sony dealer or local authorized Sony service facility. (High temperature warning) Slow flashing C:04:00 •... - Page 184 • Use the recommended “Memory Stick” * You hear a melody when the warning indicators media (p. 2). appear on the screen (p. 55). • Contact your Sony dealer or local authorized Sony service facility.
- Page 185 Do not eject the Memory Stick during Cannot recover data. writing. Data may be damaged. • Because data writing onto the “Memory Stick PRO Duo” media • Insert the “Memory Stick PRO Duo” failed, your camcorder tried to recover media again, and follow the the data, but could not recover data.
-
Page 186: Additional Information
The image files may be destroyed or being played back. may not be played back. • We (Sony) will not be responsible for the results C SD movie files (MPEG2 files) of operating the data on “Memory Stick PRO The extension of the files is “.MPG”. -
Page 187: Maintenance And Precautions
Maintenance and precautions *2: 720p specification About the AVCHD format A high definition specification which utilizes 720 effective scanning lines and the progressive What is the AVCHD format? system. *3: Data recorded in AVCHD format other than The AVCHD format is a high definition the above mentioned cannot be played on your digital video camera format used to record camcorder. -
Page 188: About The "Infolithium" Battery Pack
• Damaged or lost data may occur in the is inserted facing in the correct direction, then following cases (the data will not be insert it all the way in. Note that improper use compensated for): may cause a malfunction. Also, if you force the “Memory Stick PRO Duo”... -
Page 189: About Handling Of Your Camcorder
What is an “InfoLITHIUM” battery • Do not expose the battery pack to water. The battery pack is not water resistant. pack? About the remaining battery time An “InfoLITHIUM” battery pack is a lithium-ion battery pack that has functions indicator for communicating information related to •... - Page 190 Water may seep inside of casing, unplug your camcorder and have it the unit due to the water pressure, and it may checked by a Sony dealer before operating it damage the unit. any further. Usage life of the rubber casings •...
- Page 191 Note on moisture condensation On adjustment of the touch panel (CALIBRATION) Moisture may condense when you bring your camcorder from a cold place into a The buttons on the touch panel may not warm place (or vice versa) or when you use work correctly.
-
Page 192: Specifications
Procedures information at the time of recording. Connect your camcorder to a wall outlet The unique pixel array of Sony’s ClearVid (wall socket) using the supplied AC and the image processing system allow Adaptor, and leave it with the POWER still image resolution equivalent to the switch set to OFF for more than 24 hours. - Page 193 LCD screen Rechargeable battery pack NP-FH60 Image: 6.7 cm (2.7 type, aspect ratio 16:9) Maximum output voltage: DC 8.4 V Total dot number: 211 200 (960 × 220) Output voltage: DC 7.2 V Maximum charge voltage: DC 8.4 V Maximum charge current: 2.12 A General Capacity: 7.2 Wh (1 000 mAh) Power requirements: DC 6.8 V/7.2 V (battery...
- Page 194 • “x.v.Colour” is a trademark of Sony THE PERSONAL AND NON-COMMERCIAL Corporation. USE OF A CONSUMER TO • “BRAVIA” is a trademark of Sony Corporation. (i) ENCODE VIDEO IN COMPLIANCE WITH • “Blu-ray Disc” and the logo are trademarks. THE AVC STANDARD (“AVC VIDEO”) AND / •...
- Page 195 URL to download it. When downloading the source code, select DCR- DVD810 as the model for your camcorder. http://www.sony.net/Products/Linux/ We would prefer you do not contact us about the contents of source code. Read “license2.pdf” in the “License” folder on the CD-ROM.
-
Page 196: Quick Reference
Quick Reference Identifying parts and controls The numbers in ( ) are reference pages. Main body A Battery pack (9) B BATT RELEASE lever (10) C DC IN jack (9) (USB) jack (41, 42) E A/V Remote Connector (28) F HDMI OUT jack (28) G Speaker Playback sounds come out from the speaker. - Page 197 (Movie)/ (Still) mode lamps (12) (Movie)/ (Still) select button (12) C PHOTO button (19) D Camera recording lamp (57) Lights up in red during recording. Flashes when remaining “Memory Stick PRO Duo” media space or battery power is low. E START/STOP button (19) F CAM CTRL dial (22) G MANUAL button (22) H DISPLAY/BATT INFO button (10, 13)
- Page 198 A RESET button To remove the controller hook Initializes all the settings, including the setting of the date and time. Raise the edge of the controller hook, then B CHG (charge) lamp (9) slide it in the direction of the arrow to remove the controller hook.
- Page 199 Camera A Built-in microphone B Lens (Carl Zeiss Lens) (4) C Tripod receptacle Attach the tripod (sold separately) to the tripod receptacle using a tripod screw (sold separately: the length of the screw must be less than 5.5 mm (7/32 in.)). To adhere the cable clamper Raise the one-touch tape, then wind the cable around the hook to adhere the one-...
-
Page 200: Indicators Displayed During Recording/Playback
Indicators displayed during recording/playback A HOME button (47) Recording movies B Remaining battery (approx.) (10) C Recording status ([STBY] (standby) or [REC] (recording)) D Recording quality (HD/SD) (44) and recording mode (FH/HQ/SP/LP) (49) E Media F Counter (hour/minute/second) G Recording remaining time Recording still images H OPTION button (59) I VIEW IMAGES button (23) - Page 201 Upper right Indicators when you made changes Indicator Meaning Fader (64) Following indicators appear during LCD backlight off (13) recording/playback to indicate the settings of your camcorder. Bottom Upper left Upper right Center Indicator Meaning Picture effect (64) Digital effect (64) Manual focus (61) SCENE SELECTION Bottom...
-
Page 202: Index
Index Numeric CLOCK/LANG ....57 Folder........77 COLOR SLOW SHTR (Color Format........45 1080i/576i ......56 Slow Shutter)....64, 73 Full charge ......10 16:9 ........56 COMPONENT..... 56 21-pin adaptor.......32 Component A/V cable 4:3 .........56 ........8, 29, 31 GENERAL SET ....57 4:3 TV........30 Computer...... - Page 203 LCD BL LEVEL OTHERS category ....34 REPAIR IMG.DB F..... 46 (LCD backlight level)...55 OUTDOOR......63 RESET........89 LCD BRIGHT ......55 OUTPUT SETTINGS..56 LCD COLOR .......55 LCD PANEL ......56 S VIDEO cable....31, 40 LCD panel ......12 PAL........3 Saving images ......33 LP .........49 PASTEL.......
- Page 204 USB 2.0 ........66 USB cable .......8 USB CONNECT....77 USB SELECT....41, 42 VCR or DVD/HDD recorders ..........40 VIEW IMAGES SET ...53 Viewing pictures on a TV..28 VISUAL INDEX ....23 VOLUME ......55 Volume adjustment....24 V-OUT/PANEL....56 Wall outlet (Wall socket)..9 Warning indicators....74 Warning messages ....75 WB SHIFT (White Balance Shift) ...49 WHITE BAL.
- Page 205 Printed on 70% or more recycled paper using VOC (Volatile Organic Compound) -free vegetable oil based ink. Printed in Japan...
- Page 206 HARDWARE LIST (1/8) #1: M1.7 X 2.5 #2: M1.7 X 4.0 #3: M1.7 X 2.5 #4: M1.4 X 2.5 (Tapping) (Black) (Black) (Red) (Dark Silver) 2-635-562-11 2-635-562-31 2-660-401-01 3-348-998-81 #5: M1.7 X 3.5 (Tapping) #6: M1.4 X 1.7 #7: M1.7 X 1.6 #8: M1.7 X 3.5 (Tapping) (Black) (Silver)
- Page 207 HARDWARE LIST (2/8) #21: M1.4 X 3.0 #22: M1.7 X 5.0 (Tapping) #23: M1.7 X 4.0 (Tapping) #24: B1.7 X 5.5 (Tapping) (Black) (Silver) (Black) (Black) 2-662-396-21 3-083-261-01 3-080-204-11 4-679-805-11 #25: M1.7 X 3.0 #26: M1.4 X 2.0 #27: M1.4 X 2.0 #28: M1.4 X 4.0 (Tapping) (Black) (Silver)
- Page 208 HARDWARE LIST (3/8) #41: M3.0 X 8.0 (Tapping) #42: M2.0 X 4.0 (Tapping) #43: M1.7 X 4.0 #44: M1.7 X 3.0 (Tapping) (Silver) (Silver) (Red) (Silver) 3-065-748-01 7-628-253-00 2-660-401-31 3-078-890-61 #45: M1.4 X 2.5 #46: M1.7 X 3.0 #47: M1.4 X 3.0 (Tapping) #48: M1.7 X 2.5 (Silver) (Red)
- Page 209 HARDWARE LIST (4/8) #64: M1.7 X 5.0 (Tapping) #61: M3.0 X 10.0 #62: M2.0 X 3.0 #63: M5.0 X 12.5 (Silver) (Black) (Silver) (Black) 2-666-551-21 7-682-549-09 3-080-202-21 3-060-811-21 12.5 10.0 #65: M1.4 X 3.5 #66: M1.4 X 1.4 #67: M1.4 X 2.0 #68: M1.7 X 4.0 (Silver) (Silver)
- Page 210 HARDWARE LIST (5/8) #81: M1.7 X 2.5 #82: M1.4 X 1.4 #83: M1.7 X 7.0 (Tapping) #84: M2.0 X 3.0 (Silver) (Silver) (Black) (Silver) 2-515-756-01 3-272-251-01 3-080-204-41 3-072-453-11 #85: M1.7 X 2.5 #86: M1.7 X 4.0 (Tapping) #87: M1.6 X 5.3 #88: M1.6 X 5.9 (Tapping) (Black) (Silver)
- Page 211 HARDWARE LIST (6/8) #101: M2.0 X 5.0 #102: M2.6 X 8.0 #103: M2.6 X 10.0 #104: M3.0 X 8.0 (Silver) (Black) (Silver) (Black) 7-621-555-39 7-621-284-30 7-685-794-09 7-682-548-09 10.0 #105: M2.0 X 4.0 #106: M2.0 X 6.0 #107: M2.0 X 5.0 #108: M1.7 X 3.0 (Tapping) (Red) (Black)
- Page 212 HARDWARE LIST (7/8) #121: M2.0 X 4.0 (Tapping) #122: M3.0 X 6.0 #123: M4.0 X 8.0 #124: M1.7 X 2.0 (Silver) (Black) (Black) (Silver) 7-682-547-09 3-080-205-11 7-682-561-09 2-599-475-01 #125: M1.4 X 3.0 #126: M2.9 X 3.5 #127: M3.0 X 25.0 #128: M4.0 X 12.0 (Black)
- Page 213 HARDWARE LIST (8/8) #141: M2.6 X 5.0 (Tapping) #142: M1.4 X 2.0 #143: M1.4 X 2.0 #144: M1.4 X 1.2 (Silver) (Silver) (Black) (Silver) 4-111-392-01 4-111-392-11 4-111-392-21 7-685-791-01 #145: M1.4 X 2.4 #146: M1.4 X 2.4 #148: M1.7 X 3.0 #147: M1.4 X 3.5 (Silver) (Black)
- Page 214 • Correction of Schematic Diagrams • Correction of Printed Wiring Boards • Correction of Repair Parts S.M. correction:Page 2-3, Page 2-4, Page 2-5, Page 2-6, Page 2-7, Page 2-8, Page 2-9, Page 4-13, Page 4-15, Page 4-32, Page 4-47, Page 5-20 HXR-MC1/MC1P...