Advertisement
Quick Links
Advertisement

Related Manuals for Acer Smart Touch Kit II


Summary of Contents for Acer Smart Touch Kit II
- Page 1 Smart Touch KitⅡ INTPJ-STK2-UST/INTPJ-STK2 User’s Guide...
- Page 2 Information for Your Safety and Comfort Read these instructions carefully. Keep this document for future reference. Follow all warnings and instructions marked on the product. Caution for plugs when disconnecting devices Observe the following guidelines when connecting and disconnecting power to the external power supply unit: •...
-
Page 3: Table Of Contents
Contents Introduction and Features ............1 Hardware Installation ............... 4 System Adjustment..............8 Calibration Software .............. 12 Gesture recognition introduction ........... 21 Educational Software ............22 Troubleshooting Guide ............28... - Page 4 Introduction Product Profile Smart Touch KitⅡ is the first product in the world that supports finger touch and is easy to carry around. It makes any projection screens or LCD screens touchable with fingers. Features • Support finger touch: Use fingers instead of pens to write or control. •...
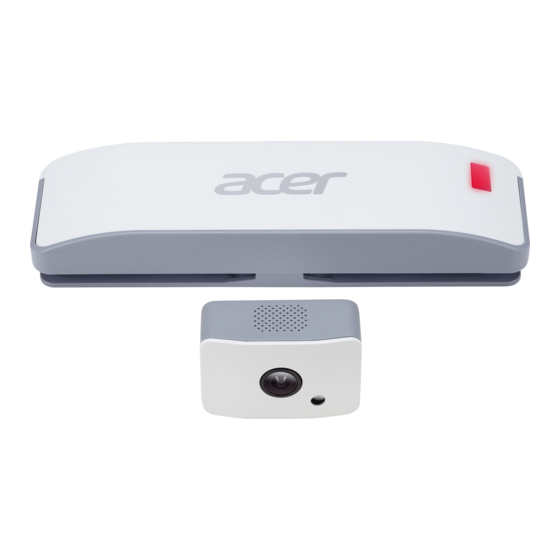
- Page 5 Package Overview Make sure your box contains everything listed below. If any of the pieces is missing, please notify your dealer. Camera Emitter Mount Mount (Optional) (Optional) Magnets Security card User's guide Security card (Optional) (CD-ROM) (Optional) Screws USB cables Pointer Adapter (6m and 12m)
- Page 6 Signal Refresh Rate 120fps Weight for package OS Requirement Win7, Win8, Win8.1, Win10 Software Calibration software and GLBoard (Application Software) The compatible Acer INTPJ-STK2-UST: 0.21 for Acer UL and U5 series projector INTPJ-STK2: 0.28 for Acer S1 series and other models...
-
Page 7: Hardware Installation
Hardware Installation Install the camera module: 1st installation method (Bracket 1): Install the camera on the top of projector by using the mounting component; fix the camera firmly to prevent it from moving wobbly. Adjust the angle of the camera to ensure that it can be detected by the emitter (as shown in the pic below). - Page 8 At last, fix the supporting bracket to the projector with matched small screws (shown as the following images): Note: Bracket 1 and bracket 2 are optional. Please refer to actual packaging accessories. Install the emitter module: Install the module approximately 3cm above the projection surface and make it aligned with the center of the image.
- Page 9 Device connection: Connect the camera module to your computer (USB port) using the 12m USB cable. Connect the emitter module to power using the 6m USB cable and the 3.3V / 2A power adapter. The wireless infrared connection is used to connect the camera module and the emitter module.
- Page 10 2. Choose the installation path to continue. 3. Be patient and wait for the installation to finish in several minutes. 4. When the installation is complete, an IWB icon will be added to the desktop. Uninstall the Software 1. Open “Control Panel” 2.
-
Page 11: System Adjustment
System Adjustment Adjust the camera module: Open the IWB calibration software, click “Installation and Debugging“ and choose “Tuning Webcam Image Mode”, the captured image by the camera module will be shown in the software interface. As shown in the pic below: The captured projection image by the camera module should be completely included in the red guide frame interface. - Page 12 Adjust the emitter module: Open the emitter module’s top cover; there are two gears (Gear A, Gear B) and the red light power button. Press the red light power button, a horizontal beam of red light will indicate whether the laser beam is parallel. Gear A: used to adjust the vertical direction of the beam of red light (which is in the same direction of the laser beam).
- Page 13 Adjustment steps: 1. Put the two magnets at the middle bottom side of the projection image, and the distance between them is 50cm. As shown in the pic below: 2. Turn on the red light power button, make the horizontal beam of red light reflect onto the magnets and you can see the clear red line between them by adjusting Gear A and Gear B.
- Page 14 Qualified Unqualified 3. Adjust Gear A to make the red light beam nearly meet the point where the magnets stand (the interval distance is better within 1mm). When you use your finger to touch the whiteboard, you can see the visible reflected red point. As shown in the pic below: 4.
-
Page 15: Calibration Software
Calibration Software Menu Display Double click the IWB icon to open calibration software Operation Run: Run the calibration program to start the camera image. Stop: Close the camera image, then no more touch functions. Parameter Setting: Software parameters setting. Auto Mask Clutter: Auto shields the interference point from the outside environment. - Page 16 Manual Mask Area: After the auto mask clutter, if there is still some interfering light spot, manually shield the interference light spot by adding mask area. Manual Calibration: After auto mask clutter, do manual calibration. It will realize the touch function after successful calibration. Auto Calibration: The software realizes auto calibration;...
- Page 17 Normal Use Setting Set the Proportion of the spot (20%-80%): refers to the sensitivity of mouse reaction to lightspot sizes, the larger the value is, the worse the sensitivity becomes. The Brightness coefficient (0-255): refers to the sensitivity of camera to light in normal mode.
- Page 18 Gesture settings: Start All Windows Gesture: refers to the switcher of Windows Gesture. Palm in multiples of spot (3~7): refers to the sensitivity of palm gesture. The lower the value is, the better the sensitivity is. Start All GLBoard Gesture: refers to the switcher of GLBoard gesture. Eraser in multiples of spot (3~7): refers to the sensitivity of palm eraser gesture.
- Page 19 More Windows Gestures: General Process: In General Process, you can see all the gesture recognitions based on palm and finger. The user can start and close any gesture recognition based on their requirements. Exceptional Process: In Exceptional Process, you can add exceptions. Click "Add exception"...
- Page 20 Manual Calibration 1. Before starting manual calibration, please click “Auto Mask Clutter”. The masked area will be displayed on the software interface. 2. Touch the four corners of the projection screen with your finger or the IR Pen. There will be four light spots, each with a size of over 3x3 pixels. 3.
- Page 21 5. Once calibration completes successfully, the calibration software will minimize onto the system tray . If the Manual Calibration has failed, please refer to Troubleshooting Guide. Auto calibration 1. Click “Auto-Calibration” on the operation menu. The image being projected will switch to the automatic calibration screen. 2.
- Page 22 Lightspot sampling After the auto calibration or manual calibration, click lightspot sampling, and the projection image will change to lightspot sampling interface. Use finger or IR pen to touch the red square, and continue the next one when the red square changes to green.
- Page 23 Tuning Webcam Image Mode: The projection image captured by camera will be shown in the software interface. Adjust the projection image inside the red frame according to the camera debugging requirement. Tuning Laser Transmitter Image Mode: In this mode, emitter emits a set of invisible laser film 4mm above the whiteboard, and the beam should be parallel with the whiteboard.
-
Page 24: Gesture Recognition Introduction
Gesture recognition introduction Gesture recognition in Windows Gesture recognition in educational software GLBoard... -
Page 25: Educational Software
GL-board educational software introduction Toolbar Introduction When you use GLBoard for the first time, double click GLBoard. To start the program, the interface includes three areas, shown as the following: Work area: picture or text editing Toolbar Function of each button on the toolbar Icon Name Function... - Page 26 Back Go back to the previous page. Forward Forward to the next page. Write like a ball pen. Brush Write like a Chinese brush pen. Smart pen Convert drawings to geometric shapes. Multi-writing Support ten persons writing mode simultaneously. Insert shape Several shapes can be chosen, such as triangle, square, and circle.
- Page 27 Redo Redo the operation, just cancel by undoing. Move Move the edit screen. Windows Go back to the desktop. When you click to go back to the desktop, GLBoard will appear as a floating toolbar. Icon Name Function Windows Back to the desktop. Write like a ball pen.
- Page 28 Back Go back to the main page of GLBoard. Note page Make the window screen as the background. Preview Note Go back to the previous note page. page Close Close GLBoard. Width Set stroke width. Start Menu List Menu Submenu Function Description Create a blank file.
- Page 29 Print Preview After print settings for the document are set, the user can preview the print result of the document. Print Any words, images, or visible data in GLBoard, could be output on media like paper through the printer. Screenshot Go back to Windows interface, select the area which you want to capture, and then click OK.
- Page 30 Mask Similar to a movie screen for the teacher to explain examples. Questions and answers are displayed separately. Magnifying glass Magnify the important part to facilitate teaching. Spotlight Spotlight can highlight a circular area, high brightness display, and other regions of translucent display. Keyboard Same Windows...
-
Page 31: Troubleshooting Guide
Troubleshooting Guide Hand touch operation is not working properly When opening the software, if you encounter the following error message “Not a valid USB Key for hand touch whiteboard”, please do as follows: Open “Device Management” and click the “Image Device” option. Check for a hardware device named “USB2.0 PC Camera”. - Page 32 Auto-Calibration process failure Select “Adjusting Webcam Image Mode” from the “Installation and adjusting” menu. Check whether the webcam image is being displayed well or there are symptoms like dazzling screen, white screen, black screen and flickering screen. Shift “Adjusting Webcam Image Mode” to “Tuning Laser Transmitter Image Mode”...