Table of Contents
Advertisement
Available languages
Available languages
BM 2609140358 12-05
IMPORTANT:
Read Before Using
22612
22614
22618
23609
23612
23614
23618
Call Toll Free for
Consumer Information
& Service Locations
1-877-BOSCH99 (1-877-267-2499) www.boschtools.com
For English Version
See page 2
12/6/05
3:28 PM
IMPORTANT :
Lire avant usage
Operating/Safety Instructions
Consignes de fonctionnement/sécurité
Instrucciones de funcionamiento y seguridad
Pour obtenir des informations
et les adresses de nos centres
de service après-vente,
appelez ce numéro gratuit
Version française
Voir page 19
Page 1
Leer antes de usar
ubicaciones de servicio
IMPORTANTE:
Llame gratis para
obtener información
para el consumidor y
Versión en español
Ver la página 36
Advertisement
Chapters
Table of Contents

Related Manuals for Bosch 22612


Summary of Contents for Bosch 22612
- Page 1 BM 2609140358 12-05 12/6/05 IMPORTANT: Read Before Using Operating/Safety Instructions Consignes de fonctionnement/sécurité Instrucciones de funcionamiento y seguridad 22612 22614 22618 23609 23612 23614 23618 Call Toll Free for Consumer Information & Service Locations 1-877-BOSCH99 (1-877-267-2499) www.boschtools.com For English Version...
-
Page 2: General Safety Rules
BM 2609140358 12-05 12/6/05 Read all instructions. Failure to follow all instructions listed below may WARNING result in electric shock, fire and/or serious injury. The term “power tool” in all of the warnings listed below refers to your mains-operated (corded) power tool or battery-operated (cordless) power tool. - Page 3 BM 2609140358 12-05 12/6/05 Keep handles dry, clean and free from oil and grease. Slippery hands cannot safely control the power tool. Power tool use and care Do not force the power tool. Use the correct power tool for your application. The correct power tool will do the job better and safer at the rate for which it was designed.
- Page 4 BM 2609140358 12-05 12/6/05 Safety Rules for Cordless Impact Drivers Hold tools by insulated gripping surfaces when performing an operation where the cutting tool may contact hidden wiring. Contact with a "live" wire will make exposed metal parts of the tool "live" and shock the operator.
- Page 5 BM 2609140358 12-05 12/6/05 Before using battery charger, read all instructions and cautionary markings on (1) battery charger, (2) battery pack, and (3) product using battery. Use only the charger which accompanied your product or direct replacement as listed in the catalog or this manual. Do not substitute any other charger.
- Page 6 BM 2609140358 12-05 12/6/05 Do not attempt to disas- WARNING semble the battery or remove any component projecting from the battery terminals. Fire or injury may result. Prior to disposal, protect exposed terminals with heavy insulating tape to prevent shorting. NICKEL-CADMIUM BATTERIES If equipped with a nickel-cadmium battery, the battery must be collected, recycled or...
- Page 7 BM 2609140358 12-05 IMPORTANT: Some of the following symbols may be used on your tool. Please study them and learn their meaning. Proper interpretation of these symbols will allow you to operate the tool better and safer. Symbol Name Volts Amperes Hertz Watt...
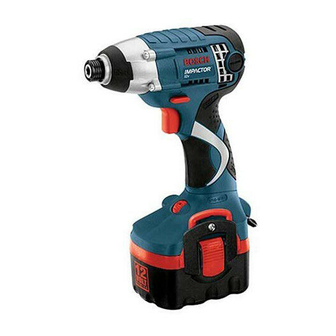
- Page 8 Such preventive safety measures reduce the risk of starting the tool accidentally. Cordless Impact Drivers and Impact Wrenches 1/2" SQUARE DRIVE (Models 22612, LOCKING 22614 & 22618 only) VARIABLE SPEED TRIGGER SWITCH...
- Page 9 BM 2609140358 12-05 12/6/05 Model number 23609 Voltage rating 9.6 V No load speed 0-2,800/min Impact rate 0-3,200 Maximum torque 950 in-lbs Maximum Capacities Chuck size 1/4" Hex-shank with power groove Screw sizes #12 x 3" Mild metal 1/4" Hard wood 3/4"...
-
Page 10: Operating Instructions
Do not attempt to insert quick-change type drill bits into this chuck. INSERTING AND REMOVING ACCESSORIES (Models 22612, 22614 & 22618 only) Attach only high quality accessories with the proper size square drive designed for use with impact wrenches. Your impact wrench is equipped with a 1/2"... - Page 11 BM 2609140358 12-05 12/6/05 The optional belt clip accessory will allow you to conveniently attach your tool to your belt. This feature will allow you to have both hands free when climbing a ladder or moving to another work area. The belt clip can be attached to either side of the tool by securing it with a mounting screw.
- Page 12 BM 2609140358 12-05 12/6/05 INSERTING AND RELEASING BATTERY PACK Release battery pack from tool by pressing on both sides of the battery release tabs and pull downward. Before inserting battery pack, 1. The battery pack accepts only about 80% of its maximum capacity with its first few charge cycles.
-
Page 13: Fig. 10
BM 2609140358 12-05 12/6/05 CHARGING BATTERY PACK (30 MINUTE SINGLE BAY-BC130) CHARGER INDICATORS, SYMBOLS AND MEANING If the indicator lights are “OFF”, the charger is not receiving power from power supply outlet. If the green indicator light is “ON”, the charger is plugged in but the battery pack is not inserted, or the battery pack is fully charged and is being trickle charged. - Page 14 BM 2609140358 12-05 12/6/05 CHARGING BATTERY PACK (30 MINUTE DUAL BAY-BC230) CHARGER INDICATORS, SYMBOLS AND MEANING If the indicator lights are “OFF”, the charger is not receiving power from power supply outlet. If the red indicator light is “ON”, the battery pack is too hot or cold for fast-charging.
- Page 15 BM 2609140358 12-05 12/6/05 CHARGER INDICATORS, SYMBOLS AND MEANING If the indicator lights are “OFF”, the charger is not receiving power from power supply outlet. If the green indicator light is “ON”, the charger is plugged in but the battery pack is not inserted, or the battery pack is fully charged and is being trickle charged, or the battery pack is too hot or cold for fast-charging.
-
Page 16: Fig. 13
BM 2609140358 12-05 12/6/05 You will extend the life of your bits and do neater work if you always put the bit in contact with the work before pulling the trigger. During the operation, hold the tool firmly and exert light, steady pressure. Too much pressure at low speed will stall the tool. -
Page 17: Fig. 14
BM 2609140358 12-05 12/6/05 clearance hole in the first piece allows the screw head to pull the pieces tightly together. RUNNING NUTS AND BOLTS Variable speed control must be used with caution for driving nuts and bolts with socket Service NO USER SERVICEABLE WARNING PARTS INSIDE. - Page 18 BM 2609140358 12-05 12/6/05 Cleaning To avoid accidents, always WARNING disconnect the tool and/or charger from the power supply before cleaning. The tool may be cleaned most effectively with compressed dry air. Always wear safety goggles when cleaning tools with compressed air. If an extension cord is WARNING necessary, a cord with...
- Page 19 BM 2609140358 12-05 12/6/05 Consignes générales de sécurité Veuillez lire et comprendre toutes les consignes. Si on n'observe pas toutes les AVERTISSEMENT consignes décrites ci-dessous, il y a risque de choc électrique, d’incendie et/ou de blessures corporelles graves. Dans toutes les mises en garde ci-dessous, le terme « outil électroportatif » se rapporte à...
- Page 20 BM 2609140358 12-05 12/6/05 Maintenez les poignées sèches et exemptes d’huile et de graisse. On ne pas maîtriser un outil électroportatif en toute sécurité quand on a les mains glissantes. Utilisation et entretien des outils électroportatifs Ne forcez pas sur l’outil électroportatif. Utilisez l’outil électroportatif qui convient à...
- Page 21 BM 2609140358 12-05 12/6/05 Consignes de sécurité pour les visseuses à percussion sans fil Tenez l'outil par les surfaces isolées de préhension en effectuant une opération où l'outil de coupe peut venir en contact avec des fils cachés. Le contact avec un fil sous tension rendra également les pièces métalliques exposées de l'outil sous tension et causera des secousses électriques à...
- Page 22 BM 2609140358 12-05 12/6/05 Avant d'utiliser le chargeur de pile, lisez toutes les consignes et tous les marquages d'avertissement sur (1) le chargeur de pile, (2) le bloc-piles et (3) le produit utilisant la pile. N'utilisez que le chargeur qui accompagnait votre produit ou remplacement direct, comme indiqué...
- Page 23 BM 2609140358 12-05 12/6/05 AVERTISSEMENT désassembler le bloc-piles ou d’enlever tout composant faisant saillie des bornes de piles, ce qui peut provoquer un incendie ou des blessures. Avant la mise au rebut, protégez les bornes exposées à l’aide d’un ruban isolant épais pour prévenir le court-circuitage.
- Page 24 BM 2609140358 12-05 IMPORTANT : Certains des symboles suivants peuvent être utilisés sur votre outil. Veuillez les étudier et apprendre leur signification. Une interprétation appropriée de ces symboles vous permettra d'utiliser l'outil de façon plus efficace et plus sûre. Symbole Volts Ampères Hertz...
-
Page 25: Fig. 1
Ces mesures de sécurité préventives réduisent le risque d'une mise en marche accidentelle de l'outil. Visseuses à percussion et clés à chocs sans fil CARRE D’ENTRAÎNEMENT BAGUE DE DE 1/2 PO VERROUILLAGE (modèles 22612, 22614 et 22618 seulement) GÂCHETTE DE COMMANDE A VITESSE VARIABLE SYSTÈME D'ECLAIRAGE PIVOTANT BLOC-PILES Numéro de modèle... - Page 26 BM 2609140358 12-05 12/6/05 Numéro de modèle 23609 Tension nominale 9,6 V Régime à vide 0-2 800/min Taux de percussion 0-3 200 Couple maximum 950 po-li Capacités maximales Dimension de mandrin Queue hexagonale de 1/4 po avec gorge de blocage Tailles de vis #12 x 76 mm Métal doux...
- Page 27 à changement rapide dans ce mandrin. INSERTION ET RETRAIT DES ACCESSOIRES (modèles 22612, 22614 et 22618 N’utilisez que des accessoires de haute qualité avec un carré d’entraînement de taille exacte conçu pour utilisation avec les clés à chocs.
-
Page 28: Table Of Contents
BM 2609140358 12-05 12/6/05 L'accessoire en option d'attache à la ceinture est un moyen pratique d'attacher votre outil à la ceinture. Ce dispositif vous permet d'avoir les deux mains libres pour monter sur une échelle ou changer de lieu de travail. - Page 29 BM 2609140358 12-05 12/6/05 INSERTION ET RETRAIT DU BLOC-PILES Enlevez le bloc-piles de l’outil en pinçant les deux côtés à la hauteur des touches de déverrouillage et en le tirant vers le bas. Avant d’introduire le bloc-piles, REMARQUES IMPORTANTES CONCERNANT LA CHARGE 1.
-
Page 30: Fig. 10
BM 2609140358 12-05 12/6/05 CHARGEMENT DU BLOC-PILES (30 MN, UNE BAIE – BC130) TEMOINS DE CHARGE, SYMBOLES ET SIGNIFICATION Si le témoin lumineux vert est éteint, ceci signifie que le chargeur ne reçoit pas de courant de la prise de courant. - Page 31 BM 2609140358 12-05 12/6/05 CHARGEMENT DU BLOC-PILES (30 MN, DEUX BAIES – BC230) TEMOINS DE CHARGE, SYMBOLES ET SIGNIFICATION Si le témoin lumineux vert est éteint, ceci signifie que le chargeur ne reçoit pas de courant de la prise de courant.
-
Page 32: Fig. 12
BM 2609140358 12-05 12/6/05 CHARGE DU BLOC-PILES (CHARGEUR DE 1 HEURE) TEMOINS DE CHARGE, SYMBOLES ET SIGNIFICATION Si le témoin lumineux vert est éteint, ceci signifie que le chargeur ne reçoit pas de courant de la prise de courant. Si le voyant vert s’allume, le chargeur est branché... -
Page 33: Fig. 13
BM 2609140358 12-05 12/6/05 Vous prolongerez la durée de vos embouts et accomplirez un travail plus net si vous mettez toujours le embout en contact avec le matériau avant d’appuyer sur la gâchette. Durant le fonctionnement, tenez l’outil fermement et exercez une pression légère et constante. Une trop grande pression à... -
Page 34: Fig. 14
BM 2609140358 12-05 12/6/05 POSE DES ÉCROUS ET DES BOULONS La commande à vitesse variable doit être utilisée soigneusement pour poser des écrous et des boulons avec des accessoires de douille. La technique consiste à commencer lentement, puis à augmenter la vitesse à Service AVERTISSEMENT L’INTÉRIEUR... - Page 35 BM 2609140358 12-05 12/6/05 Nettoyage Pour éviter les accidents, AVERTISSEMENT débranchez toujours l’outil et/ou le chargeur de la source de courant avant de nettoyer. La façon la plus efficace de nettoyer l’outil est à l’aide d’air sec comprimé. Portez toujours des lunettes de sécurité...
-
Page 36: Normas Generales De Seguridad
BM 2609140358 12-05 12/6/05 Lea todas las instrucciones. Si no se siguen todas las instrucciones que aparecen a ADVERTENCIA continuación, el resultado podría ser sacudidas eléctricas, incendio y/o lesiones graves. La expresión "herramienta mecánica" en todas las advertencias que aparecen a continuación se refiere a su herramienta mecánica alimentada por la red eléctrica (herramienta alámbrica) o su herramienta mecánica alimentada por baterías (herramienta inalámbrica). - Page 37 BM 2609140358 12-05 12/6/05 Si se proporcionan dispositivos para la conexión de instalaciones de extracción y recolección de polvo, asegúrese de que dichas instalaciones estén conectadas y se usen correctamente. El uso de estos dispositivos puede reducir los peligros relacionados con el polvo.
- Page 38 BM 2609140358 12-05 12/6/05 Normas de seguridad para atornilladores de percusión inalámbricos Sujete la herramienta por las superficies de agarre aisladas cuando realice una operación en la que la herramienta de corte pueda entrar en contacto con cables ocultos. El contacto con un cable que tenga corriente hará...
- Page 39 BM 2609140358 12-05 12/6/05 Antes de utilizar el cargador de baterías, lea todas las instrucciones e indicaciones de precaución que se encuentran en (1) el cargador de baterías, (2) el paquete de baterías y (3) el producto que utiliza baterías. Utilice solamente el cargador que acompañaba al el producto o un reemplazo directo según se indica en el catálogo o en este manual.
- Page 40 BM 2609140358 12-05 12/6/05 No intente desarmar la batería ADVERTENCIA ni quitar ninguno de los com- ponentes que sobresalen de las terminales de la batería. Se pueden producir lesiones o un incendio. Antes de tirarla, proteja las terminales que están al descubierto con cinta adhesiva aislante gruesa para prevenir cortocircuitos.
- Page 41 BM 2609140358 12-05 IMPORTANTE: Es posible que algunos de los símbolos siguientes se usen en su herramienta. Por favor, estúdielos y aprenda su significado. La interpretación adecuada de estos símbolos le permitirá utilizar la herramienta mejor y con más seguridad. Símbolo Nombre Volt...
-
Page 42: Fig. 1
Dichas medidas preventivas de seguridad reducen el riesgo de arrancar la herramienta accidentalmente. Atornilladores de percusión y aprietatuercas de percusión inalámbricos ACCIONADOR MANGUITO DE CUADRADO DE 1/2" (modelos 22612, 22614 y 22618 solamente) INTERRUPTOR GATILLO DE VELOCIDAD VARIABLE SISTEMA DE ILUMINACIÓN BASCULANTE PAQUETE DE BATERÍAS... - Page 43 BM 2609140358 12-05 12/6/05 Número de modelo 23609 Tensión nominal 9,6 V Velocidad sin carga 0-2,800/min Frecuencia de impactos 0-3,200 Par motor máximo 950 pulgadas-lb Capacidades máximas Tamaño de mandril Cuerpo hexagonal de 1/4" con ranura de fijación Tamaños de tornillo #12 x 76 mm Metal suave 6 mm...
- Page 44 No intente introducir brocas taladradoras de tipo de cambio rápido en este mandril. INSERCIÓN Y REMOCIÓN DE ACCESORIOS (modelos 22612, 22614 y 22618 solamente) Instale únicamente accesorios de alta calidad con el accionador cuadrado de tamaño apropiado que esté diseñado para utilizarse con aprietatuercas de percusión.
- Page 45 BM 2609140358 12-05 12/6/05 El clip de cinturón se puede sujetar a cualquiera de los dos lados de la herramienta fijándolo con un tornillo de montaje. Asegúrese siempre de apretar firmemente el tornillo de montaje antes de usar la herramienta. Para abrir el clip, apriete ambos botones de liberación y el clip subirá...
- Page 46 BM 2609140358 12-05 12/6/05 INTRODUCCIÓN Y SUELTA DEL PAQUETE DE BATERÍAS Saque el paquete de baterías de la herramienta presionando sobre ambos lados de las lengüetas de liberación de las baterías y tire hacia abajo. Antes de 1. El paquete de baterías acepta únicamente alrededor del 80 por ciento de su capacidad máxima en los primeros ciclos de carga.
-
Page 47: Fig. 10
BM 2609140358 12-05 12/6/05 CARGA DEL PAQUETE DE BATERÍAS (CON BAHIA UNICA DE 30 MINUTOS BC130) INDICADORES Y SIMBOLOS DEL CARGADOR Y SU SIGNIFICADO Si la luz indicadora verde está apagada, el cargador no está recibiendo energía del tomacorriente de alimentación. - Page 48 BM 2609140358 12-05 12/6/05 CARGA DEL PAQUETE DE BATERÍAS (CON DOS BAHIAS DE 30 MINUTOS BC230) INDICADORES Y SIMBOLOS DEL CARGADOR Y SU SIGNIFICADO Si la luz indicadora verde está apagada, el cargador no está recibiendo energía del tomacorriente de alimentación.
-
Page 49: Fig. 12
BM 2609140358 12-05 12/6/05 CARGA DEL PAQUETE DE BATERÍAS (CARGADOR DE 1 HORA) INDICADORES Y SIMBOLOS DEL CARGADOR Y SU SIGNIFICADO Si la luz indicadora verde está apagada, el cargador no está recibiendo energía del tomacorriente de alimentación. Si la luz indicadora verde está “EN- CENDIDA”, el cargador está... -
Page 50: Fig. 13
BM 2609140358 12-05 12/6/05 Usted prolongará la vida de las brocas y realizará un trabajo mejor ejecutado si siempre pone la broca en contacto con la pieza de trabajo antes de apretar el gatillo. Durante el funcionamiento, sujete firmemente la herramienta y ejerza una presión ligera y uniforme. -
Page 51: Fig. 14
BM 2609140358 12-05 12/6/05 El accesorio de broca de tornillo ajustable realizará todas estas operaciones rápida y fácilmente. Hay brocas de tornillo disponibles para tamaños de tornillo No. 6, 8, 10 y 12. APRIETE DE TUERCAS Y PERNOS El control de velocidad variable se debe utilizar con pre- caución para apretar tuercas y pernos con accesorios del juego de tubos. - Page 52 BM 2609140358 12-05 12/6/05 Limpieza Para evitar ADVERTENCIA desconecte herramienta y/o el cargador de la fuente de energía antes de la limpieza. La herramienta se puede limpiar más eficazmente con aire comprimido seco. Use gafas de seguridad siempre que limpie herramientas con aire comprimido.
- Page 53 BM 2609140358 12-05 12/6/05 3:28 PM Page 53 Notes: -53-...
- Page 54 BM 2609140358 12-05 12/6/05 3:28 PM Page 54 Remarques : -54-...
- Page 55 BM 2609140358 12-05 12/6/05 3:28 PM Page 55 Notas: -55-...
- Page 56 BM 2609140358 12-05 12/6/05 LIMITED WARRANTY OF BOSCH PORTABLE AND BENCHTOP POWER TOOLS Robert Bosch Tool Corporation (“Seller”) warrants to the original purchaser only, that all BOSCH portable and benchtop power tools will be free from defects in material or workmanship for a period of one year from date of purchase. SELLER’S SOLE OBLIGATION AND YOUR EXCLUSIVE REMEDY under this Limited Warranty and, to the extent permitted by law, any warranty or condition implied by law, shall be the repair or replacement of parts, without charge, which are defective in material or workmanship and which have not been misused, carelessly handled, or misrepaired by persons other than Seller or Authorized Service Station.