Miele F 2671 Vi Operating And Installation Instructions
Hide thumbs
Also See for F 2671 Vi:
- Operating and installation instructions (128 pages) ,
- Operating and installation instructions (124 pages)
Table of Contents

Related Manuals for Miele F 2671 Vi


Summary of Contents for Miele F 2671 Vi
- Page 1 Operating and installation instructions Freezer To prevent the risk of accidents or damage to the appliance, it is essential to read these instructions before it is installed and used for the first time. en- AU, NZ M.-Nr. 10 942 050...
-
Page 2: Table Of Contents
Contents Warning and Safety instructions..............Caring for the environment ................15 Installation......................16 Location....................... 16 Installation notes ....................17 Adjoining cabinets/units ................. 17 Load-bearing capacity of the niche floor ............18 Ventilation ....................... 18 Side-by-side units ..................18 Specifications for the mains water connection ........... 20 Installation dimensions.................. - Page 3 Carrying out a Self test ................... 73 Switching on the Door assistant ..............74 Switching off the Door assistant ..............76 Miele@home ......................76 Switching off Demo mode ................80 Resetting the settings to their factory default settings ........81 Selecting settings for lighting the Ice/Water dispenser ........83 Switching Sabbath mode on or off ..............
- Page 4 Contents Operating the Ice/Water dispenser..............98 Switching the Dispenser unit on..............99 Dispensing chilled water ................100 Dispensing ice cubes and crushed ice ............100 Switching the Dispenser unit off..............101 Switching the system lock on/off ................ 101 Automatic defrosting ..................102 Cleaning and care .....................
-
Page 5: Warning And Safety Instructions
“Installation”, as well as in the “Warning and Safety instructions”. Miele cannot be held liable for injury or damage caused by non- compliance with these instructions. Keep these instructions in a safe place and pass them on to any future owner. - Page 6 The appliance is also not suitable for use in areas where there is a risk of explosion. Miele cannot be held liable for damage resulting from incorrect or improper use or operation of the appliance. ...
- Page 7 Warning and Safety instructions Safety with children Young children must not be allowed to use this appliance. Older children may only use the appliance when its operation has been clearly explained to them and they are able to use it safely, recognising the dangers of misuse.
- Page 8 – ventilate the room where the appliance is located for several minutes, and – call Miele. The more coolant there is in a refrigeration appliance, the larger the room should be in which it is installed. In the event of a leakage, if the appliance is in a small room, there is a danger of combustible gases building up.
- Page 9 If the electrical connection cable supplied is damaged, it must only be replaced by an original spare part to prevent a hazard for the user. Miele can only guarantee the safety of the appliance when original Miele spare parts are used.
- Page 10 The manufacturer can only guarantee the safety of the appliance when Miele replacement parts are used. Miele cannot be held liable for damage caused by a faulty water connection. The ice cube maker must only be connected to a cold water supply.
- Page 11 Warning and Safety instructions Correct use The appliance is designed for use within a certain climate range (ambient temperatures) and should not be used outside this range. The climate range for your appliance is stated on the data plate inside the appliance.
- Page 12 Follow the instructions given on the food manufacturer's packaging regarding storage conditions and use-by dates. Use only genuine original Miele spare parts. If spare parts or accessories from other manufacturers are used, the warranty will be invalidated, and Miele cannot accept liability.
- Page 13 Warning and Safety instructions Cleaning and care Do not use any oils or grease on the door seals, as these will cause the seals to deteriorate and become porous with time. Do not use a steam cleaning appliance to clean this appliance. Steam could reach the electrical components and cause a short circuit.
- Page 14 Warning and Safety instructions Transport To avoid damage to the appliance, always transport it upright and in its packaging. Risk of injury and damage! The appliance is very heavy and must be transported by two people. Disposal of your old appliance ...
-
Page 15: Caring For The Environment
Please dispose of it at your local community waste collection/recycling centre for electrical and electronic appliances, or contact Miele. You are also responsible for deleting any personal data that may be stored on the appliance being disposed of. Take care not to damage the pipework... -
Page 16: Installation
*INSTALLATION* Installation If installation near a heat source is Location unavoidable, observe the following This appliance should be installed in a minimum distances between the dry, well-ventilated room. appliance and the heat source: When deciding where to install your – at least 3 cm refrigerator, please bear in mind that it to electric or gas stoves will use more energy if installed near a... -
Page 17: Installation Notes
*INSTALLATION* Installation Installation notes Risk of damage due to high humidity. Danger of damage and injury In environments with high humidity, due to the appliance tipping over! condensation can build up on This refrigeration appliance is very external appliance panels, which can heavy and can tip forwards when the cause corrosion. -
Page 18: Load-Bearing Capacity Of The Niche Floor
When fully loaded, the approx. weight ventilation gaps. The ventilation gaps of the appliance is: must not be covered or blocked in any way. F 2671 Vi 348 kg Side-by-side units This appliance can be installed side by side with another refrigeration appliance. - Page 19 *INSTALLATION* Installation . . . with partition wall When planning installation niches, please note that the niche into which The wall a between the side-by-side the refrigeration appliance with the refrigeration appliances must be at side panel heater is installed must be least 16 mm thick.
-
Page 20: Specifications For The Mains Water Connection
*INSTALLATION* Installation . . . without partition wall Specifications for the mains water connection – Connection to the water supply must comply with the applicable regulations in the country where the appliance is being installed. All units and systems used to supply water to the refrigeration appliance must also comply with the applicable regulations in the respective country. -
Page 21: Installation Dimensions
*INSTALLATION* Installation Installation dimensions F 2671 Vi 2134 – 2164 mm 610 mm 610 mm + Furniture front (19 – 38 mm) - Page 22 *INSTALLATION* Installation 30 mm ≥ 262 mm 22 mm ≥ 102 mm ≥ 85 mm 102 mm Side view...
-
Page 23: Dimensions With The Appliance Door Open (Opening Angle 115°)
*INSTALLATION* Installation Dimensions with the appliance door open (opening angle 115°) F 2671 Vi 90° 677 mm Furniture front Handle 296 mm (max. 38 mm) * The dimensions of the furniture front and the door handle vary depending on the design of the kitchen. The opening angle of the appliance door must not be limited to 90°... -
Page 24: Dimensions Of The Furniture Front
*INSTALLATION* Installation Dimensions of the furniture front F 2671 Vi 604 mm 302 mm 830,5 mm 230 mm 2029 mm 368 mm ≥ 102−132 mm... -
Page 25: Installing The Appliance
*INSTALLATION* Installation Tools required Installing the appliance – Cordless drill Before you start – TX 20 screwdriver It is essential to read these operating – Hammer drill and installation instructions carefully before starting to install the – Drill bits in various sizes, depending appliance. -
Page 26: Weight Of Furniture Front
*INSTALLATION* Installation Weight of furniture front Aligning the installation niche Before fitting a furniture front, ensure that its weight does not exceed the maximum permitted weight. Appliance Max. weight of furniture front F 2671 Vi 68 kg Risk of damage due to a furniture front that is too heavy. -
Page 27: Checking The Installation Niche
*INSTALLATION* Installation Checking the installation niche Check the surroundings for possible collisions (see “Installation - Check the installation dimensions Dimensions with the appliance door (see “Installation - Installation open (opening angle 115°)”). dimensions”). Install the appliance in a stable, solid ... -
Page 28: Before Installation
*INSTALLATION* Installation Before installation Before installation, remove any accessories from the back of the appliance. Check the appliance for transport damage. Do not install a damaged appliance. Check that all parts at the back of the appliance are unhindered. ... -
Page 29: Preparing The Installation Niche
*INSTALLATION* Installation With the help of several people as Preparing the installation niche required, carefully lift the appliance Danger of damage and injury from the pallet, starting with the back due to the appliance tipping over! of the appliance. This refrigeration appliance is very ... - Page 30 *INSTALLATION* Installation The anti-tip brackets prevent the Risk of injury and damage due to refrigeration appliance from tipping. the refrigeration appliance tipping over. The anti-tip brackets are also used to fix the housing unit securely to the If the anti-tip brackets are fixed too surrounding walls.
- Page 31 *INSTALLATION* Installation The accessory pack supplied contains fastening screws for various applications/materials: Securing with a wooden wedge Secure the housing unit to the wall behind it and/or above it as required using the anti-tip brackets . Connect the refrigeration appliance to the mains water supply (see "Installation - Water connection").
-
Page 32: Pushing The Appliance Into The Niche
*INSTALLATION* Installation Pushing the appliance into the niche Push the appliance into the niche, taking care not to damage the electrical and mains water connections. If you are installing several refrigeration appliances side by side, secure the appliances to one another now (see the instructions of the side- by-side installation kit). -
Page 33: Aligning The Appliance
*INSTALLATION* Installation If the refrigeration appliance cannot Aligning the appliance be pushed into the niche (because The installation aids on the the floor is uneven, for example), appliance door provide assistance unscrew the rear feet slightly (see with the alignment of the refrigeration “Installation - Aligning the appliance”) appliance in the installation niche. - Page 34 *INSTALLATION* Installation Furniture front thickness of 38 mm The front and rear feet are height- adjustable and can all be adjusted Position the spacers supplied on from the front of the appliance. both sides at the markings next to the adjustable feet in front of the ...
- Page 35 *INSTALLATION* Installation Adjust the rear feet with a ratchet Adjust the front feet with a ratchet (attachment: 8 mm socket) or a TX 20 (attachment: 8 mm socket) or a TX 20 screwdriver . screwdriver . Useful tip: Proceed carefully when adjusting the feet, alternating between the left and right feet.
-
Page 36: Securing The Appliance In The Niche
*INSTALLATION* Installation Check the alignment of the appliance again using the installation aids and the spirit level. Securing the appliance in the niche Place a spirit level across the installation aids on the appliance door to check the appliance’s alignment. - Page 37 *INSTALLATION* Installation Open the appliance door. If it is not possible to secure the appliance at the top, it can be attached to the niche with the side mounting brackets: Screw the lugs of the mounting plate at the top and bottom to the cabinets/units adjacent to the appliance.
-
Page 38: Preparing To Install The Furniture Fronts
*INSTALLATION* Installation Preparing to install the furniture fronts Open the appliance door as far as it will go. Unscrew the angle bars from both sides of the appliance door and keep the bars and screws in a safe place – they will be required later. - Page 39 *INSTALLATION* Installation Position the mounting frame according to the markings on the furniture front. Pre-drill the holes. Screw the mounting frame to the furniture front: Remove the nuts and washers Use at least one screw for each from the threaded bolts ...
- Page 40 *INSTALLATION* Installation Remove the frame from the Ice/Water dispenser. Remove the drip tray grille and the Screw the appliance handle to the drip tray from the Ice/Water furniture front from the inside if dispenser. necessary (not for handle-free kitchens).
-
Page 41: Securing And Aligning The Furniture Front
*INSTALLATION* Installation Securing and aligning the furniture front Now insert the angle bars on both sides as far as they will go into the provided spaces in the mounting frame . Open the appliance door and hang the furniture front with its mounting frame ... - Page 42 *INSTALLATION* Installation Align the depth of the furniture front via the slots in the angle bars . Press the angle bars into the white plastic frame on both sides and screw them on loosely at first. Spare screws are provided in the plastic bag marked with the letter E.
- Page 43 *INSTALLATION* Installation Close the appliance door and check Fitting the mounting bracket the distance between the door and adjacent furniture fronts again. The mounting bracket is used to further secure the furniture front to the bottom of the appliance door. Do not fit the fixing bracket until the appliance (or side-by-side combination, if applicable) has been...
- Page 44 *INSTALLATION* Installation Tighten the screw at the bottom of the appliance door. Screw the mounting bracket securely to the furniture front. Place the cover on the mounting bracket .
-
Page 45: Securing The Covers
*INSTALLATION* Installation Securing the covers The top cover must be assembled as follows before it can be fitted: Snap the cover onto the mounting bracket so that it clicks into place. Insert the two parts of the cover into one another. - Page 46 *INSTALLATION* Installation Fitting the cover in a side-by-side combination Insert the joining peg (from the side- by-side installation kit) halfway into the guide in the cover for the left- hand appliance. Place the assembled cover into Place the second cover onto the pin the gap above the appliance so that it and press the two covers together.
- Page 47 *INSTALLATION* Installation Install the cover onto the light contact switch. Secure at least 3 clips on both sides of the appliance for the gap covers. Then attach the covers onto the clips on both sides. With a side-by-side installation, the covers are only required on the outer sides.
-
Page 48: Securing The Plinth And Base Cover
*INSTALLATION* Installation Securing the plinth and base cover If necessary, cut the plinth to the required length and height (cut along Click the base cover onto the the lower edge of the plinth where it bottom of the appliance base. touches the floor). -
Page 49: Aligning The Ice/Water Dispenser
*INSTALLATION* Installation Aligning the Ice/Water dispenser If necessary, the depth of the Ice/Water dispenser can be aligned to line up with the furniture front. Switch off at the wall and withdraw the plug from the socket, or switch off the mains circuit breaker. ... - Page 50 *INSTALLATION* Installation The protrusion from the inner to the outer frame should be 1.8 mm. Then use the 4 screws to line up the depth of the dispensing unit on both sides. Align the frame perfectly with the dispensing unit.
- Page 51 *INSTALLATION* Installation Align the frame centrally. Finally, use a spanner to tighten the Remove the frame again. nuts by turning them clockwise. Attach the adhesive strips provided to the 4 sides of the frame.
- Page 52 *INSTALLATION* Installation Remove the film from each of the Refit the rear cover to the dispensing adhesive strips. unit, slotting it into place from above. Align the frame again perfectly with the dispensing unit.
-
Page 53: Water Connection
*INSTALLATION* Installation Insert the drip tray and the drip tray Water connection grille. Information about the water supply Risk of injury and damage due to incorrect connection. Failing to connect the appliance correctly can result in personal injury and/or material damage. -
Page 54: Connecting The Appliance To The Mains Water Supply
The stainless steel hose must not be shortened, extended or replaced by another hose. The stainless steel hose must only be replaced by an original Miele spare part. A stainless steel hose The stainless steel hose of the which is suitable for use with... - Page 55 *INSTALLATION* Installation Connect the stainless steel hose to the tap. Ensure that it is screwed into position correctly and watertight. Turn on the tap slowly and check the whole water system for leaks. The appliance can now be installed in the niche (see “Installation - Installing the appliance”).
-
Page 56: Electrical Connection
*INSTALLATION* Installation The plug and the power cable must not Electrical connection touch the rear of the refrigeration All electrical work should be carried out appliance as they could be damaged by by a suitably qualified and competent vibrations from the appliance. This person in strict accordance with current could result in a short circuit. - Page 57 *INSTALLATION* Installation Connecting the appliance Insert the plug connector into the back of the appliance. Make sure that the plug connector has locked into position correctly. Insert the plug of the appliance into the socket and switch it on. The appliance is now connected to the electricity supply.
-
Page 58: Saving Energy
Saving energy Normal energy Increased energy consumption consumption Installation/ In a ventilated room. In an enclosed, unventilated Maintenance room. Protected from direct In direct sunlight. sunlight. Not situated near a heat Situated near a heat source source (radiator, oven). (radiator, oven). Where the ideal ambient Where there is a high room room temperature is approx. - Page 59 Saving energy Normal energy Increased energy consumption consumption Drawers and shelves arranged as they were when the appliance was delivered. Only open the door when Frequent opening of the necessary and for as short a door for long periods will time as possible.
-
Page 60: Guide To The Appliance
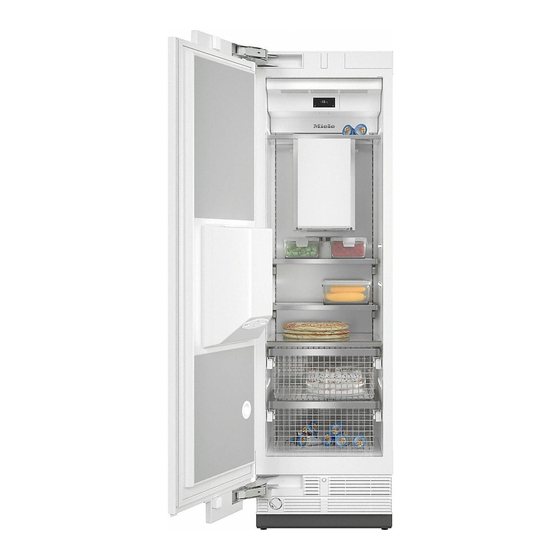
Guide to the appliance a Display b On/Off switch c Ice cube maker d Ice cube container e Interior lighting f Shelves g Ice/Water dispenser in the appliance door h Freezer baskets i Automatic door opening (Push2open/Pull2open) j Water filter k Control panel for Ice/Water dispenser l Ice/Water dispenser spout m Drip tray with drip tray grille... -
Page 61: Main Screen
(only visible when the SuperFreeze function is switched on) b Temperature display (target temperature) c sensor for setting the temperature d Display for Miele@home connection status (only visible when Miele@home has been set up) e sensor for selecting various functions in Settings mode... - Page 62 Guide to the appliance Control panel for Ice/Water dispenser a Sensor control for chilled water c Sensor control for crushed ice b Sensor control for ice cubes d System lock activation/deactivation...
-
Page 63: Settings Mode
Door assistant Push2open Pull2open ) Switch on or off (see “Selecting further settings”) Set up, deactivate, or query Wi-Fi connection Miele@home status (see “Selecting further settings”) * Demo mode Switch off * (only visible when is switched on, Demo mode... - Page 64 Guide to the appliance Reset to factory default settings Factory default settings (see “Selecting further settings”) Dispenser unit Select the lighting settings for the Ice/Water dispenser lighting (see “Selecting further settings”) Dispenser unit Switch the Ice/Water dispenser on or off (see “Operating the Ice/Water dispenser”) ...
-
Page 65: Accessories
(see “Cleaning and care - Cleaning the water filter (IntensiveClear mesh filter)”). Optional accessories A range of useful Miele accessories and care products is available for your appliance. Miele all purpose microfibre cloth Light soiling and fingerprints on... -
Page 66: Using For The First Time
Using for the first time Choosing the right Door assistant Before using for the first time (Push2open/Pull2open) Allow the refrigeration appliance to The Door assistant helps you to open stand for approx. 1 hour before the appliance door. connecting it to the power supply. This will prevent potential functional You can choose between the two Door problems with the appliance. -
Page 67: Operating The Appliance
Using for the first time Settings mode Operating the appliance In Settings mode , you can select The touch display can be scratched different functions of the appliance by pointed or sharp objects, e.g. and alter their settings (see “Selecting pens. further settings”). -
Page 68: Using For The First Time
– Set the Temperature unit (degrees Celsius) or (degrees °C °F Fahrenheit) – Set up Miele@home Select Continue if you wish to set up now (to do this, follow Miele@home the instructions in “Selecting further settings - Miele@home”). -
Page 69: Switching On And Off
The appliance will start to cool and the at least -18 °C. interior lighting will come on when the door is opened. Switching off the appliance Miele will appear in the display, followed Turn the appliance off by pressing the by the main screen. On/Off switch. -
Page 70: Switching Off For Longer Periods Of Time
Switching on and off Switching off for longer If, during a long absence, the periods of time appliance is switched off but not cleaned and the door left shut, there If the appliance is not going to be used is a risk of mould forming inside the for a longer period of time, e.g. -
Page 71: Selecting Further Settings
Selecting further settings In Settings mode , you can select The display is unlocked briefly so you different functions of the refrigeration can adjust settings as required. Closing appliance and alter their settings, the appliance door will reactivate the allowing you to adjust the appliance to sensor lock. -
Page 72: Switching Eco Mode On Or Off
Selecting further settings Switching Eco mode on or Health risk due to consumption of spoiled food. The shelf life and quality of food may is useful when going on a Eco mode be affected if the temperature holiday, for example, if you do not wish remains above -18 °C for an to switch off the appliance completely extended period. -
Page 73: Carrying Out A Self Test
Selecting further settings The main screen will appear in the Carrying out a Self test display. Perform a Self test if you feel that your refrigeration appliance is not functioning properly and needs to be checked for any malfunctions. In Settings mode , use the and ... -
Page 74: Switching On The Door Assistant
Selecting further settings Switching on Push2open Switching on the Door assistant In Settings mode , use the and sensors to select Door assistant You can choose between the two Door and touch OK to confirm your assistants Push2open Pull2open selection. The factory default Door assistant is Push2open ... - Page 75 Selecting further settings - Adjusting the duration of the – Adjusting the intensity AutoClose function You can also adjust the intensity of the You can also adjust the duration for function. The lower the Pull2open how long the appliance door will remain intensity, the less force is required when open until it closes automatically.
-
Page 76: Switching Off The Door Assistant
– a Wi-Fi network Use the and sensors to select – the Miele@mobile App and confirm your selection with – a Miele user account. The user account can be created via the Touch the sensor to return to the Miele@mobile App. - Page 77 Your appliance's password is its serial number, which can be found on the Miele@home availability data plate. The ability to use the Miele@mobile App The data plate is located inside the depends on the availability of the appliance. Miele@home service in your country.
- Page 78 Now follow the instructions in the display. Confirm the process with OK. To be able to use the Miele@home functions, you also have to register your appliance in the App. As soon as your refrigeration...
- Page 79 Setting up Miele@home again If you have previously activated If you have changed your Wi-Fi Miele@home and then deactivated the network, you can set up Miele@home connection, you can reactivate the again for your appliance. connection. In Settings mode , use the ...
-
Page 80: Switching Off Demo Mode
Selecting further settings Resetting the network configuration Switching off Demo mode Reset the appliance's settings to the Demo mode allows the appliance to factory settings when disposing of be presented in a showroom without your refrigeration appliance, selling it the cooling system being switched or putting a used refrigeration on. -
Page 81: Resetting The Settings To Their Factory Default Settings
Selecting further settings Resetting the settings to their factory default settings You can reset the appliance's settings to their default settings. Reset the appliance's settings to the factory settings when disposing of your refrigeration appliance, selling it or putting a used refrigeration appliance into operation. - Page 82 Temperature unit ° Celsius / Keypad lock switched off Eco mode switched off Door assistant Push2open Miele@home switched off Dispenser unit lighting Automatic switched on Dispenser unit switched off Sabbath mode ...
-
Page 83: Selecting Settings For Lighting The Ice/Water Dispenser
Selecting further settings Lighting for Ice/Water dispenser Selecting settings for lighting switches on manually the Ice/Water dispenser The lighting is switched on by pressing In Settings mode , you can select any sensor on the control panel of the settings for the lighting of the Ice/ Ice/Water dispenser. -
Page 84: Switching Sabbath Mode On Or Off
Selecting further settings Switching off the Ice/Water dispenser Switching Sabbath mode on lighting or off The Ice/Water dispenser lighting is The refrigeration appliance has a switched off completely. Sabbath mode to support the observance of religious customs. In Settings mode , use the and ... -
Page 85: Switching On, Switching Off, Or Resetting The Water Filter Display
Selecting further settings – the ice cube maker Switching on, switching off, or (if previously switched on) resetting the Water filter display – The Ice/Water dispenser (if previously switched on) Depending on the quantity of ice cubes produced, the Water filter display will You can still select: remind you approx. - Page 86 Selecting further settings Resetting the Water filter display Switching on the Water filter display After you have cleaned the water filter, If the has been you must reset the Water filter display Water filter display switched off, it must be switched on that it will be displayed automatically again if required.
-
Page 87: The Correct Temperature
The correct temperature It is very important to set the correct Setting the temperature temperature for storing food in the Touch the sensor for setting the appliance. Bacteria will cause food temperature. which is not stored at the correct temperature to deteriorate rapidly. -
Page 88: Temperature Range
The correct temperature Temperature range The temperature can be set from -14 °C to -24 °C. The ambient temperature in the room and the installation location can affect the time it takes for the appliance to reach the lowest temperature. If the ambient temperature is too high, the appliance may not reach the lowest temperature. -
Page 89: Using Superfreeze
Using SuperFreeze SuperFreeze function Switching off SuperFreeze Touch the sensor for setting the For best results, switch on the temperature. SuperFreeze function before putting fresh food into the freezer. The symbol will be highlighted in colour and the temperature value of This helps food to freeze quickly and -30 °C is shown in the display. -
Page 90: Temperature And Door Alarm
Temperature and door alarm The appliance has been fitted with a Health risk due to consumption warning system which ensures that the of spoiled food. temperature in the freezer cannot rise If the temperature in the freezer unnoticed and to avoid energy being remains above -18 °C for a long wasted if the door is left open. - Page 91 Temperature and door alarm Door alarm An alarm will sound if the appliance door has been left open for longer than 2 minutes. In addition, the Close the door message will appear in the display. As soon as the door is closed, the alarm will stop and the message in the display will disappear.
-
Page 92: Adjusting The Interior Fittings
Adjusting the interior fittings Moving the adjustable shelves Removing the shelf above the ice cube maker If necessary, the adjustable shelves can be removed or their height can be The shelf above the ice cube maker can adjusted: be removed: ... -
Page 93: Removing The Freezer Baskets
Adjusting the interior fittings Removing the freezer baskets The freezer baskets can also be removed if necessary (e.g. for cleaning). Open the appliance door as wide as possible. The opening angle of the appliance door must not be limited to 90° because otherwise the freezer baskets cannot be removed. -
Page 94: Freezing And Storing Food
Freezing and storing food Freezing fresh food Storing frozen food Fresh food should be frozen as quickly Never refreeze partially or fully as possible so that the nutritional value defrosted food. Defrosted food may of the food, its vitamin content, only be refrozen after it has been appearance and flavour are maintained. -
Page 95: Home Freezing
Freezing and storing food – Allow hot foods and drinks to cool Home freezing down before placing them in the Only freeze food which is fresh and freezer. Placing hot foods or drinks in in good condition. the freezer causes food that is already frozen to partially thaw and Tips on home freezing increases energy consumption. -
Page 96: Placing Food In The Freezer
Freezing and storing food Before placing food in the Storage time for frozen food appliance The storage life of food varies greatly, even when a constant temperature of When freezing more than 2 kg of -18 °C is maintained. Even in frozen fresh food, switch on the SuperFreeze products, degradation processes take function some time before placing the... - Page 97 Freezing and storing food Defrosting frozen food Cooling drinks quickly When cooling drinks quickly in the Never refreeze partially or fully freezer, make sure bottles are not left in defrosted food. Defrosted food may for more than one hour, otherwise only be refrozen after it has been they could burst, causing injury and cooked.
-
Page 98: Operating The Ice/Water Dispenser
Operating the Ice/Water dispenser The Ice/Water dispenser requires a Risk to health due to mains water connection in order for it contaminated water. to operate (see “Installation – Water The consumption of polluted water connection”). can lead to health problems. The first 5 glasses of chilled water If you do not dispense chilled water or and the first 30–40 ice cubes made... -
Page 99: Switching The Dispenser Unit On
Operating the Ice/Water dispenser Switching the Dispenser After the appliance door has been unit on opened and closed, it can take several seconds until the Ice/Water dispenser Ice cubes can only be made when the is ready for operation and the sensors ice cube container is completely can be operated again. -
Page 100: Dispensing Chilled Water
Operating the Ice/Water dispenser Dispensing chilled water Dispensing ice cubes and crushed After the initial commissioning, there may be air in the water circuit. After the Ice/Water dispenser has Dispense water until there are no more been switched on, it can take up to air bubbles. -
Page 101: Switching The Dispenser Unit Off
Operating the Ice/Water dispenser Switching the system lock on/ Empty and clean the ice cube container at regular intervals, or at least when you have not produced You can use the system lock to protect any ice cubes for longer than a week the Ice/Water dispenser from (see “Cleaning and care –... -
Page 102: Automatic Defrosting
Automatic defrosting The appliance is equipped with a “NoFrost” system. The freezer defrosts automatically. The moisture generated in the appliance collects on the evaporator and is automatically defrosted and dissipated from time to time. This automatic defrosting system enables the freezer to remain permanently ice-free. -
Page 103: Cleaning And Care
Cleaning and care Cleaning agents Do not let water get into the electronic unit or the lighting. To avoid damaging the surfaces of your appliance, do not use: Risk of damage due to moisture – cleaning agents containing soda, ingress. -
Page 104: Before Cleaning The Appliance
– Stainless steel cleaning agent: Disconnect the appliance from the This will damage the finish. power supply. Switch off at the wall – Miele conditioning agents for and withdraw the plug from the stainless steel: socket, or switch off the mains circuit This will cause noticeable smearing. -
Page 105: Cleaning The Interior And Accessories
Cleaning and care Cleaning the interior and Emptying and cleaning the ice accessories cube container Clean the appliance regularly, or at Clean the ice cube container least once a month. regularly. This ensures that fresh ice cubes are always produced. Clean up any spills, stains and food immediately. -
Page 106: Cleaning The Drip Tray
Reinsert the drip tray and the drip cleaned on a regular basis with a tray grille. brush or vacuum cleaner (you could use a Miele vacuum cleaner dusting brush, for example). A build-up of dust will increase the energy consumption of the appliance. -
Page 107: Cleaning The Water Filter (Intensiveclear Mesh Filter)
Cleaning and care Cleaning the water filter (IntensiveClear mesh filter) Depending on the quantity of ice cubes produced, the IntensiveClear mesh filter must be cleaned approx. every 6 months. appears in the Clean the water filter display. Confirm the message with OK. ... -
Page 108: After Cleaning
Cleaning and care After cleaning Refit all shelves and accessories in the appliance. Reconnect to the power supply and switch the appliance back on. Switch the SuperFreeze function on for a while so that the freezer can cool down quickly. -
Page 109: Water Filter
Water filter The refrigeration appliance is supplied Depending on the quantity of ice cubes with a water filter (IntensiveClear mesh produced, the IntensiveClear mesh filter filter) that filters mains water for making must be cleaned approx. every ice cubes. 6 months. appears in the Clean the water filter The IntensiveClear mesh filter filters... -
Page 110: Problem Solving Guide
With the help of the following guide, minor faults in the performance of the appliance, some of which may result from incorrect operation, can be remedied without contacting Miele. This will save you time and money because you won't need a service call. - Page 111 Problem solving guide Problem Possible cause and remedy The compressor is The ventilation gaps in the housing unit are covered switching on more or have become too dusty. frequently and for Do not block the ventilation gaps. longer periods of time. ...
- Page 112 Problem solving guide Problem Possible cause and remedy The compressor is The temperature setting is too low. switching on more Correct the temperature setting. frequently and for The door is not properly closed. longer periods of time. Check whether the appliance door closes properly. The temperature in the appliance is too low.
- Page 113 Problem solving guide Problem Possible cause and remedy No alarm sounds You have deactivated the alarm. despite an appliance Switch the alarm back on via the Settings mode door being open. . Sabbath mode function is switched on: The temperature display is dark and the symbol is shown in the display.
- Page 114 Problem solving guide Messages in the display Message Possible cause and remedy The alarm sounds and The temperature in the freezer has risen significantly. the message This could be due to, for example: Freezer temperature too high. Max. – the freezer door being opened too often, or appears in temperature °C being left open...
- Page 115 Problem solving guide Message Possible cause and remedy F Please call Miele Service There is a fault. appears in the display Make a note of the fault message if necessary. and an alarm sounds. Call Miele. To turn the alarm off, touch the symbol.
- Page 116 Problem solving guide Problems with the Ice/Water dispenser Problem Possible cause and remedy The Ice/Water The refrigeration appliance is not connected to the dispenser cannot be power supply. switched on. Check that the refrigeration appliance is connected to the electricity supply. The system lock of the Ice/Water dispenser is active (the sensor is highlighted in white).
- Page 117 Problem solving guide Problems with the ice cube maker Problem Possible cause and remedy The ice cube maker is The refrigeration appliance or the Ice/Water not producing any ice dispenser has not been switched on. cubes or no chilled Make sure that the refrigeration appliance is water is being switched on.
- Page 118 Problem solving guide Problem Possible cause and remedy The ice cube maker is Several household appliances connected to the only producing small mains water connection are in operation. This has ice cubes. reduced the amount of water being taken in. ...
- Page 119 Close the tap immediately. Check the water pipe for damage. Call Miele immediately. Check whether the water pressure is too high. If the water pressure is too high, this can cause leaks (see “Installation - Water connection”).
- Page 120 This lighting corresponds to risk group RG 2. If the cover is defective, there is a risk of eye injury. If the lighting cover is defective, do not look from a close range directly into the lighting with optical instruments (e.g. magnifying glass or similar). Call Miele.
-
Page 121: Noises
Noises Normal What causes them noises Brrrrr ... A humming noise is made by the motor (compressor). This noise can get louder for brief periods when the motor switches on. Blubb, A gurgling noise can be heard when coolant is circulating blubb ... -
Page 122: Service
Contact in case of fault In the event of any faults which you cannot remedy yourself, please contact Miele. You can book a Miele customer service call-out online at www.miele.com/service. Contact information for Miele can be found at the end of this booklet. -
Page 123: Copyright And Licences
GNU General Public License, version 2, or the GNU Lesser General Public License, version 2.1. For a period of at least 3 years following the purchase or delivery of the appliance, Miele shall provide you or third parties with a machine-readable copy of the source code for the open source components contained in the appliance, which are licensed under the terms of the GNU General Public License, version 2, or the GNU Lesser General Public License,... - Page 127 Miele Experience Centre South Melbourne: Auckland: 206-210 Coventry Street 8 College Hill South Melbourne, VIC 3205 Freemans Bay, Auckland 1011 Miele Experience Centre and Office Sydney: Miele Experience Centre Wellington: 3 Skyline Place Frenchs Forest, NSW 2086 183 Featherston Street...
- Page 128 F 2671 Vi en- AU, NZ M.-Nr. 10 942 050 / 01...