JVC KD-APD58 Instructions Manual
Cd receiver
Hide thumbs
Also See for KD-APD58:
- Instructions manual (68 pages) ,
- Instruction manual (36 pages) ,
- Installation & connection manual (4 pages)
Table of Contents
Advertisement
CD RECEIVER
RECEPTOR CON CD
RÉCEPTEUR CD
For canceling the display demonstration, see page 6.
Para cancelar la demostración en pantalla, consulte la página 6.
Pour annuler la démonstration des affichages, référez-vous à la page 6.
For installation and connections, refer to the separate manual.
Para la instalación y las conexiones, refiérase al manual separado.
Pour l'installation et les raccordements, se référer au manuel séparé.
MANUEL D'INSTRUCTIONS
All manuals and user guides at all-guides.com
INSTRUCTIONS
MANUAL DE INSTRUCCIONES
KD-APD58/KD-PDR50
KD-APD58/KD-PDR50
KD-APD58/KD-PDR50
For customer Use:
Enter below the Model
No. and Serial No. which
are located on the top or
bottom of the cabinet. Retain
this information for future
reference.
Model No.
Serial No.
GET0425-001A
[J]
Advertisement
Chapters
Table of Contents
Troubleshooting

Related Manuals for JVC KD-APD58


Summary of Contents for JVC KD-APD58
- Page 1 All manuals and user guides at all-guides.com CD RECEIVER KD-APD58/KD-PDR50 RECEPTOR CON CD KD-APD58/KD-PDR50 RÉCEPTEUR CD KD-APD58/KD-PDR50 For canceling the display demonstration, see page 6. Para cancelar la demostración en pantalla, consulte la página 6. Pour annuler la démonstration des affichages, référez-vous à la page 6.
- Page 2 – Connect the equipment into an outlet on a circuit different from that to which the receiver is connected. – Consult the dealer or an experienced radio/TV technician for help. Caution: Changes or modifications not approved by JVC could void the user’s authority to operate the equipment. IMPORTANT FOR LASER PRODUCTS 1. CLASS 1 LASER PRODUCT 2.
-
Page 3: Table Of Contents
M MODE, wait for 5 seconds without pressing any of these buttons until the functions mode is cleared or press M MODE again. KD-APD58 is equipped with the steering wheel remote control function. • See the Installation/Connection Manual (separate... -
Page 4: Control Panel
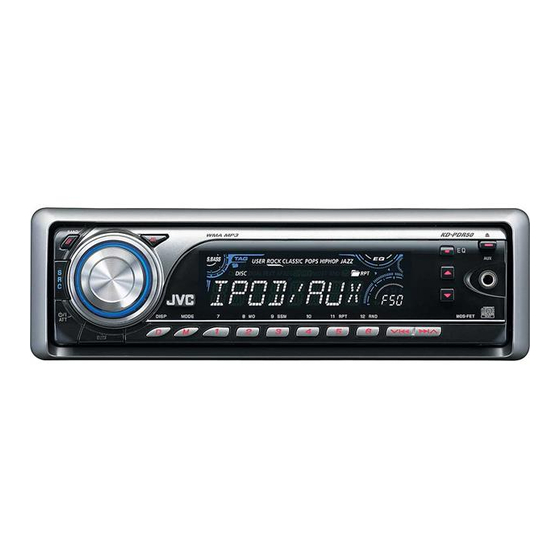
All manuals and user guides at all-guides.com Control panel — KD-APD58/KD-PDR50 Parts identification Display window SRC (source) button Remote sensor B BAND button DO NOT expose the remote sensor to strong light (standby/on attenuator) button / (direct sunlight or artificial lighting). -
Page 5: Remote Controller
All manuals and user guides at all-guides.com Remote controller — Main elements and features RM-RK50 Installing the lithium coin battery (CR2025) (standby/on/attenuator) button For USA-California Only: • Turns the power on if pressed briefly or This product contains a CR Coin Cell Lithium Battery attenuates the sound when the power is on. -
Page 6: Getting Started
All manuals and user guides at all-guides.com To drop the volume in Getting started a moment (ATT) To restore the sound, press Basic operations the button again. Turn on the power. To turn off the power Ÿ Basic settings • See also “General settings — PSM” on pages 13 and You cannot select “CD”... -
Page 7: Radio Operations
All manuals and user guides at all-guides.com When an FM stereo broadcast is hard to Radio operations receive Lights up when monaural mode is activated. Ÿ Reception improves, but stereo effect will be lost. Lights up when receiving an FM stereo broadcast with sufficient signal strength. -
Page 8: Disc Operations
All manuals and user guides at all-guides.com Manual presetting Disc operations Ex.: Storing FM station of 92.5 MHz into preset number 4 of the FM1 band. Playing a disc in the unit All tracks will be played repeatedly until you change the source or eject the disc. - Page 9 All manuals and user guides at all-guides.com To select a particular track in a folder (for MP3 or Changing the display information WMA discs): While playing an audio CD or a CD Text Other main functions Skipping tracks quickly during play •...
-
Page 10: Ipod Operations
All manuals and user guides at all-guides.com iPod operations Selecting the playback modes You can use only one of the following playback modes You can play songs from an Apple iPod through this unit at a time. by connecting it with the supplied connection cable for iPod. - Page 11 All manuals and user guides at all-guides.com • If the selected item has another layer, you will Caution: enter the layer. Repeat steps 2 and 3 until the • Avoid using the iPod if it might hinder your safety desired track is played (see page 19). driving.
-
Page 12: Sound Adjustments
All manuals and user guides at all-guides.com Sound adjustments Indication, [Range] BAS * (bass), [–06 to +06] You can select a preset sound mode suitable to the Adjust the bass. music genre (iEQ: intelligent equalizer). MID * (mid-range), [–06 to +06] Adjust the mid-range frequencies sound level. -
Page 13: General Settings - Psm
All manuals and user guides at all-guides.com General settings — PSM You can change PSM (Preferred Setting Mode) items Repeat steps 2 and 3 to adjust other PSM listed in the table that follows. items if necessary. Finish the procedure. Select a PSM item. - Page 14 All manuals and user guides at all-guides.com Indications Item Setting, [reference page] ( : Initial) SCROLL * • ONCE : Scrolls the track information once. Scroll • AUTO : Repeats scrolling (at 5-second intervals). • OFF : Cancels. • Pressing D DISP for more than one second can scroll the display regardless of the setting.
-
Page 15: External Component Operations
All manuals and user guides at all-guides.com External component Title assignment operations You can assign names to 30 station frequencies (FM and AM) and up to 8 characters for each station name. You can connect an external component to the AUX (auxiliary) input jack on the control panel. -
Page 16: More About This Unit
All manuals and user guides at all-guides.com Disc operations More about this unit Caution for DualDisc playback • The Non-DVD side of a “DualDisc” does not comply Basic operations with the “Compact Disc Digital Audio” standard. Turning on the power Therefore, the use of Non-DVD side of a DualDisc on •... - Page 17 All manuals and user guides at all-guides.com • Do not use the following CD-Rs or CD-RWs: • This unit cannot play back the following files: – Discs with stickers, labels, or a protective seal stuck – MP3 files encoded with MP3i and MP3 PRO format. to the surface.
- Page 18 • iPod shuffle is not controllable. “HIGH PWR” to “LOW PWR” while the volume level • You can control the iPod from this unit when “JVC” or is set higher than “VOL 30,” the unit automatically “ ” appears on the iPod display.
- Page 19 All manuals and user guides at all-guides.com Hierarchical structure of file searching when an iPod is connected...
-
Page 20: Maintenance
All manuals and user guides at all-guides.com To keep discs clean Maintenance A dirty disc may not play correctly. If a disc does become dirty, wipe it with How to clean the connectors a soft cloth in a straight line from center Frequent detachment will deteriorate the connectors. -
Page 21: Troubleshooting
All manuals and user guides at all-guides.com Troubleshooting What appears to be trouble is not always serious. Check the following points before calling a service center. Symptoms Remedies/Causes • Sound cannot be heard from the speakers. • Adjust the volume to the optimum level. •... - Page 22 All manuals and user guides at all-guides.com Symptoms Remedies/Causes • Tracks do not play back in the order you Playback order is determined when the files are recorded. have intended them to play. • Elapsed playing time is not correct. This sometimes occurs during play.
-
Page 23: Specifications
KD-PDR50: 2.5 V/20 kΩ load (full scale) Max. Bit Rate: 192 kbps Subwoofer-Out Level/Impedance: GENERAL KD-APD58: 4.0 V /20 kΩ load (full scale) KD-PDR50: 2.5 V/20 kΩ load (full scale) Power Requirement: Output Impedance: 1 kΩ Operating Voltage: DC 14.4 V... - Page 24 Having TROUBLE with operation? Please reset your unit Refer to page of How to reset your unit Still having trouble?? USA ONLY Call 1-800-252-5722 http://www.jvc.com We can help you! EN, SP, FR © 2006 Victor Company of Japan, Limited 1106DTSMDTJEIN...
- Page 25 NEGATIVA. Si su vehículo no posee continu de 12 V à masse NEGATIVE. Si votre véhicule n’offre pas ce voltage inverter is required, which can be purchased at JVC car audio este sistema, será necesario un inversor de tensión, que puede ser type d’alimentation, il vous faut un convertisseur de tension, que vous...
- Page 26 JVC car audio dealer or a company supplying kits. instalación, consulte con su concesionario de JVC de equipos de audio d’installation, consulter votre revendeur d’autoradios JVC ou une •...
- Page 27 Enceinte gauche (arrière) Enceinte droit (arrière) Connecting to the steering wheel remote controller (only for KD-APD58) / Conexión al control remoto del volante de dirección (sólo para KD-APD58) / Connexion de la télécommande de volant (seulement pour le KD-APD58) If your car is equipped with the steering wheel remote controller, you can operate this unit using the...
- Page 28 Los cables de los altavoces de esta unidad • Déconnectez les enceintes de cet appareil et connectez-les • For KD-APD58: The line output level of this unit is kept high to quedan sin usar. à l’amplificateur. Laissez les fils d’enceintes de cet appareil maintain the hi-fi sounds reproduced from this unit.
- Page 29 All manuals and user guides at all-guides.com CD RECEIVER RÉCEPTEUR CD KD-PDR51 For canceling the display demonstration, see page 6. Pour annuler la démonstration des affichages, référez-vous à la page 6. For installation and connections, refer to the separate manual. Pour l’installation et les raccordements, se référer au manuel séparé.
- Page 30 All manuals and user guides at all-guides.com Thank you for purchasing a JVC product. Please read all instructions carefully before operation, to ensure your complete understanding and to obtain the best possible performance from the unit. IMPORTANT FOR LASER PRODUCTS 1.
- Page 31 All manuals and user guides at all-guides.com How to use the M MODE button CONTENTS If you press M MODE, the unit goes into functions mode, ∞ then the number buttons and buttons work as Control panel ........4 different function buttons. Remote controller —...
-
Page 32: Control Panel
All manuals and user guides at all-guides.com Control panel Parts identification Display window SRC (source) button Remote sensor B BAND button DO NOT expose the remote sensor to strong light (standby/on attenuator) button / (direct sunlight or artificial lighting). Control dial S.BASS (super bass) indicator SEL (select) button DISC indicator... -
Page 33: Remote Controller
All manuals and user guides at all-guides.com Remote controller — Main elements and features RM-RK50 Installing the lithium coin battery (CR2025) (standby/on/attenuator) button • Turns the power on if pressed briefly or Aim the remote controller directly at the remote attenuates the sound when the power is on. -
Page 34: Getting Started
All manuals and user guides at all-guides.com To drop the volume in Getting started a moment (ATT) To restore the sound, press Basic operations the button again. To turn off the power Turn on the power. Ÿ Basic settings • See also “General settings — PSM” on pages 15 –... -
Page 35: Radio Operations
All manuals and user guides at all-guides.com When an FM stereo broadcast is hard to Radio operations receive Lights up when monaural mode is activated. Ÿ Reception improves, but stereo effect will be lost. Lights up when receiving an FM stereo broadcast with sufficient signal strength. -
Page 36: Fm Rds Operations
All manuals and user guides at all-guides.com Manual presetting FM RDS operations Ex.: Storing FM station of 92.5 MHz into preset number 4 of the FM1 band. What you can do with RDS RDS (Radio Data System) allows FM stations to send an additional signal along with their regular programme signals. - Page 37 All manuals and user guides at all-guides.com Start searching for your favorite Using the standby receptions programme. TA Standby Reception TA Standby Reception allows the unit to switch If there is a station broadcasting a programme temporarily to Traffic Announcement (TA) from any of the same PTY code as you have selected, that source other than AM.
-
Page 38: Disc Operations
All manuals and user guides at all-guides.com To deactivate the PTY Standby Reception, select To check the current clock time while “OFF” for the PTY code (see page 16). The PTY indicator listening to an FM RDS station goes off. Station name (PS) Station Frequency... - Page 39 All manuals and user guides at all-guides.com To fast-forward or reverse the track Other main functions Skipping tracks quickly during play • For MP3 or WMA discs, you can skip tracks within the To go to the next or previous tracks same folder.
- Page 40 All manuals and user guides at all-guides.com Changing the display information Selecting the playback modes You can use only one of the following playback modes at a time. While playing an audio CD or a CD Text Select your desired playback mode. Repeat play While playing an MP3 or a WMA track Mode...
-
Page 41: Ipod Operations
All manuals and user guides at all-guides.com Caution: iPod operations • Avoid using the iPod if it might hinder your safety driving. You can play songs from an Apple iPod through this • Make sure all important data has been backed up unit by connecting it with the supplied connection to avoid losing the data. -
Page 42: Sound Adjustments
All manuals and user guides at all-guides.com Confirm the selection. Sound adjustments To move back to the previous menu, press You can select a preset sound mode suitable to the • If a track is selected, playback starts music genre (iEQ: intelligent equalizer). automatically. -
Page 43: General Settings - Psm
All manuals and user guides at all-guides.com Indication, [Range] General settings — PSM BAS * (bass), [–06 to +06] Adjust the bass. You can change PSM (Preferred Setting Mode) items listed in the table that follows. MID * (mid-range), [–06 to +06] Adjust the mid-range frequencies sound level. - Page 44 All manuals and user guides at all-guides.com Indications Item Setting, [reference page] ( : Initial) DEMO • DEMO ON : Display demonstration will be activated automatically if no Display demonstration operation is done for about 20 seconds, [6]. • DEMO OFF : Cancels.
- Page 45 All manuals and user guides at all-guides.com Indications Item Setting, [reference page] ( : Initial) DIMMER • AUTO : Dims the display when you turn on the headlights. Dimmer • ON : Activates dimmer. • OFF : Cancels. • MUTING 1/ : Select either one which mutes the sounds while using a cellular Telephone muting MUTING 2...
-
Page 46: External Component Operations
All manuals and user guides at all-guides.com More about this unit External component operations Basic operations Turning on the power You can connect an external component to the AUX (auxiliary) input jack on the control panel. • By pressing SRC on the unit, you can also turn on the power. - Page 47 All manuals and user guides at all-guides.com • If a Traffic Announcement is received by TA Standby – CD-R/CD-RW on which the files are written with Reception, the volume level automatically changes to “Packet Write” method. the preset level (TA VOL) if the current level is lower –...
- Page 48 – WMA files copy-protected with DRM. • iPod shuffle is not controllable. – Files which have the data such as AIFF, ATRAC3, • You can control the iPod from this unit when “JVC” or etc. “ ” appears on the iPod display.
- Page 49 All manuals and user guides at all-guides.com Hierarchical structure of file searching when an iPod is connected...
-
Page 50: Maintenance
All manuals and user guides at all-guides.com To keep discs clean Maintenance A dirty disc may not play correctly. If a disc does become dirty, wipe it with How to clean the connectors a soft cloth in a straight line from center Frequent detachment will deteriorate the connectors. -
Page 51: Troubleshooting
All manuals and user guides at all-guides.com Troubleshooting What appears to be trouble is not always serious. Check the following points before calling a service center. Symptoms Remedies/Causes • Sound cannot be heard from the speakers. • Adjust the volume to the optimum level. •... - Page 52 All manuals and user guides at all-guides.com Symptoms Remedies/Causes • Tracks do not play back in the order you Playback order is determined when the files are recorded. have intended them to play. • Elapsed playing time is not correct. This sometimes occurs during play.
-
Page 53: Specifications
All manuals and user guides at all-guides.com Specifications AUDIO AMPLIFIER SECTION CD PLAYER SECTION Maximum Power Output: Type: Compact disc player Front/Rear: 50 W per channel Signal Detection Non-contact optical pickup System: (semiconductor laser) Continuous Power Output (RMS): Number of Channels: 2 channels (stereo) Front/Rear: 19 W per channel into... - Page 54 électromagnétique et à la sécurité électrique. European representative of Victor Company of Japan, Limited Représentant européen de la société Victor Company of Japan, Limited: JVC Technology Centre Europe GmbH JVC Technology Centre Europe GmbH Postfach 10 05 52 Postfach 10 05 52...
- Page 55 • Assurez-vous de raccorder de nouveau la mise à la masse de cet appareil au châssis de la voiture après l’installation. Notes: • Replace the fuse with one of the specified rating. If the fuse blows frequently, consult your JVC IN-CAR Remarques: ENTERTAINMENT dealer.
- Page 56 The following illustration shows a typical installation. If you have any questions or require information d’information sur des kits d’installation, consulter votre revendeur d’autoradios JVC ou une compagnie regarding installation kits, consult your JVC IN-CAR ENTERTAINMENT dealer or a company supplying kits.
- Page 57 All manuals and user guides at all-guides.com ENGLISH FRANÇAIS ELECTRICAL CONNECTIONS RACCORDEMENTS ELECTRIQUES If your car is equipped with the ISO For some VW/Audi or Opel (Vauxhall) automobile / Pour certaine voiture VW/Audi ou Opel connector / Si votre voiture est équippée (Vauxhall) d’un connecteur ISO You may need to modify the wiring of the supplied power cord as illustrated.
- Page 58 If your car is equipped with the steering wheel remote controller, you can operate this unit using the controller. To do it, a JVC’s OE remote adapter (not supplied) which matches with your car is required. Consult your JVC IN-CAR ENTERTAINMENT dealer for details.
- Page 59 All manuals and user guides at all-guides.com CD RECEIVER CD-RECEIVER РЕСИВЕР С ПРОИГРЫВАТЕЛЕМ КОМПАКТ-ДИСКОВ KD-PDR51 For canceling the display demonstration, see page 6. Zum Abbrechen der Displaydemonstration siehe Seite 6. Информацию об отмене демонстрации функций дисплея см. на стр. 6. For installation and connections, refer to the separate manual.
- Page 60 All manuals and user guides at all-guides.com Thank you for purchasing a JVC product. Please read all instructions carefully before operation, to ensure your complete understanding and to obtain the best possible performance from the unit. IMPORTANT FOR LASER PRODUCTS 1.
- Page 61 All manuals and user guides at all-guides.com How to use the M MODE button CONTENTS If you press M MODE, the unit goes into functions mode, ∞ then the number buttons and buttons work as Control panel ........4 different function buttons. Remote controller —...
-
Page 62: Control Panel
All manuals and user guides at all-guides.com Control panel Parts identification Display window SRC (source) button Remote sensor B BAND button DO NOT expose the remote sensor to strong light (standby/on attenuator) button / (direct sunlight or artificial lighting). Control dial S.BASS (super bass) indicator SEL (select) button DISC indicator... -
Page 63: Remote Controller
All manuals and user guides at all-guides.com Remote controller — Main elements and features RM-RK50 Installing the lithium coin battery (CR2025) (standby/on/attenuator) button • Turns the power on if pressed briefly or Aim the remote controller directly at the remote attenuates the sound when the power is on. -
Page 64: Getting Started
All manuals and user guides at all-guides.com To drop the volume in Getting started a moment (ATT) To restore the sound, press Basic operations the button again. To turn off the power Turn on the power. Ÿ Basic settings • See also “General settings — PSM” on pages 15 –... -
Page 65: Radio Operations
All manuals and user guides at all-guides.com When an FM stereo broadcast is hard to Radio operations receive Lights up when monaural mode is activated. Ÿ Reception improves, but stereo effect will be lost. Lights up when receiving an FM stereo broadcast with sufficient signal strength. -
Page 66: Fm Rds Operations
All manuals and user guides at all-guides.com Manual presetting FM RDS operations Ex.: Storing FM station of 92.5 MHz into preset number 4 of the FM1 band. What you can do with RDS RDS (Radio Data System) allows FM stations to send an additional signal along with their regular programme signals. - Page 67 All manuals and user guides at all-guides.com Using the standby receptions Start searching for your favorite programme. TA Standby Reception TA Standby Reception allows the unit to switch If there is a station broadcasting a programme temporarily to Traffic Announcement (TA) from any of the same PTY code as you have selected, that source other than AM.
-
Page 68: Disc Operations
All manuals and user guides at all-guides.com To deactivate the PTY Standby Reception, select To check the current clock time while “OFF” for the PTY code (see page 16). The PTY indicator listening to an FM RDS station goes off. Station name (PS) Station Frequency... - Page 69 All manuals and user guides at all-guides.com To fast-forward or reverse the track Other main functions Skipping tracks quickly during play • For MP3 or WMA discs, you can skip tracks within the To go to the next or previous tracks same folder.
- Page 70 All manuals and user guides at all-guides.com Changing the display information Selecting the playback modes You can use only one of the following playback modes at a time. While playing an audio CD or a CD Text Select your desired playback mode. Repeat play While playing an MP3 or a WMA track Mode...
-
Page 71: Ipod Operations
All manuals and user guides at all-guides.com Caution: iPod operations • Avoid using the iPod if it might hinder your safety driving. You can play songs from an Apple iPod through this • Make sure all important data has been backed up unit by connecting it with the supplied connection to avoid losing the data. -
Page 72: Sound Adjustments
All manuals and user guides at all-guides.com Confirm the selection. Sound adjustments To move back to the previous menu, press You can select a preset sound mode suitable to the • If a track is selected, playback starts music genre (iEQ: intelligent equalizer). automatically. -
Page 73: General Settings - Psm
All manuals and user guides at all-guides.com Indication, [Range] General settings — PSM BAS * (bass), [–06 to +06] Adjust the bass. You can change PSM (Preferred Setting Mode) items listed in the table that follows. MID * (mid-range), [–06 to +06] Adjust the mid-range frequencies sound level. - Page 74 All manuals and user guides at all-guides.com Indications Item Setting, [reference page] ( : Initial) DEMO • DEMO ON : Display demonstration will be activated automatically if no Display demonstration operation is done for about 20 seconds, [6]. • DEMO OFF : Cancels.
- Page 75 All manuals and user guides at all-guides.com Indications Item Setting, [reference page] ( : Initial) DIMMER • AUTO : Dims the display when you turn on the headlights. Dimmer • ON : Activates dimmer. • OFF : Cancels. • MUTING 1/ : Select either one which mutes the sounds while using a cellular Telephone muting MUTING 2...
-
Page 76: External Component Operations
All manuals and user guides at all-guides.com External component More about this unit operations Basic operations Turning on the power You can connect an external component to the AUX (auxiliary) input jack on the control panel. • By pressing SRC on the unit, you can also turn on the power. - Page 77 All manuals and user guides at all-guides.com • If a Traffic Announcement is received by TA Standby – CD-R/CD-RW on which the files are written with Reception, the volume level automatically changes to “Packet Write” method. the preset level (TA VOL) if the current level is lower –...
- Page 78 – WMA files copy-protected with DRM. • iPod shuffle is not controllable. – Files which have the data such as AIFF, ATRAC3, • You can control the iPod from this unit when “JVC” or etc. “ ” appears on the iPod display.
- Page 79 All manuals and user guides at all-guides.com Hierarchical structure of file searching when an iPod is connected...
-
Page 80: Maintenance
All manuals and user guides at all-guides.com To keep discs clean Maintenance A dirty disc may not play correctly. If a disc does become dirty, wipe it with How to clean the connectors a soft cloth in a straight line from center Frequent detachment will deteriorate the connectors. -
Page 81: Troubleshooting
All manuals and user guides at all-guides.com Troubleshooting What appears to be trouble is not always serious. Check the following points before calling a service center. Symptoms Remedies/Causes • Sound cannot be heard from the speakers. • Adjust the volume to the optimum level. •... - Page 82 All manuals and user guides at all-guides.com Symptoms Remedies/Causes • Tracks do not play back in the order you Playback order is determined when the files are recorded. have intended them to play. • Elapsed playing time is not correct. This sometimes occurs during play.
-
Page 83: Specifications
All manuals and user guides at all-guides.com Specifications AUDIO AMPLIFIER SECTION CD PLAYER SECTION Maximum Power Output: Type: Compact disc player Front/Rear: 50 W per channel Signal Detection Non-contact optical pickup System: (semiconductor laser) Continuous Power Output (RMS): Number of Channels: 2 channels (stereo) Front/Rear: 19 W per channel into... - Page 84 совместимости и электрической безопасности. European representative of Victor Company of Japan, Limited Представительство компании Victor Company of Japan, Limited в Европе: JVC Technology Centre Europe GmbH JVC Technology Centre Europe GmbH Postfach 10 05 52 Postfach 10 05 52 61145 Friedberg...
- Page 85 Gleichstrom und (–) Erdung ausgelegt. Verfügt Ihr Fahrzeug nicht постоянного напряжения с минусом на массе. Если Ваш voltage inverter is required, which can be purchased at JVC IN-CAR über diese Anlage, ist ein Spannungsinverter erforderlich, der bei JVC автомобиль не имеет этой системы, требуется инвертор...
- Page 86 Fragen oder wenn Sie Informationen hinsichtlich des Einbausatzes Если у Вас есть какие-либо вопросы, касающиеся установки, consult your JVC IN-CAR ENTERTAINMENT dealer or a company brauchen, wenden Sie sich an ihren JVC Autoradiohändler oder ein обратитесь к Вашему дилеру автомобилнего специалиста JVC или supplying kits.
- Page 87 All manuals and user guides at all-guides.com ENGLISH DEUTSCH РУССКИЙ ELECTRICAL CONNECTIONS ELEKTRISCHE ANSCHLÜSSE ЭЛЕКТРИЧЕСКИЕ ПОДКЛЮЧЕНИЯ If your car is equipped with the ISO For some VW/Audi or Opel (Vauxhall) automobile / Bei bestimmten VW-/Audi- order Opel- connector / Wenn Ihr Fahrzeug mit dem (Vauxhall-) Fahrzeugen / Для...
- Page 88 If your car is equipped with the steering wheel remote controller, you can operate this unit using Radio-Lenkrad-Fernbedienungsadaption (nicht the controller. To do it, a JVC’s OE remote adapter (not supplied) which matches with your car is Steering wheel remote input mitgeliefert) required.
- Page 89 All manuals and user guides at all-guides.com CD RECEIVER KD-PDR54 For canceling the display demonstration, see page 6. For installation and connections, refer to the separate manual. INSTRUCTIONS GET0455-001A [UI]...
- Page 90 All manuals and user guides at all-guides.com Thank you for purchasing a JVC product. Please read all instructions carefully before operation, to ensure your complete understanding and to obtain the best possible performance from the unit. IMPORTANT FOR LASER PRODUCTS 1.
- Page 91 All manuals and user guides at all-guides.com How to use the M MODE button CONTENTS If you press M MODE, the unit goes into functions mode, ∞ then the number buttons and buttons work as Control panel ........4 different function buttons. Remote controller —...
-
Page 92: Control Panel
All manuals and user guides at all-guides.com Control panel Parts identification Display window SRC (source) button Remote sensor B BAND button DO NOT expose the remote sensor to strong light (standby/on attenuator) button / (direct sunlight or artificial lighting). Control dial S.BASS (super bass) indicator SEL (select) button DISC indicator... -
Page 93: Remote Controller
All manuals and user guides at all-guides.com Remote controller — Main elements and features RM-RK50 Installing the lithium coin battery (CR2025) (standby/on/attenuator) button • Turns the power on if pressed briefly or Aim the remote controller directly at the remote attenuates the sound when the power is on. -
Page 94: Getting Started
All manuals and user guides at all-guides.com To drop the volume in Getting started a moment (ATT) To restore the sound, press Basic operations the button again. To turn off the power Turn on the power. Ÿ Basic settings • See also “General settings — PSM” on pages 13 and You cannot select “CD”... -
Page 95: Radio Operations
All manuals and user guides at all-guides.com When an FM stereo broadcast is hard to Radio operations receive Lights up when monaural mode is activated. Ÿ Reception improves, but stereo effect will be lost. Lights up when receiving an FM stereo broadcast with sufficient signal strength. -
Page 96: Disc Operations
All manuals and user guides at all-guides.com Manual presetting Disc operations Ex.: Storing FM station of 92.5 MHz into preset number 4 of the FM1 band. Playing a disc in the unit All tracks will be played repeatedly until you change the source or eject the disc. - Page 97 All manuals and user guides at all-guides.com To select a particular track in a folder (for MP3 or Changing the display information WMA disc): While playing an audio CD or a CD Text Other main functions Skipping tracks quickly during play •...
-
Page 98: Ipod Operations
All manuals and user guides at all-guides.com iPod operations Selecting the playback modes You can use only one of the following playback modes You can play songs from an Apple iPod through this at a time. unit by connecting it with the supplied connection cable for iPod. - Page 99 All manuals and user guides at all-guides.com • If the selected item has another layer, you will Caution: enter the layer. Repeat steps 2 and 3 until the • Avoid using the iPod if it might hinder your safety desired track is played (see page 19). driving.
-
Page 100: Sound Adjustments
All manuals and user guides at all-guides.com Indication, [Range] Sound adjustments BAS * (bass), [–06 to +06] You can select a preset sound mode suitable to the Adjust the bass. music genre (iEQ: intelligent equalizer). MID * (mid-range), [–06 to +06] Adjust the mid-range frequencies sound level. - Page 101 All manuals and user guides at all-guides.com General settings — PSM You can change PSM (Preferred Setting Mode) items Repeat steps 2 and 3 to adjust other PSM listed in the table that follows. items if necessary. Finish the procedure. Select a PSM item.
- Page 102 All manuals and user guides at all-guides.com Indications Item Setting, [reference page] ( : Initial) SCROLL * • ONCE : Scrolls the track information once. Scroll • AUTO : Repeats scrolling (at 5-second intervals). • OFF : Cancels. • Pressing D DISP for more than one second can scroll the display regardless of the setting.
- Page 103 All manuals and user guides at all-guides.com External component Title assignment operations You can assign names to 30 station frequencies (FM and AM) and up to 8 characters for each station name. You can connect an external component to the AUX (auxiliary) input jack on the control panel.
- Page 104 All manuals and user guides at all-guides.com Disc operations More about this unit Caution for DualDisc playback • The Non-DVD side of a “DualDisc” does not comply Basic operations with the “Compact Disc Digital Audio” standard. Turning on the power Therefore, the use of Non-DVD side of a DualDisc on •...
- Page 105 All manuals and user guides at all-guides.com • Do not use the following CD-Rs or CD-RWs: • This unit cannot play back the following files: – Discs with stickers, labels, or a protective seal stuck – MP3 files encoded with MP3i and MP3 PRO format. to the surface.
- Page 106 • iPod shuffle is not controllable. “HIGH PWR” to “LOW PWR” while the volume level • You can control the iPod from this unit when “JVC” or is set higher than “VOL 30,” the unit automatically “ ” appears on the iPod display.
- Page 107 All manuals and user guides at all-guides.com Hierarchical structure of file searching when an iPod is connected...
- Page 108 All manuals and user guides at all-guides.com To keep discs clean Maintenance A dirty disc may not play correctly. If a disc does become dirty, wipe it with How to clean the connectors a soft cloth in a straight line from center Frequent detachment will deteriorate the connectors.
- Page 109 All manuals and user guides at all-guides.com Troubleshooting What appears to be trouble is not always serious. Check the following points before calling a service center. Symptoms Remedies/Causes • Sound cannot be heard from the speakers. • Adjust the volume to the optimum level. •...
- Page 110 All manuals and user guides at all-guides.com Symptoms Remedies/Causes • Tracks do not play back in the order you Playback order is determined when the files are recorded. have intended them to play. • Elapsed playing time is not correct. This sometimes occurs during play.
- Page 111 All manuals and user guides at all-guides.com Specifications AUDIO AMPLIFIER SECTION CD PLAYER SECTION Maximum Power Output: Type: Compact disc player Front/Rear: 50 W per channel Signal Detection Non-contact optical pickup System: (semiconductor laser) Continuous Power Output (RMS): Number of Channels: 2 channels (stereo) Front/Rear: 19 W per channel into...
- Page 112 All manuals and user guides at all-guides.com Having TROUBLE with operation? Please reset your unit Refer to page of How to reset your unit © 2006 Victor Company of Japan, Limited 1206DTSMDTJEIN...
- Page 113 • Be sure to ground this unit to the car’s chassis again after installation. Notes: • Replace the fuse with one of the specified rating. If the fuse blows frequently, consult your JVC car audio dealer. • It is recommended to connect to the speakers with maximum power of more than 50 W (both at the rear and at the front, with an impedance of 4 Ω...
- Page 114 • Disconnect the speakers from this unit, connect them to the amplifier. Leave the speaker leads of this unit unused. Y-connector (not supplied for this unit) Set “L/O MODE” to “REAR” (See page 14 of the INSTRUCTIONS.) JVC Amplifier Remote lead (blue with white stripe) Rear speakers To the remote lead of other equipment or automatic antenna if any Set “L/O MODE”...
- Page 115 All manuals and user guides at all-guides.com CD RECEIVER KD-PDR55 KD-PDR55 For canceling the display demonstration, see page 6. For installation and connections, refer to the separate manual. INSTRUCTIONS GET0426-001A [U/UH]...
- Page 116 All manuals and user guides at all-guides.com Thank you for purchasing a JVC product. Please read all instructions carefully before operation, to ensure your complete understanding and to obtain the best possible performance from the unit. IMPORTANT FOR LASER PRODUCTS 1.
- Page 117 All manuals and user guides at all-guides.com How to use the M MODE button CONTENTS If you press M MODE, the unit goes into functions mode, ∞ then the number buttons and buttons work as Control panel ........4 different function buttons. Remote controller —...
- Page 118 All manuals and user guides at all-guides.com Control panel Parts identification Display window SRC (source) button Remote sensor B BAND button DO NOT expose the remote sensor to strong light (standby/on attenuator) button / (direct sunlight or artificial lighting). Control dial S.BASS (super bass) indicator SEL (select) button DISC indicator...
- Page 119 All manuals and user guides at all-guides.com Remote controller — Main elements and features RM-RK50 Installing the lithium coin battery (CR2025) (standby/on/attenuator) button • Turns the power on if pressed briefly or Aim the remote controller directly at the remote attenuates the sound when the power is on.
- Page 120 All manuals and user guides at all-guides.com To drop the volume in Getting started a moment (ATT) To restore the sound, press Basic operations the button again. To turn off the power Turn on the power. Ÿ Basic settings • See also “General settings — PSM” on pages 13 and You cannot select “CD”...
- Page 121 All manuals and user guides at all-guides.com When an FM stereo broadcast is hard to Radio operations receive Lights up when monaural mode is activated. Ÿ Reception improves, but stereo effect will be lost. Lights up when receiving an FM stereo broadcast with sufficient signal strength.
- Page 122 All manuals and user guides at all-guides.com Manual presetting Disc operations Ex.: Storing FM station of 92.5 MHz into preset number 4 of the FM1 band. Playing a disc in the unit All tracks will be played repeatedly until you change the source or eject the disc.
- Page 123 All manuals and user guides at all-guides.com To select a particular track in a folder (for MP3 or Changing the display information WMA disc): While playing an audio CD or a CD Text Other main functions Skipping tracks quickly during play •...
- Page 124 All manuals and user guides at all-guides.com iPod operations Selecting the playback modes You can use only one of the following playback modes You can play songs from an Apple iPod through this at a time. unit by connecting it with the supplied connection cable for iPod.
- Page 125 All manuals and user guides at all-guides.com • If the selected item has another layer, you will Caution: enter the layer. Repeat steps 2 and 3 until the • Avoid using the iPod if it might hinder your safety desired track is played (see page 19). driving.
- Page 126 All manuals and user guides at all-guides.com Indication, [Range] Sound adjustments BAS * (bass), [–06 to +06] You can select a preset sound mode suitable to the Adjust the bass. music genre (iEQ: intelligent equalizer). MID * (mid-range), [–06 to +06] Adjust the mid-range frequencies sound level.
-
Page 127: General Settings - Psm
All manuals and user guides at all-guides.com General settings — PSM You can change PSM (Preferred Setting Mode) items Repeat steps 2 and 3 to adjust other PSM listed in the table that follows. items if necessary. Finish the procedure. Select a PSM item. - Page 128 All manuals and user guides at all-guides.com Indications Item Setting, [reference page] ( : Initial) SCROLL * • ONCE : Scrolls the track information once. Scroll • AUTO : Repeats scrolling (at 5-second intervals). • OFF : Cancels. • Pressing D DISP for more than one second can scroll the display regardless of the setting.
-
Page 129: External Component Operations
All manuals and user guides at all-guides.com External component Title assignment operations You can assign names to 30 station frequencies (FM and AM) and up to 8 characters for each station name. You can connect an external component to the AUX (auxiliary) input jack on the control panel. -
Page 130: More About This Unit
All manuals and user guides at all-guides.com Disc operations More about this unit Caution for DualDisc playback • The Non-DVD side of a “DualDisc” does not comply Basic operations with the “Compact Disc Digital Audio” standard. Turning on the power Therefore, the use of Non-DVD side of a DualDisc on •... - Page 131 All manuals and user guides at all-guides.com • Do not use the following CD-Rs or CD-RWs: • This unit cannot play back the following files: – Discs with stickers, labels, or a protective seal stuck – MP3 files encoded with MP3i and MP3 PRO format. to the surface.
- Page 132 • iPod shuffle is not controllable. “HIGH PWR” to “LOW PWR” while the volume level • You can control the iPod from this unit when “JVC” or is set higher than “VOL 30,” the unit automatically “ ” appears on the iPod display.
- Page 133 All manuals and user guides at all-guides.com Hierarchical structure of file searching when an iPod is connected...
-
Page 134: Maintenance
All manuals and user guides at all-guides.com To keep discs clean Maintenance A dirty disc may not play correctly. If a disc does become dirty, wipe it with How to clean the connectors a soft cloth in a straight line from center Frequent detachment will deteriorate the connectors. -
Page 135: Troubleshooting
All manuals and user guides at all-guides.com Troubleshooting What appears to be trouble is not always serious. Check the following points before calling a service center. Symptoms Remedies/Causes • Sound cannot be heard from the speakers. • Adjust the volume to the optimum level. •... - Page 136 All manuals and user guides at all-guides.com Symptoms Remedies/Causes • Tracks do not play back in the order you Playback order is determined when the files are recorded. have intended them to play. • Elapsed playing time is not correct. This sometimes occurs during play.
-
Page 137: Specifications
All manuals and user guides at all-guides.com Specifications AUDIO AMPLIFIER SECTION CD PLAYER SECTION Maximum Power Output: Type: Compact disc player Front/Rear: 50 W per channel Signal Detection Non-contact optical pickup System: (semiconductor laser) Continuous Power Output (RMS): Number of Channels: 2 channels (stereo) Front/Rear: 19 W per channel into... - Page 138 All manuals and user guides at all-guides.com Having TROUBLE with operation? Please reset your unit Refer to page of How to reset your unit EN, TH © 2006 Victor Company of Japan, Limited 1206DTSMDTJEIN...
- Page 139 „™È æ ‘ ° — ¥ ®”‡æ“–·∑πø‘ « À“°ø‘ « Ï ¢ “¥∫Ë Õ ¬ „ÀÈ ª √÷ ° …“√È “ π¢“¬‡§√◊ Ë Õ ß‡ ’ ¬ ß√∂¬πµÏ • Replace the fuse with one of the specified rating. If the fuse blows frequently, consult your JVC car audio •...
- Page 140 ¿“æµ— « Õ¬Ë “ ßµË Õ ‰ªπ’ È · ¥ß∂÷ ß °“√µ‘ ¥ µ— È ß ·∫∫∑— Ë « ‰ª À“°§ÿ ≥ ¡’ ª — ≠ À“À√◊ Õ µÈ Õ ß°“√¢È Õ ¡Ÿ ≈ ‡°’ Ë ¬ «°— ∫ ™ÿ ¥ µ‘ ¥ µ— È ß °√ÿ ≥ “ª√÷ ° …“°— ∫ ºŸ È ¢ “¬‡§√◊ Ë Õ ß‡ ’ regarding installation kits, consult your JVC car audio dealer or a company supplying kits.
- Page 141 All manuals and user guides at all-guides.com ENGLISH ‰∑¬ ELECTRICAL CONNECTIONS °“√‡™◊ Ë Õ ¡‚¥¬„™È ‰øøÈ “ Typical connections / °“√‡™◊ Ë Õ ¡µË Õ ·∫∫ª°µ Before connecting: Check the wiring in the vehicle carefully. Incorrect connection may cause serious °Ë...
- Page 142 §”·π–π” Remote lead (Blue with white stripe) “¬µ–°— Ë « •–¬–‰°• ( ’ π È ” ‡ß‘ π ≈“¬¢“«) JVC Amplifier Rear speakers To the remote lead of other equipment or automatic antenna if any ‡§√◊ Ë Õ ß¢¬“¬‡ ’ ¬ ß...
- Page 143 All manuals and user guides at all-guides.com CD RECEIVER KD-PDR55 ALAT PENERIMA CD KD-PDR55 For canceling the display demonstration, see page 6. Untuk membatalkan tampilan demonstrasi, lihat halaman 6. For installation and connections, refer to the separate manual. Untuk instalasi dan penyambungan, lihat buku pedoman terpisah. INSTRUCTIONS BUKU PETUNJUK GET0426-004A...
- Page 144 All manuals and user guides at all-guides.com Thank you for purchasing a JVC product. Please read all instructions carefully before operation, to ensure your complete understanding and to obtain the best possible performance from the unit. IMPORTANT FOR LASER PRODUCTS 1.
- Page 145 All manuals and user guides at all-guides.com How to use the M MODE button CONTENTS If you press M MODE, the unit goes into functions mode, ∞ then the number buttons and buttons work as Control panel ........4 different function buttons. Remote controller —...
-
Page 146: Control Panel
All manuals and user guides at all-guides.com Control panel Parts identification Display window SRC (source) button Remote sensor B BAND button DO NOT expose the remote sensor to strong light (standby/on attenuator) button / (direct sunlight or artificial lighting). Control dial S.BASS (super bass) indicator SEL (select) button DISC indicator... -
Page 147: Remote Controller
All manuals and user guides at all-guides.com Remote controller — Main elements and features RM-RK50 Installing the lithium coin battery (CR2025) (standby/on/attenuator) button • Turns the power on if pressed briefly or Aim the remote controller directly at the remote attenuates the sound when the power is on. -
Page 148: Getting Started
All manuals and user guides at all-guides.com To drop the volume in Getting started a moment (ATT) To restore the sound, press Basic operations the button again. To turn off the power Turn on the power. Ÿ Basic settings • See also “General settings — PSM” on pages 13 and You cannot select “CD”... -
Page 149: Radio Operations
All manuals and user guides at all-guides.com When an FM stereo broadcast is hard to Radio operations receive Lights up when monaural mode is activated. Ÿ Reception improves, but stereo effect will be lost. Lights up when receiving an FM stereo broadcast with sufficient signal strength. -
Page 150: Disc Operations
All manuals and user guides at all-guides.com Manual presetting Disc operations Ex.: Storing FM station of 92.5 MHz into preset number 4 of the FM1 band. Playing a disc in the unit All tracks will be played repeatedly until you change the source or eject the disc. - Page 151 All manuals and user guides at all-guides.com To select a particular track in a folder (for MP3 or Changing the display information WMA disc): While playing an audio CD or a CD Text Other main functions Skipping tracks quickly during play •...
-
Page 152: Ipod Operations
All manuals and user guides at all-guides.com iPod operations Selecting the playback modes You can use only one of the following playback modes You can play songs from an Apple iPod through this at a time. unit by connecting it with the supplied connection cable for iPod. - Page 153 All manuals and user guides at all-guides.com • If the selected item has another layer, you will Caution: enter the layer. Repeat steps 2 and 3 until the • Avoid using the iPod if it might hinder your safety desired track is played (see page 19). driving.
-
Page 154: Sound Adjustments
All manuals and user guides at all-guides.com Indication, [Range] Sound adjustments BAS * (bass), [–06 to +06] You can select a preset sound mode suitable to the Adjust the bass. music genre (iEQ: intelligent equalizer). MID * (mid-range), [–06 to +06] Adjust the mid-range frequencies sound level. -
Page 155: General Settings - Psm
All manuals and user guides at all-guides.com General settings — PSM You can change PSM (Preferred Setting Mode) items Repeat steps 2 and 3 to adjust other PSM listed in the table that follows. items if necessary. Finish the procedure. Select a PSM item. - Page 156 All manuals and user guides at all-guides.com Indications Item Setting, [reference page] ( : Initial) SCROLL * • ONCE : Scrolls the track information once. Scroll • AUTO : Repeats scrolling (at 5-second intervals). • OFF : Cancels. • Pressing D DISP for more than one second can scroll the display regardless of the setting.
-
Page 157: External Component Operations
All manuals and user guides at all-guides.com External component Title assignment operations You can assign names to 30 station frequencies (FM and AM) and up to 8 characters for each station name. You can connect an external component to the AUX (auxiliary) input jack on the control panel. -
Page 158: More About This Unit
All manuals and user guides at all-guides.com Disc operations More about this unit Caution for DualDisc playback • The Non-DVD side of a “DualDisc” does not comply Basic operations with the “Compact Disc Digital Audio” standard. Turning on the power Therefore, the use of Non-DVD side of a DualDisc on •... - Page 159 All manuals and user guides at all-guides.com • Do not use the following CD-Rs or CD-RWs: • This unit cannot play back the following files: – Discs with stickers, labels, or a protective seal stuck – MP3 files encoded with MP3i and MP3 PRO format. to the surface.
- Page 160 • iPod shuffle is not controllable. “HIGH PWR” to “LOW PWR” while the volume level • You can control the iPod from this unit when “JVC” or is set higher than “VOL 30,” the unit automatically “ ” appears on the iPod display.
- Page 161 All manuals and user guides at all-guides.com Hierarchical structure of file searching when an iPod is connected...
-
Page 162: Maintenance
All manuals and user guides at all-guides.com To keep discs clean Maintenance A dirty disc may not play correctly. If a disc does become dirty, wipe it with How to clean the connectors a soft cloth in a straight line from center Frequent detachment will deteriorate the connectors. -
Page 163: Troubleshooting
All manuals and user guides at all-guides.com Troubleshooting What appears to be trouble is not always serious. Check the following points before calling a service center. Symptoms Remedies/Causes • Sound cannot be heard from the speakers. • Adjust the volume to the optimum level. •... - Page 164 All manuals and user guides at all-guides.com Symptoms Remedies/Causes • Tracks do not play back in the order you Playback order is determined when the files are recorded. have intended them to play. • Elapsed playing time is not correct. This sometimes occurs during play.
-
Page 165: Specifications
All manuals and user guides at all-guides.com Specifications AUDIO AMPLIFIER SECTION CD PLAYER SECTION Maximum Power Output: Type: Compact disc player Front/Rear: 50 W per channel Signal Detection Non-contact optical pickup System: (semiconductor laser) Continuous Power Output (RMS): Number of Channels: 2 channels (stereo) Front/Rear: 19 W per channel into... - Page 166 All manuals and user guides at all-guides.com Having TROUBLE with operation? Please reset your unit Refer to page of How to reset your unit Ada MASALAH dengan cara pengoperasian? Setel kembali unit Anda Lihat halaman mengenai Bagaimana mereset unit anda EN, IN ©...
- Page 167 Notes: Catatan: • • Replace the fuse with one of the specified rating. If the fuse blows frequently, consult your JVC car audio Ganti sekring dengan voltase yang sudah ditetapkan. Jika sekring sering meledak, konsultasikan pada dealer. penyalur audio mobil JVC anda.
- Page 168 The following illustration shows a typical installation. If you have any questions or require information Ilustrasi berikut menunjukkan sebuah tipe pemasangan. Jika anda mempunyai suatu pertanyaan atau regarding installation kits, consult your JVC car audio dealer or a company supplying kits. informasi yang diperlukan mengenai alat-alat pemasangan, konsultasikan pada penyalur audio mobil JVC •...
- Page 169 All manuals and user guides at all-guides.com ENGLISH INDONESIA ELECTRICAL CONNECTIONS SAMBUNGAN-SAMBUNGAN LISTRIK Typical connections / Ciri khas sambungan-sambungan Before connecting: Check the wiring in the vehicle carefully. Incorrect connection may cause serious Sebelum penyambungan: Cek perkabelan dalam mobil dengan hati-hati. Penyambungan yang tidak damage to this unit.
- Page 170 Setel “L/O MODE ” ke “REAR” (Lihat halaman 14 dari BUKU PETUNJUK.) Remote lead (blue with white stripe) Ujung jauh (biru dengan strip putih) Rear speakers JVC Amplifier Speaker-speaker To the remote lead of other equipment or automatic antenna if any Penguat JVC belakang Ke ujung jauh dari peralatan lain atau antena otomatis jika ada Set “L/O MODE”...
- Page 171 All manuals and user guides at all-guides.com CD RECEIVER KD-PDR55 KD-PDR55 For canceling the display demonstration, see page 6. For installation and connections, refer to the separate manual. INSTRUCTIONS GET0426-005A [UT]...
- Page 172 All manuals and user guides at all-guides.com Thank you for purchasing a JVC product. Please read all instructions carefully before operation, to ensure your complete understanding and to obtain the best possible performance from the unit. IMPORTANT FOR LASER PRODUCTS 1.
-
Page 173: For Safety
All manuals and user guides at all-guides.com How to use the M MODE button CONTENTS If you press M MODE, the unit goes into functions mode, ∞ then the number buttons and buttons work as Control panel ........4 different function buttons. Remote controller —... -
Page 174: Control Panel
All manuals and user guides at all-guides.com Control panel Parts identification Display window SRC (source) button Remote sensor B BAND button DO NOT expose the remote sensor to strong light (standby/on attenuator) button / (direct sunlight or artificial lighting). Control dial S.BASS (super bass) indicator SEL (select) button DISC indicator... -
Page 175: Remote Controller
All manuals and user guides at all-guides.com Remote controller — Main elements and features RM-RK50 Installing the lithium coin battery (CR2025) (standby/on/attenuator) button • Turns the power on if pressed briefly or Aim the remote controller directly at the remote attenuates the sound when the power is on. -
Page 176: Getting Started
All manuals and user guides at all-guides.com To drop the volume in Getting started a moment (ATT) To restore the sound, press Basic operations the button again. To turn off the power Turn on the power. Ÿ Basic settings • See also “General settings — PSM” on pages 13 and You cannot select “CD”... -
Page 177: Radio Operations
All manuals and user guides at all-guides.com When an FM stereo broadcast is hard to Radio operations receive Lights up when monaural mode is activated. Ÿ Reception improves, but stereo effect will be lost. Lights up when receiving an FM stereo broadcast with sufficient signal strength. -
Page 178: Disc Operations
All manuals and user guides at all-guides.com Manual presetting Disc operations Ex.: Storing FM station of 92.5 MHz into preset number 4 of the FM1 band. Playing a disc in the unit All tracks will be played repeatedly until you change the source or eject the disc. - Page 179 All manuals and user guides at all-guides.com To select a particular track in a folder (for MP3 or Changing the display information WMA disc): While playing an audio CD or a CD Text Other main functions Skipping tracks quickly during play •...
-
Page 180: Ipod Operations
All manuals and user guides at all-guides.com iPod operations Selecting the playback modes You can use only one of the following playback modes You can play songs from an Apple iPod through this at a time. unit by connecting it with the supplied connection cable for iPod. - Page 181 All manuals and user guides at all-guides.com • If the selected item has another layer, you will Caution: enter the layer. Repeat steps 2 and 3 until the • Avoid using the iPod if it might hinder your safety desired track is played (see page 19). driving.
-
Page 182: Sound Adjustments
All manuals and user guides at all-guides.com Indication, [Range] Sound adjustments BAS * (bass), [–06 to +06] You can select a preset sound mode suitable to the Adjust the bass. music genre (iEQ: intelligent equalizer). MID * (mid-range), [–06 to +06] Adjust the mid-range frequencies sound level. -
Page 183: General Settings - Psm
All manuals and user guides at all-guides.com General settings — PSM You can change PSM (Preferred Setting Mode) items Repeat steps 2 and 3 to adjust other PSM listed in the table that follows. items if necessary. Finish the procedure. Select a PSM item. - Page 184 All manuals and user guides at all-guides.com Indications Item Setting, [reference page] ( : Initial) SCROLL * • ONCE : Scrolls the track information once. Scroll • AUTO : Repeats scrolling (at 5-second intervals). • OFF : Cancels. • Pressing D DISP for more than one second can scroll the display regardless of the setting.
-
Page 185: External Component Operations
All manuals and user guides at all-guides.com External component Title assignment operations You can assign names to 30 station frequencies (FM and AM) and up to 8 characters for each station name. You can connect an external component to the AUX (auxiliary) input jack on the control panel. -
Page 186: More About This Unit
All manuals and user guides at all-guides.com Disc operations More about this unit Caution for DualDisc playback • The Non-DVD side of a “DualDisc” does not comply Basic operations with the “Compact Disc Digital Audio” standard. Turning on the power Therefore, the use of Non-DVD side of a DualDisc on •... -
Page 187: Ipod Operations
All manuals and user guides at all-guides.com • Do not use the following CD-Rs or CD-RWs: • This unit cannot play back the following files: – Discs with stickers, labels, or a protective seal stuck – MP3 files encoded with MP3i and MP3 PRO format. to the surface. -
Page 188: General Settings-Psm
• iPod shuffle is not controllable. “HIGH PWR” to “LOW PWR” while the volume level • You can control the iPod from this unit when “JVC” or is set higher than “VOL 30,” the unit automatically “ ” appears on the iPod display. - Page 189 All manuals and user guides at all-guides.com Hierarchical structure of file searching when an iPod is connected...
-
Page 190: Maintenance
All manuals and user guides at all-guides.com To keep discs clean Maintenance A dirty disc may not play correctly. If a disc does become dirty, wipe it with How to clean the connectors a soft cloth in a straight line from center Frequent detachment will deteriorate the connectors. -
Page 191: Troubleshooting
All manuals and user guides at all-guides.com Troubleshooting What appears to be trouble is not always serious. Check the following points before calling a service center. Symptoms Remedies/Causes • Sound cannot be heard from the speakers. • Adjust the volume to the optimum level. •... - Page 192 All manuals and user guides at all-guides.com Symptoms Remedies/Causes • Tracks do not play back in the order you Playback order is determined when the files are recorded. have intended them to play. • Elapsed playing time is not correct. This sometimes occurs during play.
-
Page 193: Specifications
All manuals and user guides at all-guides.com Specifications AUDIO AMPLIFIER SECTION CD PLAYER SECTION Maximum Power Output: Type: Compact disc player Front/Rear: 50 W per channel Signal Detection Non-contact optical pickup System: (semiconductor laser) Continuous Power Output (RMS): Number of Channels: 2 channels (stereo) Front/Rear: 19 W per channel into... - Page 194 All manuals and user guides at all-guides.com Having TROUBLE with operation? Please reset your unit Refer to page of How to reset your unit EN, CT © 2006 Victor Company of Japan, Limited 1206DTSMDTJEIN...
- Page 195 • Be sure to ground this unit to the car’s chassis again after installation. 注意: Notes: • 把保險絲更換為額定負荷值的保險絲。如果保險絲經常燒壞,請向 JVC 汽車音響分銷商詢問。 • Replace the fuse with one of the specified rating. If the fuse blows frequently, consult your JVC car audio • 後置和前置揚聲器的最大輸入功率應大於 50 W,其阻抗為 4 Ω 8 Ω。如果最大功率小於 50 W, dealer.
- Page 196 The following illustration shows a typical installation. If you have any questions or require information 下面的圖解表示了典型的安裝程序。如果您有問題,或需要有關配套元件的資料,請向 JVC regarding installation kits, consult your JVC car audio dealer or a company supplying kits. 汽車音響分銷商或配套元件供應公司詢問。 • If you are not sure how to install this unit correctly, have it installed by a qualified technician.
- Page 197 All manuals and user guides at all-guides.com ENGLISH 中文 電路連接 ELECTRICAL CONNECTIONS Typical connections / 典型的接線方法 接線前: Before connecting: Check the wiring in the vehicle carefully. Incorrect connection may cause serious 仔細檢查汽車內的線路。不正確的接線會導致本機嚴重損壞。 damage to this unit. 電源線的引線和車身的連接器引線在顏色上可能有所不同。 The leads of the power cord and those of the connector from the car body may be different in color. 依照下圖所示之次序連接電源線的顏色導線。...
- Page 198 L/O MODE REAR 說明書的第 頁。) Remote lead (blue with white stripe) 遙控導線(藍色帶有白色條紋) JVC Amplifier Rear speakers To the remote lead of other equipment or automatic antenna if any 後置揚聲器 JVC 功率放大器 連接至其他裝置上的遙控導線或自動天線(若有裝設) Set “L/O MODE” to “WOOFER” (See page 14 of the INSTRUCTIONS.)