Table of Contents
Advertisement
Quick Links
Advertisement
Table of Contents

Related Manuals for Sony PEG-SJ20 Add-on Application


Summary of Contents for Sony PEG-SJ20 Add-on Application
- Page 1 Read This First Personal Entertainment Organizer PEG-SL10/PEG-SJ20/PEG-SJ30 © 2002 Sony Corporation 4-664-965-11(3) Chapter 1 What is the Sony CLIÉ Handheld? Chapter 2 Setting up your Sony CLIÉ Handheld – Basics Chapter 3 Setting up your Sony CLIÉ Handheld – Advanced...
- Page 2 The model number and serial number are located on the back of the product. Record the model number and the serial number in the space provided below. Refer to them whenever you call upon your Sony dealer regarding this product. Model No._____________ Serial No.______________ The socket-outlet shall be installed near the equipment and shall be easily accessible.
- Page 3 • In no event will SONY be liable for any financial damage or loss of profits, including claims made by third parties, arising out of the use of the software supplied with this player.
-
Page 4: Table Of Contents
PEG-SJ20, and PEG-SJ30 ... 7 Which manual to read? ... 8 Chapter 1 What is the Sony CLIÉ Handheld? What can you do with your Sony CLIÉ Handheld? ... 12 System requirements ... 13 Sony CLIÉ Handheld components .. 14 Locating front panel controls ... -
Page 5: About This Manual
About this manual Welcome to the Sony Personal Entertainment Organizer (referred to as the “CLIÉ handheld” or “Sony CLIÉ Handheld” in this manual). Your CLIÉ handheld comes with three manuals: Read This First (this guide) Operating Instructions (as a PDF file on the CD-ROM) Add-on Application Guide Before using your CLIÉ... - Page 6 About this manual Operating Instructions The Operating Instructions manual is on the supplied CD-ROM as a PDF file; you can view or print the file as necessary. The manual describes how to use your CLIÉ handheld and the Personal Information Management (PIM) applications that come with your CLIÉ...
-
Page 7: Differences Between The Peg-Sl10, Peg-Sj20, And Peg-Sj30
Differences between the PEG-SL10, PEG-SJ20, and PEG-SJ30 This manual describes the operation of three CLIÉ handheld models: PEG-SL10, PEG-SJ20, and PEG-SJ30. Following is the major differences in these models: PEG-SL10 • Two AAA (LR03) batteries • Monochrome LCD PEG-SJ20 • Built-in rechargeable battery •... -
Page 8: Which Manual To Read
Chapter 3 Exchanging and updating data ® using a HotSync operation Operating Instructions Chapter 4 Communicating using your Sony CLIÉ Handheld Add-on Application Guide Chapter 1 Viewing image files (PictureGear Pocket) Add-on Application Guide Chapter 2 Displaying image files one after... - Page 9 Set your favorite application to start automatically whenever you insert a Memory Stick media. Transfer data between your CLIÉ handheld and your computer using a Memory Stick media. Add-on Application Guide Chapter 6 Setting the Memory Stick automatic start function (Memory Stick Autorun) Add-on Application Guide Chapter 7...
- Page 11 Installation CD-ROM. Contents What can you do with your Sony CLIÉ Handheld? ... 12 System requirements ... 13 Sony CLIÉ Handheld components ... 14 Locating front panel controls ... 14 Locating back panel components ...
-
Page 12: What Can You Do With Your Sony Clié Handheld
What can you do with your Sony CLIÉ Handheld? Once you familiarize yourself with the basic workings of your CLIÉ handheld, you’ll easily be able to: Enter your schedule into the Date Book and view them by the day, week, or month, and even set an alarm to remind you of an important event. -
Page 13: System Requirements
• To install the Palm Desktop for CLIÉ software on Windows ® or Windows XP , log on as “Administrator” or using an account that has Administrator privileges. • Macintosh computers are not compatible with the Sony CLIÉ Handheld. ™ Desktop software on your computer, ® 98 Second Edition ®... -
Page 14: Sony Clié Handheld Components
Sony CLIÉ Handheld components Locating front panel controls PEG-SL10 ™ 1 Jog Dial Navigator Used to select and run applications or items. Depending on the application you use, specific functions are assigned to the navigator. For details, see “Using the Jog Dial Instructions manual. - Page 15 4 Application Buttons Activates the individual applications that correspond to the icons on the buttons: Date Book, Memo Pad. See “Assigning applications to buttons” in the Operating Instructions manual for details on reassigning these buttons to activate any application on your CLIÉ handheld. 5 Screen Displays the applications and information stored in your CLIÉ...
-
Page 16: Locating Back Panel Components
Sony CLIÉ Handheld components Locating back panel components PEG-SL10 1 Stylus Used to tap icons and buttons on the screen, or to write characters on the Graffiti writing area. For details, see “Using the stylus” in the Operating Instructions manual. - Page 17 Uses infrared technology to transmit data to and receive data from ® other CLIÉ or Palm OS operations. For details, see “Beaming between your Sony CLIÉ Handheld and ® another Palm OS PDA” in the Operating Instructions manual. 6 Hook for Strap Used to hook up a mobile phone strap (not supplied).
- Page 18 Sony CLIÉ Handheld components Removing the supplied protective soft cover from your CLIÉ handheld Slide A down (1), then remove the cover (2). Reattaching the protective soft cover Pull A outward (1) and place the tabs into the holes of the CLIÉ...
-
Page 19: Elements Of The Clié Interface
Elements of the CLIÉ interface 1 Battery Icon Displays the remaining charge in the battery. Tap the icon to show the battery's remaining charge by percentage and the amount of available memory. PEG-SL10; When your CLIÉ handheld is operating on the AC power source, the battery icon ( batteries are not charged. - Page 20 Sony CLIÉ Handheld components 4 Contrast/Brightness Adjustment Icon Tap this icon to adjust the contrast (PEG-SL10 and PEG-SJ20) or the brightness (PEG-SJ30) of the LCD screen of your CLIÉ handheld. Note If the digitizer preferences are not set correctly, you cannot adjust the contrast/brightness level properly.
-
Page 21: What Is On The Clié Installation Cd-Rom
What is on the CLIÉ Installation CD-ROM? CD-ROM contents The Installation CD-ROM that comes with your CLIÉ handheld contains the following applications and manuals: PC applications You can install the following PC applications and related online help files from the installer’s main launcher window: –... -
Page 22: How To Read The Pdf Manuals On The Cd-Rom
What is on the CLIÉ Installation CD-ROM? How to read the PDF manuals on the CD-ROM To view the PDF manuals contained on the Installation CD-ROM, you need the Acrobat Reader software installed on your computer. To install the Acrobat Reader software, see “Installing Acrobat Reader 5.0”... -
Page 23: Setting Up Your Sony Clié Handheld - Basics
Installing the batteries (PEG-SL10) ... 24 Charging your Sony CLIÉ Handheld (PEG-SJ20/PEG-SJ30) ... 26 Step 2: Turning on your Sony CLIÉ Handheld for the first time .. 28 Step 3: Entering data into your Sony CLIÉ Handheld ... 32 Step 4: Installing the Palm™ Desktop for CLIÉ software on your computer ... -
Page 24: Step 1: Supplying Power To Your Sony Clié Handheld
Step 1: Supplying power to your Sony CLIÉ Handheld Installing the batteries (PEG-SL10) Slide open the battery compartment lid and insert two size AAA (LR03) alkaline batteries. Be sure to line up the + and – on the batteries with the + and – in the battery compartment. - Page 25 When replacing the batteries • INSERT THE NEW BATTERIES WITHIN 1 MINUTE AFTER YOU REMOVED THE EXHAUSTED ONES. IF THE BATTERY IN YOUR CLIÉ HANDHELD IS FULLY DISCHARGED OR REMOVED, ALL DATA STORED ON THE SDRAM (MEMORY) IS LOST. IN SUCH A CASE, PERFORMING A ®...
-
Page 26: Charging Your Sony Clié Handheld (Peg-Sj20/Peg-Sj30)
Step 1: Supplying power to your Sony CLIÉ Handheld Charging your Sony CLIÉ Handheld (PEG-SJ20/PEG-SJ30) Note Before you use your CLIÉ handheld for the first time, make sure to charge it. You can charge your CLIÉ handheld by connecting the supplied AC adapter using the USB jack (mini-B) to your CLIÉ... - Page 27 When charging is completed The LED indicator of your CLIÉ handheld turns off. When you disconnect the AC adapter from your CLIÉ handheld, the battery charging icon changes to the battery icon ( Note IF THE BATTERY IN YOUR CLIÉ HANDHELD IS FULLY DISCHARGED, ALL DATA STORED ON THE SDRAM (MEMORY) IS LOST.
-
Page 28: Step 2: Turning On Your Sony Clié Handheld For The First Time
Step 2: Turning on your Sony CLIÉ Handheld for the first time The first time you start your CLIÉ handheld, setup instructions appear onscreen. Follow the onscreen instructions to perform initial settings, digitizer calibration, current time, date, and year settings (required for operation). - Page 29 Press lightly on the screen with the stylus. This action is called “tapping.” The digitizer calibration screen appears. Calibration aligns the internal circuitry of the handheld with its touch-sensitive screen so your CLIÉ handheld can detect the task you want to perform when you tap an element on the screen.
- Page 30 Step 2: Turning on your Sony CLIÉ Handheld for the first time After calibration completes, a screen for setting time and date appears. Tap the Set Date box. The Set Date screen appears. Tap the arrow b or B next to the year to select the current year.
- Page 31 Tap each number of the minute, and then tap the arrow v or V to set the minutes to the current time. Tap AM or PM. Tap OK. The Set Time screen closes. Tap Next. The Setup Complete screen appears. Tap Next.
-
Page 32: Step 3: Entering Data Into Your Sony Clié Handheld
Step 3: Entering data into your Sony CLIÉ Handheld There are three ways to enter data into your CLIÉ handheld: ® – Using Graffiti writing – Using the onscreen keyboard – Using your computer keyboard Graffiti writing Your CLIÉ handheld includes Graffiti writing application as the primary system for entering text and numbers. - Page 33 After a keyboard is open, you can tap to open any of the other keyboards, including the international keyboard. For details, see “Using the onscreen keyboard” in the Operating Instructions manual. Caps lock Caps shift Tap here to display alphabetic keyboard Numeric Tap here to display numeric keyboard...
-
Page 34: Step 4: Installing The Palm™ Desktop For Clié Software On Your Computer
Palm Desktop for CLIÉ software. The installation of the software might not be performed correctly. • If you are already using a Sony CLIÉ Handheld or other Palm device, and Palm Desktop software is installed on your computer: uninstall it and reinstall the Palm Desktop for CLIÉ... - Page 35 Click Install Palm Desktop for CLIÉ. The setup program starts and the Welcome screen is displayed. Click Next. The Palm Desktop for CLIÉ 4.0.1 software installation begins. Follow the onscreen instructions, then the following dialog box appears. Select the software you will use to synchronize your CLIÉ handheld with your computer.
- Page 36 You need Internet access for the online customer registration. You can take advantage of Sony’s commitment to quality customer support and 9 months of the extended limited warranty for a total of 12 months from the original date of purchase when you register your CLIÉ...
- Page 37 Click Finish. Note Make sure you perform a HotSync operation before installing any third- party applications. (See pages 53 - 54) Upgrading the existing Palm Desktop software Multiple versions of Palm Desktop software cannot be installed on one computer. If an older version of Palm Desktop for CLIÉ software already exists, it is recommended that you uninstall it prior to the new installation.
-
Page 38: For Clié Software On Your Computer
Step 5: Connecting your Sony CLIÉ Handheld and your computer via the USB cable The USB cable that comes with your CLIÉ handheld enables you to synchronize the information on your CLIÉ handheld with the Palm Desktop for CLIÉ software on your computer using HotSync technology. -
Page 39: Connecting The Usb Cable Using The Plug Adapter (Peg-Sj20/Peg-Sj30)
Connecting the USB cable using the plug adapter (PEG-SJ20/PEG-SJ30) Connect the USB cable’s connector (mini-B) to the USB jack (mini-B) of the plug adapter (1) then connect the plug adapter to the interface connector of your CLIÉ handheld (2). USB connector (mini-B) Connect the USB cable’s connector (“A”... -
Page 40: Step 6: Performing A Hotsync Operation For The First Time
Step 6: Performing a HotSync for the first time What is a HotSync operation? HotSync, which is a technology particular to a Palm OS device, is the one-step operation that allows you to synchronize data between your CLIÉ handheld and your computer, and back up the CLIÉ... - Page 41 HotSync Manager. Then click the HotSync button on your CLIÉ handheld to start the HotSync operation. button during a HotSync operation. It might icon is displayed in the Windows task ® XP), Sony Handheld, and then Continued on next page...
- Page 42 Start, point to Programs (All Programs in ® Windows XP), Sony Handheld, and click Palm Desktop for CLIÉ. The Palm Desktop for CLIÉ software starts. All the main applications on your CLIÉ handheld are also available in the Palm Desktop for CLIÉ...
-
Page 43: Setting Up Your Sony Clié Handheld - Advanced
CD-ROM on your computer, and installing add-on applications on your CLIÉ handheld. Contents Checking the bundled applications on your Sony CLIÉ Handheld ... 44 Overview of basic Palm OS Overview of Sony applications ... 48 Installing the supplied applications on your computer ... 52 Installing PictureGear™... -
Page 44: Checking The Bundled Applications On Your Sony Clié Handheld
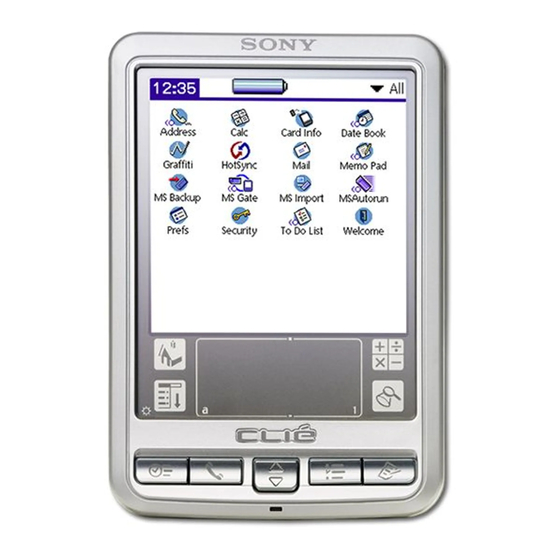
Checking the bundled applications on your Sony CLIÉ Handheld After you make your CLIÉ handheld ready for use, start the Application Launcher to display all the available applications on your CLIÉ handheld. To open an application from the Application Launcher screen Tap the Home The Application Launcher screen appears. -
Page 45: Overview Of Basic Palm Os ® Applications
Overview of basic Palm OS Your CLIÉ handheld comes with the following Palm OS basic applications: Date Book, Address Book, To Do List, Memo Pad, and Calculator applications. This section gives an overview of these basic applications. Date Book Date Book lets you quickly and easily schedule appointments or any kind of activity associated with a time and date. -
Page 46: Memo Pad
Checking the bundled applications on your Sony CLIÉ Handheld • Define which phone number appears in the Address List for each Address Book entry. • Attach a note to each Address Book entry, in which you can enter additional information about the entry. - Page 47 Calc (Calculator) Calculator enables you to perform addition, subtraction, multiplication, division, and calculate square roots. In Calculator, you can do the following: • Perform basic calculations. • Store and retrieve values. • Display the last series of calculations, which is useful for confirming a series of “chain”...
-
Page 48: Overview Of Sony Applications
Sony CLIÉ Handheld Overview of Sony applications In addition to the basic Palm OS applications, your CLIÉ handheld also offers original Sony applications. This section describes them. Note The applications provided with this CLIÉ handheld (PEG-SL10/PEG-SJ20/PEG- SJ30) are not guaranteed to work on other devices. - Page 49 CLIÉ Paint The CLIÉ Paint application is used to draw shapes, letters, or patterns on PGP format images. You can also draw from scratch on a white background. In the CLIÉ Paint application, you can do the following: • Draw on a PGP format image (or a white background) using various drawing tools.
- Page 50 Checking the bundled applications on your Sony CLIÉ Handheld Memory Stick Autorun The Memory Stick Autorun (MS Autorun) application is used to start a specified application when Memory Stick media is inserted into your CLIÉ handheld. In the Memory Stick Autorun application, you can do the following: •...
- Page 51 Memory Stick Backup The Memory Stick Backup (MS Backup) application is used to back up your CLIÉ data on a Memory Stick media, unlike the HotSync operation that backs up data to your computer. In the Memory Stick Backup application, you can do the following: •...
-
Page 52: Installing The Supplied Applications On Your Computer
Installing the supplied applications on your computer From the installation launcher window of the supplied CLIÉ Installation CD-ROM, you can install the following software on your computer’s hard disk. Installing PictureGear The PictureGear 4.6Lite software allows you to transfer image or movie files between your computer and your CLIÉ... -
Page 53: Installing Memory Stick Export
Select your CLIÉ handheld model (PEG-SL10, PEG-SJ20, or PEG-SJ30). Click Install CLIÉ Utilities. The CLIÉ utilities window is displayed. Click Install CLIÉ Image Software. Click Install QuickTime. The QuickTime 5 software installation starts. Follow the onscreen instructions to complete the installation. Installing Memory Stick Export To use the Memory Stick Import/Export feature, you need to install the Memory Stick Export software onto your computer. -
Page 54: Installing Other Third-Party Applications On The Supplied Cd-Rom
Installing the supplied applications on your computer Installing other third-party applications on the supplied CD-ROM You can install other add-on applications on your computer and then install them on your CLIÉ handheld at the next HotSync For details, see “Installing add-on applications from the Palm Desktop for CLIÉ... -
Page 55: Uninstalling The Supplied Applications
Click Start from the taskbar, then click Run. The Run window is displayed. Type or select “E:\PC\Acrobat\ar500enu.exe” in the text box, and click Run. (If necessary, replace “E:” with the drive letter of your CD-ROM drive.) You can also use Browse to select the setup program. The Acrobat Reader 5.0 software installation starts. -
Page 56: Installing Add-On Applications On Your Sony Clié Handheld Or Memory Stick Media
A variety of third-party applications are also available for your CLIÉ handheld, such as games and other software that run on the Palm OS For information on the latest third-party applications, see the Sony official CLIÉ Web site (http://www.sony.com/clie/). Notes •... -
Page 57: Installing Add-On Applications From The Palm™ Desktop For Clié Software
HotSync operation. Copy or download the application you want to install into the Add-on folder in the Sony CLIÉ Handheld folder on your computer (example : C:\Program Files\Sony Handheld\Add-on). If you want to copy to a different folder, specify the folder in step 5. -
Page 58: Step 6: Performing A Hotsync Operation For The First Time
Installing add-on applications on your Sony CLIÉ Handheld or Memory Stick media Click Add. The Open File dialog box appears. The supplied add-on applications are stored in the Add-on folder. Select the application(s) you want to install on your CLIÉ... - Page 59 • Click Start on the taskbar, point to Programs (All Programs ® in Windows XP), Sony Handheld, and then click Install Tool. • Double-click any file with a PRC, or PDB file extension. To install applications to the Memory Stick media...
-
Page 60: Installing Add-On Applications By Beaming Them From Another Palm Os Device
Installing add-on applications on your Sony CLIÉ Handheld or Memory Stick media Installing add-on applications by beaming them from another Palm OS Your CLIÉ handheld is equipped with an IR (infrared) port that you can use to beam an application to another Palm OS is close by and also has an IR port. - Page 61 Tap the application you want to transfer. Note Some applications are copy-protected and cannot be beamed. These are listed with the lock icon next to them. Tap Beam. When the Beam dialog box appears, point the IR port directly at the IR port of the receiving handheld. For best results, the handhelds should be 4 to 8 inches (approximately 10 to 20 centimeters) apart, and the path between the two handhelds must be clear of obstacles.
-
Page 62: Removing Add-On Applications
Installing add-on applications on your Sony CLIÉ Handheld or Memory Stick media Removing add-on applications If the memory of your CLIÉ handheld or Memory Stick media is full, or you decide that an add-on application is no longer needed, you can remove it from your CLIÉ... -
Page 63: Customer Registration
Desktop for CLIÉ software, follow the instructions in this section to complete the registration. Note Your computer needs to be connected to the internet to complete the registration. Double-click the Sony CLIÉ Registration icon on the ® Windows desktop or click Start on the taskbar, point to Programs (All Programs in Windows Handheld, and then click Sony CLIÉ... - Page 68 For the latest support information, check our official Sony CLIÉ Web site http://www.sony.com/clie/ For information on accessories http://www.sonystyle.com/micros/ clie/accessories/index.html...