Sony Handycam DCR-TRV361 Operation Manual
Sony operating instructions digital video camera recorder dcr-trv361/trv460
Hide thumbs
Also See for Handycam DCR-TRV361:
- Service manual (64 pages) ,
- Service manual (42 pages) ,
- Operation manual (136 pages)

Related Manuals for Sony Handycam DCR-TRV361


Summary of Contents for Sony Handycam DCR-TRV361
- Page 1 Camera Operations Guide Read this first SERIES © 2004 Sony Corporation Digital Video Camera Recorder DCR-TRV361/TRV460 3-087-921-12(1)
-
Page 2: Read This First
Read this first Before operating the unit, please read this manual thoroughly, and retain it for future reference. WARNING To prevent fire or shock hazard, do not expose the unit to rain or moisture. This symbol is intended to alert the user to the presence of uninsulated “dangerous voltage”... -
Page 3: Notes On Use
– Connect the equipment to an outlet on a circuit different from that to which the receiver is connected. – Consult a Sony dealer or an experienced radio/TV technician for help. The interface cable supplied must be used with the... - Page 4 Then, touch the buttons displayed on the screen. Touch the button on the LCD screen. • You can change the language to be used for screen display on your camcorder (p. 22) • Do not hold the camcorder by the following parts. Viewfinder LCD panel Battery pack...
-
Page 5: Table Of Contents
Table of Contents Read this first ... 2 Quick Start Guide Recording movies ... 8 Recording still images ... 10 Recording/Playing back with ease ... 12 Getting started Step 1: Checking supplied items... 13 Step 2: Charging the battery pack... 14 Using an outside power source ... - Page 6 Adjusting the exposure... 35 Adjusting the exposure for backlit subjects ... 35 Fixing the exposure for the selected subject – Flexible spot meter ... 35 Adjusting the exposure manually ... 36 Recording in dark places – NightShot plus, etc..37 Adjusting the focus...
- Page 7 Printing recorded images (PictBridge compliant printer) Troubleshooting Troubleshooting ...103 Warning indicators and messages ...110 Additional Information Using your camcorder abroad ...114 Usable cassette tapes ...115 About the “Memory Stick” ...116 About the “InfoLITHIUM” battery pack ...118 About i.LINK ...119 Maintenance and precautions ...120 Specification ...123...
-
Page 8: Quick Start Guide
Quick Start Guide Recording movies Attach the charged battery pack to the camcorder. To charge the battery, see page 14. Lift up the viewfinder. Insert a cassette into the camcorder. Slide the OPEN/ EJECT lever in the direction of the arrow to open the lid. -
Page 9: Start Recording While Checking The Subject On The Lcd Screen
The date and time is not set up in the default setting. To set the date and time, see page 19. Remove the lens cap. Lens cap is not attached when you purchase your camcorder (p. 126). Press OPEN and open the LCD panel. While pressing the... -
Page 10: Recording Still Images
Recording still images Attach the charged battery pack to the camcorder. To charge the battery, see page 14. Lift up the viewfinder. Insert a “Memory Stick” into the camcorder. Insert it so that the b mark is at the bottom left corner. - Page 11 The date and time is not set up in the default setting. To set the date and time, see page 19. Remove the lens cap. Lens cap is not attached when you purchase your camcorder (p. 126). Press OPEN and open the LCD panel. While pressing the...
-
Page 12: Recording/Playing Back With Ease
Recording/Playing back with ease By switching to Easy Handycam operation, recording/playback operation becomes even easier. Easy Handycam operation allows easy recording/playback for even first time users by providing only the basic functions for recording/playback. Press EASY when recording/ playing back. EASY lights up in blue (1) and screen font size increases (2) during Easy Handycam operation. -
Page 13: Getting Started
Make sure you have following items supplied with your camcorder. The number in parentheses indicates the number of that item supplied. “Memory Stick” 8MB (1) (DCR-TRV361) “Memory Stick” media is only supplied with DCR-TRV361. There is no “Memory Stick” media supplied with DCR-TRV460. -
Page 14: Step 2: Charging The Battery Pack
Battery pack With the v mark on the DC plug facing up, connect the AC Adaptor to the DC IN jack on your camcorder. AC Adaptor Connect the power cord to the AC Adaptor. Connect the power cord to the wall outlet. - Page 15 Slide the POWER switch up to (CHG) OFF. The CHG (charge) lamp lights up and charging starts. After charging the battery The CHG (charge) lamp turns off when the battery is fully charged. Disconnect the AC Adaptor from the DC IN jack. To remove the battery pack POWER switch BATT(battery)
-
Page 16: Charging Time
• The power will not be supplied from the battery pack when the AC Adaptor is connected to the DC IN jack of your camcorder, even if its power cord is disconnected from the wall outlet. • The recording and playback time will be shorter when you use your camcorder in low temperature. -
Page 17: Using An Outside Power Source
PRECAUTION Even if your camcorder is turned off, AC power (house current) is still supplied to it while connected to the wall outlet via the AC Adaptor. -
Page 18: Step 4: Adjusting The Lcd Panel And Viewfinder
180 degrees Maximum 90 degrees Press OPEN and open the LCD panel. Open the LCD panel 90 degrees to the camcorder, then rotate it to the desired position. To adjust the brightness of the LCD screen Touch Touch [LCD BRIGHT]. -
Page 19: Step 5: Setting The Date And Time
Note • If you do not use your camcorder for about 3 months, the built-in rechargeable button-type battery gets discharged and the date and time settings may be cleared from the memory. In that case, charge the rechargeable button-type battery (p. -
Page 20: Step 6: Inserting The Recording Media
• Do not force the cassette into the compartment. This may cause a malfunction of your camcorder. • The recording time when you use your camcorder is half of the indicated time on Hi8 select the LP mode in the menu settings, the recording time is 3/4 of the indicated time on Hi8 tape. -
Page 21: Inserting A "Memory Stick
116. b Note • When using the half-sized “Memory Stick,” the “Memory Stick Duo,” make sure you attach the Memory Stick Duo adaptor. Your camcorder may malfunction when it is inserted without an adaptor (p. 117). b mark Insert the “Memory Stick”... -
Page 22: Step 7: Setting The Screen Language
• When the access lamp is lit or flashing, your camcorder is reading/writing data from/to the “Memory Stick.” Do not shake or knock your camcorder, turn the power off, eject the “Memory Stick,” or remove the battery pack. Otherwise, image data may be damaged. - Page 23 Select the desired language with , then touch z Tip • Your camcorder offers [ENG[SIMP]](simplified English) for when you cannot find your native tongue among the options. Getting started...
-
Page 24: Recording
To record on a tape Slide the POWER switch until the CAMERA-TAPE lamp lights up, and your camcorder is set to the standby mode. To record on a “Memory Stick” – MPEG MOVIE EX Slide the POWER switch repeatedly until... -
Page 25: Remaining Battery
Personal Menu. In order to use other menu items, add them to the Personal Menu. z Tip • If you do not use your camcorder for a long time, remove the cassette and store it. Indicators displayed during recording on a tape The indicators will not be recorded on the tape. -
Page 26: Recording For A Longer Time
(MSX-256) 512MB 01:25:20 (MSX-512) 02:50:40 (MSX-1G) * Supplied with DCR-TRV361 only. Using zoom When the CAMERA-TAPE mode is selected, you can choose zoom to magnification levels greater than 20 times, and from that point activate the digital zoom ([DIGITAL ZOOM], p. 63). -
Page 27: Using The Built-In Light
• The battery pack discharges quickly while the built- in light is turned on. • When you do not use your camcorder, turn the built- in light off and remove the battery pack to avoid turning on the built-in light accidentally. -
Page 28: Recording In Mirror Mode
You can also utilize this function when recording yourself, to keep the attention of small children attracted to the camcorder while you record them. Open the LCD panel 90 degrees to the camcorder, then rotate it 180 degrees towards the subject. -
Page 29: Recording Still Images
Press REC START/STOP. You will hear a beep sound counting down for about 10 seconds (The count down indication begins from 8). The recording starts. To stop recording, press REC START/ STOP. To cancel the count down Touch [RESET] or press REC START/STOP. To cancel the self-timer Follow steps 1 and 2, then select [OFF] in step Recording still... - Page 30 Select the [STILL SET], then [ Your camcorder compensates for camera-shake when recording moving subjects in the [FIELD] mode. Your camcorder records in high quality in the [FRAME] mode (p. 65). Indicators displayed during recording A Recording folder B Quality ([FINE]) or C Personal Menu button (p.
-
Page 31: Selecting Image Quality
2850 (MSX-512) 1GB (MSX-1G) 5900 14500 * Supplied with DCR-TRV361 only. z Tip • The still image size is 640 × 480 dots only. Using the self-timer With the self-timer, you can record a still image after a delay of about 10 seconds. -
Page 32: Recording A Still Image On A "Memory Stick" While Recording Movies On A Tape
Press PHOTO. You will hear a beep sound counting down for about 10 seconds (The count down indication begins from 8). The image is recorded. When bars of disappears, the image is recorded on the “Memory Stick.” To cancel the count down Touch [RESET]. -
Page 33: Recording With Ease - Easy Handycam
Recording with ease – Easy Handycam With this Easy Handycam operation, most of the camera settings are set to automatic mode, only basic functions become available, and screen font size increases for easy viewing. Even first time users can enjoy easy recording. -
Page 34: Recording A Still Image
Recording a still image Remove the lens cap. Pull the lens cap string down and attach it to the grip belt. Press OPEN and open the LCD panel. Slide the POWER switch repeatedly until the CAMERA-MEMORY lamp lights up. Slide the POWER switch while pressing the green button. -
Page 35: Adjusting The Exposure
Adjusting the exposure The exposure is adjusted automatically in the default setting. Adjusting the exposure for backlit subjects When your subject has its back to the sun or other light, you can adjust the exposure to prevent the subject from becoming shadowed. -
Page 36: Adjusting The Exposure Manually
b Notes • You cannot use the Flexible spot meter together with: – Color Slow Shutter function – NightShot plus function • If you set [PROGRAM AE], [SPOT METER] is automatically set to [AUTO]. z Tip • If you set [SPOT METER], [EXPOSURE] is automatically set to [MANUAL]. -
Page 37: Recording In Dark Places - Nightshot Plus, Etc
Recording in dark places – NightShot plus, etc. You can record subjects in dark places (such as when capturing the face of your baby sleeping) with the NightShot plus, Super NightShot plus or Color Slow Shutter function. The NightShot plus and Super NightShot plus function enable you to record an image brighter and smoother. -
Page 38: Adjusting The Focus
• When using the Super NightShot plus or Color Slow Shutter function, the shutter speed of your camcorder changes depending on the brightness. The motion of the picture may slow down at this time. • Adjust the focus manually when it is hard to focus automatically. -
Page 39: Adjusting The Focus Manually
b Note • You cannot use the SPOT FOCUS function together with [PROGRAM AE]. z Tip • If you set [SPOT FOCUS], [FOCUS] is automatically set to [MANUAL]. Adjusting the focus manually You can adjust the focus manually according to the recording conditions. Use this function in the following cases. -
Page 40: Recording A Picture Using Various Effects
Recording a picture using various effects Fading in and out of a scene – FADER You can add the following effects to currently recording pictures. [BLACK FADER] [WHITE FADER] [MOSAIC FADER] [MONOTONE] When fading in, the picture gradually changes from black-and-white to color. When fading out, the picture gradually changes from color to black-and-white. -
Page 41: Using Special Effects - Digital Effect
Touch the desired effect, then touch When you touch [OVERLAP], [WIPE] and [DOT FADER], the image on the tape in your camcorder is stored as a still image. (While storing the image, the screen turns to blue.) 60min STBY 0:00:00... - Page 42 [OLD MOVIE] You can add an old movie-type atmosphere to pictures. Your camcorder automatically records pictures in the letterbox mode for all screen size, sepia in color, and at a slower shutter speed. Slide the POWER switch to select the CAMERA-TAPE mode.
-
Page 43: Overlaying Still Images On Movies On A Tape - Memory Mix
Check that you have a “Memory Stick” with the still image to be superimposed and a tape (only if you are recording on tape) in your camcorder. Slide the POWER switch repeatedly to select the CAMERA-TAPE mode (when you are recording on a tape) or... -
Page 44: Searching For The Starting Point
CAMERA-TAPE mode. Touch 60min EDIT Touch The last scene of the most recent recording is played back for about 5 seconds, and the camcorder enters the standby mode at the point where the last recording has finished. POWER switch STBY 0:00:00... -
Page 45: Searching Manually - Edit Search
Touch once. The last few seconds of the most recently recorded scene are played back. Then, your camcorder is set to the standby mode. b Note • For DCR-TRV460: The Rec review function does not work for the tapes recorded on other devices in the Hi8 8 mm system. -
Page 46: Playback
Playback Viewing movies recorded on a tape Make sure you have a recorded cassette inserted into your camcorder. Some of the operations are possible using the Remote Commander or using the touch panel. When you want to play back recordings on your TV, see page 56. -
Page 47: Playing Back In Various Modes
Digital8 For DCR-TRV460: Noise may appear when your camcorder plays back tapes recorded on other devices in the Hi8 /standard 8 mm During playback or playback pause,... -
Page 48: Viewing Recordings With Added Effects - Digital Effect
8 mm system. z Tip • You cannot record the pictures edited using special effects on the tape in your camcorder, but you can copy them to a “Memory Stick” (p. 89) or another tape (p. 87). POWER switch DV Interface. -
Page 49: Viewing Recordings On A "Memory Stick
When you have a lot of pictures, you can list them to search through them easily. Make sure you have a recorded “Memory Stick” inserted into your camcorder. When you want to play back a recorded picture on your TV, see page 56. -
Page 50: Playing Back In Various Modes From A "Memory Stick
Indicators displayed during “Memory Stick” playback 60min 1 0 / 10 101–0010 0:00:00 P-MENU A Remaining battery B Picture number/Total number of recorded pictures in the current playback folder C Playback folder D Playing time (movies only) E Previous/next folder icon The following indicators appear when the first or last picture of the current folder is displayed and when there are multiple... -
Page 51: Playing Back With Ease - Easy Handycam
Also screen font size increases for , then touch easy viewing. Make sure you have a recorded cassette or a recorded “Memory Stick” inserted into your camcorder. OPEN Press OPEN and open the LCD panel. Slide the POWER switch repeatedly until the PLAY/EDIT lamp lights up. -
Page 52: Making Full Use Of Easy Handycam Operation
Play back a picture. When playing back on a tape The following buttons can be operated. (play/pause)/ (fast forward)/ (stop)/ (rewind) You can operate these operations and SLOW on the Remote Commander. When playing back on a “Memory Stick” Touch The following buttons can be operated. -
Page 53: Various Playback Functions
Various playback functions You can magnify a small subject in a recording and display it on the screen. You can also display the recorded date and the name of the folder in which the picture is recorded. DSPL/BATT INFO Magnifying pictures – Tape playback zoom/Memory playback zoom You can magnify movies recorded on a tape... -
Page 54: Displaying The Screen Indicators
z Tip • If you press DSPL/BATT INFO during the playback zoom operation, the frame will disappear. Displaying the screen indicators You can choose to display the time code, tape counter, and other information on the screen. Press DSPL/BATT INFO. The indicators appear/disappear as you press the button. -
Page 55: Shutter Speed
D Gain* E Shutter speed F Aperture value * Appears only during tape playback b Notes • Camera setting data do not appear when movies on a “Memory Stick” are played back. • For DCR-TRV460: The data code function does not work with tapes recorded on other devices in the Hi8 8 mm system. -
Page 56: Playing The Picture On A Tv
S video plug alone. When your TV is connected to a VCR Connect your camcorder to the LINE IN input on the VCR using the A/V connecting cable. Set the input selector on the VCR to LINE. -
Page 57: Locating A Scene On A Tape For Playback
Locating a scene on a tape for playback Searching quickly for a desired scene – Zero set memory m REW PLAY STOP DISPLAY ZERO SET MEMORY During playback, press ZERO SET MEMORY on the Remote Commander at the point you want to locate later on. - Page 58 Press STOP on the Remote Commander. b Notes • If one day’s recording is less than 2 minutes, your camcorder may not accurately find the point where the recording date changes. • The Date search will not function correctly when there is a blank section between recorded sections on the tape.
-
Page 59: Advanced Operations
You can also touch the item directly to select it. You can scroll and see all items. The POWER switch available items vary depending on the power mode of your camcorder. Unavailable items will be grayed out. 60min REMOTE CTRL: ON Select the desired setting. - Page 60 To use the short-cuts of the Personal Menu The available items vary depending on the power mode of your camcorder. Unavailable items will be grayed out. You can customize the short-cuts (p. 83). Touch Touch the desired item.
-
Page 61: Using The (Camera Set) Menu
** (sunset & moon) LANDSCAPE** (landscape) ( * Your camcorder is adjusted to focus only on subjects in the middle to far distance. setting is selected. The settings you can adjust vary depending on the power mode of your camcorder. The screen shows the items you can currently operate. - Page 62 **Your camcorder is adjusted to focus only on distant subjects. SPOT METER See page 35 for details. EXPOSURE See page 36 for details. AUTO SHUTTER SPOT FOCUS See page 38 for details. FOCUS See page 39 for details. SUPER NSPLUS See page 37 for details.
- Page 63 With this function [ON], your camcorder offers even wider angles when you move the power zoom lever to the “W” side than recording in [OFF]. When you connect your camcorder to a TV compatible with the ID-1/ID-2 system and play the tape, the TV switches to full mode automatically.
- Page 64 * Picture appears in full screen when the wide-screen TV switches to full mode. **Played in 4:3 mode. When you play a picture in the wide mode, it appears as you have seen on the LCD screen. GOFF ON ( Tips •...
-
Page 65: Using The (Memory Set) Menu
GAUTO indicators in parentheses appear when the setting is selected. The settings you can adjust vary depending on the power mode of your camcorder. The screen shows the items you can currently operate. Unavailable items will be grayed out. 60min... - Page 66 The supplied* or newly purchased “Memory Stick” has been formatted at the factory, and does not require formatting. For details on the “Memory Stick,” see page 116. * Memory Stick media is only supplied with DCR-TRV361. Touch To cancel formatting, select [NO].
- Page 67 Touch Notes • You cannot delete the created folders using your camcorder. You will have to format the “Memory Stick” (p. 66), or delete them using your computer. • The number of pictures that can be recorded on a “Memory Stick” decreases as the number of folders increases on the “Memory Stick.”...
-
Page 68: Frame Rec/Interval Rec Etc
(PICT. setting is selected. The settings you can adjust vary depending on the power mode of your camcorder. The screen shows the items you can – PICT. currently operate. Unavailable items will be grayed out. -
Page 69: Memory Mix
Touch [ON] or [OFF], then GON ( Touch [END]. Touch [START]. Your camcorder plays back the images recorded on the “Memory Stick” in sequence. To cancel the slide show, touch [END]. To pause, touch [PAUSE]. Select to record picture appearing mosaic- patterned. - Page 70 • If movies are played in the slide show, you can adjust the volume by touching (decrease)/ FRAME REC You can record pictures with a stop-motion animated effect by alternately frame recording and then moving the subject a little. Operate your camcorder using the Remote Commander to prevent camera shake. GOFF ON ( Notes •...
- Page 71 GOFF To deactivate interval recording. ON ( To record moving pictures on a tape in the selected interval. Touch flashes on the screen. Press REC START/STOP. stops flashing and the Interval recording starts. To cancel interval recording, select [OFF] in step 7. Notes •...
-
Page 72: Demo Mode
– When a cassette or “Memory Stick” is inserted. – When a mode other than CAMERA-TAPE is selected. • If [A.SHUT OFF] is set to [5 min] when the camcorder is used on the battery pack, the power will be turned off after approximately 5 minutes (p. 81). -
Page 73: Using The (Edit/Play) Menu
See page 88, 89 for details. BURN DVD When your camcorder is connected to a Sony VAIO series personal computer, you can easily burn the picture recorded on the tape on a DVD (Direct Access to “Click to DVD”) using this command. See the supplied “Computer Applications Guide”... - Page 74 Select a desired title from the displayed titles (2 original titles that you have created before and the preset titles that have been stored in your camcorder). You can create original titles (up to 2 types of title of within 20 characters each) in the following procedure.
- Page 75 Touch Notes • When you are using your camcorder on the battery pack and do not operate it for 5 minutes, the power automatically goes off as the default setting. If you may take 5 minutes or longer to enter characters, set [A.SHUT OFF] on the [NEVER] (p.
-
Page 76: Using The (Standard Set) Menu
Select to record in the SP (Standard Play) mode on a cassette. Select to increase the recording time to 1.5 times the SP mode (Long Play). The use of Sony cassette is recommended to get the most out of your camcorder. - Page 77 GSTEREO Notes • You can playback a dual sound track cassette on your camcorder. However, you cannot record a dual sound track on your camcorder. • The setting returns to [STEREO] when you disconnect the power source from your camcorder for more than 5 minutes.
- Page 78 You can adjust the brightness of the LCD screen’s backlight. GNORMAL BRIGHT Notes • When you connect your camcorder to outside power sources, [BRIGHT] is automatically selected for the setting. • When you select [BRIGHT], battery life is reduced by about 10 percent during recording. LCD COLOR...
- Page 79 PB MODE For DCR-TRV460: GAUTO Note • The setting returns to [AUTO] when you disconnect the power source from your camcorder or slide the power switch. USB-CAMERA You can connect a USB cable (supplied) to your camcorder, and view the picture displayed on the screen of your camcorder on your computer (USB Streaming).
-
Page 80: Data Code
USB-PLY/EDT You can connect a USB cable (supplied) to your camcorder, and view the picture on the tape or “Memory Stick” in your camcorder on your computer. For details, refer to the “Computer Applications Guide.” GSTD-USB PictBridge USB STREAM DATA CODE... - Page 81 GLCD PANEL V-OUT/PANEL Note • You cannot input a signal to your camcorder if you press DSPL/BATT INFO while [V- OUT/PANEL] is selected. MENU ROTATE You can select the scrolling direction (up or down) of the menu items on the LCD...
-
Page 82: Etc
You can set the date and time (p. 19). WORLD TIME You can adjust the time difference when using your camcorder abroad. Set the time difference by touching with the time difference. If you set the time difference to 0, the clock returns to the originally set time. -
Page 83: (Time/Langu.) Menu
EDIT/PLAY STANDARD SET TIME/LANGU. Touch to select a menu category, then touch The available items vary depending on the power mode of the camcorder. Only the available items are displayed. 60min 0:00:00 Select the item. PROGRAM AE SPOT METER EXPOSURE... - Page 84 Deleting menu – Delete Touch 60min 0:00:00 EXPO– MENU SURE SPOT FADER FOCUS SPOT PRGRAM METER Touch [P-MENU SET UP]. If the desired menu is not displayed on the screen, touch until the menu is displayed. 60min 0:00:00 P–MENU SET UP DELETE SORT RESET...
- Page 85 Touch the menu item you want to move. 60min 0:00:00 Select new location. EXPO– MENU SURE SPOT FADER FOCUS SPOT PRGRAM METER Touch to move the menu item to the desired place. 60min 0:00:00 Select new location. MENU FADER SPOT SPOT FOCUS METER...
-
Page 86: Dubbing/Editing
You can record the picture from a VCR or TV to a tape or a “Memory Stick” inserted into your camcorder (p. 88). You can also create a copy of the picture recorded on your camcorder on other recording device (p. 87). -
Page 87: Dubbing To Another Tape
When the dubbing is finished, stop your camcorder and the VCR. b Notes • When your camcorder is connected to the VCR via DV Interface, you cannot record the title, indicators and words entered on the index screen of the “Memory Stick.”... -
Page 88: Recording Pictures From A Vcr Or Tv
Tips • The indicator appears when you connect your camcorder and other devices via an i.LINK cable. (This indicator may also appear on your TV.) • When recording movies on a “Memory Stick,” you can skip step 4 and press REC START/STOP in step 6. -
Page 89: Dubbing Pictures From A Tape To A "Memory Stick
Play the video, or receive the TV program you want to record. The pictures on the VCR or TV appear on the screen of your camcorder. Press PHOTO lightly at the scene you want to record. Check the image and press it fully. -
Page 90: Dubbing Still Images From A "Memory Stick" To A Tape
Stick” to a tape You can record still images on a tape. Make sure you have the “Memory Stick” with the images and a tape inserted into your camcorder. /standard 8 mm Slide the POWER switch to select the PLAY/EDIT mode. -
Page 91: Dubbing Selected Scenes From A Tape
You can select up to 20 scenes (programs) and record them in the desired order to other recording device such as VCRs or to a “Memory Stick” inserted in your camcorder. When you are recording on a “Memory Stick,” skip steps 1 and 2 and start from “Recording the selected scenes as programs”... - Page 92 Connect your VCR to the camcorder as a recording device (p. 86). You can use either the A/V connecting cable or the i.LINK cable to make the connection. The dubbing procedure is easier with the i.LINK connection. Prepare your VCR.
- Page 93 When recording fails to start, select another [IR SETUP] code and try again. [IR SETUP] code list The following [IR SETUP] codes are recorded on your camcorder by default. (It is set at “3” as the default setting.) Manufacturing company Sony Admiral (M.
- Page 94 VCR before using the following procedure. You can adjust the synchronization of your camcorder and the VCR to avoid not recording the starting scene. Remove the cassette from your camcorder. Prepare a pen and paper to take notes.
- Page 95 Prepare a cassette or a “Memory Stick.” Insert a tape to be played back into the camcorder. When you are recording on a tape, insert a cassette for recording into your VCR. When you are recording on a “Memory Stick,”...
- Page 96 PROG. EDIT MARK TOTAL SCENE Repeat steps 7 to 10 and create programs. Set your VCR to recording pause. Skip this step if your camcorder is connected via an i.LINK cable or recording on a “Memory Stick.” (frame). 0:00:00:00 EDIT START...
- Page 97 Touch [START]. START 0:00:00:00 ENGAGE CANCEL EXEC REC PAUSE TOTAL 0:00:00:25 SCENE Touch [EXEC]. A search for the beginning of the first program starts, then the recording starts. [SEARCH] appears during the search and [EDITING] appears during editing. –x 1 SEARCH 0:00:00:00 SCENE 1/3...
-
Page 98: Deleting Recorded Pictures
Deleting recorded pictures You can delete all or selected pictures stored on a “Memory Stick.” Slide the POWER switch repeatedly to select the PLAY/EDIT mode. Touch 60min 2 / 10 101–0001 MEMORY PLAY P-MENU Touch to select a picture you want to delete. Touch DELETE 2 / 10... -
Page 99: Marking Recorded Images With Specific Information
Selecting still images for printing – Print mark You can mark images that you want to print out while viewing them on your camcorder. (You cannot specify the number of printouts.) The DPOF (Digital Print Order Format) standard is used to select images for printing on your camcorder. - Page 100 Dubbing/Editing b Note • Do not mark images on your camcorder if the “Memory Stick” already has some images with the Print mark put on other devices. This may change the information of the images with the Print mark put on the other device.
-
Page 101: Printing Recorded Images (Pictbridge Compliant Printer)
Notes • We cannot guarantee the operation of models that are not PictBridge compatible. • You cannot connect your camcorder to the printer if [USB-PLY/EDT] in the menu settings is not set to [PictBridge]. Follow the instructions shown on the screen. - Page 102 • Some printer models may not support the date printing function. Refer to the operating instructions of your printer for details. • We cannot guarantee the printing of images recorded with a device other than your camcorder.
-
Page 103: Troubleshooting
• The battery pack is discharged, running low, or not attached to the camcorder. cAttach a charged battery pack to the camcorder. (p. 14) cUse the AC Adaptor to connect to the wall outlet. (p. 17) cDisconnect the AC Adaptor from a wall outlet or remove the battery pack, then reconnect it after about 1 minute. -
Page 104: Cassette Tapes
If the problem persists, disconnect the AC Adaptor from the wall outlet and contact your Sony dealer. The battery pack may be damaged. (p. 14) • The temperature of the environment is too low, or the battery pack has not been charged enough. - Page 105 (p. 80) Cause and/or Corrective Actions cSee page 22. • The camcorder is in [DEMO MODE]. (The [DEMO MODE] is automatically displayed when you leave the camcorder for 10 minutes after selecting CAMERA-TAPE without inserting a cassette and “Memory Stick.”) Touch on the LCD screen or insert a cassette or...
- Page 106 REC or insert a new cassette. (p. 115) cThe tape is stuck to the drum due to moisture condensation. Remove the cassette and leave your camcorder for at least 1 hour, then re-insert the cassette. (p. 121) •...
- Page 107 • There is a blank section in the beginning or middle of the tape. This is not a malfunction. cPress LIGHT repeatedly to select cIf the problem persists, contact your Sony dealer or local authorized Sony service facility. Cause and/or Corrective Actions cIf the tape has reached the end, rewind the tape.
- Page 108 Insert a “Memory Stick” into your camcorder. (p. 21) • The “Memory Stick” was formatted on a personal computer. cFormat it on your camcorder (Note that all recorded data will be deleted). (p. 66) cRelease the lock on the write-protect tab of the “Memory Stick.” (p. 116) cThe capacity is full.
- Page 109 VCR correctly, then check the connection between your camcorder and the VCR. (p. 86) cWhen your camcorder is connected to a DV device that is not a Sony product via an i.LINK cable, select [IR] in step11 of “Step 1: Preparing your camcorder and VCR for operation”...
-
Page 110: Warning Indicators And Messages
Troubleshooting Cause and/or Corrective Actions Some symptoms can be fixed by yourself. If the problem persists even after you tried a couple of times, contact your Sony dealer or local authorized Sony service facility. C:04:ss cA battery pack that is not an “InfoLITHIUM” battery pack is being used. - Page 111 Indication (Warning indicator pertaining to “Memory Stick” formatting)* (Warning indicator pertaining to incompatible “Memory Stick”)* Q (Warning indicator pertaining to the tape) Z (Eject cassette warning)* - (Warning indicator pertaining to image deletion)* - (Warning indicator pertaining to the write-protect of the “Memory Stick”) * You hear a melody or beep sound when the warning indicators appear on the screen.
-
Page 112: Warning Messages
Warning messages If messages appear on the screen, check the following. See the page in parentheses for details. Subjects Indications Battery Use the “InfoLITHIUM” battery pack. Battery level is low. Old battery. Use a new one. Z Re-attach the power source. % Z Moisture condensation. - Page 113 Cannot record still images on Memory Stick. Cannot record Memory Stick movie on a tape. PictBridge Check the connected device. compliant printer Connect the camcorder to a PictBridge compatible printer. Check the printer. Error-Cancel the task. Cannot print. Check the printer.
-
Page 114: Additional Information
Power supply You can use your camcorder in any country/ regions using the AC Adaptor supplied with your camcorder within AC 100 V to 240 V, 50/60 Hz. Use a commercially available AC plug adaptor [a], if necessary, depending on the design of the wall outlet [b]. -
Page 115: Usable Cassette Tapes
Copyright signal When you play back If the cassette you play back on your camcorder contains copyright signals, you cannot copy it to a tape in another video camera connected to your camcorder. -
Page 116: About The "Memory Stick
Compensation for damaged image data will not be made. – If you eject the “Memory Stick,” turn the power off on your camcorder, or remove the battery pack for replacement while your camcorder is reading or writing image files on the “Memory Stick”... - Page 117 – When playing back image data recorded with other device. • “Memory Stick,” and “MagicGate Memory Stick” are trademarks of Sony Corporation. • “Memory Stick Duo” and “ are trademarks of Sony Corporation. • “Memory Stick PRO” and “...
-
Page 118: About The "Infolithium" Battery Pack
Additional Information – Put the battery pack in a pocket to warm it up, and insert it in your camcorder right before you start taking shots. – Use a large capacity battery pack: NP- FM50/QM71/QM71D/QM91/QM91D (optional). -
Page 119: About I.link
Tips • i.LINK is a more familiar term for the IEEE 1394 data transport bus proposed by Sony, and is a trademark approved by many corporations. • IEEE 1394 is an international standard standardized by the Institute of Electrical and Electronics Engineers. -
Page 120: Maintenance And Precautions
Interface, see page 86, 87. This unit can also be connected to other i.LINK (DV Interface) compatible device made by Sony (e.g. a VAIO series personal computer) as well as to video device. Before connecting this unit to your computer,... - Page 121 • If the following problem occurs, clean the video heads for 10 seconds with the Sony V8-25CLD cleaning cassette (optional). When you play back in the Digital8 – Mosaic-pattern noise appears on the playback picture or the screen is displayed in blue.
- Page 122 LCD screen • Do not add excessive pressure on the LCD screen, as it may cause damage. • If your camcorder is used in a cold place, a residual image may appear on the LCD screen. This is not a malfunction.
-
Page 123: Specification
The button-type battery will be fully discharged in about 3 months if you do not use your camcorder at all. - Page 124 Focal length 2.5 - 50 mm (1/8 - 2 in.) When converted to a 35 mm still camera In CAMERA-TAPE: 42 - 840 mm (1 11/16 - 33 1/8 in.) In CAMERA-MEMORY: 42 - 840 mm (1 11/16 - 33 1/8 in.) Color temperature Auto Minimum illumination...
- Page 125 Rechargeable battery pack (NP-FM30) Maximum output voltage DC 8.4 V Output voltage DC 7.2 V Capacity 5.0 Wh (700 mAh) Dimensions (approx.) 38.2 × 20.5 × 55.6 mm (1 9/16 × 13/16 × 2 1/4 in.) (w/h/d) Mass (approx.) 65 g (2.3 oz) Operating temperature 0°C to 40°C (32°F to 104°F) Type...
-
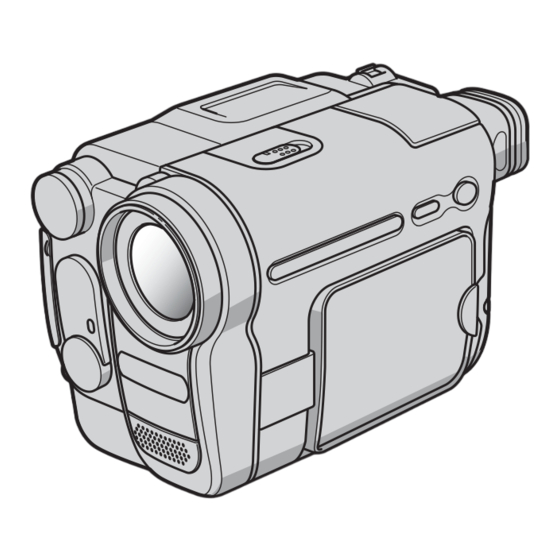
Page 126: Quick Reference
Quick Reference Identifying parts and controls Camcorder A EASY button (p. 12, 33, 51) B DSPL/BATT INFO button (p. 15) C Lens cap (p. 24, 29) D LCD/Touch panel screen (p. 3, 18) E OPEN button (p. 18) F Speaker... - Page 127 F Grip belt (p. 4) G REC START/STOP button (p. 24) H DC IN jack (p. 14) To attach the shoulder strap Attach the shoulder strap supplied with your camcorder to the hooks for the shoulder strap. Quick Reference ,continued...
- Page 128 Make sure that the length of the tripod screw is less than 5.5 mm (7/32 inch). Otherwise, you cannot attach the tripod securely, and the screw may damage your camcorder. Quick Reference G Built-in light (p. 27) H Remote sensor/Infrared ray emitter (p.
- Page 129 Playback, Fast-forward, Pause, Stop, Slow) (p. 47) F ZERO SET MEMORY button* (p. 57) G Transmitter After turning on your camcorder, point towards the remote sensor to control your camcorder. H REC START/STOP button (p. 28) I Power zoom button (p. 26) J DISPLAY button (p.
- Page 130 (optional). • When you are operating with the Remote Commander supplied with your camcorder, your VCR may also operate. In that case, select a commander mode other than VTR 2 for your VCR, or cover the sensor of your VCR with black paper.
-
Page 131: Indicators For The Lcd Screen And Viewfinder
Indicators for the LCD screen and viewfinder Following indicators will appear on the LCD screen and viewfinder to indicate the state of your camcorder. Indicators vary depending on your camcorder model. Example: Indicators in the CAMERA-TAPE mode Time code (p. 25)/Tape counter (p. 25)/ Self-diagnosis (p. -
Page 132: Index
... 25, 118 BEEP ...18, 81 BLACK FADER ... 40 Built-in light ... 27 BURN DVD ... 73 BURN VCD ... 73 Button-type battery Camcorder ... 123 Remote Commander... 129 CALIBRATION... 122 Camera Chroma key (CAMTM CHROMA) ... 43 Camera settings data display... - Page 133 LP (Long Play) See Recording mode (REC MODE) Luminance key (LUMI. KEY)...41 Main sound See MULTI-SOUND Manual focus...39 Memory Chroma key (MTCAM CHROMA) ...43 Memory Luminance key (MTCAM LUMI.) ...43 MEMORY MIX...42 Memory Overlap (OVERLAP)...41 Memory photo...29, 49 “Memory Stick” General information ..116 Inserting...21 Number of pictures...31...
- Page 134 WHITE FADER... 40 Wide angle See Zoom WIPE ... 40 WORLD TIME ... 82 Write-protect tab ... 115, 116 Zero set memory ... 57 Zoom ... 26 Quick Reference...
- Page 136 Printed in Japan...