
Related Manuals for Miele FN 22062 ws


Summary of Contents for Miele FN 22062 ws
- Page 1 Operating and installation instructions Freezer To avoid the risk of accidents or damage to the appliance it is essential to read these instructions before it is installed and used for the first time. en-GB M.-Nr. 10 698 510...
-
Page 2: Table Of Contents
Contents Warning and Safety instructions................ 4 Caring for the environment ................ 13 How to save energy..................... 14 Guide to the appliance .................. 16 Control panel ......................16 Accessories ...................... 18 Accessories supplied .................... 18 Optional accessories..................... 18 Isolating plate .................... 18 Using for the first time .................. - Page 3 Contents Adjusting the interior fittings.................. 32 Defrosting...................... 33 Cleaning and care .................... 34 Cleaning agents..................... 34 Preparing the appliance for cleaning..............35 Cleaning the interior and accessories ..............35 Cleaning the front of the appliance and the side panels........36 Cleaning the ventilation gaps ................
-
Page 4: Warning And Safety Instructions
Incorrect use of the appliance for such purposes can cause deterioration of the items stored. The appliance is not suitable for use in areas where there is a risk of explosion. Miele cannot be held liable for damage resulting from improper or in- correct use of the appliance. - Page 5 Warning and Safety instructions The appliance can only be used by people with reduced physical, sensory or mental capabilities, or lack of experience and knowledge, if they are supervised whilst using it, or have been shown how to use it in a safe way and recognise and understand the consequences of incorrect operation.
- Page 6 In the event of any damage: – avoid naked flames or anything which creates a spark, – disconnect the appliance from the mains electricity supply, – ventilate the room where the appliance is located for several minutes, and – contact the Miele Service Department.
- Page 7 If the electrical connection cable is faulty it must only be replaced by a Miele authorised service technician to protect the user from danger. Do not connect the appliance to the mains electrical supply by a multi-socket adapter or extension lead.
- Page 8 Miele authorised service technician. Otherwise the guarantee is invalidated. Miele can only guarantee the safety of the appliance when genu- ine original Miele replacement parts are used. Faulty components must only be replaced by Miele spare parts.
- Page 9 Warning and Safety instructions Correct use The appliance is designed for use within a certain climate range (ambient temperatures), and should not be used outside this range. The climate range for your appliance is stated on the data plate in- side the appliance.
- Page 10 Only use genuine original Miele accessories and spare parts with this appliance. Using accessories or spare parts from other manu- facturers will invalidate the guarantee, and Miele cannot accept liab-...
- Page 11 Warning and Safety instructions Cleaning and care Do not use any oils or grease on the door seals, as these will cause the seals to deteriorate and become porous with time. Do not use a steam cleaning appliance to clean or defrost this ap- pliance.
- Page 12 Warning and Safety instructions Disposal of your old appliance Before disposing of an old appliance, first make the door latch or lock unusable. This way you will prevent children from accidentally locking them- selves in and endangering their lives. ...
-
Page 13: Caring For The Environment
/ recycling centre for electrical and electronic ap- pliances, or contact your dealer or Miele for advice. You are also respons- ible (by law, depending on country) for deleting any personal data that may be stored on the appliance being disposed... -
Page 14: How To Save Energy
How to save energy Normal energy consump- Increased energy con- tion sumption Installation / In a ventilated room. In an enclosed, unventilated Maintenance room. Protected from direct sun- In direct sunlight. light. Not near to a heat source Near to a heat source (radi- (radiator, oven). - Page 15 How to save energy Normal energy consump- Increased energy con- tion sumption Drawers and shelves ar- ranged as they were when the appliance was delivered. Only open the door when Frequent opening of the necessary and for as short a door for long periods will time as possible.
-
Page 16: Guide To The Appliance
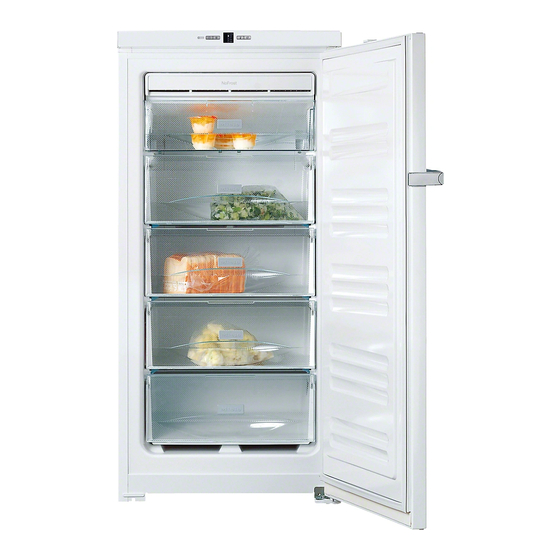
Guide to the appliance Control panel a On/Off button g Temperature display b Super freeze button h Temperature selector button c Display. i Alarm off button The brightness of the display j Super freeze symbol changes automatically to the set k Display brightness symbol brightness level if the appliance has not been used for a while. - Page 17 Guide to the appliance a Control panel with display b Frost Free module c Top freezer drawer, can also be used as a freezer tray d Freezer drawers (number depends on model) For easier installation there are trans- port handles on the back at the top and transport wheels underneath the appli- ance.
-
Page 18: Accessories
Accessories Accessories supplied Optional accessories A range of useful Miele accessories and Ice cube tray care products are available for your ap- pliance. Accessories are available to order via the Miele Webshop, from Miele dir- ectly (see back cover for contact de- tails) or from your Miele dealer. -
Page 19: Using For The First Time
Using for the first time Before using for the first time Packaging material Remove all packaging material from the inside of the appliance. Protective foil The appliance is covered with a special foil to protect it during transportation. Do not remove the foil until the appli- ance has been positioned in its final location. -
Page 20: Switching On And Off
Switching on and off Switching on Switching off for longer peri- ods of time To enable the temperature to get suffi- ciently cold inside the appliance, allow If, during a long absence, the ap- the appliance to run for approx. pliance is switched off but not 2 hours before placing food in it. -
Page 21: The Correct Temperature
The correct temperature It is very important to set the correct Setting the temperature temperature for storing food in the ap- Press the button for setting the tem- pliance. Micro-organisms will cause perature repeatedly until the tem- food which is not stored at the correct perature you want lights up in the temperature to deteriorate rapidly. -
Page 22: Temperature Display
The correct temperature Temperature display The temperature display on the control panel always shows the required tem- perature. The temperature can be adjusted from -15 °C to -32 °C. The temperature display will flash if: – the temperature is not within the range that can be displayed, e.g. -
Page 23: Using Super Freeze
Using Super freeze The Super freeze function can also When Super freeze is switched off, the be switched on. appliance will run at normal power again. Super freeze function Switching on Super freeze For optimum results switch on the Su- ... -
Page 24: Temperature And Door Alarm
Temperature and door alarm The appliance has been fitted with a If the temperature in the freezer warning system which ensures that the remains above -18 °C for a long temperature in the freezer cannot rise time, check that the frozen food has unnoticed and to avoid energy being not started to defrost. -
Page 25: Selecting Further Settings
Selecting further settings Press the button for setting the tem- Settings mode perature repeatedly until the bright- Certain settings on the appliance can ness level you want is reached. only be selected in settings mode. The more fields that are lit up in the To adjust the brightness of the ... - Page 26 Selecting further settings Activating or deactivating the – To deactivate the lock Press the Super freeze button for The lock function can be activated to prevent the appliance being switched approx. 5 seconds. off by mistake. The menu symbol lights up. Settings mode is now active.
-
Page 27: Freezing And Storing Food
Freezing and storing food Maximum freezing capacity Storing frozen food To ensure that fresh food placed in the When buying frozen food to store in freezer freezes through to the core as your freezer, check quickly as possible, the maximum –... -
Page 28: Home Freezing
Freezing and storing food fore freezing, but care should be Home freezing taken as the taste of some spices al- Only freeze fresh food which is in a ters when frozen. good condition. – Placing hot foods or drinks in the freezer causes food that is already Hints on home freezing frozen to partially thaw and increases... - Page 29 Freezing and storing food Make a note of the contents and the - Freezing the maximum amount (see date of freezing on the packaging. data plate) Ensure ventilation slots at the back Before placing food in the appliance of the freezer section are always free ...
-
Page 30: Using Accessories
Freezing and storing food Defrosting Never re-freeze partially or fully Frozen food can be defrosted in differ- defrosted food. Consume defrosted ent ways: food as soon as possible as it will lose its nutritional value and spoil if – in a microwave oven, left for too long. -
Page 31: Freezer Tray
Freezing and storing food Freezer tray – The isolating plate must be placed below the last drawer in which frozen The top freezer drawer in your appli- food is stored. ance can be used as a freezer tray. – The fewer drawers that have to be The freezer tray can be used to effect- chilled, the less energy required. -
Page 32: Adjusting The Interior Fittings
Freezing and storing food Adjusting the interior fittings Removing the drawers and glass plates from the freezer section The drawers can be removed for filling, emptying or cleaning purposes. You can also use the space in the freezer section more flexibly. If you wish to freeze large items such as a turkey or game, the glass cold plates between the drawers can be removed. -
Page 33: Defrosting
Defrosting The appliance is equipped with a "Frost free" system. The freezer defrosts auto- matically. The moisture generated in the appli- ance collects on the condenser and is automatically defrosted and dissipated by the condenser from time to time. This automatic defrosting system en- ables the freezer to remain permanently ice-free, however, the food stored in the freezer will not defrost. -
Page 34: Cleaning And Care
Cleaning and care Cleaning agents Do not let water get into the electronic unit or the lighting. Cleaning and conditioning agents used inside the appliance must be Steam from a steam cleaning ap- food safe. pliance could reach the electrical components and cause a short cir- To avoid damaging all the surfaces of cuit. -
Page 35: Preparing The Appliance For Cleaning
Cleaning and care Preparing the appliance for Cleaning the interior and ac- cleaning cessories Switch the appliance off. Clean the appliance regularly (approx. twice a year). Remove any soiling im- The temperature shown in the display mediately - do not allow it to dry on. will go out and the cooling system switches off. -
Page 36: Cleaning The Front Of The Appliance And The Side Panels
Cleaning and care The following parts cannot be cleaned Cleaning the front of the appli- in a dishwasher: ance and the side panels – all drawers and the compartment lid If soiling is left on for any length of (depending on model) time, it may become impossible to –... -
Page 37: Cleaning The Ventilation Gaps
(e.g. use the not get broken or damaged in any dusting brush for Miele vacuum way. cleaners) The compressor and metal grille at the... -
Page 38: What To Do If
Unauthorised installation, maintenance and repairs can cause considerable danger for the user. Installation, maintenance and repairs must only be carried out by a Miele au- thorised technician. Problem Cause and remedy The appliance is not The appliance has not been switched on. - Page 39 What to do if ... Problem Cause and remedy The appliance door has been opened too frequently, or a large amount of fresh food has been placed in the appliance for freezing. Only open the door when necessary and for as short a time as possible.
- Page 40 What to do if ... Problem Cause and remedy Frost has accumulated This is not a fault. Condensation has settled on the on the front panel of the panel and frozen. NoFrost module. This could be due to: – the appliance door being opened too often, or be- ing left open.
- Page 41 Do not activate this setting although the appliance for domestic use. controls are working. Contact Miele Service for instructions on how to switch Demo mode off. is lit up in the display The safety lock has been activated.
- Page 42 What to do if ... Other problems Problem Cause and remedy The door to the freezer This is not a fault. The suction caused by opening will not open because it and closing the door is preventing the door from has been opened and opening.
-
Page 43: Noises
Noises Normal What causes them noises Brrrrr ... A humming noise is made by the motor (compressor). This noise can get louder for brief periods when the motor switches on. Blubb, A gurgling noise can be heard when coolant is circulating blubb ... -
Page 44: After Sales / Guarantee
See end of this booklet for contact de- tails. For information on the appliance guar- antee specific to your country please When contacting your Dealer or Miele, contact Miele. please quote the model and serial num- ber of your appliance. -
Page 45: Electrical Connection
Electrical connection The appliance is supplied with a power Do not connect the appliance to the cable and moulded plug ready for con- mains electricity supply by an extension nection to an AC 230 V 50 Hz supply. lead. Extension leads do not guarantee the required safety of the appliance The fuse rating must be at least 10 A (e.g. -
Page 46: Installation
Installation Fire risk and danger of damage! In environments with high hu- Appliances which give off heat, such midity condensation can build up on as toasters, mini-ovens or double the external appliance panels. burner hobs, can catch fire. This can lead to corrosion of the Do not place them on top of this re- panels. -
Page 47: Ventilation
Installation Climate range Fitting wall spacers supplied The appliance is designed for use within The wall spacers supplied must be a certain climate range (ambient tem- used in order to achieve declared en- perature) and should not be used out- ergy consumption values and to pre- side this range. -
Page 48: Installation
Installation Installation Aligning the appliance Two people are required for in- stalling the appliance. The appliance must be empty when it is installed. Move the appliance carefully on floors that are sensitive to scratching To align the appliance, adjust the to prevent damage. -
Page 49: Building The Appliance Into A Kitchen Run
Installation The appliance can be built into a kit- Building the appliance into a chen run and installed directly next to a kitchen run kitchen furniture housing unit. The ap- pliance front must protrude in front of If the ventilation gaps given are furniture fronts by at least 34 mm at the not observed, the compressor will sides and by at least 55 mm in the... -
Page 50: Appliance Dimensions
Installation Appliance dimensions [mm] [mm] [mm] FN 22062 ws 1250 630* FN 24062 ws 1450 630* FN 26062 ws 1650 630* FN 28062 ws 1850 630* * Dimensions without wall spacers. Appliance depth is increased by 35 mm with the wall spacers supplied fitted. -
Page 51: Changing The Door Hinging
Changing the door hinging The appliance is supplied right-hand Remove the door handle hinged. If left-hand hinging is required, Open the appliance door. the hinges must be changed. Two people are needed for chan- ging the door hinging. ... -
Page 52: Remove The Door
Changing the door hinging Remove the door If the hinge components (hinge plate and hinge pin) are not screwed Danger of injury when removing in tightly enough, the door can fall off the door. or may not close properly. Cooling The appliance door is not secure will be less efficient, and condensate once the hinge pin has been re-... -
Page 53: Changing The Upper Hinge Plate Over
Changing the door hinging Screw hinge plate onto the oppos- Changing the upper hinge ite side, using only the outer two plate over slots. Do not use the screw in the middle hole because you will not be able to align the door later on with the outer slots. -
Page 54: Changing Over The Spring Clip And The Hinge Pin
Changing the door hinging Changing over the spring clip Refitting the door and the hinge pin Take the appliance door and guide the upper door bearing bush into the hinge pin at the top of the appliance. Using a screwdriver, remove the spring clip ... -
Page 55: Refitting The Handle
Changing the door hinging Refitting the handle Permanent damage to the door seal. Make sure that the sidebar does The door seal will be damaged if not come into contact with the door the handle is fitted incorrectly. seal when the door is opened. -
Page 56: Aligning The Appliance Doors
Aligning the appliance doors The appliance door can be aligned with the appliance housing after it has been fitted. In the following illustration the door is not shown in the closed position to make it easier to see what you have to To align the appliance door use the long outer slots in the lower hinge plate: ... - Page 59 Tel. +971 4 3044 999 Tel: (01) 461 07 10, Fax: (01) 461 07 97 Fax. +971 4 3418 852 E-Mail: info@miele.ie, Internet: www.miele.ie 800-MIELE (64353) Manufacturer: Miele & Cie. KG E-Mail: info@miele.ae Website: www.miele.ae Carl-Miele-Straße 29, 33332 Gütersloh, Germany...
- Page 60 FN 22062 ws, FN 24062 ws, FN 26062 ws, FN 28062 ws en-GB M.-Nr. 10 698 510 / 00...