Miele KWT 6321 UG Operating And Installation Instructions
Wine conditioning unit
Hide thumbs
Also See for KWT 6321 UG:
- Operating and installation instructions (56 pages) ,
- Operating and installation instructions (56 pages) ,
- Operating and installation instructions (56 pages)
Table of Contents

Related Manuals for Miele KWT 6321 UG


Summary of Contents for Miele KWT 6321 UG
- Page 1 Operating and installation instructions Wine conditioning unit To avoid the risk of accidents or damage to the appliance it is essential to read these instructions before it is installed and used for the first time. en-GB M.-Nr. 09 875 610...
-
Page 2: Table Of Contents
Contents Warning and Safety instructions................ 4 Caring for the environment ................ 12 How to save energy..................... 13 Guide to the appliance .................. 14 Accessories ...................... 16 Accessories supplied .................... 16 Optional accessories..................... 16 Switching on and off ................... 17 Before using for the first time ................17 Switching the wine unit on .................. - Page 3 Contents Automatic defrosting .................. 31 Cleaning and care .................... 32 Cleaning agents..................... 32 Before cleaning the wine unit ................33 Interior, accessories, and appliance door ............. 33 Cleaning the ventilation gaps ................33 Cleaning the door seal ..................33 Cleaning the air filter....................33 Active AirClean filters ..................
-
Page 4: Warning And Safety Instructions
They contain important notes on installation, safety, use and maintenance. Miele cannot be held liable for non-compliance with these instruc- tions. Keep these instructions in a safe place and ensure that new users are familiar with the contents. - Page 5 The wine conditioning unit is not suitable for use in areas where there is a risk of explosion. Miele cannot be held liable for damage resulting from improper or in- correct use of the appliance. ...
- Page 6 – avoid naked flames or anything which creates a spark, – disconnect the appliance from the mains electricity supply, – ventilate the room where the wine conditioning unit is located for several minutes, and – contact the Miele Service Department.
- Page 7 If the electrical connection cable is faulty it must only be replaced by a Miele authorised service technician to protect the user from danger. Do not connect the wine conditioning unit to the mains electrical supply by a multi-socket adapter or extension lead.
- Page 8 Miele authorised service technician. Other- wise the warranty is invalidated. Miele can only guarantee the safety of the appliance when genu- ine original Miele replacement parts are used. Faulty components must only be replaced by Miele spare parts.
- Page 9 Do not operate any electrical equipment inside the wine condition- ing unit. Danger of sparking and explosion. Only use genuine original Miele accessories and spare parts with this appliance. Using accessories or spare parts from other manu- facturers will invalidate the warranty, and Miele cannot accept liabil-...
- Page 10 Warning and Safety instructions Cleaning and care Do not use any oils or grease on the door seals, as these will cause the seals to deteriorate and become porous with time. Do not use a steam cleaning appliance to clean this wine condi- tioning unit.
- Page 11 Warning and Safety instructions Transporting the appliance Always transport the wine conditioning unit in an upright position and in its original transport packaging to avoid damage in transit. Danger of injury and damage. The wine conditioning unit is very heavy and must be transported by two people.
-
Page 12: Caring For The Environment
/ recycling centre for electrical and electronic ap- pliances, or contact your dealer or Miele for advice. You are also respons- ible (by law, depending on country) for deleting any personal data that may be stored on the appliance being disposed... -
Page 13: How To Save Energy
How to save energy Normal energy consump- Increased energy con- tion sumption Installation / In a ventilated room. In an enclosed, unventilated Maintenance room. Protected from direct sun- In direct sunlight. light. Not near to a heat source Near to a heat source (radi- (radiator, oven). -
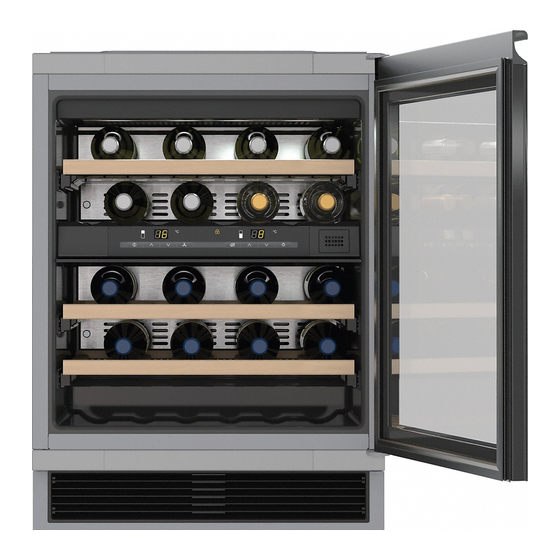
Page 14: Guide To The Appliance
Guide to the appliance a For switching the entire g For switching the temperature or wine unit on and off door alarm off b For setting the temperature in the h For setting the temperature in the upper wine conditioning zone lower wine conditioning zone (... - Page 15 Guide to the appliance a Lighting strip (in both wine conditioning zones) b Active AirClean filter c Control panel for the upper and lower wine conditioning zones / isolation plate for thermal separation of the zones d Isolation strips for thermal separation of the temperature zones e Wooden racks f Safety glass door...
-
Page 16: Accessories
Accessories Accessories supplied Optional accessories A range of useful Miele accessories and Active AirClean filter care products are available for your The Active AirClean filter ensures op- wine conditioning unit. timum air quality in the wine condition- ing unit by filtering the incoming air. -
Page 17: Switching On And Off
Switching on and off Before using for the first time Switching the wine unit on Packaging material Remove all packaging material from the inside of the appliance. Touch the On/Off sensor for the Cleaning the wine unit whole appliance so that the temper- ature displays light up. -
Page 18: Switching Off For Longer Periods Of Time
Switching on and off Switching off for longer peri- ods of time If, during a long absence, the wine unit is switched off, but not cleaned, and the door left shut, there is a danger of mould building up inside the appliance. -
Page 19: Selecting Further Settings
Selecting further settings Safety lock The safety lock can be activated to pre- vent the wine unit being switched off by mistake. To save the setting, touch the DynaCool On/Off sensor. Activating or deactivating the lock When the lock function is activated, its indicator ... -
Page 20: To Change The Brightness Of The Temperature Display
Selecting further settings To change the brightness of the temperature display The default brightness for the wine unit temperature display is set to . Touch the DynaCool On/Off sensor again. will light up in the display. To change the brightness of the tem- perature display (the temperature dis- ... -
Page 21: The Optimum Temperature And Air Quality
The optimum temperature and air quality Wine keeps on maturing depending on Type of wine Recommended the surrounding conditions. The length drinking of time for which wine can be kept in temperature* good condition will therefore depend Light, fruity reds: +14 °C to +16 °C not only on the temperature but also on the air quality. -
Page 22: Setting The Temperature
The optimum temperature and air quality Safety device in case of low ambient Setting the temperature temperatures You can set the respective temperat- The appliance is equipped with a safety ures using the two sensors below the thermostat to protect your wine against temperature displays. -
Page 23: Temperature Range
The optimum temperature and air quality Temperature range The two temperature zones are cooled alternately which means that, depend- In both zones it is possible to set tem- ing on the amount of wine being peratures between 5 and 20 °C. stored, it may take a few hours before Temperature display the set temperatures are reached and... -
Page 24: Air Quality And Humidity
The optimum temperature and air quality DynaCool (constant humidity) Air quality and humidity DynaCool raises the relative humidity In most refrigerators the humidity is too inside the whole of wine conditioning low for wine and therefore a refrigerator unit. It also distributes the humidity and is not suitable for wine storage. -
Page 25: Air Filtration With The Active Airclean Filters
This also ensures your wine does not absorb any unwanted odours through the corks. The Active AirClean filter should be replaced at least every 12 months. Active AirClean filters can be ob- tained from your Miele dealer, Miele or from the Miele website. -
Page 26: Temperature And Door Alarm
Temperature and door alarm This wine conditioning unit is equipped Switching the temperature alarm off with an alarm system so that the tem- early perature cannot rise or fall unnoticed, If the noise disturbs you, you can thus possibly damaging the wine. switch the alarm off if you wish. -
Page 27: Door Alarm
Temperature and door alarm Door alarm An alarm will sound if the appliance door has been left open for longer than 60 seconds. It will stop as soon as the door is closed. Switching the door alarm off early If the noise disturbs you, you can switch the alarm off if you wish. -
Page 28: Feature Lighting
Feature lighting The interior lighting can be set to re- Setting the brightness of the feature main on when the door is closed so lighting your wines can be on display at all The brightness of the feature lighting times. can be adjusted. -
Page 29: Storing Wine Bottles
Storing wine bottles Vibration and movement have a negat- Wooden shelves ive effect on the maturing process which can affect the taste of the wine. To avoid disturbing other bottles when removing a bottle of wine, store bottles of the same type beside each other on the same shelf. -
Page 30: Maximum Capacity
Storing wine bottles Maximum capacity To replace the shelf, place it on the extended rails. The notches in the wooden shelf fit onto the retaining bolts on the runners. Up to 34 Bordeaux bottles (0.75 l) can be stored in the wine conditioning unit, with 14 in the upper zone and 20 in the lower zone. -
Page 31: Automatic Defrosting
Automatic defrosting The wine conditioning unit defrosts automatically. -
Page 32: Cleaning And Care
Cleaning and care Cleaning agents Do not let water get into the elec- tronic unit, the ventilation gap or the To avoid damaging the surfaces of your lighting. appliance, do not use: – cleaning agents containing soda, am- Do not use a steam cleaning appli- monia, acids or chlorides ance to clean this wine conditioning unit. -
Page 33: Before Cleaning The Wine Unit
Take any wine bottles out of the wine brush or vacuum cleaner (e.g. use the unit and store them in a cool place. dusting brush for Miele vacuum cleaners) Take out all other removable parts for cleaning. -
Page 34: Active Airclean Filters
Push the filter in and then release it. Pull the filter out. The filter will lock into place automat- ically with an audible click. Active AirClean filters can be obtained from your Miele dealer, Miele or from the Miele website. -
Page 35: Problem Solving Guide
Unauthorised installation, maintenance and repairs can cause considerable danger for the user. Installation, maintenance and repairs must only be carried out by a Miele au- thorised technician. Problem Cause and remedy The wine unit is not get- The wine unit is not switched on. - Page 36 Problem solving guide Problem Cause and remedy The compressor is The temperature in the wine conditioning unit is set switching on more fre- too low. quently and for longer Adjust the temperature. periods of time, the The appliance door is not properly closed. temperature in the wine ...
- Page 37 Problem solving guide Display warnings Message Cause and remedy A dash is lit up up/flash- Only temperatures within the range the wine condi- ing in the display. tioning unit can display will be shown. F0 or F1 appears in the There is a fault.
- Page 38 There are live electrical components under the lighting cover. The LED lighting may only be repaired or replaced by a Miele authorised service technician. Danger of injury from LED lighting. Light in- tensity corresponds to laser beam class 1/1M.
- Page 39 Problem solving guide General problems with the wine conditioning unit Problem Cause and remedy An alarm sounds. The appliance door has been open for longer than ap- prox.60 seconds. Close the appliance door. The safety lock is activated. The symbol is lit up in You cannot switch the wine conditioning unit the display.
-
Page 40: Noises
Noises Normal noises What causes them Brrrrr ... A humming noise is made by the motor (compressor). This noise can get louder for brief periods when the motor switches Blubb, blubb ... A gurgling noise can be heard when coolant is circulating through the pipes. -
Page 41: After Sales Service And Warranty
Please quote the model and serial num- ber of your appliance when contacting Miele. This information can be found on the data plate. The data plate is located inside the wine unit. -
Page 42: Electrical Connection
Electrical connection The appliance is supplied with a mains Do not connect the appliance to the cable with moulded plug for connection mains electricity supply by an extension to a 50 Hz 220–240 V supply. lead. Extension leads do not guarantee the required safety of the appliance The fuse rating must be at least 10 A (e.g. -
Page 43: Installation
This appliance should be installed in a quired for this. This is available from dry, well-ventilated room. Miele or your Miele dealer. When deciding where to install your Your dealer will be able to advise you wine unit please bear in mind that it will... -
Page 44: Climate Range
Installation Climate range Ventilation The wine conditioning unit is designed The wine conditioning unit is ventilated for use within a certain climate range via the grille in the plinth. This must not (ambient temperatures) and should not be covered over or blocked. Clean the be used outside this range. -
Page 45: Installation Dimensions
Installation Installation dimensions Before installation, ensure the the niche dimensions are the correct size. Before in- stallation, ensure that the ventilation gap dimensions are the correct size. The spe- cified air vents must be observed and the cut-out in the plinth facing must be aligned centrally with the appliance in order to ensure the correct functioning of the wine unit. -
Page 46: View From Above
Installation View from above... -
Page 47: Changing The Door Hinging
Changing the door hinging The wine unit is supplied right-hand hinged. If left-hand hinging is required, the hinges must be changed. To change the door hinging, you will need the following tools: Danger of injury and damage to the appliance. The glass door is breakable! ... - Page 48 Changing the door hinging Place the appliance door with the outer side upwards on a stable sur- face. Remove the hinge bracket at the top and the cover cap on the op- posite side. Take off the upper retaining bracket ...
- Page 49 Changing the door hinging Unscrew the door opening angle lim- iter from the lower hinge bracket . Screw the door opening angle limiter onto the other hinge bracket . Place one washer over the hinge pin and the other washer between the door and the screw.
-
Page 50: Installing The Wine Conditioning Unit
Installing the wine conditioning unit Setting up the wine condition- Warning! Do not drop the appli- ing unit ance. Risk of injury and damage. Two people are required for installing The air filter prevents soiling of the this wine conditioning unit. compressor compartment to ensure efficient functioning of the appliance. - Page 51 Installing the wine conditioning unit Align the wine conditioning unit hori- zontally and vertically. If the wine conditioning unit is not correctly aligned it can distort. Check the alignment of adjacent fur- niture housing doors. If adjacent doors vary in height from the wine ...
-
Page 52: Aligning The Wine Conditioning Unit To Taller Furniture Doors
A retaining bracket is required to se- cure the filler panel. This is available from Miele or from specialist retailers. The retaining bracket can be fitted above or below the wine conditioning If adjacent furniture doors are taller... -
Page 53: Push The Wine Conditioning Unit Into The Niche
Installing the wine conditioning unit Push the wine conditioning unit into the niche Make sure that the mains cable does not become trapped or dam- aged as you push the wine condi- tioning unit into its niche. To avoid damaging flooring which is susceptible to scratching, take great care when pushing the appliance into its niche. -
Page 54: Securing The Wine Conditioning Unit In The Niche
Installing the wine conditioning unit Securing the wine conditioning unit in the niche The wine unit must stand proud of furniture doors evenly by 2 mm. Open the appliance door. Screw the wine conditioning unit at Remove cover , and first screw the the bottom left and right to adjacent wine unit to the adjacent furniture unit furniture units. -
Page 55: Adjusting The Lateral Alignment Of The Appliance Door
Installing the wine conditioning unit Adjusting the lateral alignment of the appliance door If the appliance door is not aligned with the housing side walls, the appliance door can be adjusted using the screws underneath the hinges. Fit the covers . ... - Page 56 Installing the wine conditioning unit Fit plinth facing in position. The cut-out in the plinth facing must be aligned centrally with the wine unit. Fit ventilation grille into the plinth facing. This will cause the foam block to be pushed back.
- Page 59 Tel: +65 6735 1191 Fax. +971 4 3418 852 Fax: 011-46 900 001 Fax: +65 6735 1161 800-MIELE (64353) E-mail: customercare@miele.in E-Mail: info@miele.com.sg E-Mail: info@miele.ae Internet: www.miele.in Internet: www.miele.sg Website: www.miele.ae Manufacturer: Miele & Cie. KG, Carl-Miele-Straße 29, 33332 Gütersloh, Germany...
- Page 60 KWT 6321 UG en-GB M.-Nr. 09 875 610 / 04...