
Related Manuals for Motorola DTR600


Summary of Contents for Motorola DTR600
- Page 1 PROFESSIONAL DIGITAL TWO-WAY RADIO DTR600/DTR700 LIMITED KEYPAD PORTABLE RADIO USER GUIDE en-US fr-CA June 2018 © 2018 Motorola Solutions, Inc. All rights reserved. *MN004869A01* MN004869A01-AA...
-
Page 2: Table Of Contents
English Contents Removing the Li-Ion Battery....16 Holster............ 18 Power Supply, Adapter, and Drop-In Product Safety and RF Exposure Compliance....5 Tray Single Unit Charger (SUC)..... 18 Acoustic Safety............5 Battery Life..........19 Introduction..............6 Battery Status Information...... 19 Package Contents..........6 Charging with the Drop-In Tray Single Notice to Users (FCC and Industry Canada)....7 Unit Charger (SUC)........ - Page 3 English Canceling Queues..........25 Viewing Call Log Details......34 Private Reply............. 25 Deleting Call Log........34 Starting a Private Reply......25 Storing Call Log........35 Direct Call............26 Chapter 5: Advanced Setting........36 Making a Direct Call........26 Power Save Mode..........36 Private Reply and Direct Call Frequently Enabling Power Save Mode....
- Page 4 Cloning the Wireless PROFILE ID Number ..55 Chapter 9: Troubleshooting..........56 Symptoms and Solutions........56 Chapter 10: Use and Care........... 61 Maintenance............61 Chapter 11: Motorola Solutions Limited Warranty for the United States and Canada........63 What Does this Warranty Cover......63 Products and Accessories......... 63 Exclusions............64...
-
Page 5: Product Safety And Rf Exposure Compliance
Regulations. • If you experience hearing discomfort, ringing in your For a list of Motorola Solutions-approved antennas, ears, or speeches that are muffled, you should stop batteries, and other accessories, visit the following listening to your radio through your headset or earpiece, site:http://www.motorolasolutions.com... -
Page 6: Introduction
The following list encompasses the package content This user guide covers the operation of your radios. available: This radio is a product of Motorola Solutions' 80 plus years • Radio of experience as a world leader in the designing and manufacturing of communications equipment. -
Page 7: Notice To Users (Fcc And Industry Canada)
• Changes or modifications made to this device, not expressly approved by Motorola Solutions, could void the authority of the user to operate this equipment. To comply with FCC/IC requirements, transmitter adjustments should be made only by or under the supervision of a technically qualified person to perform transmitter maintenance and repairs. -
Page 8: Batteries And Chargers Safety Information
Safety Information • Do not operate the charger if it has been broken or damaged in any way. Take it to any qualified Motorola This document contains important safety and operating Solutions service representatives. instructions. Read these instructions carefully and save •... - Page 9 English • Connect the equipment to an outlet which is easy to access and near. • For equipment using fuses, replacements must comply with the type and rating specified in the equipment instructions. • Maximum ambient temperature around the power supply equipment must not exceed 40 °C (104 °F).
-
Page 10: Chapter 1: Radio Overview
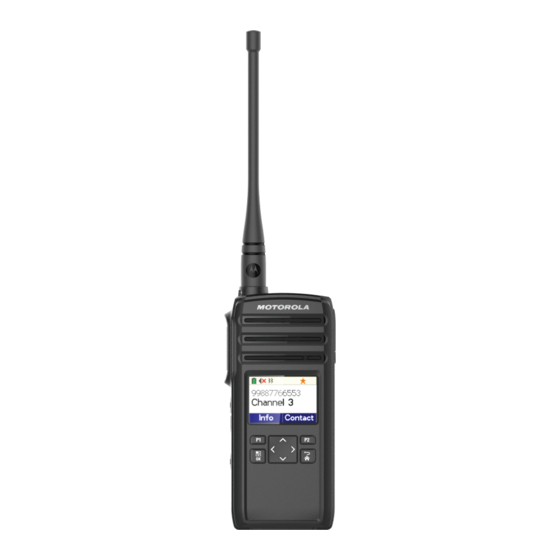
English Radio Overview Table 1: Parts of the Radio Label Item Description This chapter explains the buttons and functions to control Antenna Provides the needed RF the radio. amplification when trans- mitting or receiving. Parts of The Radio Push-To-Talk Press to execute voice op- (PTT) button erations. -
Page 11: Radio Specifications
Band (Watts nels features. Speaker Outputs all tones and au- ISM 900 Remova- DTR600 dio that are generated by the radio (for example, ISM 900 Remova- keypad tones and voice DTR700 audio). Power button Press to turn on and off your radio. -
Page 12: Status Indicators
English Status Indicators Mini Positive Notice Successful action taken. This chapter explains the status indicators and audio tones used in the radio. Tones Display Icons The following are the tones that sound through on the radio Your radio display shows radio status and menu entries. speaker. -
Page 13: Indicator Tones
50% per day. Battery with minimal overcharge and has an average of Negative Indicator Tone 25% discharge, lasts even longer. Motorola Solutions batteries are designed specifically to be used with a Motorola Solutions charger and vice versa. -
Page 14: Battery Recycling And Disposal
Charging a hot battery agencies. (above 95 °F [35 °C]) results in reducing discharge capacity and affecting the performance of the radio. Motorola Installing the Li-Ion Battery Solutions rapid-rate battery chargers contain a temperature-sensing circuit to ensure that batteries are NOTICE: charged within the temperature limits stated above. - Page 15 English 2 To attach battery cover, align it in place and slide the battery latch until it snaps into place. 3 Slide battery latch into lock position.
-
Page 16: Removing The Li-Ion Battery
English 2 To remove the battery cover, lift the battery cover up. Removing the Li-Ion Battery The following steps explain how a Li-Ion battery is removed. Ensure that the radio is turned off. 1 Move the battery latch to the unlock position. - Page 17 English 3 To remove the battery, lift the battery up from the battery compartment.
-
Page 18: Holster
English Holster Power Supply, Adapter, and Drop-In Tray Single Unit Charger (SUC) The following steps explain how to use a holster. The radio is equipped with one power supply, one adaptor, and one SUC. 1 To insert the radio into the holster, press the radio against the back of the holster until the hooks on the holster are inserted in the top recesses of the battery. -
Page 19: Battery Life
English Battery Life Table 5: Battery Status Battery Status Battery Level Battery Icon The battery lasts longer when Battery Save feature is set to on (enabled by default). Battery high 71%–100% Table 4: Li-Ion Battery Life Battery medium 41%–70% Battery Type Battery Save Battery Save Battery low... -
Page 20: Charging A Stand-Alone Battery
English NOTICE: 1 Place the SUC on a flat surface. To perform CPS programming, your radio needs to be turned on before placing into the 2 Insert the connector of the power supply into the port SUC. on the side of the SUC. The red LED on the SUC illuminates to indicate that 3 Plug the AC adapter into a power outlet. -
Page 21: Estimated Charging Time
English indicate that the battery is charging and turns green NOTICE: indicates the battery is fully charged. Turn off the radios before charging and it is best to charge at room temperature. Estimated Charging Time 1 Place the MUC on a flat surface. The following table provides the estimated charging time of the battery. -
Page 22: Led Indicator Of Chargers
English 4 Insert the radio or battery into the charging pocket Status LED Indicator Comments with the front of the radio or battery facing the LED of Charged Steady green the MUC. Error Fast-blinking red The charger LED flashes a few times to indicate the current battery charge when the radio is inserted in Slowly blinking Standby... -
Page 23: Chapter 2: Getting Started
If device is receiving during • To turn on the radio, press and hold the Power button volume interaction, received audio is heard at until the radio vibrates and the display shows Motorola the new volume instead of beeps. Logo. •... -
Page 24: Browsing And Selecting Channels
English NOTICE: Talk Range The four levels available for battery status are: High, You can communicate with a radio or a group of radios with Medium, Low, and Critical. the same configuration. Browsing and Selecting Channels Table 8: Talk Range To select a channel, press the Up or Down button Model Steel or Concrete... -
Page 25: Chapter 3: Radio Call Features
English Radio Call Features Private Reply This radio Top button is programmed by default as “Private This chapter explains all radio call features available in this Reply”. Push the Top button to capture the radio ID of the radio. person currently talking to your group and right after the transmission is over, push the PTT button to talk privately to that person. -
Page 26: Direct Call
English NOTICE: 1 To initiate a Private Reply, press the Programmable To set up the Direct Call function for the first time in button during a group call. your radio, (either Programmable button or to a The display shows Private Reply On. specific channel) you need to use the CPS (Customer Programming Software) which is available for free download at... -
Page 27: Private Reply And Direct Call Frequently Asked Questions
English PTT button at the same time to talk privately to B. Then, 2 When you hear the distinctive Private Talk Permit whoever presses the PTT button faster gets to talk Tone (TPT), press PTT button to reply. privately to B. The other user hears a “busy” or rejection The display shows a Private Call icon and Direct tone. - Page 28 English Answer: The radios allow for “Group Hang Time” talk, the radio gave me a busy tone or other strange (around four seconds) for you to be able to Private tones and I could not initiate my conversation. Reply to someone who had just finished talking. Push Answer: It is likely there are other users who were the Programmable button within the hang time window waiting as well to talk to the last person transmitting and...
-
Page 29: Private Call
English Answer: Yes. While waiting in queue to talk privately, Answer: You are no longer in a private conversation if you will receive a call reminder tone after 1 minute of the radio sounds an end tone. being in queue, followed by another reminder tone 4 NOTICE: minutes after that. -
Page 30: Group Call
English NOTICE: Making Group Call If you receive a busy tone and your radio display shows Call Failed, the channel is 1 To call a group, press P2 → Contact Alias/Contact either not available, busy, or there are no ID → PTT. users reachable within transmission range. -
Page 31: Starting Call All Available
English through each channel individually. Call All Available is a Starting Call All Available group call to all users available in different channels and users who are not currently tied up in an on-going radio 1 To turn on the Call All Available feature, press the conversation Programmable button. -
Page 32: Starting Page All Available
English to change through each channel individually. Page All 2 When your radio is in queue, press PTT button. Available is a one-way group voice announcement to all The display shows Page All Available. users in different channels who are not currently tied up in an ongoing radio conversation 3 Wait for the Talk Permit Tone to end and speak into Any user who wants to respond to a Page All Available... -
Page 33: Chapter 4: Advanced Features
English Advanced Features Contact Type Maximum Number of Entries This chapter explains the operations of the features Private Group available in your radio. Public Group Contact List Adding New Contacts This feature allows you to save contacts. Each entry corresponds to an alias or ID that you use to initiate a call. 1 To add new contacts, press P2 →... -
Page 34: Deleting Contacts
English Viewing Call Log Details 2 Enter the new contact number. The display shows a positive mini notice. 1 To scroll through a list of menu items, press the Menu/OK button. Deleting Contacts 2 Do one of the following: • To view incoming call log, select Call Log →... -
Page 35: Storing Call Log
English • To delete all incoming or outgoing call log, select Call Log → Incoming/Outgoing → Delete All → A tick indicates the call log is deleted. Storing Call Log 1 To scroll through a list of menu items, press the Menu/OK button. -
Page 36: Chapter 5: Advanced Setting
English Advanced Setting 3 To select, press the Menu/OK button. A tick indicates Power Save Mode is enabled. The Advanced Configuration Mode allows you to configure special settings in your radio without the need of Setting the Non-Interference or programming cables or additional software. Privacy Feature Power Save Mode This feature ensures improved private communications by... -
Page 37: Configuring The Programmable Button
English Configuring the Programmable 2 To select the Home Channel, locate the Advanced → Home Channel. Button 3 To scroll through a list of Home Channel, press the 1 To scroll through a list of menu items, press the 4-Way Navigation Button. Menu/OK button. -
Page 38: Radio Factory Default Settings
English Radio Factory Default Settings Radio Advanced Con- Default figuration Mode Table 10: Radio Basic Feature Defaults Direct Call MIC Gain Medium Radio Basic Feature Default Home Channel Disabled Quick press Power but- Battery Status Number of channels Set to maximum number Table 12: Radio Special Mode Defaults of channels supported by Radio Special Mode... -
Page 39: Chapter 6: Radio Settings
English Radio Settings 3 To scroll through a list of timer, press the 4-Way Navigation Button. This sections explains on the basic operation of the radio. 4 To select, press the Menu/OK Button. A tick indicates the current selected timer. Adjusting Display Brightness 1 To scroll through a list of menu items, press the Setting Menu Timer... -
Page 40: Enabling All Tones
English Enabling All Tones Enabling Keypad Tone 1 To scroll through a list of menu items, press the 1 To scroll through a list of menu items, press the Menu/OK button. Menu/OK button. 2 To select the All Tones, locate the Settings → 2 To select the Keypad Tone, locate the Settings →... -
Page 41: Selecting Mic Gain For Radio
English Selecting Mic Gain for Radio 4 To select, press the Menu/OK Button. A tick indicates the current selected Mic Gain. 1 To scroll through a list of menu items, press the Menu/OK button. Setting Languages 2 To select the Mic Gain, locate the Settings → Mic Gain →... - Page 42 English 2 To select the Config Channel List, locate the Settings → Config CH List. 3 To scroll through a list of channels, press the 4-Way Navigation Button. 4 To select, press the Menu/OK Button. A bullet point indicates the selected enabled channel.
-
Page 43: Chapter 7: Customer Programming Software (Cps)
CPS for CPS Basic Menu Instructions security purpose. The CPS software is available for download as free at: 1 Open the CPS software and click on the RADIO top http://www.motorolasolutions/DTR600 http:// tab. www.motorolasolutions/DTR700. 2 Do one the following: •... - Page 44 English • On the drop down menu Radio Type, select DLR if you want to open a new profile or an existing one. 4 Scroll down to see more feature options. Customize as necessary. 3 Do one the following: • Click Read Radio.
- Page 45 English operation mode. You can also choose which function you want to have for Power button short press. Click ONLY if you are going to Selection of options to be available upload radios IDs for Direct Call, in the Advanced Configuration Private Groups or interoperability mode.
- Page 46 English Programmable features to the radio basic menu (Channel / Menu button). Direct Call will be listed in this drop List of programmable features for down menu of Top Button the Top Button. programmable features once it is enabled. 7 To enable Direct Call feature in your Basic Menu 8 Customize your PROFILE ID Number for any four options, you need to first upload the radio(s) unique digit number different from “0000”...
- Page 47 English a Home Channel is off by default. If you want to assign a specific channel as your Home Channel, select the channel using the drop down menu List of available modes for under Home Channel. CPS will enable the option Home Channel to choose any channel you want as your...
- Page 48 English channel name to be announced by the radio. Click on Edit More to edit the voice prompt. Speaker icon indicates that customized voice prompt is enabled for this channel 12 Once you have changed all the settings, click Write to radio in order to program your radio with the new settings.
- Page 49 English...
-
Page 50: Chapter 8: Cloning Radios
English Cloning Radios You can clone radio profiles from one Source radio to a Target radio by using any one of these four methods: • Using a Multi-Unit Charger (MUC- optional accessory) • Using two Single Unit Chargers (SUC) and a Radio-to- Radio cloning cable (optional accessory) •... -
Page 51: Cloning With A Muc (Optional Accessory)
Label Item MUC pockets numbers should be read from left to right Pocket 1 with the Motorola Solutions logo facing front. Pocket 2 Paired Target radios and Source radios must be of the Pocket 4 same band type in order for the cloning to run successfully. - Page 52 English 1 Turn on the Target radio and place it into one of the 5 If cloning fails, refer to What To Do If Cloning Fails MUC Target Pockets. on page When ordering the MUC, refer to P/N# PMLN7136_. 2 Power the Source radio by performing the following actions: a Press the PTT button and the (-) button simultaneously while turning the radio on.
-
Page 53: Cloning Radio Using The Radio To Radio (R2R) Cloning Cable (Optional Accessory)
English Cloning Radio using the Radio to • Two Single-Unit Chargers (SUC) for radio cloning. Radio (R2R) Cloning Cable (Optional • Ensure that the radios are turned off Accessory) 2 Unplug any cables (power supply or USB cables) from the SUCs. 3 Plug one side of the cloning cable mini USB connector to the first SUC and the other end to the second SUC. -
Page 54: What To Do If Cloning Fails
NOTICE: What To Do If Cloning Fails This cloning cable is designed to operate only with compatible Motorola Solutions SUC . The radio audible voice announces “Fail” indicating that the cloning process has failed. In the event that the cloning... -
Page 55: Cloning The Wireless Profile Id Number
English Cloning the Wireless PROFILE ID 2 Power on Target radio by performing the following actions: Number a Press the PTT button and the (-) button The PROFILE ID Number Wireless Cloning feature is simultaneously while turning the radio on. useful when you want to clone the PROFILE ID Number for b Wait three seconds before releasing the buttons all the radios in your fleet but you do not want to clone... -
Page 56: Chapter 9: Troubleshooting
English Troubleshooting If... Then... position or “Flash” position in older The following table explains the ways to troubleshoot if the version programming cable. symptom occurred: Ensure that the radio is positioned correctly inside the Single Unit Symptoms and Solutions Charger (radio making proper con- tact with the charger). - Page 57 English If... Then... If... Then... Hearing conver- If you hear conversations from other Ensure that everybody in your team sation from oth- users that do not belong to your ra- is aware of proper operation of the er users that are dio fleet, it means that your radios radios.
- Page 58 English If... Then... If... Then... Transmit audio Hold the radio vertically 1 inch to 2 or there are no users reachable is low inches from mouth when talking. within transmission range. For accessory, hold the accessory Limited talk Steel and/or concrete structures, microphone 2 inches to 3 inches range heavy foliage, buildings, or vehicles...
- Page 59 English If... Then... If... Then... Message not Ensure that the PTT button is com- Radios are too far apart or obsta- transmitted or pletely pressed when transmitting. cles are interfering with transmis- received sion. Confirm that the radios have the same settings and PROFILE ID.
- Page 60 English If... Then... page 19 Charging A Stand- Alone Battery. Check the charger LEDs indicators to see if the battery has a problem. Radio Status.
-
Page 61: Chapter 10: Use And Care
English Use and Care This chapter explains the maintenance of the radio. Maintenance Do not place more than Use a soft damp cloth to Do not use alcohol or clean- seven radios turned on, Do not immerse in water clean the exterior ing solutions too close to each other in a container... - Page 62 English Turn radio off and remove Do not use radio until com- Dry with soft cloth the battery pletely dry...
-
Page 63: Chapter 11: Motorola Solutions Limited Warranty For The United States And Canada
This limited warranty is a consumer's exclusive remedy, and applies as follows to new Motorola Products, Products and Accessories The balance of the origi- Accessories and Software purchased by consumers in the... -
Page 64: Exclusions
Product or Accessory to of the product. abnormal usage or conditions • other acts which are not the fault of Motorola Exclusions Solutions, are excluded from coverage. Use of Non-Motorola Solutions Products and Normal Wear and Tear... -
Page 65: Software
Ninety (90) days from the date of purchase. Applies only to physical How to Obtain Warranty Service or defects in the media that Other Information embodies the copy of the software (e.g. CDROM, or Contact your Motorola Solutions point of purchase. floppy disk). -
Page 66: Patent Notice
United States of America may restrict the exportation or re- exportation of this product to certain destinations. For further information, contact the U.S. Department of Commerce. For questions or comments related to this product, please contact Motorola Solutions 1-800-448-6686 or visit us at: http://www.motorolasolutions/DTR600 http:// www.motorolasolutions/DTR700. -
Page 67: Appendix A: Accessories
English Accessories Table 15: Battery Part No. Description The following tables are the accessories list. PMNN4578_ Li-Ion Battery 2500 mAh Table 13: Antenna Table 16: Cables Part No. Description Part No. Description PMAF4024_ Whip Antenna 900–928 MHz HKKN4027_ Business Radio CPS Cable Kit HKKN4028_ Business Radio Cloning Cable Kit Table 14: Audio Accessories... - Page 68 English Part No. Description PS000227A11_ 5 W Power Supply, Micro-usb Table 19: Carry Accessories Part No. Description PMLN7939_ DTR Swivel Clip Holster Kit...
- Page 69 MOTOROLA, MOTO, MOTOROLA SOLUTIONS and the Stylized M Logo are trademarks or registered trademarks of Motorola Trademark Holdings, LLC and are used under license. All other trademarks are the property of their respective owners. © 2018 Motorola Solutions, Inc. All rights reserved.