JVC KW-XC406 Instructions Manual
Cd/cassette receiver
Hide thumbs
Also See for KW-XC406:
- Service manual (83 pages) ,
- Installation & connection manual (4 pages)
Table of Contents
Advertisement
Available languages
Available languages
CD/CASSETTE RECEIVER
ALAT PENERIMA CD/KASET
For canceling the display demonstration, see page 8.
Untuk membatalkan tampilan demonstrasi, lihat halaman 8.
For installation and connections, refer to the separate manual.
Untuk instalasi dan penyambungan, lihat buku pedoman terpisah.
INSTRUCTIONS
BUKU PETUNJUK
KW-XC406/KW-XC405
KW-XC406/KW-XC405
GET0327-009A
[UN]
Advertisement
Table of Contents

Related Manuals for JVC KW-XC406


Summary of Contents for JVC KW-XC406
- Page 1 CD/CASSETTE RECEIVER KW-XC406/KW-XC405 ALAT PENERIMA CD/KASET KW-XC406/KW-XC405 For canceling the display demonstration, see page 8. Untuk membatalkan tampilan demonstrasi, lihat halaman 8. For installation and connections, refer to the separate manual. Untuk instalasi dan penyambungan, lihat buku pedoman terpisah. INSTRUCTIONS...
-
Page 2: How To Reset Your Unit
Thank you for purchasing a JVC product. Please read all instructions carefully before operation, to ensure your complete understanding and to obtain the best possible performance from the unit. IMPORTANT FOR LASER PRODUCTS 1. CLASS 1 LASER PRODUCT 2. CAUTION: Do not open the top cover. There are no user serviceable parts inside the unit; leave all servicing to qualified service personnel. - Page 3 How to use the MODE button ....Other convenient tape functions .... 17 Control panel — Sound adjustments ....18 ....5 KW-XC406/KW-XC405 Selecting preset sound modes Parts identification ......... (EQ: equalizer) ......... 18 Adjusting the sound ....... 18 Remote controller —...
-
Page 4: How To Read This Manual
How to read this manual How to use the MODE button The following methods are used to make the Press MODE repeatedly to select the different explanations simple and easy-to-understand: functions available during play. • Some related tips and notes are explained in “More about this unit”... -
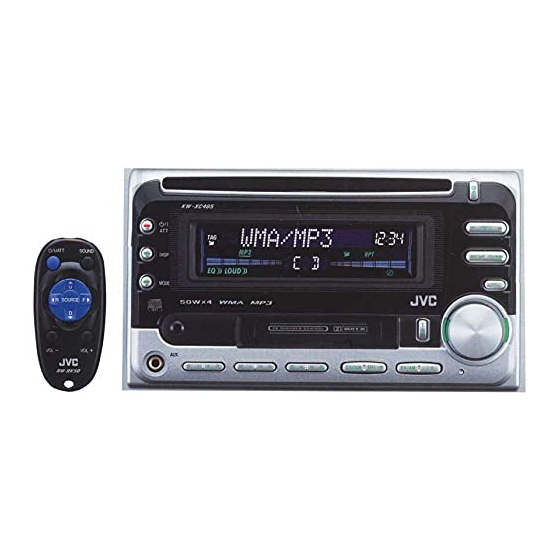
Page 5: Kw-Xc406/Kw-Xc405
Control panel — KW-XC406/KW-XC405 Parts identification Display window Display window 1 Loading slot (standby/on attenuator) button i Tuner reception indicators—ST (stereo), 3 DISP (display) button MO (monaural) 4 MODE button o Disc information indicators— 5 Cassette compartment (track/file), TAG (ID3 Tag),... -
Page 6: Main Elements And Features
Remote controller — RM-RK50 Installing the lithium coin battery Main elements and features (CR2025) (standby/on/attenuator) button • Turns the power on if pressed briefly or • When operating, aim the remote controller attenuates the sound when the power is on. directly at the remote sensor on the unit. -
Page 7: Getting Started
For CD/CD-CH To turn off the power Select “CD-CH” when using an Apple iPod ® or a JVC D. player (see page 22). iPod is a trademark of Apple Computer, Inc., registered in the U.S. and other countries. -
Page 8: Canceling The Display Demonstrations
Canceling the display Setting the clock demonstrations If no operations are done for about 20 seconds, display demonstration starts. [Initial: DEMO ON] —see page 20. Set the hour and minute. 1 Select “CLOCK HOUR,” then adjust the hour. 2 Select “CLOCK MIN,” (minute) then adjust the minute. -
Page 9: Radio Operations
Radio operations 2 Select the desired station frequencies. Listening to the radio When an FM stereo broadcast is hard to receive Lights up when monaural mode is activated. Lights up when receiving an FM stereo broadcast with sufficient signal strength. Reception improves, but stereo effect will be lost. -
Page 10: Listening To A Preset Station
Listening to a preset station Select the preset station (1 – 6) you “SSM” flashes, then disappears when want. automatic presetting is over. Local FM stations with the strongest signals are searched and stored automatically in the FM band. Manual presetting Ex.: Storing FM station of 92.5 MHz into the preset number 4 of the FM1 band. -
Page 11: Assigning Titles To The Stations
Finish the procedure. Assigning titles to the stations You can assign titles to 30 station frequencies (including both FM and AM). Each station name can be assigned up to 10 characters. However, you cannot assign title to the station To erase the entire title frequency stored in the EX button. -
Page 12: Disc Operations
Disc operations • When inserting an audio CD or a CD Text Playing a disc in the unit disc: Total track number Total playing time of the inserted disc of the inserted disc CD Text: Disc title/performer = Track title appears automatically All tracks will be played repeatedly until (see page 15). -
Page 13: Playing Discs In The Cd Changer
Select a disc. For disc number from 01 – 06: About the CD changer It is recommended to use a JVC MP3- compatible CD changer with your unit. • You can also connect other CH-X series For disc number from 07 – 12: CD changers (except CH-X99 and CH-X100). - Page 14 To fast-forward or reverse the track • When the current disc is an MP3 disc: To go to the next or previous tracks Folder name To go to the next or previous folders (for MP3 and WMA discs) Disc information appears (For MP3/WMA automatically (see page 15).
-
Page 15: Other Main Functions
Other main functions Changing the display information Skipping a track quickly during play While playing an audio CD or a CD Only possible on JVC MP3-compatible CD changer Text • For MP3 or WMA disc, you can skip a track within the same folder. -
Page 16: Selecting The Playback Modes
Selecting the playback modes You can use only one of the following playback modes at a time. Select your desired playback mode. Mode Plays repeatedly Repeat play TRACK RPT : The current track. • RPT and light up. FOLDER RPT* : All tracks of the current folder. -
Page 17: Tape Operations
Tape operations Playing a tape Finding the beginning of a tune Multi Music Scan (MMS) allows you to automatically start playback from the beginning of a specified tune. Specify the tune you want to locate (how many tunes ahead of or before the current tune) When the beginning of the specified tune is... -
Page 18: Sound Adjustments
Sound adjustments Selecting preset sound modes Adjusting the sound (EQ: equalizer) You can adjust the sound characteristics to your preference. Indication Range You can select a preset sound mode suitable to the music genre. FADER* R06 (Rear only) Adjust the front and rear speaker balance. -
Page 19: Storing Your Own Sound Adjustments
Adjust the selected sound elements Storing your own sound while the indication on step adjustments shown. You can adjust the sound modes and store your own adjustments in memory. Preset values Indication HIGH LEVEL –06 –06 –06 Select one of the sound mode to (min.) to (min.) to (min.) to... -
Page 20: General Settings — Psm
General settings — PSM Adjust the PSM item selected. Basic procedure You can change PSM (Preferred Setting Mode) items listed in the table that follows. Repeat steps to adjust the other PSM items if necessary. Select a PSM item. Finish the procedure. Indications Selectable settings, [reference page] DEMO MODE... - Page 21 • Pressing DISP for more than one second can scroll the display regardless of the setting. EXT INPUT* CHANGER : [Initial]; To use a JVC CD changer, an Apple iPod, or a External input JVC D. player, [13, 22]. EXT INPUT : To use another external component, [22].
-
Page 22: External Component Operations
External component operations ® This unit is ready for any Apple iPod For selecting the external JVC D. player control interface. component connected to..• For details, refer also to the manual • AUX input jack supplied with the interface adapter ®... -
Page 23: Maintenance
Maintenance Do not use the following discs: Handling discs Warped Moisture condensation disc Moisture may condense on the lens inside the Sticker Sticker CD player in the following cases: residue • After starting the heater in the car. • If it becomes very humid inside the car. Stick-on Should this occur, the CD player may label... -
Page 24: More About This Unit
More about this unit Basic operations Disc operations Turning on the power Caution for DualDisc playback • By pressing the source buttons on the unit, • The Non-DVD side of a “DualDisc” does you can also turn on the power. If the source not comply with the “Compact Disc Digital is ready, playback also starts. - Page 25 • Some CD-Rs or CD-RWs may not play • The maximum number of characters for file/ back on this unit because of their disc folder names vary among the disc format used characteristics, and for the following causes: (includes 4 extension characters—<.mp3> or –...
- Page 26 Changing the source Changing the source • If you change the source, playback also stops • If you change the source, playback also stops (without ejecting the disc). (without ejecting the cassette). Next time you select “CD” or “CD-CH” for Ignition key-off release the playback source, disc play starts from where it has been stopped previously.
-
Page 27: Troubleshooting
Troubleshooting What appears to be trouble is not always serious. Check the following points before calling a service center. Symptoms Remedies/Causes • Sound cannot be heard from the • Adjust the volume to the optimum level. speakers. • Check the cords and connections. •... - Page 28 Symptoms Remedies/Causes • Tracks do not play back in the order Playback order is determined when the files are you have intended them to play. recorded. • Elapsed playing time is not correct. This sometimes occurs during play. This is caused by how the tracks are recorded on the disc.
-
Page 29: Specifications
Specifications AUDIO AMPLIFIER SECTION CD PLAYER SECTION Maximum Power Output: Type: Compact disc player Front: 50 W per channel Signal Detection System: Non-contact optical Rear: 50 W per channel pickup (semiconductor laser) Continuous Power Output (RMS): Number of Channels: 2 channels (stereo) Front: 19 W per channel into 4 Ω, 40 Hz Frequency Response: 5 Hz to 20 000 Hz to 20 000 Hz at no more than 0.8%... - Page 30 Terima kasih telah membeli produk JVC. Harap membaca seluruh petunjuk dengan teliti sebelum mengoperasikan, untuk memastikan anda memahami secara keseluruhan dan mendapatkan performansi terbaik dari unit ini. PENTING UNTUK PRODUK-PRODUK LASER 1. PRODUK LASER KELAS 1 2. PERHATIAN: Jangan membuka penutup atas. Tidak ada bagian yang dapat diperbaiki oleh pengguna di dalam unit tersebut;...
- Page 31 Fungsi tape praktis lainnya ....17 MODE ..........Penyetelan suara-suara ..18 Panel kontrol — Memilih mode-mode preset (pengaturan ....5 KW-XC406/KW-XC405 awal) suara (EQ: equalizer) ....18 Pengenalan bagian-bagian ..... Menyetel Suara ........18 Menyimpan penyetelan-penyetelan suara Remote Kontrol —...
- Page 32 Bagaimana membaca manual ini Bagaimana menggunakan tombol MODE Metode berikut telah digunakan untuk menyederhanakan penjelasan dan mudah di Tekan MODE berulang-ulang untuk memilih mengerti: beberapa fungsi, yang tersedia sewaktu • Beberapa tips yang berhubungan dan catatan pemutaran. telah dijelaskan dalam “Lebih lagi tentang alat penerima ini”...
- Page 33 Panel kontrol — KW-XC406/KW-XC405 Pengenalan bagian-bagian Jendela tampilan Jendela tampilan 1 Celah pemuatan 2 Tombol (standby/hidup pelemah) i Indikator-indikator penerima tuner— 3 Tombol DISP (Tampilan) ST (stereo), MO (mono) 4 Tombol MODE o Indikator-indikator informasi disk— 5 Tempat kaset (trek/file), TAG (Tag ID3),...
- Page 34 Remote Kontrol — RM-RK50 Memasang baterai koin litium Elemen-elemen utama dan (CR2025) fitur-fitur 1 Tombol (standby/hidup/pelemah) • Ketika mengoperasikan, arahkan remote • Menghidupkan daya jika ditekan sebentar kontrol secara langsung ke sensor remote atau melemahkan bunyi suara apabila kontrol pada alat penerima. Pastikan tidak daya sedang hidup.
- Page 35 Untuk mengembalikan suara, tekanlah kembali. Untuk CD/CD-CH Untuk mematikan power Pilih “CD-CH” apabila menggunakan Apple iPod ® atau JVC D. player (lihat halaman 22). iPod adalah merek dagang dari Apple Computer, Inc., terdaftar di Amerika Serikat dan di negara-negara lain.
- Page 36 Membatalkan tampilan Pengaturan jam demonstrasi-demonstrasi Jika tidak ada pengoperasian yang dilakukan sekitar 20 detik tampilan demonstrasi dimulai. [Permulaan: DEMO ON]—lihat halaman 20. Atur jam dan menit. 1 Pilih “CLOCK HOUR”, kemudian setel jam. 2 Pilih “CLOCK MIN”, (menit) kemudian setel menit. Prosedur selesai.
- Page 37 Pengoperasian radio 2 Pilih frekuensi-frekuensi stasiun yang Mendengarkan radio diinginkan. Ketika sebuah siaran stereo FM sulit diterima Menyala ketika mode mono diaktifkan. Menyala ketika menerima sebuah siaran stereo FM dengan kekuatan sinyal yang cukup. Penerimaan membaik, tetapi efek stereo akan hilang. Untuk menyimpan ulang efek stereo, ulangi prosedur yang sama.
- Page 38 Mendengarkan sebuah preset (pengaturan awal) stasiun “SSM” berkedip, kemudian hilang ketika Pilih preset (pengaturan awal) mempreset (mengatur awal) secara otomatis stasiun (1 – 6) yang anda inginkan. selesai. Stasiun-stasiun FM lokal dengan sinyal-sinyal terkuat dicari dan disimpan secara otomatis dalam jalur FM tersebut. atau Mempreset (Mengatur awal) secara manual...
- Page 39 Prosedur selesai. Menetapkan judul untuk stasiun-stasiun Anda dapat menetapkan judul untuk 30 frekuensi stasiun (termasuk FM dan AM) Setiap stasiun dapat diberi nama hingga 10 karakter. Untuk menghapus semua judul Namun, Anda tidak dapat menetapkan judul Dalam langkah 3 pada bagian kiri... pada frekuensi stasiun yang disimpan dalam tombol EX.
- Page 40 Pengoperasian disk • Ketika menyisipkan sebuah disk CD audio Memutar sebuah disk di atau sebuah disk Teks CD: dalam unit Total nomor trek Total waktu putar dari disk yang sudah ulang dari disk yang dimasukkan sudah dimasukkan Teks CD: Judul disk/pemain = Judul trek muncul secara otomatis (lihat halaman 15).
- Page 41 * Jika anda telah mengganti pengaturan “EXT INPUT” ke “EXT INPUT” (lihat halaman 21), anda tidak dapat memilih CD changer. Lihat juga halaman 22 untuk cara menggunakan iPod atau JVC D. player. Ÿ Memilih sebuah disk. Mengenai CD changer Untuk nomor disk dari 01 – 06:...
- Page 42 Untuk maju-cepat atau mundur trek • Ketika disk yang sekarang adalah sebuah disk MP3: Pergi ke trek-trek sesudah atau sebelumnya Nama folder Untuk pergi ke folder-folder berikut atau sebelumnya (untuk disk-disk MP3 atau WMA) (Untuk disk-disk Informasi disk muncul secara MP3/WMA) otomatis (lihat halaman 15).
- Page 43 Sementara memutar sebuah CD Audio atau sebuah CD Teks Hanya dimungkinkan pada CD changer JVC yang kompatibel dengan MP3 • Untuk disk MP3 atau WMA, anda dapat melewati sebuah trek dengan folder yang sama. Contoh: Untuk memilih trek 32 sementara...
- Page 44 Memilih mode-mode putar ulang Anda dapat menggunakan hanya satu dari mode putar ulang berikut pada saat yang sama. Pilih mode putar ulang yang anda inginkan. Mode Memutar secara berulang-ulang Putar berulang TRACK RPT : Trek yang sekarang. • RPT dan menyala.
- Page 45 Pengoperasian-pengoperasian tape Memutar sebuah tape Menemukan awal lagu Dengan operasi Multi Music Scan (MMS), Anda dapat secara otomatis memutar ulang lagu tertentu dari permulaannya. Tentukan lagu yang ingin Anda cari (beberapa lagu sesudah atau sebelum lagu yang sekarang diputar) Apabila permulaan lagu yang ditentukan sudah ketemu, Putar ulang mulai secara otomatis.
- Page 46 Penyetelan suara-suara Memilih mode-mode preset Menyetel Suara (pengaturan awal) suara Anda dapat menyetel karakteristik-karakteristik (EQ: equalizer) suara untuk kesukaan anda. Indikasi Cakupan Anda dapat memilih sebuah mode preset FADER* R06 (Hanya (pengaturan awal) yang sesuai untuk jenis musik. belakang) ke F06 Setel balance (keseimbangan) speaker (Hanya depan)
- Page 47 Sesuaikan elemen suara yang dipilih Menyimpan penyetelan- sewaktu indikasi pada langkah penyetelan suara milik anda diperlihatkan. sendiri Anda dapat menyetel mode-mode suara dan meyimpan penyetelan-penyetelan milik anda Nilai-nilai preset dalam memori. (pengaturan awal) Indikasi HIGH –06 –06 –06 LEVEL (min.) (min.) (min.) ke +06...
- Page 48 Pengaturan-pengaturan umum — PSM Menyetel bagian PSM yang sudah Prosedur dasar dipilih. Anda dapat mengganti bagian PSM (Mode Pengaturan yang Disukai) yang telah terdaftar dalam tabel berikut. Ulangi langkah untuk menyetel bagian-bagian PSM lain jika diperlukan. Pilih sebuah bagian PSM. Prosedur selesai.
- Page 49 CHANGER : [Permulaan]; Untuk menggunakan sebuah CD changer Input eksternal JVC, Apple iPod atau JVC D. player, [13, 22]. EXT INPUT : Untuk menggunakan komponen eksternal yang lain, [22]. AUX ADJUST AUX ADJ 00 – AUX ADJ 05: Setel tingkat input tambahan secara...
- Page 50 Pengoperasian komponen eksternal Unit ini siap digunakan untuk sembarang Untuk memilih komponen ® antaramuka kontrol Apple iPod atau JVC eksternal yang terhubung ke..D. player. • Konektor input AUX • Untuk rinciannya, lihat juga buku petunjuk yang disertakan dengan adaptor ®...
- Page 51 Perawatan Jangan gunakan disk-disk berikut: Menangani disk Disk Pengembunan uap air melengkung Uap air mungkin mengembun pada lensa di dalam pemutar CD dalam kasus-kasus berikut: Stiker Bekas • Setelah menyalakan pemanas di dalam mobil. stiker • Jika ini menjadi sangat lembab di dalam mobil. Jika ini terjadi, pemutar CD mungkin Label yang mengalami kesalahan fungsi.
- Page 52 Lebih lagi tentang alat penerima ini Pengoperasian dasar Pengoperasian disk Menghidupkan power Perhatian untuk putar ulang DualDisc • Sisi yang non-DVD dari sebuah “DualDisc”, • Dengan menekan tombol sumber pada unit, tidak tunduk pada standar “Compact Disc anda dapat juga menghidupkan power. Jika Digital Audio”.
- Page 53 • Beberapa CD-R atau CD-RW mungkin tidak • Maksimum jumlah karakter untuk nama- diputar ulang pada alat penerima ini karena nama file/folder bervariasi pada format karakteristik-karakteristik disk tersebut, dan disk yang digunakan (termasuk 4 karakter untuk sebab-sebab berikut: perpanjangan—<.mp3> atau <.wma>). –...
- Page 54 Mengganti sumber Mengganti sumber • Jika anda mengganti sumber, putar ulang juga • Jika anda mengganti sumber, putar ulang juga berhenti (tanpa mengeluarkan disk). berhenti (tanpa mengeluarkan kaset). Pada waktu berikutnya anda memilih “CD” Pelepasan kunci kontak atau “CD-CH” untuk sumber putar ulang, disk mulai memutar dari tempat mana pernah •...
- Page 55 Pemecahan Masalah Apa yang muncul dan menjadi masalah tidak selalu serius. Cek poin-poin berikut sebelum memanggil sebuah pusat layanan. Gejala-gejala Perbaikan-perbaikan/Sebab-sebab • Suara tidak dapat didengar dari • Sesuaikan volume ke level optimum. speaker-speaker. • Cek kabel-kabel dan penyambungan- penyambungan. •...
- Page 56 Gejala-gejala Perbaikan-perbaikan/Sebab-sebab • Trek tidak berputar ulang dalam urutan Urutan putar ulang ditentukan ketika file-file yang Anda inginkan. direkam. • Waktu putar yang sudah lewat tidak Ini kadang-kadang terjadi selama putar. Hal ini benar. disebabkan dengan bagaimana trek-trek tersebut direkam pada disk. •...
- Page 57 Spesifikasi-spesifikasi SEKSI PENGUAT AUDIO SEKSI ALAT PEMUTAR CD Maksimum keluaran power: Tipe: Alat Pemutar CD kompak Depan: 50 W per saluran Sistem Pendeteksi Sinyal: Optik non kontak Belakang: 50 W per saluran terbuka (laser semikonduktor) Output Power Kontinu (RMS): Jumlah Saluran: 2 saluran (stereo) 19 W per saluran dalam 4 Ω, Depan:...
- Page 58 Having TROUBLE with operation? Please reset your unit Refer to page of How to reset your unit Ada MASALAH dengan cara pengoperasian? Setel kembali unit Anda Lihat halaman mengenai Bagaimana mereset unit anda EN, IN © 2006 Victor Company of Japan, Limited 0406DTSMDTJEIN...