Pioneer CT-F10 Operating Instructions Manual
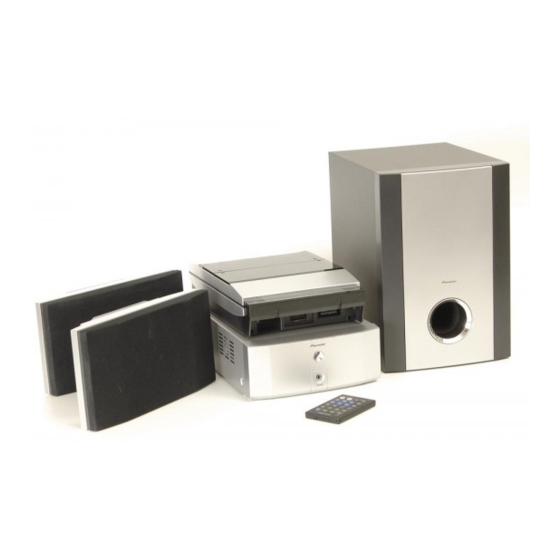
Stereo cd tuner stereo power amplifier speaker system stereo cassette deck
Hide thumbs
Also See for CT-F10:
- Service manual (28 pages) ,
- Servise manual (28 pages) ,
- Supplementary operating instructions (21 pages)
Advertisement
Quick Links
Download this manual
See also:
Service Manual
Stereo CD Tuner
XC-F10
XC-NS1
Stereo Power Amplifier
M-F10
M-NS1
Speaker System
S-F10-LRW
S-NS1-LRW
Stereo Cassette Deck
CT-F10
Operating Instructions
Advertisement

Related Manuals for Pioneer CT-F10


Summary of Contents for Pioneer CT-F10
- Page 1 Stereo CD Tuner XC-F10 XC-NS1 Stereo Power Amplifier M-F10 M-NS1 Speaker System S-F10-LRW S-NS1-LRW Stereo Cassette Deck CT-F10 Operating Instructions...
-
Page 2: Class 1 Laser Product
M-F10 (Stereo Power Amplifier); and S-F10-LRW (Speaker System). In all other countries the model names are XC-NS1, M- NS1 and S-NS1-LRW respectively. The optional CT-F10 Stereo Cassette Deck is available in the UK only. Please read through these operating instructions so you will know how to operate your model properly. - Page 4 Thank you for buying this Pioneer product. Before starting to set up your new system, please check that you have received the following supplied accessories: • Lithium battery (CR2025) (for remote control) • Remote control unit • Stand A (mounting bracket) •...
- Page 5 The diagram below shows the operating range of the remote control. Keep in mind the following when using the remote control: • Make sure that nothing is blocking the remote sensor on the unit. • Remote operation may become unreliable is direct sunlight or fluorescent light is shining onto the remote sensor.
- Page 6 Connect the CD-tuner to the amplifier as described below. If you also have the optional cassette deck, MD recorder or CD- Recorder, see their accompanying instructions before following the instructions on this page. This will make connecting up several components easier. When connecting or disconnecting the system cable, make sure that the power is switched off and the unit unplugged from the wall outlet.
- Page 7 The speaker system consists of stereo satellite speakers and a subwoofer for powerful bass sound. Connect the speakers to the amplifier unit as shown below. • When connecting or disconnecting speakers, make sure that the power is switched off and the unit unplugged from the wall outlet.
- Page 8 • To remove the stand, press the center tab and slide the stand from the speaker. Use the supplied subwoofer cable to connect the subwoofer to the amplifer. The white wire connects to the black terminal; the gray wire to the red.
- Page 9 If you prefer, you can hang the satellite speakers and/or the CD-tuner (together with the optional tape deck, MD recorder and CD-Recorder) on a wall. (Screws and other fixings are not supplied.) Make sure of the following when wall-mounting any equipment: •...
- Page 10 (Illustration shows UK model) Avoid placing near computers, television sets or other electrical appliances, and do not let it come into contact with metal objects. The signal earth (H) is designed to reduce noise that occurs when an antenna is connected. It is not an electrical safety earth.
- Page 11 A damaged power cord can cause a fire or give you an electric shock. Check the power cord once in a while. If you find it damaged, ask your nearest Pioneer authorized service center or your dealer for a replacement.
- Page 12 OPEN/CLOSE VOLUME CD-R TUNER SOUND DIRECT PLAY 3 CD-R TAPE TIMER ¢ ¡ CD-R MENU DISP STANDBY/ON SYSTEM CANCEL MENU DISP CHARA Press to open/close the disc compartment of the CD player and optional CD-Recorder. Use to adjust the volume. Press to switch to CD, tuner, tape, MD, CD-R or AUX (auxiliary).
- Page 13 – Remove to access the antenna terminals and auxiliary inputs – Press to switch the system on or into standby – Use to reduce the volume – Use to increase the volume – Press to stop the currently playing CD 6 –...
- Page 14 Many of the features of this system are accessed from menus displayed in the CD tuner’s fluorescent display. The advantage of this is that you can use many of the features using just four to display the first menu option; 4 and buttons: ¢...
- Page 15 If power is interrupted, the clock display will flash until you reset it to the correct time. To use the timer features, always set the clock to the correct time. • You can display the clock in either 12 or 24-hour format. See page 37 for how to change it.
- Page 16 ¢ Pressing ¢ once skips to the start of the next track on the disc. Further presses take you to subsequent tracks. Pressing 4 once takes you to the beginning of the current track. Further presses skip to the start of previous tracks. You can use the track skip buttons while the disc is paused, too.
- Page 17 The tuner can receive both FM and AM broadcasts, and lets you memorize your favorite stations so you don't have to manually tune in every time you want to listen. Here we run through the basic tuner controls, including switching between AM and FM, and tuning to a station.
- Page 18 This mode lets you program a sequence (a playlist) of up to 24 tracks to play. The order can be anything you choose. Tracks can appear more than once in the playlist, or can be left out entirely. The playlist applies only to the disc in the player at the time.
- Page 19 You can set the CD player to repeat either a single track over and over, or the whole disc. ¢ SYSTEM MENU ¢ ¢ Three options are available: • – repeat one track • – repeat all tracks on the disc •...
- Page 20 You can choose to display various kinds of information during playback and stop modes. Switch between them by pressing button. SYSTEM DISP CHARA – displays the number of tracks and the total playing time of the disc – displays the current time and date –...
- Page 21 You can save up to 30 station presets so that you always have easy access to your favorite stations without having to tune in manually each time. After you've set a station preset you can give it a name so you can remember which is which. The following instructions assume that you are already familiar with tuning into radio stations —turn back to page for detailed tuning instructions.
- Page 22 If you've set up more than a couple of station memories, you'll probably want to give them names that are a little more memorable than ‘FM 108.00’. Normally, of course, the name will be that of the radio station. ¢ SYSTEM CANCEL MENU...
- Page 23 Radio Data System, or RDS as it's usually known, is a system used by FM radio stations to provide listeners with various information—the name of the station and the kind of show they're broadcasting, for example. This information shows up as text on the display, and you can switch between the kind of information shown.
- Page 24 You can search for a station among your presets that is broadcasting a particular program type from the list on page ¢ SYSTEM DISP CHARA Press repeatedly to switch between the options, then press Use the 4 and ¢ buttons to change the program type; select one by pressing The complete list is on page 23.
- Page 25 In some regions or countries, the default tuning frequency interval may not be suitable. If you find that you can't tune into stations properly (it sounds 'almost' tuned in), try switching to the alternate tuning frequency interval. ¢ SYSTEM MENU ¢...
- Page 26 The tape deck features auto-reverse, Dolby B NR (noise reduction) and auto tape select. The auto-reverse feature lets you play or record both sides of the tape without physically taking it out and turning it over. Dolby B NR reduces tape hiss on tapes recorded using Dolby NR (which includes almost all commercially recorded tapes).
- Page 27 The tape deck can play both sides of a tape without you having to take the cassette out and turning it over by hand. This feature is called auto-reverse (because to play the other side of the tape, the tape travels in the opposite direction). You can switch sides any time while playing a tape by pressing the tape button.
- Page 28 You can make tape recordings from any other component in the system, and also from an external component connected to the auxiliary inputs. If you're recording from CD or the optional CD-Recorder, it's usually most convenient to use the synchro-recording mode. This makes the process largely automatic with the system starting and stopping the recording for you.
- Page 29 See page for detailed instructions on loading discs. If the disc has started playing, press 7. ¢ ¶ 8 The tape deck goes into record-pause mode, waiting for you to start the CD. Recording starts automatically with the CD. Once the track or disc has finished, the tape deck goes back into record-pause mode —...
- Page 30 You can set the timer to record something from either the tuner or a component connected to the auxiliary inputs. For example, you might want to record a program on the radio that is broadcast while you're at work. If you're recording from an auxiliary component it must also be able to switch on at the time the recording starts —this system can't control it—...
- Page 31 You can set the record timer together with the wake-up timer (described on page 32)— to record a radio program with the record timer, then later start playing a CD at the time set by the wake-up timer, for example. Be careful, however, to leave at least a minute between the end time for one timer and the start time of the another.
- Page 32 Using the timer features you can automatically record a program from the tuner at a certain time, wake up to a CD playing, or fall asleep at night to the radio. These functions are available from the timer menu, which is accessed by pressing the button.
- Page 33 Set the hour: use the 4 and ¢ buttons to change the flashing hour display, then press Next, set the minute: use the 4 and ¢ buttons to change the flashing minute display, then press After pressing the display shows you the settings you’ve just made, including the switch on and off times, the component, and the volume level.
- Page 34 This system is designed for use with conventional, fully circular CDs only. Use of shaped CDs is not recommended. Pioneer disclaims all liability arising in connection with the use of shaped CDs. The tape of a cassette is quite easily damaged and loose tape can jam in the tape deck mechanism.
- Page 35 Avoid using dry-type cassette head cleaners. Some cassette head cleaners are not designed to work with auto-reverse decks and may become jammed in the mechanism — ask your Pioneer authorized service centre for details. After using the head cleaner, leave the unit for 2–3 minutes before playing a tape.
- Page 36 The door open sensor on the front of the CD tuner has two operating modes, as well as an off setting. switch between menu options using 4 and ¢; select the option by pressing ¢ • – (default) the door will open automatically, even if a disc is currently playing.
- Page 37 By default, the time is displayed as a standard 12-hour clock. If you prefer, you can show the time in 24-hour format. switch between menu options using 4 and ¢; select the option by pressing ¢ The system goes back into standby.
- Page 38 If the trouble cannot be rectified even after checking the points below, ask your nearest Pioneer authorized service station to carry out repair work. • Check that the cooling vents are not blocked. Do not use on thick carpet or cover with cloth in use.
- Page 40 PIONEER ELECTRONICS [USA] INC. PIONEER ELECTRONICS OF CANADA, INC. PIONEER EUROPE N.V. PIONEER ELECTRONICS AUSTRALIA PTY. LTD. PIONEER ELECTRONICS DE MEXICO S.A. DE C.V. <00I00ZW0I00> 4-1, Meguro 1-Chome, Meguro-ku, Tokyo 153-8654, Japan P.O. BOX 1540, Long Beach, California 90801-1540, U.S.A.