
Related Manuals for Bosch PXX875D34E


Summary of Contents for Bosch PXX875D34E
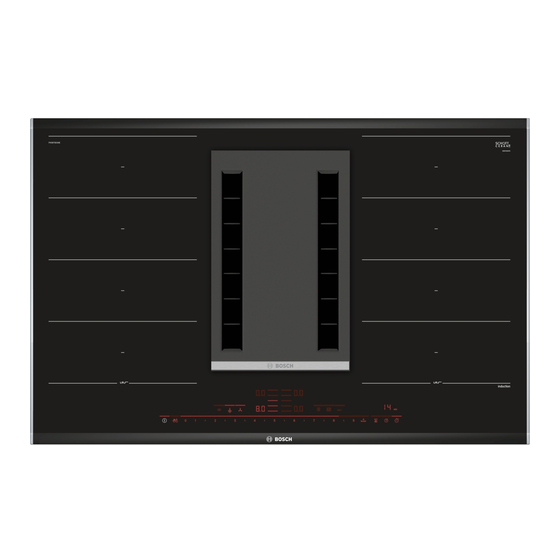
- Page 1 Flex induction cooktop with integrated ventilation system PXX8..D3.E Instruction manual...
- Page 2 Ø = cm...
-
Page 3: Table Of Contents
Table of contents e n I n s t r u c t i o n m a n u a l Intended use ......4 ShortBoost function . -
Page 4: Intended Use
Children must not play with, on, or around the replacement parts and services can be found at appliance. Children must not clean the www.bosch-home.com and in the online shop appliance or carry out general maintenance www.bosch-eshop.com unless they are at least 8 years old and are being supervised. -
Page 5: Important Safety Information
Important safety information In combination with an activated vapour (Important safety extractor hood, room air is extracted from the information kitchen and neighbouring rooms - a partial vacuum is produced if not enough fresh air is supplied. Toxic gases from the chimney or the The appliance can only be used safely if it is i n f o r m a t i o n I m p o r t a n t s a f e t y... - Page 6 Important safety information Grease deposits in the grease filter may Warning – Risk of electric shock! ■ catch fire. Incorrect repairs are dangerous. Repairs ■ Clean the grease filter at least once a may only be carried out and damaged month.
- Page 7 Important safety information Warning – Risk of injury! When cooking in a bain marie, the hob and ■ cooking container could shatter due to overheating. The cooking container in the bain marie must not directly touch the bottom of the water-filled pot. Only use heat- resistant cookware.
-
Page 8: Causes Of Damage
Causes of damage ]Causes of damage Caution! C a u s e s o f d a m a g e Rough pan bases may scratch the hob. ■ Avoid leaving empty pots and pans on the hotplate. ■ Doing so may cause damage. Do not place hot pans on the control panel, the ■... -
Page 9: Environmental Protection
Environmental protection 7Environmental protection fInduction cooking Advantages of induction cooking In this section, you can find information about saving t e c t i o n E n v i r o n m e n t a l p r o I n d u c t i o n c o o k i n g energy and disposing of the appliance. - Page 10 Induction cooking Some induction cookware does not have a fully Empty pans or those with a thin base ferromagnetic base: Do not heat empty pans, nor use pans with a thin base. The hob is equipped with an internal safety system. If the base of the cookware is only partially ■...
-
Page 11: Getting To Know Your Appliance
Getting to know your appliance *Getting to know your appliance You can find information on the dimensions and power y o u r a p p l i a n c e G e t t i n g t o k n o w of the hotplates in~ Page 2 In this section, we will explain the indicators and controls. -
Page 12: The Control Panel
Getting to know your appliance The control panel Indicators/symbols Touch controls Automatic mode for the ventilation system Switch the appliance on and off Flexible cooking zone è Locking the control panel for cleaning/switching on >Š the childproof lock Move function ç... -
Page 13: Residual Heat Indicator
Getting to know your appliance Residual heat indicator Circulating-air mode The air which is drawn in is cleaned by the The hob has a residual heat indicator for each hotplate. grease filters and an activated carbon filter This indicates that a hotplate is still hot. Do not touch a and conveyed back into the kitchen. -
Page 14: Before Using For The First Time
Before using for the first time Select the setting in the control panel. ‚ KBefore using for the first time Please read the following information before using the t h e f i r s t t i m e B e f o r e u s i n g f o r appliance for the first time: Clean the appliance and all accessory parts thoroughly. -
Page 15: Operating The Appliance
Operating the appliance Touch the symbol for at least four seconds. 1Operating the appliance The settings are saved. Use the main switch in order to exit the basic settings. This chapter explains how to set a hotplate. The table p l i a n c e O p e r a t i n g t h e a p shows heat settings and cooking times for various The display of the electronic controller is switched to air... -
Page 16: Switching The Ventilation System On And Off
Operating the appliance Selecting a hotplate and heat setting Switching on the ventilation system The hob must be switched on. If the symbols are not available, insert Note: the metal grease filter correctly.~ "Cleaning" Touch the symbol for the required hotplate. ã... -
Page 17: Intensive Setting
Operating the appliance Intensive setting Switching off Touch the symbol. Activate intensive mode to eliminate strong smells and odours. In this mode, the extractor hood operates at its The line above the symbol is not longer lit. Automatic maximum fan setting for a short time. After a short time, mode with sensor control is switched off. - Page 18 Operating the appliance To brown food, fry small portions in succession. ■ Cookware may reach high temperatures while the ■ food is cooking. We recommend that you use oven gloves. You can find recommendations for energy-efficient ■ cooking in section ~ "Environmental protection" Cooking table The table shows which heat setting is suitable for each type of food.
- Page 19 Operating the appliance Heat setting Cooking time (mins) Roasting/frying with little oil* Escalope, plain or breaded 6 - 7 6 - 10 Escalope, frozen 6 - 7 8 - 12 Chop, plain or breaded** 6 - 7 8 - 12 Steak (3 cm thick) 7 - 8 8 - 12...
-
Page 20: Flex Zone
Flex Zone As two independent hotplates |Flex Zone The flexible cooking zone is used like two independent hotplates. You can use each flex zone as a single hotplate or as F l e x Z o n e two independent hotplates, as required. Activating It consists of four inductors that work independently of See section ~ "Operating the appliance"... -
Page 21: Move Function
Move function Activation uMove function Select one of the two hotplates in the flexible cooking zone. This function activates the entire flexible cooking zone, M o v e f u n c t i o n Touch the ç symbol. The indicator beside the which is divided into three cooking areas and which has symbol lights up. -
Page 22: Time-Setting Options
Time-setting options Frying sensor OTime-setting options If a cooking time has been programmed for a hotplate and the frying sensor has been activated, the cooking Your hob has three timer functions: time will not begin to count down until the selected i o n s T i m e - s e t t i n g o p t temperature setting has been reached. -
Page 23: Stopwatch Function
PowerBoost function Changing or deleting the time vPowerBoost function Touch the symbol. Change the cooking time in the settings range or set The PowerBoost function enables you to heat up large to delete the programmed cooking time. ‹‹ P o w e r B o o s t f u n c t i quantities of water faster than when using heat setting Š... -
Page 24: Shortboost Function
ShortBoost function xShortBoost function zKeep warm function The ShortBoost function enables you to heat cookware This function is suitable for melting chocolate or butter S h o r t B o o s t f u n c t i K e e p w a r m f u n c t i o and for keeping food warm. -
Page 25: Transferring Settings
Transferring settings sTransferring settings This function can be used to transfer the heat setting, t i n g s T r a n s f e r r i n g s e t the programmed cooking time and the selected cooking function from one hotplate to another. -
Page 26: Cooking Assist Functions
Cooking assist functions The cooking functions are available to all hotplates if a ÜCooking assist functions wireless temperature sensor is connected. In this section, you will find information on: The cooking assistance functions make cooking easy u n c t i o n s C o o k i n g a s s i s t f Cooking assistant function types and always give you excellent results. -
Page 27: Sensors And Special Accessories
Cooking assist functions Any cookware that is suitable for induction cooking can Functions and heat settings be used with the cooking functions. You can find information on which types of cookware can be used Frying sensor with an induction hob in the section on ~ "Induction You can use the frying sensor when pan-frying food with cooking". - Page 28 Cooking assist functions Setting procedure Switching off the frying sensor Select the appropriate temperature setting from the Select the hotplate and set it to in the settings ‹ ‹ table. Place the empty frying pan on the hotplate. range. The hotplate switches itself off and the residual heat indicator appears.
- Page 29 Cooking assist functions Notes Connecting the wireless temperature sensor to the Always cook with the lid on. Exception: "Frying with a control panel ■ large amount of oil in the saucepan", temperature You will need to connect the wireless temperature setting 5/170 °C.
- Page 30 Cooking assist functions Setting procedure Attach the temperature sensor to the saucepan; see the section on ~ "Preparing and maintaining the wireless temperature sensor" Place a saucepan filled with sufficient liquid on the required hotplate and always put the lid on. Select the hotplate on which you have placed the saucepan with the temperature sensor.
-
Page 31: Recommended Dishes
Cooking assist functions Recommended dishes The following table shows a selection of dishes and is arranged by food type. The temperature and the cooking time depend on the amount, the condition and the quality of the food. Meat Cooking assistance Temperature Total cooking time functions... - Page 32 Cooking assist functions Egg-based dishes Cooking assistance Temperature Total cooking time functions setting from signal tone (mins) Function for frying with a small amount of oil Pancakes* Frying sensor Omelette* Frying sensor 3 - 6 Fried egg Frying sensor 2 - 4 2 - 6 Scrambled egg Frying sensor...
- Page 33 Cooking assist functions Potatoes Cooking assistance Temperature Total cooking time functions setting from signal tone (mins) Function for frying with a small amount of oil Fried potatoes (made from unpeeled boiled potatoes) Frying sensor 6 - 12 Fried potatoes (made from raw potatoes) Frying sensor 15 - 25 Potato fritter*...
- Page 34 Cooking assist functions Sauces Cooking as- Temperature Total cooking time from sistance setting signal tone (mins) functions Function for frying with a small amount of oil Tomato sauce with vegetables Frying sensor 1 25 - 35 Béchamel sauce Frying sensor 1 10 - 20 Cheese sauce, e.g.
-
Page 35: Preparing And Maintaining The Wireless Temperature Sensor
Cooking assist functions Frozen products Cooking assistance Temperature Total cooking time functions setting from signal tone (mins) Function for frying with a large amount of oil Frozen chips*** Cooking functions 5 / 170 ºC 4 - 8 * Turn several times. ** Add liquid according to the manufacturer's instructions. - Page 36 Cooking assist functions Remove the upper section of the casing. Take the Using the wireless temperature sensor old batteries out. Put the new batteries in. Make sure Attach the temperature sensor to the silicone patch and that the polarity is correct. align it correctly.
-
Page 37: Declaration Of Conformity
Childproof lock Declaration of Conformity kWipe protection Robert Bosch Hausgeräte GmbH hereby declares that the appliance with wireless temperature sensor function If you wipe over the control panel while the hob is meets the basic requirements and other relevant W i p e p r o t e c t i o n switched on, settings may be altered. -
Page 38: Basic Settings
Basic settings QBasic settings The appliance has various basic settings. You can B a s i c s e t t i n g s adapt these to suit your cooking habits. Display Function Automatic childproof lock ™‚ ‹ Manual*. ‚... -
Page 39: To Access The Basic Settings
Basic settings Display Function Configuring activation of the flexible cooking zone ™‚„ ‹ As two independent hotplates.* ‚ As a single hotplate. Connecting the wireless temperature sensor to the hob ™‚… ‹ Connected correctly ‚ Not connected correctly: Transmission error. ƒ... -
Page 40: Energy Consumption Indicator
Energy consumption indicator Then select the required setting from the settings [Energy consumption area. indicator This function indicates the total amount of energy n i n d i c a t o r E n e r g y c o n s u m p t i o consumed by this hob the last time it was used for cooking. -
Page 41: Cookware Check
Cookware check tCookware check DCleaning This function can be used to check the speed and Warning – Risk of burns! C o o k w a r e c h e c k C l e a n i n g quality of the cooking process depending on the The appliance becomes hot during operation. -
Page 42: Components To Clean
Cleaning Components to clean Area Cleaning products Glass ceramic Glass cleaner for stains caused by limescale and residual water: Clean the hob as soon as it has cooled down. You can use a cleaning product that is suita- ble for glass-ceramic hobs or glass cleaner (article no. -
Page 43: Hob
Cleaning Notes The activated charcoal filter is not included with the ■ Clean the hob each time you use it. This will prevent appliance.The activated charcoal filter (article food remnants from becoming burned on. Do not clean no. HEZ381700) is available from specialist the hob until the residual heat indicator has gone out. - Page 44 Cleaning Removing metal grease filter By hand: The metal grease filters filter the grease out of kitchen You can use a special degreaser to remove Note: steam. To keep them in good working order, the filters stubborn dirt (article no. 00311297). This can be should be cleaned at least once a month.
-
Page 45: Cleaning The Overflow Container
Cleaning If necessary, take off the housing cover underneath Unscrew the overflow container with both hands. the appliance and clean it. Notes – Hold the overflow container level to prevent liquid from leaking out. – Take the housing cover off if necessary. Clean the parts and dry them before putting them back together. -
Page 46: Frequently Asked Questions (Faq)
Frequently Asked Questions (FAQ) {Frequently Asked Questions (FAQ) Q u e s t i o n s ( F A Q ) F r e q u e n t l y A s k e d Using the appliance Why can't I switch on the hob and why is the childproof lock symbol lit? The childproof lock is activated. -
Page 47: Trouble Shooting
Trouble shooting 3Trouble shooting Warning – Risk of electric shock! Incorrect repairs are dangerous. Repairs may only be carried out and damaged power cables replaced by Usually, faults are small matters that are easy to one of our trained after-sales technicians. If the T r o u b l e s h o o t i n g eliminate. - Page 48 Trouble shooting The temperature sensor indi- The temperature sensor is not responding and Replace the 3 V CR2032 battery. See the section entitled cator is not lighting up the indicator is not lighting up. ~ "Changing the battery" If this does not solve the problem, press and hold the symbol on the temperature sensor for 8 seconds and then reconnect the temperature sensor to the hob.
-
Page 49: Customer Service
Customer service 4Customer service Our after-sales service is there for you if your appliance C u s t o m e r s e r v i c e needs to be repaired. We will always find an appropriate solution, also in order to avoid after-sales personnel having to make unnecessary visits. - Page 50 Test dishes Saucepan Ø 16 cm, 1.2 l for hotplates of Ø 14.5 cm ETest dishes ■ Pot Ø 16 cm, 1.7 l for hotplates of Ø 14.5 cm ■ Pot Ø 22 cm, 4.2 l for hotplates of Ø 18 cm ■...
- Page 51 Test dishes Preheating Cooking Heat Cooking time Test dishes Cookware Heat setting Lid setting (min:sec) Cooking rice pudding Rice pudding, cooked with the lid on Temperature of the milk: 7 ºC Heat the milk until it starts to rise up. Set the recommended heat setting and add rice, sugar and salt to the milk.
- Page 52 *9001240833* 9001240833 961020(00)