Brother QL-810W User Manual
Hide thumbs
Also See for QL-810W:
- Quick setup manual (10 pages) ,
- Installation manual (5 pages) ,
- User manual (214 pages)
Table of Contents
Troubleshooting

Related Manuals for Brother QL-810W


Summary of Contents for Brother QL-810W
- Page 1 User’s Guide QL-810W QL-820NWB Read the Product Safety Guide first, then read the Quick Setup Guide for the correct setup procedure. After reading this guide, keep it in a safe place for quick reference. Version B US ENG...
- Page 2 The available options and supplies may vary depending on the country. Available Manuals Visit the Brother Solutions Center at support.brother.com and click Manuals on your model page to download the latest manuals. This guide provides safety information; read it before you use the Product Safety Guide Label Printer.
-
Page 3: Symbols Used In This Guide
Symbols Used in This Guide The following symbols are used throughout this guide: WARNING Tells you what to do to avoid the risk of injury. Tells you about procedures you must follow to avoid minor personal injury or CAUTION damage to the Label Printer. Indicates information or directions that should be followed. -
Page 4: General Precautions
When applying CD/DVD labels, use the applicator included with the CD/DVD label rolls. Failure to do so could cause damage to the CD/DVD player. Users shall take full responsibility for applying CD/DVD labels. Brother accepts no responsibility for any loss or damage of data caused by the inappropriate use of CD/DVD labels. ... - Page 5 2008 R2. ® ® Windows Server 2012 in this document represents all editions of Windows Server 2012 and Windows ® Server 2012 R2. Not all models are available in all countries. ©2016 Brother Industries, Ltd. All rights reserved.
-
Page 6: Table Of Contents
Section I Basic Operations Setting Up the Label Printer Parts Description ............................2 Front ..............................2 Rear..............................4 Loading the DK Roll...........................5 Connecting the AC Adapter ........................7 Installing the Coin Cell Battery (QL-820NWB only) ...................8 Turning Power On/Off..........................10 Setting LCD Language (QL-820NWB only) .....................10 Setting the Time and Date (QL-820NWB only)..................10 LCD (QL-820NWB only) ..........................11 Screen ...............................11... - Page 7 Changing the Label Printer Settings ® Printer Setting Tool for Windows ......................37 Before Using the Printer Setting Tool ....................37 ® Using the Printer Setting Tool for Windows ...................38 ® Communication Settings for Windows ....................40 Settings Dialog Box ...........................40 Menu Bar ............................42 General Tab............................44 Wired LAN (QL-820NWB only) / Wireless LAN Tabs ................46 Wireless Direct Tab ...........................48...
- Page 8 Starting the P-touch Address Book ....................108 Creating a new contact........................110 ® How to use P-touch Editor Lite (Windows only) ® How to use P-touch Editor Lite (QL-810W only) (Windows only) ............112 ® How to use P-touch Editor Lite LAN (Windows only) ................116 ®...
- Page 9 ® Transferring Templates with P-touch Transfer Express (Windows only) Preparing P-touch Transfer Express .....................138 Transferring the Template to P-touch Transfer Manager ..............139 Saving the Template as a Transfer Package File (.pdz)................140 Distributing the Transfer Package File (.pdz) and P-touch Transfer Express to the User .....142 Transferring the Transfer Package File (.pdz) to Your Label Printer .............143 How to Update P-touch Software ®...
- Page 10 Section IV Appendix Resetting the Label Printer Resetting All Settings to the Factory Settings Using the Label Printer Buttons (QL-810W only) ..161 Resetting Data Using the LCD menu (QL-820NWB only) ..............161 Resetting Data Using the Printer Setting Tool ..................162 Maintenance Cleaning the Exterior of the Unit......................163...
- Page 11 General Procedure for the P-touch Template Function .................194 List of Barcodes for Specifying Settings ....................195 Using the Battery Unit (Optional: PA-BU-001) Using the Battery Unit (Rechargeable Li-ion Battery included) .............198 Product Specifications ...........................200 Using the Brother Barcode Scanner (Optional: PA-BR-001) (QL-820NWB only)
- Page 12 Section I Basic Operations Setting Up the Label Printer Printing Using a Computer (P-touch Editor) Printing Using the Mobile Device Changing the Label Printer Settings Printing Labels Using P-touch Template Other Functions...
-
Page 13: Setting Up The Label Printer
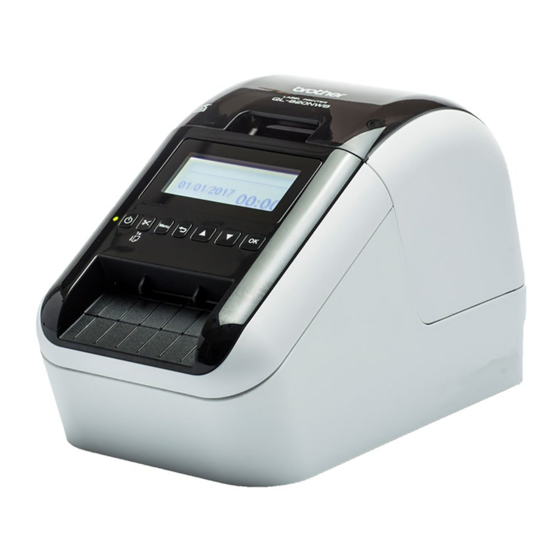
Setting Up the Label Printer Parts Description Front QL-810W 1 Battery LED 8 Wi-Fi Button 2 Status LED 9 Editor Lite LED 3 Power Button 10 Editor Lite Button 4 Feed Button 11 DK Roll Compartment Cover 5 Cutter Button... - Page 14 Setting Up the Label Printer QL-820NWB 1 Indicator Display 13 Label Output Slot 2 Date Display 14 DK Roll Compartment Cover 3 Time Display 15 Roll Spool Arm 4 Status LED 16 Roll Spool Guide 5 Power Button 6 Cutter Button 7 Menu Button 8 Cancel Button 9 Up Arrow Button...
-
Page 15: Rear
Setting Up the Label Printer Rear QL-810W QL-820NWB 1 AC Adapter Port 2 USB Port 3 USB Host 4 LAN Port Important Before using the Label Printer, make sure you remove the protective sheet according in the following way: 1 Make sure that the Label Printer is turned Off. -
Page 16: Loading The Dk Roll
Setting Up the Label Printer Loading the DK Roll Make sure that the Label Printer is turned Off. Hold the Label Printer by the front, and firmly lift the DK Roll Compartment Cover to open it. Place the DK Roll into the Roll Spool Guide. •... - Page 17 Setting Up the Label Printer Close the DK Roll Compartment Cover. When you press the Power ( ) Button to turn the Label Printer On, the end of the DK Roll aligns automatically. Important Do not leave any printed labels in the Label Printer. Doing so will cause the labels to jam.
-
Page 18: Connecting The Ac Adapter
Setting Up the Label Printer Connecting the AC Adapter Connect the AC Power Cord to the Label Printer and to the AC Adapter. Then, plug the AC Power Cord into a grounded AC power outlet. The PA-BU-001 (optional battery unit) can also be used. -
Page 19: Installing The Coin Cell Battery (Ql-820Nwb Only)
Setting Up the Label Printer Installing the Coin Cell Battery (QL-820NWB only) A coin cell battery is used as a backup power supply to maintain the settings for the internal clock. Please note that battery power will be consumed even if the Label Printer is not in use. The Label Printer has a preinstalled coin cell battery. - Page 20 Setting Up the Label Printer CAUTION • Remove the battery if you do not intend to use the Label Printer for an extended period of time. • Dispose of the battery at an appropriate collection point, not in the general waste stream. Be sure to observe all applicable federal, state, and local regulations.
-
Page 21: Turning Power On/Off
Setting Up the Label Printer Turning Power On/Off On: Press the Power ( ) Button to turn the Label Printer On. The Status LED turns green. Off: Press and hold the Power ( ) Button again to turn the Label Printer Off. Important When turning the Label Printer Off, do not remove the battery or disconnect the AC Adapter until the orange Status LED turns Off. -
Page 22: Lcd (Ql-820Nwb Only)
Setting Up the Label Printer LCD (QL-820NWB only) Screen When the Label Printer is turned on, the main screen appears. 2 3 4 5 6 1 Update icon Indicates whether updated templates, databases, and other data are available. : There is new data. (flashing) : Data update failed. -
Page 23: Lcd Settings
Setting Up the Label Printer 9 Time display Note While using the buttons on the Label Printer, do not send prints or change settings from your computer or other devices. LCD Settings The settings for the LCD can be specified either by using the Label Printer or by using the Printer Setting Tool on a computer connected to the Label Printer. - Page 24 Setting Up the Label Printer Using the buttons on the Label Printer, the following settings can be specified: Menu Title Sub title Settings Description Adjust the density of the first color Settings Print Color 1 when using 2-color printing. Density (Black) (2 colors) Adjust the density of the second...
- Page 25 Setting Up the Label Printer Menu Title Sub title Settings Description Specify the period of time that Settings Auto Power Adapter passes before the Label Printer (Continued) turns off automatically when connected to an AC power outlet. Specify the period of time that Li-ion passes before the Label Printer Battery...
- Page 26 Setting Up the Label Printer Menu Title Sub title Settings Description Select whether the template mode Template Template starts when the Label Printer is Settings Mode turned on. Note In the template mode, you can replace the contents of the templates stored in the Label Printer and print them.
- Page 27 Setting Up the Label Printer Menu Title Sub title Settings Description Display the Label Printer Information Configuration Printer: information. QL-820NWB ProgVer: *.** FontVer: *.** Memory: ***/8064kbytes Print the Label Printer set-up Print Start information (missing dot test pattern, Configuration Back usage log, printer settings, wireless setting information and transfer data).
- Page 28 Setting Up the Label Printer Menu Title Sub title Settings Description Select the type of command mode. Administration Command Mode P-touch Template ESC/P Raster Select the date format for the clock. Date Format 1/31/2099 01/31/2099 31/1/2099 31/01/2099 31.1.2099 31.01.2099 31-1-2099 31-01-2099 2099/1/31 2099/01/31...
- Page 29 Setting Up the Label Printer Menu Title Sub title Settings Description Returns all printer settings, including Administration Reset Factory Reset Reset the communication settings and (Continued) Back device settings, to their factory defaults. Templates and databases stored in the Label Printer are also deleted. Returns all device settings to their User Data Reset...
- Page 30 Setting Up the Label Printer Menu Title Sub title Settings Description Select whether to turn the WLAN WLAN WLAN function On or Off. (On/Off) Set which network is used when you Network Mode Infrastructure select [On] from [WLAN (On/Off)]. Mode Direct Mode Infra/ Direct Mode...
- Page 31 Setting Up the Label Printer Menu Title Sub title Settings Description Determine when the label feed Feed Feed Start starts. These modes may vary depending on the DK Roll used. Label feed starts on the current page Die-cut Feed Current Page when the die-cut black mark is Setting detected on the reverse side.
- Page 32 Setting Up the Label Printer Setting the Menu Security When setting the menu security, access to the Administration mode can be restricted by setting a password. Press the Menu, [▲], or [▼] Button to select the [Administration] menu, and then press the [OK] Button.
-
Page 33: Printing Using A Computer (P-Touch Editor)
Printer Driver, P-touch Editor, P-touch Update Software, Printer Setting Tool and Wireless Device Setup Wizard Important QL-810W only: When printing with P-touch Editor, press and hold the P-touch Editor Lite Button until the green Editor Lite LED turns off. Visit our website (install.brother) and download the Software Installer for the latest software and manuals. -
Page 34: Connecting The Label Printer To A Computer
Printing Using a Computer (P-touch Editor) Connecting the Label Printer to a Computer Refer to these directions for the type or connection method: USB cable connection See Connecting Using USB on page 23. Wireless LAN connection ® See Connecting Using Wi-Fi on page 23. - Page 35 • To configure the Wi-Fi settings again, or if the status of the Wi-Fi connection for the Label Printer is unknown, reset the Wi-Fi settings of the Label Printer. For QL-810W 1 Press and hold the Power ( ) Button to turn the Label Printer off.
- Page 36 Printing Using a Computer (P-touch Editor) 2 Press and hold the Cutter ( ) Button and the Power ( ) Button for about one second. The Status LED starts blinking in green. 3 The Status LED is lit in orange, the Editor Lite LED flashes in green and the Wi-Fi LED flashes in blue. While pressing the Power ( ) Button, press the Cutter ( ) Button once and the Status LED lights in orange.
- Page 37 When the connection between the Label Printer and your Wi-Fi access point/router is established, the Wi-Fi ( ) LED starts flashing in blue (QL-810W) or [Connected!] appears on the LCD (QL-820NWB). Computers and mobile devices that are on the same network as the Label Printer will have access to the Label Printer.
- Page 38 • Computers and mobile devices that are on the same network as the Label Printer will have access to the Label Printer. • The Label Printer will try to connect using WPS for two minutes. If the WPS Button (QL-810W) or [OK] Button (QL-820NWB) is pressed during that time, the Label Printer will continue trying to connect for an additional two minutes.
-
Page 39: Connecting Using A Wired Lan (Ql-820Nwb Only)
Printing Using a Computer (P-touch Editor) Connecting Using a Wired LAN (QL-820NWB only) Note To use a static IP address to connect your Label Printer to a wired LAN connection, install the printer drivers and Printer Setting Tool, and then specify the wired LAN connection settings. For more information, see Installing the Software and Printer Drivers to a Computer on page 22. -
Page 40: Connecting The Label Printer To A Barcode Scanner Using Bluetooth (Ql-820Nwb Only)
Printing Using a Computer (P-touch Editor) Connecting the Label Printer to a Barcode Scanner using Bluetooth (QL-820NWB only) You can connect the Label Printer to a Barcode Scanner using a Bluetooth interface. Note • Follow the recommendations of the manufacturer of your Bluetooth-equipped devices, such as Barcode Scanners, and install any necessary hardware and software. -
Page 41: Printing From A Computer
To use the Label Printer effectively, a number of applications and functions are available. You must install the printer driver to use these applications. Visit our website (install.brother) and download the installer for the applications and printer driver. Application Windows... -
Page 42: Creating Labels From Your Computer
Printing Using a Computer (P-touch Editor) Creating Labels from Your Computer There are various methods for printing with this Label Printer. The following describes the procedure for printing from a computer using P-touch Editor or P-touch Address Book. Start P-touch Editor or P-touch Address Book, and then open the document you want to print. Create a label design. -
Page 43: Attaching Labels
Printing Using a Computer (P-touch Editor) Attaching Labels Peel the backing from the label. Position the label, and then press firmly from top to bottom with your finger to attach the label. Note Labels may be difficult to attach to surfaces that are wet, dirty, or uneven. The labels may peel off easily from these surfaces. -
Page 44: Printing Using The Mobile Device
Installing Applications for Use with Mobile Devices Brother offers various applications for use with your Label Printer, including applications that allow you to print directly from your Apple iPhone, iPad, and iPod touch or Android™ smartphone or tablet, and applications that allow you to transfer data wirelessly, such as templates, symbols, and databases created using a computer, to your Label Printer. - Page 45 Click the [Wireless LAN] tab. c) Confirm that [Wireless Direct] is set to [On]. For QL-810W Press and hold the Wi-Fi ( ) Button on the Label Printer for one second to turn the Wi-Fi function On. The Wi-Fi ( ) LED starts flashing blue once every three seconds.
-
Page 46: Printing From A Mobile Device
Printing Using the Mobile Device Printing from a Mobile Device Make sure that the Label Printer is connected to your mobile device. Start the mobile printing application on your mobile device. See Connecting the Label Printer to a Mobile Device on page 33. Select a label template or design. -
Page 47: Attaching Labels
Printing Using the Mobile Device Attaching Labels Peel the backing from the label. Position the label, and then press firmly from top to bottom with your finger to attach the label. Note Labels may be difficult to attach to surfaces that are wet, dirty, or uneven. The labels may peel off easily from these surfaces. -
Page 48: Changing The Label Printer Settings
The Printer Setting Tool is installed automatically when you use the initial installer to install the printer driver. For more information, see Installing the Software and Printer Drivers to a Computer on page 22. Important The Printer Setting Tool is available only with compatible Brother printers. Before Using the Printer Setting Tool ... -
Page 49: Using The Printer Setting Tool For Windows
® For Windows Vista / Windows 7 / Windows Server 2008 / Windows Server 2008 R2: Click Start > All Programs > Brother > Labels & Mobile Printer > Printer Setting Tool. ® ® ® ® For Windows 8 / Windows 8.1 / Windows Server... - Page 50 Changing the Label Printer Settings Check that the Label Printer you want to configure appears next to [Printer]. If a different Label Printer appears, select the Label Printer you want from the drop-down list. Note If only one Label Printer is connected, it is unnecessary to make a selection because only that Label Printer is available.
-
Page 51: Communication Settings For Windows
Changing the Label Printer Settings ® Communication Settings for Windows Use [Communication Settings] in the Printer Setting Tool to specify or change the Label Printer communication information when connecting the Label Printer and computer with a USB cable or via a Bluetooth connection (QL-820NWB only). - Page 52 Changing the Label Printer Settings 5 Node Name Displays the node name (nodes can be renamed). For more information, see Menu Bar on page 42. 6 Settings Tabs Contains settings that may be specified or changed. appears in the tab, the settings in that tab will not be applied to the Label Printer. 7 Settings Display/Change Area Displays the current settings for the selected item.
-
Page 53: Menu Bar
Changing the Label Printer Settings Menu Bar The following explains about the menu items in the settings dialog box. • Apply Settings to the Printer Applies the settings to the Label Printer. • Save Settings in Command File Saves the specified settings in a command file. The file extension is .bin. The saved command file can be used with the mass storage mode to apply the settings to a Label Printer. - Page 54 Changing the Label Printer Settings Note • All settings, such as wireless settings or TCP/IP settings, can be imported, except for node names. • Only profiles that are compatible with the selected Label Printer can be imported. • If the imported profile’s IP address is set to [STATIC], change the IP address of the imported profile, if needed, so that it does not duplicate the IP address of an existing configured Label Printer on the network.
-
Page 55: General Tab
Specifies the conditions for connecting via Wi-Fi when the Label Printer is turned on. QL-810W: Select [On by Default], [Off by Default] or [Keep Current State]. QL-820NWB: Select [Wireless LAN by Default], [Wired LAN by Default] or [Keep Current State]. - Page 56 Changing the Label Printer Settings Log (QL-820NWB only) • Log storage Selects whether to export the update log to the FTP server. • Log storage path of FTP server Enters the path to the folder on the FTP server where you want to export the log data.
-
Page 57: Wired Lan (Ql-820Nwb Only) / Wireless Lan Tabs
Changing the Label Printer Settings Wired LAN (QL-820NWB only) / Wireless LAN Tabs The following explains about the Wired LAN (QL-820NWB only) and Wireless Tab in the settings dialog box. TCP/IP (Wired/Wireless) • Boot Method Selects [AUTO], [BOOTP], [DHCP], [RARP], or [STATIC]. •... - Page 58 Changing the Label Printer Settings • User ID/Password You can specify settings only when LEAP, EAP-FAST, PEAP, EAP-TTLS or EAP-TLS is selected as the authentication method. In addition, with EAP-TLS, it is not necessary to register a password, but a client certificate must be registered.
-
Page 59: Wireless Direct Tab
Changing the Label Printer Settings Wireless Direct Tab The following explains about the Wireless Direct Tab in the settings dialog box. Wireless Direct Settings • SSID/Network Key Generation Select [AUTO] or [STATIC]. • SSID (Network Name)/Network Key Specifies the SSID (25 ASCII characters or fewer) and the network key (63 characters or fewer) you want to use in the Wireless Direct mode. -
Page 60: Bluetooth Tab (Ql-820Nwb Only)
Changing the Label Printer Settings Bluetooth Tab (QL-820NWB only) The following explains about the Bluetooth Tab in the settings dialog box. Bluetooth Settings • Visible to Other Devices Allows the Label Printer to be “discovered” by other Bluetooth devices. Available settings: [Discoverable], [Not Discoverable] •... -
Page 61: Applying Setting Changes To Multiple Printers
Changing the Label Printer Settings Applying Setting Changes to Multiple Printers After applying settings to the first Label Printer, disconnect the Label Printer from the computer, and then connect the second Label Printer to the computer. Select the newly connected Label Printer from the [Printer] drop-down list. Note If the [Automatically detects the connected Label Printer, and retrieves the current settings] check box in the Option Setting dialog box is selected, the Label Printer connected with the USB cable is... -
Page 62: Device Settings For Windows
Changing the Label Printer Settings ® Device Settings for Windows Use [Device Settings] in the Printer Setting Tool to specify or change printer settings when connecting the Label Printer and computer with a USB cable or via a Bluetooth connection. Not only can you change the device settings for one Label Printer, but you can also apply the same settings to multiple Label Printer. - Page 63 Changing the Label Printer Settings 3 Settings Tabs Contains settings that may be specified or changed. Note appears in the tab, the settings in that tab cannot be specified or changed. In addition, the settings in the tab will not be applied to the Label Printer even if [Apply] is clicked. The settings in the tab will also not be saved or exported when the [Save in Command File] or [Export] command is used.
-
Page 64: Menu Bar
• Print Unit Settings... Prints a report containing firmware version and device setting information. For QL-810W You can also print this report using the Cutter ( ) Button. For more information, see Confirming the Label Printer Settings on page 84. -
Page 65: Basic Tab
Changing the Label Printer Settings Basic Tab The following explains about the Basic Tab in the settings dialog box. • Auto Power On Specifies whether the Label Printer turns on automatically when the AC Power Cord is plugged into an AC power outlet. -
Page 66: Advanced Tab
Changing the Label Printer Settings Advanced Tab The following explains about the Advanced Tab in the settings dialog box. • Print Density (Black) Sets the density of black. Available settings: [+6/+5/+4/+3/+2/+1/0/-1/-2/-3/-4/-5/-6] • Print Density (Red) Sets the density of red. Available settings: [+6/+5/+4/+3/+2/+1/0/-1/-2/-3/-4/-5/-6] •... -
Page 67: Display Tab (Ql-820Nwb Only)
Changing the Label Printer Settings Display Tab (QL-820NWB only) The following explains about the Display Tab in the settings dialog box. • Set Clock Sets date and time. Clicking the [Current Date/Time] button will sync to the date and time on the computer. •... -
Page 68: Management Tab
Allows disabling the Bluetooth or Wi-Fi interfaces. This function is useful when you use the Label Printer in a place where signal transmissions are not allowed. The following conditions apply: QL-810W: Pressing and holding the Wi-Fi ( ) Button and WPS Button will be ineffective. QL-820NWB: [WLAN] and [Bluetooth] menu will disappear from the LCD. -
Page 69: Applying Setting Changes To Multiple Label Printers
Changing the Label Printer Settings Applying Setting Changes to Multiple Label Printers After applying settings to the first Label Printer, disconnect the Label Printer from the computer, and then connect the second Label Printer to the computer. Select the newly connected Label Printer from the [Printer] drop-down list. Click [Apply]. -
Page 70: P-Touch Template Settings For Windows
• When printing using a P-touch Template, some symbols printed in red or black may look different from when printed using the computer. For more information, see P-touch Template Manual/Command Reference (English only) from the Brother Solutions Center at support.brother.com. -
Page 71: P-Touch Template Settings Dialog Box
[Received Data Size]: Printing starts when the number of characters specified here is received. However, delimiters are not counted in the number of characters. 5 Character Code Table Selects one of the following character code sets: Available settings: [Windows 1252], [Windows 1250 Eastern Europe], [Brother standard]... - Page 72 23h 24h 40h 5Bh 5Ch 5Dh 5Eh 60h 7Bh 7Ch 7Dh 7Eh For switched characters, download P-touch Template Manual/Command Reference (English only) from the Brother Solutions Center at support.brother.com. 7 Command Prefix Character Specifies the prefix character code which identifies commands used in P-touch Template mode.
-
Page 73: Printer Setting Tool For Mac
Using the Printer Setting Tool for Mac Connect the Label Printer you want to configure to the computer. Click [Macintosh HD] - [Applications] - [Brother] - [Printer Setting Tool] - [Printer Setting Tool.app]. The Printer Setting Tool window appears. Check that the Label Printer you want to configure appears next to [Printer]. If a different Label Printer appears, select the Label Printer you want from the pop-up list. -
Page 74: Settings Dialog Box
8 Print Unit Settings Prints a report containing firmware version and device setting information. For QL-810W You can also print this report using the Cutter ( ) Button. For more information, see Confirming the Label Printer Settings on page 84. -
Page 75: Basic Tab
Changing the Label Printer Settings 9 Current Settings Retrieves the settings from the currently connected Label Printer and displays them in the dialog box. 10 Exit Exits the Printer Setting Tool. Basic Tab The following explains about the Basic Tab in the settings dialog box. •... -
Page 76: Advanced Tab
• Airplane Mode Selects On to set the Label Printer to Airplane Mode. The following conditions apply: QL-810W: Pressing and holding the Wi-Fi ( ) Button and WPS Button will be ineffective. QL-820NWB: [WLAN] and [Bluetooth] menus will disappear from the display. -
Page 77: Bluetooth Settings Tab (Ql-820Nwb Only)
Changing the Label Printer Settings Bluetooth Settings Tab (QL-820NWB only) The following explains about the Bluetooth Settings Tab in the settings dialog box. • Bluetooth Device Name Displays the Bluetooth device name. • Bluetooth Address Displays the acquired Bluetooth address. •... -
Page 78: Applying Setting Changes To Multiple Label Printers
Changing the Label Printer Settings Applying Setting Changes to Multiple Label Printers After applying settings to the first Label Printer, disconnect the Label Printer from the computer, and then connect the second Label Printer to the computer. Select the newly connected Label Printer from the [Printer] drop-down list. Click [Apply Settings to the Printer]. -
Page 79: Changing Settings When Printing From A Mobile Device
Changing the Label Printer Settings Changing Settings When Printing from a Mobile Device If using a mobile device, change the settings as necessary using the application before printing. The settings that can be changed vary according to the application. Note Before connecting a mobile device, you can specify detailed settings by connecting the Label Printer to a computer and using the Printer Setting Tool. -
Page 80: Printing Labels Using P-Touch Template
• See the P-touch Template Manual/Command Reference for more information. You can download the latest versions from the Brother Solutions Center at support.brother.com [Select your region/country.] - [Manuals] - [Choose your product] • When printing using a P-touch Template, some symbols printed in red and black may look different from when printed using the computer. -
Page 81: Preparation
® For Windows Vista / Windows 7 / Windows Server 2008 / Windows Server 2008 R2: From the Start button, click [All Programs] - [Brother] - [Label & Mobile Printer] - [Printer Setting Tool]. ® ® ® ® ... - Page 82 Printing Labels Using P-touch Template Note • By default, printing begins when the code "^FF" is scanned from a barcode using a Barcode Scanner. (This can be changed with the settings highlighted by (A) in the previous image.) If [Received Data Size] is selected with the number of bytes setting, the template will automatically print after the specified number of bytes have been scanned.
-
Page 83: Connecting A Barcode Scanner
We recommend you use a reliable high-quality Barcode Scanner and you check the Barcode Scanner specifications before selecting a model. Barcode Scanner connection methods: For QL-810W, use the Wi-Fi interface. For QL-820NWB, use the USB host interface, the Wi-Fi interface, or the Bluetooth interface. Recommended Barcode Scanner selection criteria: •... -
Page 84: Standard Template Printing
• You can specify a [Key Assign] number between 1 and 255 by using the Label Printer buttons. • For advanced operation, you can specify a [Key Assign] number between 1 and 99 (for QL-810W) and 1 and 255 (for QL-820NWB) for any downloaded templates into the Label Printer but you will need to scan different barcodes in step f to select and print it. - Page 85 Cut] turned [On]. For more information on P-touch Template Settings, download P-touch Template Manual/Command Reference (English only) from the Brother Solutions Center at support.brother.com [Select your region/country.] - [Manuals] - [Choose your product] • To specify the number of copies you want, scan the “Number of copies” barcode, and then scan the barcodes under “For entering numbers”...
-
Page 86: Advanced Template Printing
Printing Labels Using P-touch Template Advanced Template Printing Download a template and scan a barcode to print a copy or insert the scanned data into a different template. Note • For more information on the barcodes that can be scanned using various settings, see List of Barcodes for the P-touch Template Function on page 194. - Page 87 Cut] turned [On]. For more information on P-touch Template Setting Tool, download P-touch Template Manual/Command Reference (English only) from the Brother Solutions Center at support.brother.com [Select your region/country.] - [Manuals] - [Choose your product] • To specify the number of copies you want, scan the “Number of copies” barcode, and then scan the barcodes under “For entering numbers”...
- Page 88 Printing Labels Using P-touch Template Scan a barcode that contains the data you want inserted into the barcode object in the selected downloaded template from step f. Example: (CODE128/9-digit) Scan the "Begin printing" barcode to send the command to start printing. The barcode in the printed template will contain the data from the barcode scanned in step g.
-
Page 89: Database Lookup Printing
Printing Labels Using P-touch Template Database Lookup Printing You can download a database linked to a template, scan a barcode as a keyword to find a record containing that keyword, and then insert that record into the template and print it out. Note •... - Page 90 Cut] turned [On]. For more information on P-touch Template Setting Tool, download P-touch Template Manual/Command Reference (English only) from the Brother Solutions Center at support.brother.com [Select your region/country.] - [Manuals] - [Choose your product] • To specify the number of copies you want to print, scan the “Number of copies” barcode, and then scan the barcodes under “For entering numbers”...
- Page 91 Printing Labels Using P-touch Template Note You can use P-touch Editor to create and print a label with a single barcode for step f. Example: Scan a barcode that contains the keyword to look up in downloaded database from step d. Example: Scan the "Delimiter"...
-
Page 92: Numbering (Serialized Number) Printing
Printing Labels Using P-touch Template Numbering (Serialized Number) Printing Automatically increment text or barcodes in any downloaded template while printing. Note • This advanced operation can be applied to any of the P-touch Template mode basic operations. • You can automatically increment up to 999 printed copies. •... -
Page 93: Barcode Numbering (Serializing)
Printing Labels Using P-touch Template Barcode Numbering (Serializing) Procedure Use P-touch Editor to create or open a template and select a barcode object that you want to automatically increment while printing. With the cursor over a selected barcode object, right-click and select [Properties]. Example: Click the Input tab and highlight or drag the cursor over a group of numbers and letters within the barcode object that you want to increment (Numbering field). -
Page 94: Printing With Numbering (Serializing) Advanced Operation
Printing Labels Using P-touch Template Click [Numbering], and then click [OK]. Note A maximum of 15 numbers and letters can be selected in each Numbering field. Printing with Numbering (Serializing) Advanced Operation Using P-touch Transfer Manager, transfer (from P-touch Editor) a template (label layout) to the Label Printer. -
Page 95: Other Functions
(The printed information is different depending on the model.) Turn on the Label Printer. For QL-810W Press and hold the Cutter ( ) Button for more than one second to print the report. For QL-820NWB 1 Press the Menu, [▲], or [▼] Button to select the [Information] menu, and then press the [OK]... -
Page 96: 2-Color Printing Configuration With Other Applications
Follow the process below when carrying out 2-color printing from any other applications than P-touch Editor. ® For Windows Open the Devices and Printers window, select the [QL-810W]/[QL-820NWB] and right-click it. Click [Printer Properties]. Select the [General] tab, then click the [Preferences...] button. -
Page 97: Using The Mass Storage Mode
Other Functions Using the Mass Storage Mode Confirm that the Label Printer is turned off. Press and hold the [OK] Button and the Power ( ) Button at the same time for several seconds. The Label Printer starts up in mass storage mode, the Status LED lights in green and [Mass Storage Mode] appears on the LCD. -
Page 98: Jpeg Printing
Other Functions JPEG Printing Image data (JPEG) can be printed without using the printer driver. Note • JPEG images can be printed using the mass storage feature. • The Object Push Profile (OPP) is used for printing via a Bluetooth connection. •... -
Page 99: Template Printing From The Label Printer Using The Lcd Menu (Ql-820Nwb Only)
Other Functions Template Printing from the Label Printer Using the LCD menu (QL-820NWB only) Transferred or preset templates can be printed only by the Label Printer using the LCD menu without connecting to a computer or mobile device. When you print a template that is not linked to a database Make sure the LCD is in the template mode as shown on the below. - Page 100 Other Functions When you print a template that is linked to a database Make sure the LCD is in the template mode as shown on the below. If it is not, set to the template mode. 1 Press the Menu Button and [▼] Button to select the [Template Settings] menu, and then press the [OK] Button.
- Page 101 Other Functions Note • When you press the Menu Button once on the number of printing setting screen and then press the [OK] Button, you can check the Object in the Template. To return to the number of printing setting screen, press the Cancel Button or the [OK] Button.
-
Page 102: Remote Update
Other Functions Remote Update Remote Update is a Label Printer feature that facilitates the semi-automatic update of the printer's settings with a simple connection to a network folder where the update files reside. For more information about Remote Update, see Remote Update on page 20. ®... - Page 103 Other Functions Click the [Advanced] tab, select the [Distributed Printing] check box, and then click [Settings].
- Page 104 Other Functions In the Distributed Printing Settings dialog box, select the Label Printers you want to use for distributed printing. a). Click [Detect Current Paper Information...] (1). b). The current Label Printer information detected appears below [Current Paper] and [Paper Type] (2). c).
- Page 105 Other Functions Specify the label size. A. If only one Label Printer has been selected. In the Distributed Printing Settings dialog box from step d, select the Label Printer whose setting you want to specify, and then either double-click it or right-click it, and then click [Settings]. From the [Set Width] drop-down list, select the label size.
- Page 106 Section II Application How to Use P-touch Editor ® How to use P-touch Editor Lite (Windows only) How to Use P-touch Transfer Manager and P-touch Library ® (Windows only) Transferring Templates with P-touch Transfer Express ® (Windows only) How to Update P-touch Software...
-
Page 107: How To Use P-Touch Editor
For Windows Vista / Windows 7 / Windows Server 2008 / Windows Server 2008 R2: From the Start button, click [All Programs] - [Brother P-touch] - [P-touch Editor 5.1], or double-click [P-touch Editor 5.1] shortcut icon on the desktop. ® ® ®... - Page 108 How to Use P-touch Editor Select one of the displayed options: 1 To create a new layout, double-click [New Layout], or click [New Layout] and then click [→] . 2 To create a new layout using a preset layout, double-click a category button, or select a category button and then click [→].
-
Page 109: Printing With P-Touch Editor
How to Use P-touch Editor Printing with P-touch Editor Express mode This mode allows you to quickly create layouts that include text and images. To print, click [File] - [Print] from the menu bar or click the [Print] icon. Before printing, configure the print settings in the Print screen. -
Page 110: Transferring Data To The Label Printer
How to Use P-touch Editor Snap mode This mode allows you to capture all or a portion of your computer screen display, print it as an image, and save it for future use. Click the [Snap] mode selection button. The Description of Snap mode dialog box appears. -
Page 111: 2-Color Printing Configuration
How to Use P-touch Editor 2-color Printing Configuration The Label Printer is capable of 2-color printing. Configuring using P-touch Editor Express mode Select [Paper] then the Two-Color Mode appears. Select [On] for [Two-Color Mode]. Select [Text] to edit the color of the text. - Page 112 How to Use P-touch Editor • Use [Sets Text Color for Selected Text] to edit the color of the text. • Use [Changes the fill color] to edit the color to fill an enclosed area with. • Use [Changes the color of the line] to edit the color of the line.
- Page 113 How to Use P-touch Editor Click the drop- down list on the left, and select [BK-RD]. Click [View], then select [Property Palette], and click [Color]. The Color Editing Tool appears. • Use [Sets Text Color for Selected Text] to edit the color of the text.
- Page 114 How to Use P-touch Editor Note • The brightness, contrast and threshold (range of red) can be adjusted through the driver Settings. • The Black/Red Print density can be adjusted through the Printer Setting Tool. • You cannot select High Resolution mode when using 2-color printing.
-
Page 115: For Mac
How to Use P-touch Editor For Mac Starting P-touch Editor To start P-touch Editor, double-click [P-touch Editor] icon on the desktop. Note • The following method can also be used to start the P-touch Editor: Double-click [Macintosh HD] - [Applications] - [P-touch Editor 5.1], and then double-click the [P-touch Editor] application icon. -
Page 116: Operation Modes
How to Use P-touch Editor Operation modes Standard Mode This mode allows you to create labels with text and images. The Layout Window consists of the following sections: 1 Command Bar 2 Draw/Edit Toolbar 3 Inspector 4 Layout Window 5 Database Window... -
Page 117: Transferring Data To The Label Printer
How to Use P-touch Editor Snap mode This mode allows you to capture the screen, print it as an image, and save it for future use. To start the Snap mode, follow the steps below: Click the [Snap] mode selection button. The Description of Snap mode dialog box appears. -
Page 118: 2-Color Printing Configuration
How to Use P-touch Editor 2-color Printing Configuration The Label Printer is capable of 2-color printing. Configuring using P-touch Editor Standard mode Select [Paper], then the Two-Color Mode appears. Select [BK-RD] for [Print Colors] and [ON] for [Two-Color Mode]. Select [Text] to edit the text. -
Page 119: How To Use The P-Touch Address Book (Windows Only)
(P-touch Address Book is not supported in some languages.) Starting the P-touch Address Book Click [Start] - [All Programs] - [Brother P-touch] - [P-touch Address Book 1.2]. Note You can also start the P-touch Address Book using the following methods (only if you created the shortcut during installation): •... - Page 120 How to Use P-touch Editor Layout Window The Layout Window consists of the following eight sections: 1 Menu Bar Commands are categorized under each menu (File, Edit, View, Layout and Tools) according to their functions. 2 Standard Toolbar Provides a group of frequently used commands (such as New Contact, Edit Contact, Find or Print). 3 Text Toolbar Used to adjust text attributes such as font size and alignment for text formatting.
-
Page 121: Creating A New Contact
How to Use P-touch Editor Creating a new contact This section explains how to create a new contact. Click [File] - [New Contact], or click the New Contact button. The New Contact dialog box appears. Enter the new contact information. 1 New Contact Form Toolbar The following commands are categorized in the menu: Icon... - Page 122 How to Use P-touch Editor Icon Button name Function Image Allows you to insert an image for a contact from a file or a camera currently connected to the computer. The following file types are supported: • Bitmap (*.bmp, *.dib) •...
-
Page 123: How To Use P-Touch Editor Lite (Ql-810W Only) (Windows ® Only)
® (Windows only) ® How to use P-touch Editor Lite (QL-810W only) (Windows only) With P-touch Editor Lite, you can quickly create various simple label layouts without installing any drivers or software. P-touch Editor Lite is only supported when the Label Printer is connected using a USB cable. - Page 124 ® How to use P-touch Editor Lite (Windows only) Icon Function Exits P-touch Editor Lite and starts up P-touch Editor. Displays the menu. The menu includes all P-touch Editor Lite functions. Minimizes P-touch Editor Lite. Exits P-touch Editor Lite. 2 Property Toolbar Icon Function Click...
- Page 125 ® How to use P-touch Editor Lite (Windows only) 3 Label View Display Function This label view is displayed when the software is started. The width of label currently set is displayed on the left of the label image. When "Auto" is shown on the right, the length of label is automatically adjusted to the length of text.
- Page 126 Select either Display New Value after Printing or Reset to Original Value after Printing to set the numbering option. Brother Solutions Center Click Brother Solutions Center to go to the website for assistance and information. About... Click About to learn about the P-touch Editor Lite version.
-
Page 127: How To Use P-Touch Editor Lite Lan (Windows Only)
P-touch Editor Lite LAN is supported only when the machine is connected to a Network. By downloading the installer from install.brother and installing it, the P-touch Editor Lite LAN program package is created on the desktop. Open the program package and copy it to the shared folder on the server. - Page 128 ® How to use P-touch Editor Lite (Windows only) Layout window 1 Command Toolbar Icon Function Displays the new label creation screen. Opens a saved file with P-touch Editor Lite LAN. Saves the data to your computer, but not to the Label Printer. Inserts a new text box (convenient when creating labels containing both single and multiple lines of text).
- Page 129 ® How to use P-touch Editor Lite (Windows only) Icon Function Sets the length of the label. Click to automatically adjust the length of the label to accommodate the entered text. Changes the label direction to vertical. Click to set the zoom factor for the Label View. You can also change the zoom factor by clicking Click to print normally or...
- Page 130 ® How to use P-touch Editor Lite (Windows only) 4 Label View Display Function This label view is displayed when the software is started. The width of label currently set is displayed on the left of label image. When "Auto" is shown on the right, the length of label is automatically adjusted to the length of text.
- Page 131 Select either Display New Value after Printing or Reset to Original Value after Printing to set the numbering option. Brother Solutions Center Click Brother Solutions Center to go to the website for assistance and information. About Click About to learn about the P-touch Editor Lite LAN version.
-
Page 132: How To Use P-Touch Transfer Manager And P-Touch Library (Windows ® Only)
® • For Windows Vista / Windows 7 / Windows Server 2008 / Windows Server 2008 R2: From the Start button, click [All Programs] - [Brother P-touch] - [P-touch Tools] - [P-touch Transfer Manager 2.2]. ® ® ® ® • For Windows 8 / Windows 8.1 / Windows Server... - Page 133 ® How to Use P-touch Transfer Manager and P-touch Library (Windows only) Main window 1 Menu Bar Provides access to various commands, which are grouped under each menu title ([File], [Edit], [View], [Tool], and [Help]) according to their functions. 2 Toolbar Provides access to frequently used commands.
- Page 134 ® How to Use P-touch Transfer Manager and P-touch Library (Windows only) Explanations of the Toolbar Icons Icon Button name Function Transfers templates and other data from the computer to the Label Transfer Printer. Save Transfer File Changes the file type of the data to be transferred to other applications.
-
Page 135: Transferring Templates Or Other Data From The Computer To The Label Printer
® How to Use P-touch Transfer Manager and P-touch Library (Windows only) Transferring Templates or Other Data from the Computer to the Label Printer Use the following procedure to transfer templates, databases and images from the computer to the Label Printer. - Page 136 Drag the template or other data that you want to transfer and place it in the new folder. Transfer Function Specification Maximum number of Data type Restriction details transferable items QL-810W: 99 Each template can contain a maximum of 50 objects. Template QL-820NWB: 255 ...
- Page 137 ® How to Use P-touch Transfer Manager and P-touch Library (Windows only) Note You can confirm the available space in the transfer file memory by printing the Printer Setting Report. For more information, see Confirming the Label Printer Settings on page 84. See [ROM FREE] in the report for the available space The available space that appears in "ROM FREE: ******* byte"...
- Page 138 ® How to Use P-touch Transfer Manager and P-touch Library (Windows only) To change the key number assigned to an item, right-click the item, select [Key Assign], and then select the key number you want. Note • Except for the data in databases, all data transferred to the Label Printer is assigned a key number. •...
- Page 139 ® How to Use P-touch Transfer Manager and P-touch Library (Windows only) Select the folder containing the templates or other data that you want to transfer, and then click [Transfer]. A confirmation message appears. Note • You can also transfer individual items to the Label Printer without adding them to a folder. Select the template or other data that you want to transfer, and then click [Transfer].
-
Page 140: Backing Up Templates Or Other Data Saved In The Label Printer
® How to Use P-touch Transfer Manager and P-touch Library (Windows only) Backing up Templates or Other Data Saved in the Label Printer Use the following procedure to retrieve templates or other data saved in the Label Printer and save it on the computer. -
Page 141: Deleting Label Printer Data
® How to Use P-touch Transfer Manager and P-touch Library (Windows only) Deleting Label Printer Data Use the following procedure to delete all templates or other data saved on the Label Printer. Connect the computer and the Label Printer and turn on the Label Printer. The Label Printer model name appears next to a printer icon in the folder view. -
Page 142: Creating Transfer Files And Transfer Package Files
® How to Use P-touch Transfer Manager and P-touch Library (Windows only) Creating Transfer Files and Transfer Package Files You can use P-touch Transfer Manager to save template data, which was created using P-touch Editor, in the BLF or PDZ format. You can transfer these files in this format to a Label Printer over a network, from a computer or mobile device. -
Page 143: P-Touch Library
For Windows Vista / Windows 7 / Windows Server 2008 / Windows Server 2008 R2: From the Start button, click [All Programs] - [Brother P-touch] - [P-touch Tools] - [P-touch Library 2.2]. ® ® ® ® For Windows 8 / Windows 8.1 / Windows Server... - Page 144 ® How to Use P-touch Transfer Manager and P-touch Library (Windows only) 4 Templates List Displays a list of the templates in the selected folder. 5 Preview Displays a preview of the templates selected in the templates list. Explanations of the Toolbar Icons Icon Button name Function...
-
Page 145: Opening And Editing Templates
® How to Use P-touch Transfer Manager and P-touch Library (Windows only) Opening and Editing Templates Select the template you want to open or edit, and then click [Open]. The program associated with the template starts so that you can edit the template. -
Page 146: Printing Templates
® How to Use P-touch Transfer Manager and P-touch Library (Windows only) Printing Templates Select the template you want to print, and then click [Print]. The connected Label Printer prints the template. -
Page 147: Searching For Templates
® How to Use P-touch Transfer Manager and P-touch Library (Windows only) Searching for Templates You can search for templates registered to P-touch Library. Click [Search]. The Search dialog box appears. Specify the search criteria. The following search criteria are available: Settings Details Multiple Parameters... - Page 148 ® How to Use P-touch Transfer Manager and P-touch Library (Windows only) Close the Search dialog box. To confirm the search results, click [Search Results] in the folder view. Note You can register templates to P-touch Library by dragging and dropping them into the [All Contents] folder or to the folder list.
-
Page 149: Transferring Templates With P-Touch Transfer Express (Windows ® Only)
P-touch Transfer Express. You can then use P-touch Transfer Express to transfer the template directly to your Label Printer. You can download the latest P-touch Transfer Express from the Brother Solutions Center at support.brother.com [Select your region/country.] - [Downloads] - [Choose your product]... -
Page 150: Transferring The Template To P-Touch Transfer Manager
The template can also be transferred to P-touch Transfer Manager by clicking the Start button - [All Programs] - [Brother P-touch] - [P-touch Tools] - [P-touch Transfer Manager 2.2] to start P-touch Transfer Manager, and then dragging the .lbx file to the P-touch Transfer Manager window. -
Page 151: Saving The Template As A Transfer Package File (.Pdz)
® Transferring Templates with P-touch Transfer Express (Windows only) Saving the Template as a Transfer Package File (.pdz) To create a file in a format that can be used by P-touch Transfer Express, save the template as a Transfer Package file (.pdz). In the folder view, select [Configurations]. - Page 152 ® Transferring Templates with P-touch Transfer Express (Windows only) Click [File] - [Save Transfer File]. Important The [Save Transfer File] button appears only if the Label Printer is disconnected from the computer or offline. Note • If you click [Save Transfer File] after selecting [Configurations] or a created folder, all templates in the folder are saved as the Transfer Package file (.pdz).
-
Page 153: Distributing The Transfer Package File (.Pdz) And P-Touch Transfer Express To The User
® Transferring Templates with P-touch Transfer Express (Windows only) Distributing the Transfer Package File (.pdz) and P-touch Transfer Express to the User Note If the user already has P-touch Transfer Express downloaded, it is not necessary for the administrator to send the Transfer Express folder to the user. -
Page 154: Transferring The Transfer Package File (.Pdz) To Your Label Printer
® Transferring Templates with P-touch Transfer Express (Windows only) Transferring the Transfer Package File (.pdz) to Your Label Printer Using the P-touch Transfer Express application received from the administrator, the user can transfer the Transfer Package file (.pdz) to the Label Printer. Important Do not turn off the power when transferring templates. - Page 155 ® Transferring Templates with P-touch Transfer Express (Windows only) 2 When there are either multiple or no Transfer Package files (.pdz) within the folder containing [PtTrExp.exe], click [Browse]. Select the Transfer Package file you want to transfer, and then click [Open]. Click [Transfer].
- Page 156 ® Transferring Templates with P-touch Transfer Express (Windows only) Click [Yes]. The transfer of the Transfer Package file begins. Click [OK]. The transfer of the Transfer Package file is completed.
-
Page 157: How To Update P-Touch Software
2008 R2: Double-click the [P-touch Update Software] icon. Note The following method can also be used to start P-touch Update Software: Click the Start button, and then select [All Programs] - [Brother P-touch] - [P-touch Update Software]. ® ® ®... - Page 158 How to Update P-touch Software Click the [Computer software update] icon. Select the [Printer] and [Language], select the check boxes next to Cable Label Tool and P-touch Editor, and then click [Install]. A message appears indicating that the installation has finished.
-
Page 159: For Mac
How to Update P-touch Software For Mac Double-click the [P-touch Update Software] icon on the desktop. Note The following method can also be used to start P-touch Update Software: Double-click [Macintosh HD] - [Applications] - [P-touch Update Software], and then double-click the [P-touch Update Software] application icon. -
Page 160: Updating P-Touch Editor Lite (Windows ® Only) And The Firmware
2008 R2: Double-click the [P-touch Update Software] icon. Note The following method can also be used to start P-touch Update Software: Click the Start button, and then select [All Programs] - [Brother P-touch] - [P-touch Update Software]. ® ® ®... - Page 161 How to Update P-touch Software Click the [Machine update] icon. Select the [Printer], make sure that The machine is connected correctly. message appears, and then click [OK].
-
Page 162: For Mac
How to Update P-touch Software Select the [Language], select the check box next to the firmware you want to update to, and then click [Transfer]. Important Do not turn off the Label Printer or disconnect the cable during data transfer. Check the content to be updated, and then click [Start] to begin the update. - Page 163 How to Update P-touch Software Click the [Machine update] icon. Select the [Printer], make sure that [The machine is connected correctly.] message appears, and then click [OK]. Select the [Language], select the check box next to the firmware you want to update to, and then click [Transfer].
- Page 164 Section III Network Introduction Changing Your Label Printer Network Settings Web Based Management...
-
Page 165: Introduction
Introduction Network Features Your Label Printer can be shared on an IEEE 802.11b/g/n wireless network or Ethernet 10BASE-T/100BASE- TX Auto Negotiation wired network (QL-820NWB only) using the internal network print server. The print server supports various functions and methods of connection on a network supporting TCP/IP, depending on the operating system you are running. -
Page 166: Changing Your Label Printer Network Settings
Using the BRAdmin Light Utility (Windows only) The BRAdmin Light utility is designed for the initial setup of Brother network connectable devices. It can also search for Brother products in a TCP/IP environment, display the status, and configure basic network settings, such as the IP address. - Page 167 Select [STATIC] for [Boot Method]. Type the [IP Address], [Subnet Mask], and [Gateway] settings (if needed) for your print server. Click [OK]. If you have set the IP address up correctly, the Brother print server appears in the device list.
-
Page 168: Other Management Utilities
BRAdmin Professional is a utility for more advanced management of network connected Brother devices. This utility can search for Brother products on your network, and display the device status from a simple Explorer style window that changes color to represent the status of each device. You can configure network ®... -
Page 169: Web Based Management
Web Based Management Overview You can use a standard web browser to manage a Label Printer on your network using HTTP. When using Web Based Management, the following operations are available: Displaying your Label Printer status information Changing network settings, such as TCP/IP information ... -
Page 170: Configuring The Printer Settings Using Web Based Management (Web Browser)
Web Based Management Configuring the Printer Settings Using Web Based Management (Web Browser) A standard web browser can be used to change your print server settings using the HTTP (Hyper Text Transfer Protocol). In your browser's address bar, type the IP address of your Label Printer (or print server name). For example: http://192.168.1.2 Note If you have edited the hosts file on your computer or are using a Domain Name System, you can also type... - Page 171 Resetting the Label Printer Maintenance Troubleshooting Product Specifications Notes on Using P-touch Transfer Manager Network Terms and Information List of Barcodes for the P-touch Template Function Using the Battery Unit (Optional: PA-BU-001) Using the Brother Barcode Scanner (Optional: PA-BR-001) (QL-820NWB only)
-
Page 172: Resetting The Label Printer
Reset the internal memory of your Label Printer to clear all saved label files, or if the Label Printer is not operating correctly. Resetting All Settings to the Factory Settings Using the Label Printer Buttons (QL-810W only) To reset the Label Printer, perform the following procedure. Confirm that the Label Printer is turned off. -
Page 173: Resetting Data Using The Printer Setting Tool
Resetting the Label Printer Resetting Data Using the Printer Setting Tool You can use the Printer Setting Tool from a computer to perform the following operations for the Label Printer: Deleting the templates and databases Resetting communication settings Resetting printer settings to factory settings ... -
Page 174: Maintenance
Maintenance We recommend cleaning your Label Printer on a regular basis to maintain its correct performance. Note Always disconnect the AC Adapter before cleaning the Label Printer. Cleaning the Exterior of the Unit Wipe any dust and marks from the main unit using a soft, dry cloth. Use a cloth slightly damp with water on difficult to remove marks. - Page 175 The printed side of the Cleaning Sheet should be facing upwards. Close the DK Roll Compartment Cover and turn on the Label Printer. Press the Feed ( ) Button (QL-810W) or the Cutter ( ) Button (QL-820NWB) for more than one second. The Cleaning Sheet is ejected.
-
Page 176: Cleaning The Label Outlet
Maintenance Cleaning the Label Outlet If a label causes the machine to jam due to adhesive residue attached to the label outlet, clean the label outlet with a cloth. Use a slightly damp cloth on difficult to remove adhesive, if necessary. -
Page 177: Troubleshooting
Insert a DK Roll correctly. For more information, see Loading the DK Roll on page 5. If you still have problems, read the troubleshooting tips in this chapter for help. If, after reading this chapter, you are unable to resolve your problem, visit the Brother Solutions Center at support.brother.com. -
Page 178: Printing Problems
Wait until the Status LED stops flashing and then try printing again. Labels are jammed in the cutter. • Contact Brother Customer Service. The label is not ejected correctly after • Check that the Label Output Slot is not blocked. - Page 179 You can reset the Label Printer using the Printer Buttons. For more information, see Resetting All Settings to the Factory Settings Using the Label Printer Buttons (QL-810W only) on page 161. For QL-820NWB You can reset the Label Printer using the LCD menu.
- Page 180 Troubleshooting Problem Solution When printing via the USB cable, the • Is the Label Printer set for sequential printing? Label Printer repeatedly pauses and If so, set print mode to buffered printing. then continues printing. ® ® For Windows Vista / Windows Server 2008: Open printer properties from [Control Panel] - [Hardware and Sound] -...
- Page 181 Troubleshooting Problem Solution Printed barcodes cannot be read. Print labels so that barcodes are aligned with the print head as shown below: 1 Print head 2 Barcodes 3 Printing orientation Try using another scanner. We recommend printing the Barcode with Print Quality options set to [Give priority to print quality].
- Page 182 2 Close the DK Roll Compartment Cover completely. 3 Press and hold the Editor Lite Button (QL-810W) or Cancel Button (QL- 820NWB) for more than five seconds. Wait while the platen roller rotates. 4 When the platen roller stops rotating, load the DK Roll.
-
Page 183: Network Setup Problems
Troubleshooting Network Setup Problems Problem Solution You are using security software Confirm your settings in the installation dialog box. Allow access when the security software alert message appears during the Label Printer installation. Your security settings Recheck and select the correct security settings. (SSID/Network Key) are incorrect ... - Page 184 If the Label Printer is still not connected, please try the following. • For Wi-Fi connection For QL-810W (flashes once every three seconds): The network is connected incorrectly, and the Wi-Fi settings must be reconfigured. For QL-820NWB : Your Label Printer is searching for the network.
-
Page 185: Label Printer Cannot Print Over The Network Label Printer Is Not Found On The Network Even After Successful Installation
Incorrect port numbers are being The following port numbers are used for Brother network features: used for the Brother network features BRAdmin Light i Port number 161 / Protocol UDP ... -
Page 186: Checking The Operation Of Network Devices
I do not know the version number of You can use the following procedure. the firmware for the Label Printer. For QL-810W 1 Turn your Label Printer on. 2 Press and hold the Cutter ( ) Button for several seconds to print the report. -
Page 187: Led Indicators
The indicators light and flash to indicate the Label Printer status. Indicator is lit in the color shown Indicator is flashing in the color shown Indicator can be off, lit or flashing in any color Indicator is off QL-810W Status Editor Lite Battery Wi-Fi LED... - Page 188 Troubleshooting Status Editor Lite Battery Wi-Fi LED Condition The DK Roll Compartment Cover is open. Close the DK Roll Compartment Cover correctly. Resetting mode (Once for 1 second) System OFF mode The Cutter ( ) Button is pressed once in resetting mode. Cooling mode Data overwrite mode The Cutter (...
-
Page 189: Ql-820Nwb
Troubleshooting Status Editor Lite Battery Wi-Fi LED Condition Cutter error (Twice for System error 2 seconds) QL-820NWB Status LED Condition Power Off Power On Feeding Mode Printing Mode Mass storage mode Forward/reverse roller rotation mode Cutting Mode Cleaning Mode Initializing mode Print preparation mode Canceling job Receiving data from the computer... - Page 190 Troubleshooting Status LED Condition End of DK Roll Feed error Transmission error Database search error Access point search error Access point connection error Security error No template selected (Once for 2 seconds) The DK Roll Compartment Cover is opened while the Label Printer is in use. No media error Incorrect media error Communication command error...
-
Page 191: Troubleshooting
2 If the error is not reset, press the Cutter ( ) Button. 3 If the error is not reset, turn off the Label Printer, and then turn it on again. 4 If the error is not reset, contact Brother Customer Service. -
Page 192: Product Specifications
Product Specifications Label Printer Specifications Model Name QL-810W QL-820NWB Size Dimensions Approximately 4.9 (W) x 9.2 (D) x 5.7 (H) in./ Approximately 4.9 (W) x 9.2 (D) x 5.7 (H) in./ 125.3 (W) x 234 (D) x 145 (H) mm 125.3 (W) x 234 (D) x 145 (H) mm... - Page 193 (10°C) and 95°F (35°C) / /humidity between 20% and 80% /humidity between 20% and 80% The maximum wet bulb The maximum wet bulb temperature: 80.6°F (27°C) temperature: 80.6°F (27°C) Compatible operating systems See support.brother.com for a complete and updated list of software.
-
Page 194: Notes On Using P-Touch Transfer Manager
Notes on Using P-touch Transfer Manager Because some P-touch Editor functions are not available with the Label Printer, keep the following points in mind when using P-touch Editor to create templates. You can check a preview of the printed template before the created template is transferred to the Label Printer. -
Page 195: Notes On Transferring Data Other Than Templates
Notes on Using P-touch Transfer Manager Notes on Transferring Data Other Than Templates If the number or order of fields in a database is changed and only the database (.csv file) is transferred to update it, the database may not link correctly with the template. In addition, the first line of data in the transferred file must be recognized by the Label Printer as "field names". -
Page 196: Network Terms And Information
Network Terms and Information Supported Protocols and Security Features Interface Wireless IEEE 802.11b/g/n (Infrastructure Mode) IEEE 802.11g/n (Wireless Direct Mode) Ethernet Ethernet 10BASE-T/100BASE-TX Auto Negotiation (QL-820NWB only) Network Protocol (IPv4) ARP, RARP, BOOTP, DHCP, APIPA (Auto IP), mDNS, WINS, (Common) NetBIOS name resolution, DNS Resolver, LPR/LPD, Custom Raw Port/Port9100, FTP Server, TFTP client and server, SNTP client, ICMP, LLMNR responder, SNMPv1/v2c... -
Page 197: Types Of Network Connections And Protocols
Network Terms and Information Types of Network Connections and Protocols You will find basic information about the advanced network features of the Label Printer, along with general networking and common terms. The supported protocols and network features differ depending on the model you are using. Types of Network Connections Peer-to-Peer printing using TCP/IP In a Peer-to-Peer environment, each computer directly sends and receives data to each device. - Page 198 Network Terms and Information Network Shared printing In a Network Shared environment, each computer sends data via a centrally controlled computer. This type of computer is often called a “Server” or a “Print Server”. Its job is to control the printing of all print jobs. Network printer (your Label Printer) 1 Client computers...
-
Page 199: Configuring Your Label Printer For A Network
Network Terms and Information Configuring Your Label Printer for a Network IP Addresses, Subnet Masks and Gateways To use the Label Printer in a networked TCP/IP environment, you must configure its IP address and subnet mask. The IP address you assign to the print server must be on the same logical network as your host computers. - Page 200 Network Terms and Information Subnet mask Subnet masks restrict network communication. For example, Computer 1 can communicate with Computer 2 • Computer 1 IP Address: 192.168.1.2 Subnet Mask: 255.255.255.0 • Computer 2 IP Address: 192.168.1.3 Subnet Mask: 255.255.255.0 The 0 in the Subnet mask signifies that there is no limit to communication at this part of the address. In the example above, this means that you can communicate with any device with an IP address that begins with 192.168.1.x.
-
Page 201: Wireless Network Terms And Concepts
(how the device identifies itself to the network) and encryption (how the data is encrypted as it is sent on the network). If you do not correctly specify these options when you are configuring your Brother wireless printer, it will not be able to connect to the wireless network. Make sure you configure these options carefully. - Page 202 Network Terms and Information TKIP TKIP (Temporal Key Integrity Protocol) provides per-packet key mixing, a message integrity check and rekeying mechanism. Advanced Encryption Standard (AES) provides stronger data protection using a symmetric-key encryption. When [Communication Mode] is set to [Ad-hoc] Authentication Method Encryption Mode Open System...
- Page 203 Network Terms and Information Authentication methods LEAP (For wireless network) Cisco LEAP (Light Extensible Authentication Protocol) has been developed by Cisco Systems, Inc. and uses a user ID and password for authentication. EAP-FAST EAP-FAST (Extensible Authentication Protocol-Flexible Authentication via Secured Tunnel) has been developed by Cisco Systems, Inc.
- Page 204 Network Terms and Information Encryption methods TKIP TKIP (Temporal Key Integrity Protocol) provides a per-packet key mixing a message integrity check and rekeying mechanism. Advanced Encryption Standard (AES) provides stronger data protection using a symmetric-key encryption. CKIP The original Key Integrity Protocol for LEAP by Cisco Systems, Inc.
-
Page 205: List Of Barcodes For The P-Touch Template Function
List of Barcodes for the P-touch Template Function General Procedure for the P-touch Template Function The general procedure for using the P-touch Template function is described below. For more information on specifying the various settings, see Printing Labels Using P-touch Template on page 69. -
Page 206: List Of Barcodes For Specifying Settings
List of Barcodes for the P-touch Template Function List of Barcodes for Specifying Settings For more information about using these barcodes for specifying the Label Printer settings, see Printing Labels Using P-touch Template on page 69. Note • When using the barcodes in this list, set “Trigger for P-touch Template Printing” and “Command Prefix Character”... - Page 207 List of Barcodes for the P-touch Template Function For entering numbers Preset template number Preset template 1 Preset template 2 Preset template 3 Preset template 4...
- Page 208 List of Barcodes for the P-touch Template Function Preset template 5 Preset template 6 Preset template 7 Preset template 8 Preset template 9 Preset template 10 Select template Number of serialized copies Delimiter Initialize template data ...
-
Page 209: Using The Battery Unit (Optional: Pa-Bu-001)
Make sure the Battery Unit is installed in the Label Printer. Use the AC Adapter and AC Power Cord to connect the Label Printer to an AC power outlet. For QL-810W, the Battery ( ) LED lights in orange during charging, and it turns off when the Battery Unit is fully charged. - Page 210 Using the Battery Unit (Optional: PA-BU-001) Stopping Battery Unit Charging To stop charging the Battery Unit, disconnect the AC Adapter. Notes on Using the Battery Unit • Before use, fully charge the Battery Unit. Do not use it until it is fully charged. •...
-
Page 211: Product Specifications
Using the Battery Unit (Optional: PA-BU-001) Product Specifications Rechargeable Li-ion Battery Unit Size: approx. 4.92" (W) x 7.76" (D) x 2.72" (H) (125 mm (W) x 197 mm (D) x 69 mm (H)) Weight: approx. 1.31 lb (0.59 kg) Voltage: 14.4 V Capacity: 1750 mAh Charging/discharging cycle: approx. -
Page 212: Using The Brother Barcode Scanner (Optional: Pa-Br-001) (Ql-820Nwb Only)
Because the Brother Barcode Scanner (optional: PA-BR-001) has been set according to the [P-touch Template Settings] in the Printer Setting Tool, you can quickly use this Barcode Scanner without changing its settings. For information about using the Brother Barcode Scanner, see the instruction manual included with the Barcode Scanner.