Sony ICF-SC1PC Operating Instructions Manual
Scanning receiver controller
Hide thumbs
Also See for ICF-SC1PC:
- Operating instructions manual (39 pages) ,
- Operating instructions manual (21 pages) ,
- Service manual (35 pages)
Table of Contents
Advertisement
Quick Links
Download this manual
See also:
Service Manual
Advertisement
Table of Contents

Related Manuals for Sony ICF-SC1PC


Summary of Contents for Sony ICF-SC1PC
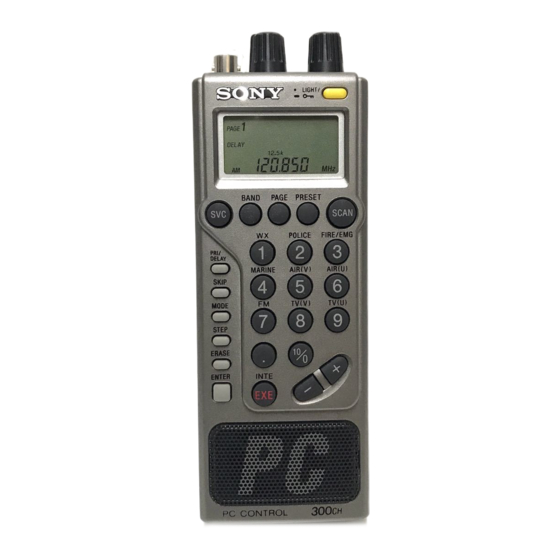
- Page 1 3-861-712-11 (1) Scanning Receiver Controller for ICF-SC1PC Operating Instructions ©1998 by Sony Corporation...
- Page 2 CONNECTION WITH THIS MANUAL, THE SOFTWARE OR OTHER INFORMATION CONTAINED HEREIN OR THE USE THEREOF. Sony Corporation reserves the right to make any modification to this manual or the information contained herein at any time without notice. The software described herein may also be governed by the terms of a separate user license agreement.
- Page 3 SC1PC scanning receiver from a PC. Here are some of the capabilities and features you will discover with the new scanning receiver controller. • Control your scanning receiver ICF-SC1PC from a PC. • Supports all major functions of the receiver: — Scanning options: Programmable Scanning, Memory...
-
Page 4: Table Of Contents
Table of contents Preparation Connection ................5 Installing the controller ............6 To uninstall the controller ..........7 Starting up the controller ............. 8 Quitting the controller ............8 Overview of the main window .......... 10 Command reference ............12 Reception —... -
Page 5: Connection
Connection Connect the ICF-SC1PC scanning receiver to the serial port (RS232C) of your PC using the supplied cable. Align the arrow on the cable plug to the “ mark on the receiver. Attach the supplied clamp filter near the end that connects to the PC, as shown in the illustration below. -
Page 6: Installing The Controller
...and then the main window will appear. Click [Next]. The installer prompts you to choose the destination location. By default, it is: C:\Program Files\Sony Scanner\ To select the default location, click [Next] (go to step 7). To select a different location, click [Browse]. -
Page 7: To Uninstall The Controller
The installer asks you if you will read the ReadMe file. Click [Yes] to read the file. Click [No] to skip reading the file. To uninstall the controller Select [Programs] from the [Start] menu. Select [Uninstall] in [Sony Scanner]. Proceed as prompted by the dialog. -
Page 8: Starting Up The Controller
Connect the receiver to the PC before starting up (see ”Connection”, page 5). Select [Programs] from the [Start] menu. Select [Sony Scanning Receiver Controller] in [Sony Scanner]. The power will turn on automatically on the receiver. The receiver goes into the PC control mode, and ”PC-cnt”... -
Page 9: Overview Of The Main Window
Overview of the main window !º !¡ !™ 1 SCAN MODE buttons Starts the respective modes of scanning. 2 POWER button Turns the receiver on and off. 3 Frequency display When running scan: ”SCANNING” flashes and the detection mode is displayed. At scan pause or in the Manual Mode: Frequency, detection mode, frequency step (Programmable Scanning only), preset channel number (Memory Scanning or Preset... - Page 10 !£ !¢ !∞ !§ !¶ !º SKIP button Click during scan pause or in the Manual Mode to designate the current frequency a SKIP-frequency. Click again to cancel SKIP designation. !¡ DELAY button Click to turn DELAY on and off (the 2-second delay mode).
-
Page 11: Command Reference
Command reference File menu [Exit] Quits application. Operations menu [Tune]... [Direct] Goes into Direct tuning. [Preset] Goes into Preset tuning. [Intelligent] Goes into Intelligent Memory tuning. [Scan] Same as the SCAN START/STOP button (Ctrl + S). [Minus] Same as the – button (Ctrl + M). [Plus] Same as the + button (Ctrl + L). - Page 12 View menu [Pattern 1 - 4] Switches the display pattern of the main window. [Guide] Turns the pointer guide on/off. Options menu [Frequency Search] Starts up the frequency database. [Send Programmable Data to Receiver] Exports data to the receiver. [Service Scan Data] Displays the service bands.
-
Page 13: Reception - Receiving In The Scanning Mode
z Reception — Receiving in the Scanning Mode Programmable Scanning Default frequency range of the bands The receiver controller has 20 programmable bands. You can specify any frequency within the range of the receiver to any band. By default, the controller divides its frequency range of 25 to 1300 MHz into 17 predefined bands, with 3 separate bands for the amateur radio frequencies;... -
Page 14: Defining The Programmable Scanning Frequency Range
Defining the programmable scanning frequency range You can program the frequency range of each of the 20 bands. Define the range by specifying the lower and the upper limits of the range. You can also specify the frequency step and the detection mode. Click [Scan Stop] in the main window if the receiver is running Programmable scan. - Page 15 Repeat steps 3 and 4 if you wish to define other bands. Click [OK] on the Programmable Scan Preferences dialog. Notes • All settings are NOT saved until you click [OK] in the Programmable Scan Preferences dialog (step 6). • You cannot change the Programmable Scanning preferences while running it.
-
Page 16: Running Programmable Scanning
Running Programmable Scanning Click [Program] under SCAN MODE in the main window. Select one or more bands in the target display. To include/exclude bands Click the band number or the band title in the target display. Click a target band to exclude it from the scanning target. -
Page 17: Exporting Programmable Scanning Data To The Receiver
Note You cannot exclude a band if it is the only target band. To start scanning again manually during scan pause Click + or –. Scanning will restart in ascending direction if you click +, and in descending direction if you click –. To change scanning direction during scanning Click + or –. -
Page 18: Memory Scanning
Memory Scanning Presetting stations in the memory Presetting is done in preset files. A preset file can hold up to 10 preset pages, each able to memorize 30 channels; thus a single memory preset file can hold a total of 300 channels. - Page 19 Click [NEW]. The new preset dialog will appear. The lowest vacant channel number in the page will be displayed. Select the options to your choice and click [OK]. Select a preset number. Select frequency step*. (Select [Default] from the pull- down menu to select the default frequency step of the frequency, as seen in ”Default frequency range of the bands”, page14).
-
Page 20: Running Memory Scanning
Running Memory Scanning Memory Scanning scans the frequencies preset in the memory channels. Click [Memory] under SCAN MODE in the main window. Select the page(s) of your choice in the scanning target display. To include/exclude pages Click the page number or the page title in the target display. - Page 21 Notes •You cannot run Memory Scanning if there are no pages with channel presets. •You cannot exclude a page if it is the only target page. To start scanning again manually during scan pause Click + or –. Scanning will restart in ascending direction if you click +, and in descending direction if you click –.
-
Page 22: Editing Memory Data
Editing memory data The preset memory data can be edited. Click [Scan Stop] in the main window if the receiver is running Memory Scan. Click [MEMORY] under PREFERENCES (or select [Memory Scan Preferences] from the [Preferences] menu). The Memory Scan Preferences dialog will appear. Click the page of your choice. -
Page 23: Other Options In The Memory Scan Preferences-Data Dialog
Other options in the Memory Scan Preferences–Data dialog Deleting channel presets Select the preset channel you want to erase. Click [Delete]. Printing the channel chart Click [Print]. The Print dialog will appear. Select the options to your choice and click [OK]. Arranging the chart according to frequency Click [Frequency (MHz)]. -
Page 24: Saving Memory Preferences Data In Files
Note All settings are NOT saved until you click [OK] in the Memory Scan Preferences dialog. If you exit the Memory Scan Preferences dialog by clicking [Cancel], the changes are not saved and the preferences will revert to the previous condition. Saving Memory Preferences Data in files The memory preferences can further be saved as files (up... -
Page 25: Switching The Active Memory Scan Preferences File
Editing existing files Click [Open] in the Memory Scan Preferences dialog. If the current preferences have been changed, the controller asks you if you want to save it before opening an existing file. If you do, click [Yes]. The Open dialog will appear. Select the file you want to edit and click [Open]. -
Page 26: Importing Memory Data From The Receiver
Importing memory data from the receiver You can import the Memory Preferences data from the receiver. Click [MEMORY] under PREFERENCES in the main window (or select [Memory Scan Preferences] in the [Preferences] menu). The Memory Scan Preferences dialog will appear. Click [Import]. -
Page 27: Saving Database Search Results
Name the search result. By default, the file will be named Output.dbf. The extension ”.dbf” will be added automatically. Save it in the ”Reference” folder in the ”Sony Scanner” folder. Click [MEMORY] under PREFERENCES in the main window (or select [Memory Scan Preferences] in the [Preferences] menu). -
Page 28: Service Scanning
Service Scanning Service Scanning scans one or more of the 9 pre- programmed Public Service Bands of your choice. The pre-programmed Public Service Bands are as follows; Program Service Band NOAA Weather broadcast Police Fire and Emergency Marine Aircraft (VHF) Aircraft (UHF) FM broadcast TV audio (VHF) -
Page 29: Displaying Service Scanning Frequency Range
Note You cannot exclude a service band if it is the only target band. To start scanning again manually during scan pause Click + or –. Scanning will restart in ascending direction if you click +, and in descending direction if you click –. To change scanning direction during scanning Click + or –. -
Page 30: Intelligent Memory Scanning
Intelligent Memory Scanning When the receiver receives a station continuously for 5 seconds or longer, the frequency is memorized automatically in the Intelligent Memory. The Intelligent Memory holds the 10 most recent reception frequencies. Intelligent Memory Scanning scans the frequencies in the Intelligent Memory of the receiver. -
Page 31: Displaying Intelligent Memory Frequency
Displaying Intelligent Memory frequency Click [SCAN STOP] in the main window if you are running scan. Select [Intelligent Memory Data] from the [Options] menu. The Intelligent Memory Data dialog will display the 10 recent reception frequencies. To Print Click [Print]. -
Page 32: Reception - Receiving In The Manual Mode Direct Tuning
z Reception — Receiving in the Manual Mode Direct tuning You can tune by directly inputting the frequency digits (Direct tuning), or by adjusting the frequency step by step by clicking 4 or $*. Click [Tune] in the main window. The Tune dialog will appear. -
Page 33: Preset Tuning
Preset tuning Preset tuning recalls a frequency stored in memory (see page 19). Click [Tune] in the main window. The Tune dialog will appear. Click the [Preset] tab. Select the page from the pull-down menu in the upper column. The lower column will display the channels in the selected page. -
Page 34: Intelligent Memory Tuning
Intelligent Memory tuning Intelligent Memory tuning recalls a frequency stored in the Intelligent Memory of the receiver (see page 31). Click [SCAN STOP] in the main window if the receiver is running scan. Click [Tune] in the main window. The Tune dialog will appear. Click the [Intelligent] tab. -
Page 35: Priority Scanning
Priority Scanning Priority Scanning checks the priority channel every 5 seconds and switches to this channel if there is reception. If reception is broken, the receiver will return to the previous condition. You can run Priority Scanning during any scanning or tuning modes. -
Page 36: Running Priority Scanning
•You cannot change the Memory Scanning Preferences while running it. Running Priority Scanning Click [PRIORITY] in the main window. PRIORITY, the priority frequency, and the mode indication will appear in the priority frequency display. When the receiver receives the priority frequency, the mode indication and the priority frequency display will be highlighted. -
Page 37: Other Useful Functions
zOther useful functions SKIP function You can designate up to 100 frequencies as SKIP- frequencies. The receiver will skip these frequencies during scanning. Designate unwanted frequencies such as interference signals. Designating the current reception a SKIP-frequency Click [SKIP] (in the lower left) during reception (i.e., scanning pause or in the Manual Mode). -
Page 38: Tuning In To A Skip-Frequency
Select the options to your choice and click [OK]. Select frequency step*. (Select [Default] from the pull- down menu to select the default frequency step of the frequency, as seen in ”Default frequency range of the bands”, page14). Type in the frequency, or select by clicking 4 or $*. Select detection mode. -
Page 39: Saving Skip Frequency Preferences In Files
Saving Skip Frequency Preferences in files You can save SKIP frequency preferences in files. The controller runs the SKIP function on a single SKIP- frequency data file at a time. Store SKIP-frequency data in files and switch the active SKIP-frequency file. Saving a file Click [Save] in the Skip Frequency Preferences dialog. -
Page 40: Deleting A Skip-Frequency
Saving the edited file as a different file Click [Save As File...] in the Skip Frequency Preferences dialog. The Save As dialog will appear. Name the file, select the ”Skip” folder and click [Save]. Note Save all Skip Frequency Preferences files in the ”Skip” folder. -
Page 41: Other Operation In The Skip Frequency Preferences Dialog
Other operation in the Skip Frequency Preferences dialog Printing the SKIP-frequency chart Click [Print]. The Print dialog will appear. Select the options to your choice and click [OK]. Importing SKIP data from the receiver You can import SKIP data from the receiver. Click [SKIP] under PREFERENCES in the main dialog (or select [Skip Frequency Preferences] from the [Preferences] menu). - Page 42 Click [OK] in the export confirmation dialog. ”Exporting” will appear in the display. Click [Cancel] to close the Memory Scan Preferences dialog. To use the exported data as the active SKIP preference data, click [OK] to close the dialog. Erasing all SKIP data on the receiver Note that the erased SKIP data cannot be retrieved.
-
Page 43: Adjusting Scan Pause Time
Adjusting scan pause time Switching DELAY on/off By default, DELAY is turned on. Click [DELAY] in the main window to turn off DELAY. The DELAY indication will disappear. Click [DELAY] again to turn it on again. DELAY off: The receiver resumes scanning the moment signal reception is broken during scan pause. -
Page 44: Additional Information
zAdditional information Starting up the CD-ROM frequency database The database holds information for over 3 million station frequencies nationwide. Insert the supplied CD-ROM in the CD-ROM drive. Select [Frequency Search] from the [Options] menu. The dialog prompts you to ”Select Frequency Database”. -
Page 45: Troubleshooting
Quit one or more other application(s) and start up the controller again. If you are experiencing difficulty with the set-up or operation of your Sony ICF-SC1PC Controller or the frequency database, you may contact Sony for technical support as follows:... - Page 46 Sony Corporation Printed in Japan...