Advertisement
Table of Contents
- 1 Table of Contents
- 2 Acp IV Functions and Specification
- 3 ACP IV Functions
- 4 ACP IV Components
- 5 Names of each Part of ACP IV
- 6 ACP IV Hardware Specification
- 7 Installing ACP IV
- 8 Check Points During the ACP IV Installation
- 9 Setting the Indoor Unit Address
- 10 Setting the PI485 and Connecting the Cable
- 11 Installing ACP IV and Connecting Cables
- 12 Setting the ACP IV Network Address
- Download this manual
INSTALLATION/USER MANUAL
• Make sure to read the cautions for safety before installation and use, and use
it correctly.
• It is intended to keep protect the safety of the installer and user and to prevent
the property damage, etc.
• After reading the user manual, please keep it at a place where user can access
any time.
Type: ACP IV
Model No.: PACP4B000
*MFL68583904*
P/NO : MFL68583904
www.lg.com
Advertisement
Table of Contents

Related Manuals for LG PACP4B000


Summary of Contents for LG PACP4B000
- Page 1 • It is intended to keep protect the safety of the installer and user and to prevent the property damage, etc. • After reading the user manual, please keep it at a place where user can access any time. Type: ACP IV Model No.: PACP4B000 *MFL68583904* www.lg.com P/NO : MFL68583904...
- Page 3 Computer Program Protection Act. The contents of the User Guide and the programs mentioned herein may only be used under license from LG Electronics in strict adherence to the user agreement. You may not reproduce or distribute, by any means, copies of this User Guide, or any part of it, without prior approval from LG Electronics.
- Page 4 TIPS FOR SAVING ENERGY TIPS FOR SAVING ENERGY Here are some tips that will help you minimize the power consumption when you use the air conditioner. You can use your air conditioner more efficiently by referring to the instructions below: • Do not cool excessively indoors.
- Page 5 IMPORTANT SAFETY INSTRUCTIONS IMPORTANT SAFETY INSTRUCTIONS READ ALL INSTRUCTIONS BEFORE USING THE APPLIANCE. Always comply with the following precautions to avoid dangerous situations and ensure peak performance of your product WARNING It can result in serious injury or death when the directions are ignored. CAUTION It can result in minor injury or product damage when the directions are ignored.
- Page 6 IMPORTANT SAFETY INSTRUCTIONS y Do not install the product at wet place. - It may cause failure of the product. y Provided product and adaptor shall only be installed and used inside a building. - It may cause fire or failure of the product. *Do not install or use outside.
- Page 7 IMPORTANT SAFETY INSTRUCTIONS y Let the children or the old and the weak be controlled by the guardian to use. - It may cause accident or failure. y Do not give any shock to the product. - Any shock to the product may cause failure. y Grab the head of the plug of the power cord to pull when disconnecting the plug, and do not click the plug with wet hands.
- Page 8 MEMO...
-
Page 9: Table Of Contents
Table Of Contents Table Of Contents ACP IV FUNCTIONS AND SPECIFICATION ACP IV Functions ACP IV Components Names of each part of ACP IV ACP IV Hardware specification Installing ACP IV Installing ACP IV Check points during the ACP IV installation Setting the indoor unit address Setting the PI485 and connecting the cable Installing ACP IV and connecting cables... - Page 10 MEMO...
-
Page 11: Acp Iv Functions And Specification
• Set Network environment (IP address, Net mask, Gateway) • Set ACP ID when demand linkage • SW upgrade function • Data backup function • Data recovery function • RS-485 communication logging function • ACP IV-screen display language setup • Check the network connection function PACP4B000 PACP4B000... - Page 12 Internet Explorer, the central control program in ACP IV web server is automatically run, and the functions of various contents can be used. Internet PACP4B000 Internet Explorer Controlling of up to 256 air conditioner indoor units (ACS I/O Interlocking : Control up to 128 indoor units and 16 I/O modules) • Monitoring of error and operation status...
-
Page 13: Acp Iv Components
• After reading the user manual, please keep it at a place where user can access any time. • For more information, please read the manual in the CD. Type: ACP IV Model No.: PACP4B000 *MFL68583901* www.lg.com P/NO : MFL68583901... -
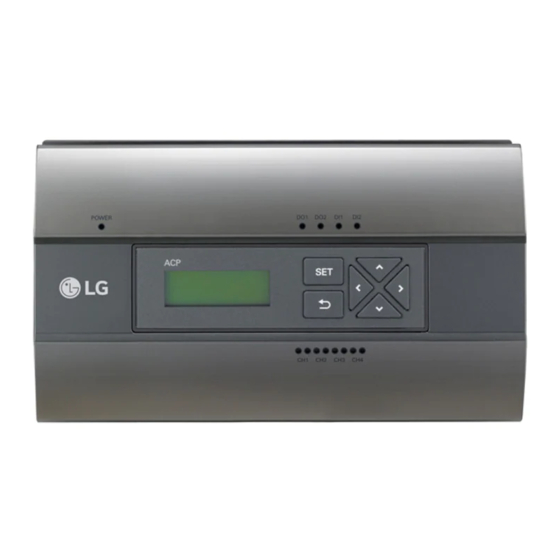
Page 14: Names Of Each Part Of Acp Iv
ACP IV FUNCTIONS AND SPECIFICATION Names of each part of ACP IV ACP IV is composed as follows. ① ② ③ ④ ⑤ ⑥ ⑦ ⑧ ⑨ ⑩ ⑪ ⑫... - Page 15 ACP IV FUNCTIONS AND SPECIFICATION Number Item Description Cover Front cover of the ACP IV ① RS-232 console port Reserved communication port ② Adaptor connection jack Jack for DC 12 V to connect to the power supply adaptor ③ Buttons and LCD to set network environment and to dis- Buttons and LCD ④...
-
Page 16: Acp Iv Hardware Specification
ACP IV FUNCTIONS AND SPECIFICATION ACP IV Hardware specification ACP IV hardware specification is as follows. Category Description Boundary of usage temperature 0 °C ~ 40 °C i.MX515 32Bit 800 MHz speed 128MB DDR2 SDRAM * 2EA 4GB i-NAND Flash y Ethernet 10 / 100 BASE-T y USB : USB Host (SW upgrade, data backup) mini USB Device (Debug) -
Page 17: Installing Acp Iv
Installing ACP IV Installing ACP IV Installing ACP IV This chapter describes how to install the ACP IV to use. In order to use the ACP IV, the installation should be performed by the following order. STEP 1. Check the cautions during the ACP IV installation Before installing the ACP IV, check the cautions. -
Page 18: Check Points During The Acp Iv Installation
Installing ACP IV CAUTION Installing the ACP IV The ACP IV installation work needs the professional technique. Therefore, the installation described in this chapter should be performed by the certified installation professional. Consult the service center or the professional installation agency certified by us about any question or request related to the installation. - Page 19 Installing ACP IV The maximum quantity of connected indoor unit is different depending on the quantity of connected I/O modules. Please refer to following information related to product connection quantity. Quantity of Quantity of I/O Module Device Quantity of Device Quantity ofI/O Module * Devices: Indoor units, ERV, DI/DOs, DOKITs, AWHPs, AHUs • RS-485 communication cable connection...
-
Page 20: Setting The Indoor Unit Address
Installing ACP IV Setting the indoor unit address By considering the entire installation configuration connecting to one ACP IV, set the address to each indoor unit not to be overlapped. 00~FF in hexadecimal can be set to the indoor unit address. However, in case of I/O module, address 00 should not be set because address 00 is used as Broadcast in MODBUS communication. - Page 21 Installing ACP IV Power Distribution watt-hour meter Indicator (PDI) Outdoor Units Indoor devices 1 Indoor devices 2 Indoor devices 3 PACP4B000 Configuration Configuration Configuration Address: 01 Address: 02 Address: 03 ACP IV Configuration Address: 11 DI/DO, ON/OFF Configuration Address: 21...
-
Page 22: Setting The Pi485 And Connecting The Cable
Installing ACP IV Setting the PI485 and connecting the cable After setting the address of the indoor unit, install the PI485 and set the DIP switch. And then, connect the RS485 cable for communication with the ACP IV. Notes Installing the PI485 Installing the PI485 depends on the outdoor unit. - Page 23 Installing ACP IV The following figure is an example of connecting several PI485 with each other to connect to one ACP IV. PQNFB17C0 PACP4B000 BUS A BUS B...
-
Page 24: Installing Acp Iv And Connecting Cables
And, Ethernet cable (LAN cable) shall be connected for the connection with internet or AC Manager To fix the ACP IV, the following 2 methods may be used. Install in DIN RAIL or fix to the wall considering the environment of the site. Power PACP4B000 LAN cable RS-485 cable CAUTION If four times the power connector for the connection, as shown by using the right connection, but please note that an electric shock. - Page 25 Installing ACP IV Installing the ACP IV in DIN RAIL ACP IV can be installed in DIN RAIL with width 35 mm and height 7.5 mm. Proceed as the follows to install the ACP IV in an adequate place. The installation method of the ACP IV is explained here with the example of installing the ACP IV in DIN RAIL.
- Page 26 • Fix to the wall using the driver. It can be fixed as in the following figure according to the location to install PACP4B000 Connecting RS-485 cable to the ACP IV After fixing the ACP IV in the installation place, RS-485 cable that was connected to PI485 shall be connected to the ACP IV.
- Page 27 The following is an example of dividing to CH1 and CH2 and connecting in BUS format. BUS B BUS A BUS B BUS A PACP4B000 ACP IV The next shows the wrong example (STAR connection) of RS-485 connection of the ACP IV. BUS B PACP4B000...
- Page 28 Installing ACP IV Connecting Ethernet cable (LAN cable) to the ACP IV After connecting the ACP IV and RS-485 cable, Ethernet cable shall be connected to the ACP IV. ACP IV may be connected to hub through Ethernet cable, or directly to AC Manager IV. Connecting the ACP IV and hub It is the case of connecting the ACP IV to the basic internet network installed at the site, and it is generally connected to the hub.
-
Page 29: Setting The Acp Iv Network Address
The network environment of the ACP IV can be set by the LCD and the buttons at the front side of the ACP IV. The current ACP IV information and the menu are displayed on the LCD, and the menu can be changed and selected by pressing button and Up/Down/Left/Right (▲, ▼, ◀ , ▶ ) buttons. PACP4B000 PACP4B000... - Page 30 When the power switch is turned on, the ACP IV booting screen is displayed on the LCD as shown at the following figure, and when booting is completed, the initial ACP IV screen is displayed. LG ACP IV SW ver. 1.0.0 LG Electronics Wait for booting···...
- Page 31 • When you select [Function] and press [SET] button, it enters the No. 2 menu in the following figure. In [Function] menu, ACP IV software service function is supported. [ Network Info ] 000.000.000.000 GW 000.000.000.000 MS 000.000.000.000 MC 000000:00:00:00 LG ACP IV > Network Info DHCP NO SW ver. 1.0.0 Function 192.168.001.100 [ Function ] GW 192.168.001.001...
- Page 32 Installing ACP IV How to set network address In [Network Info] menu, use the category to set using “up” and “down” (▲, ▼) buttons. IP, Gateway, and Net mask settings are displayed in the initial screen of [Network Info] menu, and you can check MAC address and DHCP setting using “down” (▼) button. [하] DOWN [Network Info] [Network Info] 000.000.000.000 000000:00:00:00 > 000.000.000.000 DHCP NO 000.000.000.000 >...
- Page 33 The network address consists of four 3-digit numbers. In case of setting the network address, the, name of the related address is displayed on the LCD of the ACP IV, and press Up/Down/Left/Right (▲, ▼, ◄, ►) button to set. Press Up/Down (▲, ▼) button to increase/decrease the number of the digit where the cursor is on, and press Left/Right (◄, ►) button to move the digit of the network address to the left or right. Example of pressing down (▼) button [Set IP Address] 192.168.000.000 Click down (▼) button [Set IP Address] PACP4B000 192.167.000.000 Example of pressing right (►) button [Set IP Address] 192.168.000.000 Click right (►) button [Set IP Address] PACP4B000 192.168.000.000 CAUTION Setting the network address The network address can be separated to 4 digits based on ., and each number shall be 255...
- Page 34 • If you press [SET] button again, [Network Info] setting screen will be displayed. • While IP is selected, pressing [SET] button will display the screen to input IP address. Network Info > Function Click [SET] button [Network Info] PACP4B000 > 000.000.000.000 000.000.000.000 000.000.000.000 Click [SET] button [Set IP Address] 000.000.000.000...
- Page 35 • While DHCP is selected, if you press [SET] button, you can input whether to use DHCP function. Network Info > Function Click [SET] button Click ▼ [Network Info] PACP4B000 button 000000:00:00:00 four times > DHCP NO Click [SET] button [Set DHCP] NOT(0) / USE(1) : 0 Use up and down (▲, ▼) buttons to set whether to use DHCP function.
- Page 36 Installing ACP IV Checking ACP IV access It checks whether the ACP IV network address setting is properly done. You can check the possibility of accessing the ACP IV through PING test. You can open the following DOS window through Windows “Start”, “Run”, “cmd” input. In DOS screen, input “ping <ACP IV IP address>”...
- Page 37 Installing ACP IV NOTES When you connected the ACP IV and PC through a cross cable, but you cannot access the ACP IV Check IP address of the ACP IV and IP address of the PC. Ex) If IP address of the ACP IV is 192.168.1.101 and Net mask is 255.255.255.0, check if the first three digits of the IP address of the PC is the same as the first three digits of the IP address of the ACP IV.
- Page 38 Software update can be done with USB memory. Proceed in the following order. Create “ramdisk” folder in USB memory. Put the S/W file to update in ′ramdisk′ folder. • At this time, only one S/W file must be put. (New version software file can be downloaded from LG Electronics System Air Conditioner homepage.)
- Page 39 Installing ACP IV E: may be changed.
- Page 40 • Even when you do not immediately restart, update will be applied only after rebooting the ACP IV in the future. Network Info > Function Click [SET] button PACP4B000 [Function 1/3] > S/W update DB back up DB recover Click [SET]...
- Page 41 Installing ACP IV Data backup If ACP IV data backup is necessary, it must be carried out by the specialized service technician. Data backup can be done with USB memory or SD card. Proceed in the following or der. Insert USB memory or SD card into the ACP IV. (Refer to software update for USB memory insertion.)
- Page 42 Select [DB back up] menu, and press [SET] button again. Select [USB] or [SD card], and press [SET] button. After completing backup, remove USB memory. Network Info > Function Click [SET] button PACP4B000 [Function 1/3] S/W update > DB back up DB recover Click [SET] button [DB back up] >...
- Page 43 Installing ACP IV Data recovery If ACP IV data recovery is necessary, it must be carried out by the specialized service technician. Data recovery can be done with USB memory or SD card. Proceed in the following order. Save the database file to recover in USB memory or SD card. • Save the files in “db”...
- Page 44 Installing ACP IV ACP IV is automatically restarted for data recovery. Network Info > Function Click [SET] button PACP4B000 [Function 1/3] S/W update DB back up Click > DB recover [SET] button [DB recover] > SD card Click [SET] button...
- Page 45 Select [Function] menu, and press [SET] button. Select [Data Logging] menu, and press [SET] button again. Select whether to set data logging. Network Info > Function Click [SET] button PACP4B000 [Function 2/3] > Data Logging ACP_ID(DEMAND) Click Language [SET] button...
- Page 46 ACP IV of [SET] button. [Function] menu is selected, and then press [SET] button. Select the Language menu again [SET] button. [Up], [Down] (▲, ▼) button to select it. Network Info > Function Click [SET] button PACP4B000 [Function 2/3] Data Logging ACP_ID(DEMAND) > Language Click [SET] button [Set Language]...
- Page 47 Enter the IP address of the connecting PC, please press the [SET] button. Network Info > Function Click [SET] button [Function 3/3] PACP4B000 > Net Test Click [SET] button [Set PC IP] 000.000.000.000 Check the network Check the network...
- Page 48 Installing ACP IV Accessing ACP IV User may control the functions of the ACP IV using web GUI program of the ACP IV in the computer connected to the ACP IV through network. web GUI is the ACP IV function control program developed in Java language.
- Page 49 Check the ACP IV status according to the following flowchart. Air conditioner is not searched in web GUI of the ACP IV Carry out PING test in Success Is LG-NET LED of Are all the indoor units command prompt window of ACP IV blinking? connected?
- Page 50 Installing ACP IV ACP IV status monitoring after executing lock all and temperature lock Run web GUI of the ACP IV to select all indoor units, and execute lock all function. Afterwards, execute temperature lock function again, and monitor the status of the ACP IV. Check the status of the ACP IV according to the following flowchart.
- Page 51 Installing ACP IV Troubleshooting During the use of the ACP IV, if unexpected problem occurs, please find the solution by studying the following list. When BUS-A or BUS-B LED of CH1~4 port is not blinking during the product installation When BUS-A or BUS-B LED of CH1~4 port is not blinking during the product installation, run it after setting the indoor and outdoor unit groups.
- Page 52 The CH242 (network error) keeps occurring and disappearing in the ACP IV controller. Case of incorrect connection of RS-485 communication line If each communication line is connected altogether as in the following figure, the communication line must be separated. PI485 PI485 PI485 PI485 PACP4B000 PQNFB17C0 ACP IV...
- Page 53 AC Ez cannot recognize the corresponding indoor unit. Therefore, the connections need to be modified to have the AC Ez to be in the same RS-485 communication line with the indoor unit to control. [LINE A] [0-6] [0-A] PACP4B000 PQNFB17C0 ACP IV [3-0] [3-5] [LINE B]...
- Page 54 Main PCB 오결선 Wrong connection LG ACCS의 이미지가 깨어져 온도 등 화면이 잘 보이지 않는 경우 When the image of web GUI is broken and you cannot see the screen such as the temperature well �LG ACCS 를 종료하고 다시 실�하세요.
- Page 55 In addition to the source code, all referred license terms, warranty disclaimers and copyright notices are available for download. LG Electronics will also provide open source code to you on CD-ROM for a charge covering the cost of performing such distribution (such as the cost of media, shipping and handling) upon email request to opensource@lge.com.
- Page 56 Installing ACP IV If the abnormality occurs in products, please first check the following points before requesting to service center. Symptom Measures Because there is no icon on the Please refer to the connection guide. desktop, it is impossible to control. Although running on the desktop Please check LAN cable and the power supply of Hub.
- Page 58 ver. 1.0.0...