Advertisement
KD-AV300
MONITOR WITH DVD RECEIVER
INSTRUCTION MANUAL
MONITOR CON RECEPTOR DE DVD
MANUAL DE INSTRUCCIONES
Please read all instructions carefully before operation to obtain the
best possible performance from the unit.
Por favor lea detenidamente este manual para comprender a fondo
todas las instrucciones y obtener un máximo disfrute de esta unidad.
LVT2501-001B [J/JW]
Advertisement
Table of Contents

Related Manuals for JVC KD-AV300


Summary of Contents for JVC KD-AV300
-
Page 1: Manual De Instrucciones
KD-AV300 MONITOR WITH DVD RECEIVER Please read all instructions carefully before operation to obtain the best possible performance from the unit. INSTRUCTION MANUAL MONITOR CON RECEPTOR DE DVD Por favor lea detenidamente este manual para comprender a fondo MANUAL DE INSTRUCCIONES todas las instrucciones y obtener un máximo disfrute de esta unidad. - Page 2 Inc., registered in the U.S. and other countries. relating to laser product safety. • THIS PRODUCT IS LICENSED UNDER THE MPEG-4 VISUAL PATENT PORTFOLIO JVC KENWOOD Corporation LICENSE FOR THE PERSONAL AND NON-COMMERCIAL USE OF A CONSUMER 2967-3, ISHIKAWA-MACHI, HACHIOJI-SHI,...
-
Page 3: Table Of Contents
Before Use Contents Before Use Warning Do not operate any function that takes your attention away from safe driving. Basics Caution Tuner Volume setting: • Adjust the volume so that you can hear sounds outside the car to prevent accidents. iPod/iPhone •... -
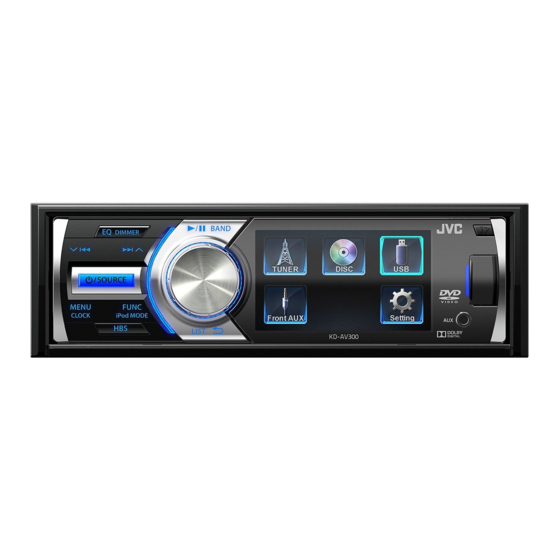
Page 4: Basics
Basics Faceplate Attach How to reset Monitor Faceplate-open button Volume knob (turn/press) Remote sensor Detach Your preset adjustments will also be erased. Do this Initial setting — Clock adjustment Press L /SOURCE. Turn on the power Press L /SOURCE to turn on the power. (The buttons on the faceplate light up.) Press MENU to display the top menu screen. - Page 5 Basics Remote control (RM-RK257) Button Operations Button Operations How to install the battery Turns the power on/off. Exits from the menu. MENU Displays the top menu screen. Mutes/restores the sound. 5/∞/2/3 Selects an item. SOURCE Selects a source. ENTER Confirms the selection. LIST Displays the item list for the selected source.
-
Page 6: Tuner
Tuner LOCAL indicator Band indicator Preset number Station name The frequency of the tuned-in station HBS indicator (➜ 11) Sound mode indicator (➜ 11) Tuner source screen [Tuner List] menu screen Search for a station Other settings—Tuner function While listening to a station... Press L /SOURCE repeatedly to select [TUNER]. -
Page 7: Ipod/Iphone
iPod/iPhone Song no. / Total song number Artwork (shown if the file contains Song information the artwork) Sound mode indicator (➜ 11) HBS indicator (➜ 11) Playback mode Playback status (3: play/8: pause) / Playing time / Total [LIST] menu screen playing time iPod/iPhone playback screen Start playback... -
Page 8: Disc/Usb
Disc/USB Folder no. / Total folder number Start playback Track/file no. / Total track/ (MP3/WMA) file number Disc Track/file information Source ([DISC] or [USB]) Sound mode indicator (➜ 11) HBS indicator (➜ 11) Playback mode Playback status (3: play/8: pause) / Playing time / Total Label side Audio playback screen playing time... - Page 9 Disc/USB Playback information • DVD Video: Title no./Chapter no./Playing time • VCD/MPEG1/MPEG2/MPEG4: Playing time Playback file type : Audio For DVD/VCD/MPEG1/MPEG2/MPEG4: On-screen information is displayed by pressing DISP on the remote : Picture control. : Video Video playback screen [LIST] menu screen DVD/VCD/MPEG1/MPEG2/MPEG4/JPEG Do this Various disc operations from the remote control (RM-RK257)
-
Page 10: External Components
External Components Disc/USB Other settings—DVD function/VCD function/Media function Use a portable audio player (AUX) Press FUNC to display the [DVD function] (DVD), [VCD function] (VCD), or [Media HBS indicator Sound mode function] (MPEG1/MPEG2/MPEG4) menu. (➜ 11) indicator (➜ 11) 3.5 mm stereo mini plug Turn the volume knob to select the item to set (see the table below), then (commercially available) press the knob to make a selection. -
Page 11: Sound/Display/Other Settings
Sound/Display/Other Settings Change the display brightness (Dimmer) Press and hold DIMMER repeatedly to select [Dimmer Low] or [Dimmer High]. Change the general settings/check information on the [Setting] menu Press MENU to display the top menu screen. Turn the volume knob to select [Setting], then press the knob to display the Setting menu setting menu. -
Page 12: More Information
More Information About discs • Unplayable discs : About files • Playable discs : - DVD-Audio, DVD-ROM (data), DVD-RAM, DVD+R/ • Playing MPEG1/MPEG2/MPEG4 files: DVD+RW recorded in the DVD-VR/DVD+VR format, - This unit can play back MPEG1/MPEG2/MPEG4 Disc type Recording format, DTS-CD, SVCD (Super Video CD), CD-ROM, CD-I files with the extension code <.mpg>, <.mpeg>... - Page 13 More Information • Playing MP3/WMA files: About iPod/iPhone Maintenance - This unit can play back files with the extension • Made for code <.mp3> or<.wma> (regardless of the letter - iPod touch 4th generation Cleaning the unit: Wipe off dirt on the faceplate case—upper/lower).
-
Page 14: Troubleshooting
Troubleshooting Symptom Remedy Symptom Remedy Sound cannot be heard. • Adjust the volume to the optimum level. Recordable/Rewritable discs • Insert a finalized disc. • Check the cords and connections. cannot be played back. / Tracks • Finalize the discs with the component which you used on the Recordable Rewritable for recording. -
Page 15: Specifications
Specifications Maximum Power Output Front/Rear 50 W per channel USB Standard USB 1.1 Full Speed Continuous Power Output (RMS) Front/Rear 20 W per channel Compatible Device Mass storage class Compatible File System FAT 32/16/12 Load Impedance 4 Ω (4 Ω to 8 Ω allowance) Maximum Supply Current DC 5 V Audio Output Level (REAR OUT) -
Page 16: Installation/Connection
Installing the unit (in-dash mounting) Warning • The unit can only be used with a 12 V DC power supply, negative ground. Do the required wiring.(➜ 17) • Disconnect the battery’s negative terminal before wiring and mounting. • Do not connect Battery wire (yellow) and Ignition wire (red) to the car chassis or Ground wire (black) to prevent a short circuit. - Page 17 Wiring connection Parts list for installation To reverse lamp (required when Purple/White using a rear view camera) REVERSE A Faceplate/Faceplate E Speaker cord GEAR Audio output (Rear) Fuse (15 A) SIGNAL case Connect to the vehicle's parking Light Green Video output * brake detection switch harness.
- Page 18 • “DVD Logo” es una marca comercial de DVD Format/Logo Licensing Corporation Información acerca de la eliminación de equipos registrado en los EE.UU., Japón y otros países. eléctricos y electrónicos al final de la vida útil (aplicable a • Fabricado bajo licencia de Dolby Laboratories. Dolby y el símbolo de la doble D los países que hayan adoptado sistemas independientes son marcas comerciales de Dolby Laboratories.