Table of Contents
Advertisement
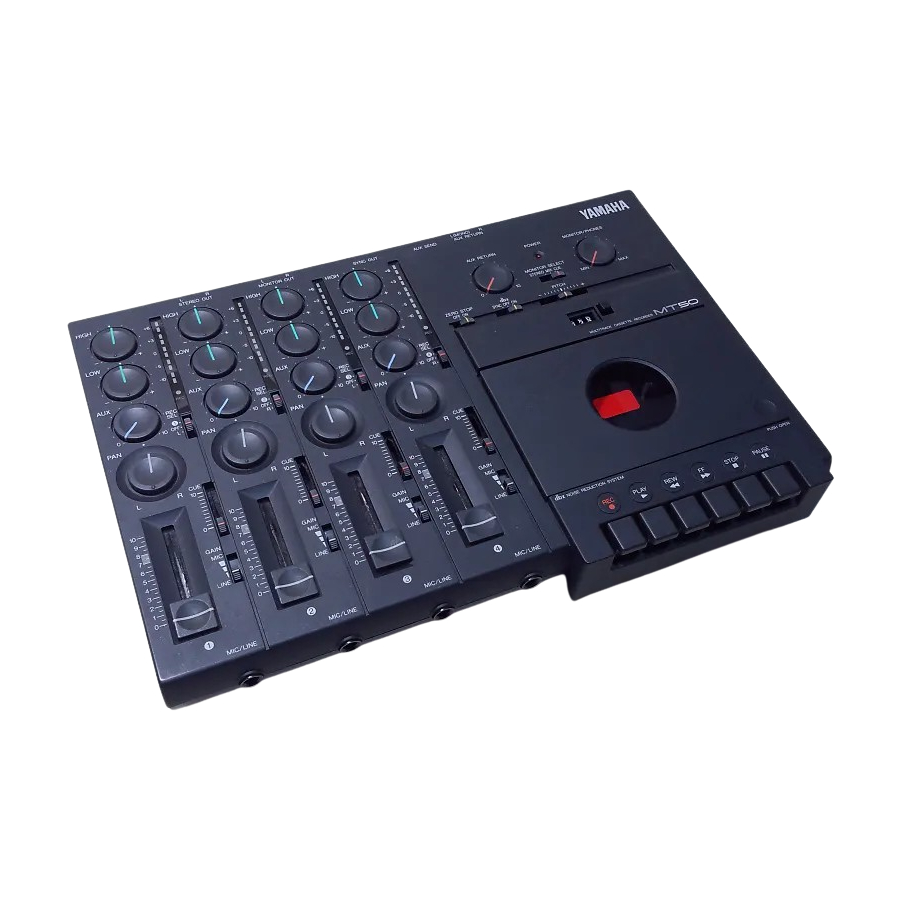
Multitrack Cassette Recorder
User's Guide
Manuel de l'utilisateur
Bedienungsanleitung
Guía del Usuario
HIGH
–
LOW
–
AUX
0
PAN
L
10
9
8
7
6
5
4
3
2
1
0
1
L
R
L
STEREO OUT
MONITOR OUT
HIGH
HIGH
+6
+6
+3
+3
+
–
+
–
0
0
LOW
LOW
-5
-5
-10
-10
+
–
+
–
AUX
AUX
REC
REC
REC
REC
SEL
SEL
1
2
OFF
OFF
10
0
10
0
L
R
PAN
PAN
CUE
CUE
R
L
R
L
10
10
10
10
9
9
0
0
8
8
7
7
6
6
GAIN
GAIN
MIC
MIC
5
5
4
4
3
3
2
2
LINE
LINE
1
1
0
0
2
3
MIC/LINE
MIC/LINE
R
SYNC OUT
AUX SEND
HIGH
+6
+6
+3
+3
+
–
+
0
0
LOW
-5
-5
-10
-10
ZERO STOP
+
–
+
OFF ON
AUX
REC
REC
REC
REC
SEL
SEL
3
4
OFF
OFF
10
0
10
L
R
PAN
CUE
CUE
R
L
R
10
10
10
9
0
0
8
7
6
GAIN
GAIN
MIC
MIC
5
4
3
2
LINE
LINE
1
0
NOISE REDUCTION SYSTEM
4
MIC/LINE
MIC/LINE
L (MONO)
R
AUX RETURN
POWER
MONITOR/PHONES
AUX RETURN
MONITOR SELECT
STEREO MIX CUE
MIN
0
10
PITCH
SYNC OFF ON
+
–
0 0 0
MULTITRACK CASSETTE RECORDER
REC
PLAY
REW
FF
STOP
PAUSE
MAX
PUSH OPEN
Advertisement
Table of Contents

Related Manuals for Yamaha MT50


Summary of Contents for Yamaha MT50
- Page 1 Multitrack Cassette Recorder User’s Guide Manuel de l’utilisateur Bedienungsanleitung Guía del Usuario SYNC OUT AUX SEND L (MONO) STEREO OUT MONITOR OUT AUX RETURN HIGH HIGH HIGH HIGH POWER MONITOR/PHONES AUX RETURN – – – – MONITOR SELECT STEREO MIX CUE ZERO STOP –...
- Page 2 This product, when installed as indicated in the instructions contained in this manual, meets FCC requirements. Modifications not expressly approved by Yamaha may void your authority, granted by the FCC, to use the product. 2. IMPORTANT: When connecting this product to accessories and/or another product use only high quality shielded cables.
-
Page 3: Safety Precautions
• To reduce the risk of electric shock, do not open the MT50. • To reduce the risk of fire or electric shock, do not expose the MT50 to rain or moisture. • In an extremely humid environment, condensation may form on the inside and outside of the MT50. -
Page 4: Table Of Contents
About this User’s Guide ......1 What is the MT50? ......1 Choosing Cassette Tapes . -
Page 5: Welcome To The Mt50
Track 1: effect, there is no B side. If you turn the cassette over, you’ll hear the four tracks play backwards. This is because the MT50 uses the full width of the * dbx noise reduction system was manu- tape to record four tracks. The MT50 uses dbx noise reduction to reduce factured based on a patent license from tape hiss and keep your recordings clean and crisp. -
Page 6: About Multitrack Recording
Are Four Tracks Enough? The MT50 is a four-track tape recorder: its recording heads create four sep- arate tracks on a tape. You will also notice that the left side of the unit is composed of four groups or “modules”... -
Page 7: Getting To Know The Mt50
Getting to Know the MT50 Getting to Know the MT50 This chapter takes you on a guided tour of the MT50 and explains what the controls and connections do, and how to use them. First the module controls, then the general controls, are illustrated and explained. - Page 8 AUX SEND output, which is used to feed an external effects pro- HIGH cessor. The MT50’s aux send signal is sourced after the fader. To feed a channel’s signal to an external effects processor via the aux send, you must turn up its AUX control and raise its fader.
- Page 9 Use this for overdub recording. — The signal source is the stereo mix and CUE. Use this for punch-in/out recording. POWER indicator: This indicator lights up when the MT50 is powered-on and ready for use. MONITOR/PHONES control: This control is used to adjust the PHONES and MONITOR OUT levels.
- Page 10 Chapter 2: Getting to Know the MT50 ZERO STOP switch: When set to ON, rewind stops automati- cally at approximately 999 (the REW button remains depressed). Tape counter and reset button: The tape counter indicates the tape position, making it easy to locate specific points in your songs.
-
Page 11: Connections
L/R jacks. Connect a pair of speakers with built-in amplifiers. SYNC OUT jack: This jack outputs the FSK signal to synchro- nize the MT50 and a MIDI sequencer or drum machine. Connect a MIDI-FSK convertor such as the Yamaha YMC10. -
Page 12: Basic Recording
OFF all your equipment. Power ON/OFF Warning: The AC adaptor 1. Press the POWER switch to power ON the MT50. should be connected only to an AC The POWER indicator lights up. outlet of the voltage type stated on the adaptor. -
Page 13: Step 1 - Recording The Drums
18. Press REW to rewind the tape to 000. The easiest song to record is one that starts with a drum intro. If your song starts with drums, bass, and synth all on the first bar, you’ll need to record a count-in. MT50 User’s Guide... -
Page 14: Step 2 - Recording The Bass
Connecting an instrument with a high output impedance such as an HIGH electric guitar or bass to the MT50 may increase noise and distortion and preclude high quality recordings. If this happens, connect a direct box or effect unit between the instrument –... -
Page 15: Step 3 - Recording The Guitar
Connecting an instrument with a high output impedance such as an HIGH electric guitar or bass to the MT50 may increase noise and distortion and preclude high quality recordings. As explained in Step 1 on page 10, connect a direct box or effect unit –... -
Page 16: Step 4 - Recording The Vocals
19. Set Module 4’s fader to 0. 20. Press REW to rewind the tape to 000. Use a compressor to even out the vocal level. Watch out for feedback. Don’t place your microphone too close to your speakers. MT50 User’s Guide... -
Page 17: Step 5 - Mixing Down
– fader levels. Preparation 1. Connect the STEREO OUT on the MT50 to the input on your mas- ter cassette recorder. 2. Set the input levels on your master recorder as appropriate. 3. You can connect the stereo outputs of your master recorder to a hi-fi... -
Page 18: Panning
Adding Effects If you have an effects processor, such as the Yamaha REV100 or FX770, you can connect it to the MT50 and apply effects to recorded sounds. 1. Connect the AUX SEND to the effects processor’s input. 2. Connect the AUX RETURN to the effects processor’s outputs. -
Page 19: Setting Example
Setting example Setting example Powered Monitor Speakers YAMAHA YAMAHA Master Recorder Effect Processor YAMAHA MONITOR STEREO SEND RETURNS Drum Machine Footswitch Bass Effect Processor YAMAHA Guitar Effect Processor Compressor YAMAHA MT50 User’s Guide... -
Page 20: Advanced Recording
Advanced Recording This chapter explains how to perform advanced multi-track recording tech- niques on your MT50. The MT50 is so flexible that you can perform sophis- ticated recording techniques with relative ease on a single, compact machine. Here’s a little of what you can do. -
Page 21: One-Take Recording
One-Take Recording One-Take Recording The MT50 enables you to record up to four instruments at the same time. This is useful for recording a live band, as discussed previously. Simply record the instruments directly into input modules 1 through 4 and add effects during mixdown. - Page 22 The special one-take recording capabilities of the MT50 explained below allow you to accomplish some pretty slick tricks to solve these problems.
- Page 23 The instruments you connected to inputs 1 and 3 will be combined on Track 1. The instruments you connected to Inputs 2 and 4 will be com- bined on Track 2. Tracks 3 and 4 are available for additional recording. MT50 User’s Guide...
- Page 24 AUX RETURN jacks. The left channel of each stereo instrument will be mixed to Track 1. The right channel for each instrument will be mixed to Track 2. Tracks 3 and 4 will be available for additional recording. MT50 User’s Guide...
-
Page 25: Ping-Pong Recording
3 to Track 4; and example 2, overdubbing a new sound source during bouncing tracks, you can make ping-pong recording. your MT50 sound like a ten (or This will free up Tracks 1, 2, and 3 for additional instruments, solos, or more) track recording studio! vocals. - Page 26 You can use this process over again to combine and mix three tracks into one. Unfortunately, the sound quality will deteriorate rapidly after a couple of bounces. Using this technique, the MT50 can function as though it had far more than four tracks! You can perform ping-pong recording of Tracks 1, 2, and 3, and simulta- neously overdub an instrument connected to Module 4.
-
Page 27: Punch In/Out Recording
1’. (No connection.) Yamaha supplies an optional foot- 9’. Set the REC SEL switch while holding down the PLAY button to switch, FC-5. Note that using a foot- 4 at the beginning of Bar 4, start recording on Track 4 and play the switch other than Yamaha’s may... - Page 28 Drum Machine Program 012 Bass Alembic through Ampeg Rythm Guitar Gibson ES-225, Mesa Boogie Lead Guiiar ‘57 Strat, tweed Princeton Track Instrument Other Info High Fader Start Stop To Track Guita mix ES-225 and Strat Rhythm track Drum/Bass MT50 User’s Guide...
-
Page 29: Synchronization
Synchronization Synchronization By recording a timecode onto Track 4, you can synchronize the MT50 with a MIDI sequencer or drum machine. (FSK stands for Frequency Shift Keying, in case you were wondering. It is a type of MIDI performance tempo data. The track that contains the FSK signal is a little like the conductor of an orchestra who controls the tempo for your sequencers or drum machines.). -
Page 30: Appendix
Appendix Appendix Troubleshooting If you’re having trouble operating MT50, or it doesn’t seem to be working as it should, look up the symptoms in the following table and see what to do. Symptom What to Do Make sure the AC adaptor is connected to a suitable AC outlet. -
Page 31: Mt50 Maintenance
If the head becomes dirty, the MT50 may sound distorted or noisy. In severe cases, the MT50 may not be able to playback or record at all. If you expect optimal results from a recording session, it is best to clean the heads before the session. - Page 32 It is best to demagnetize the recording head after no more than ten hours of recording use. If you are planning a special session, it is a good idea to clean and demagnetize the head before the session to ensure the best sounding results. MT50 User’s Guide...
-
Page 33: Specifications
FC5 Footswitch for punch-in/out recording 0 dB = 0.775 V rms * dbx noise reduction system was manufactured based on a patent license from THAT Corporation. dbx is a trademark of Carillon Electronics Corporation. All specifications subject to change without notice. MT50 User’s Guide... -
Page 34: Block Diagram
MIC/LINE LINE GAIN METER MIC/LINE LINE GAIN METER MIC/LINE LINE GAIN METER MIC/LINE SYNC OUT LINE GAIN STEREO AUX RETURN (MONO) MONITOR STEREO AUX RETURN MONITOR/ PHONES MONITOR PHONES SELECT AUX SEND Dimensions H: 69.3 W: 337 MT50 User’s Guide... -
Page 35: Glossary
AUX RETURN (Auxiliary Return) — The AUX RETURN control determines the amount of signal that is fed back to the MT50 via the AUX RETURN input connectors (generally after processing by an external effects unit connected to the AUX SEND). - Page 36 One-Take recording — Recording several instruments simultaneously (four on the MT50) for later mixdown. Excellent for recording a live band. Overdub recording — Recording one track while listening to another track or tracks.
-
Page 37: Tracking Sheet
Tracking Sheet Trac Fade Instrument Other Info High Start Stop Track Trac Fade Instrument Other Info High Start Stop Track Trac Fade Instrument Other Info High Start Stop Track Trac Fade Instrument Other Info High Start Stop Track... - Page 38 Tracking Sheet Track Instrument Other Info High Fader Start Stop To Track Track Instrument Other Info High Fader Start Stop To Track Track Instrument Other Info High Fader Start Stop To Track Track Instrument Other Info High Fader Start Stop To Track VS74840 R1 1 IP 94 11 5000 CP Printed in Japan P.O.Box 1, Hamamatsu,Japan...