Panasonic BL-C10 Installation & Troubleshooting Manual
Hide thumbs
Also See for BL-C10:
- Operating instructions manual (110 pages) ,
- Installation & configuration manual (11 pages) ,
- Getting started (4 pages)
Table of Contents
Advertisement
How to Use This Documentation
The camera includes the following 4 manual types.
•
Installation/Troubleshooting (This manual)
This manual has important information you will need to understand before
installing the camera and troubleshooting tips.
•
Getting Started
Getting Started provides explanations for the initial configuration and
accessories included with the camera. The Getting Started helps you to easily
configure the camera. The Setup CD-ROM provides Getting Started in the
following languages: English, French, German, Italian, Spanish, Russian and
Chinese.
•
Operating Instructions (Included on the Setup CD-ROM)
Operating Instructions explains about operations, settings, features and the
cleaning method when using the camera.
•
IMPORTANT SAFETY INSTRUCTIONS (Included on the Setup CD-ROM)
Basic safety precautions are described to use the camera.
Please read this manual before using and save this manual for future
reference.
Installation/Troubleshooting
Network Camera
BL-C10
Model No.
Advertisement
Table of Contents

Related Manuals for Panasonic BL-C10


Summary of Contents for Panasonic BL-C10
-
Page 1: Network Camera
Installation/Troubleshooting Network Camera BL-C10 Model No. How to Use This Documentation The camera includes the following 4 manual types. • Installation/Troubleshooting (This manual) This manual has important information you will need to understand before installing the camera and troubleshooting tips. - Page 2 Installation/Troubleshooting Abbreviations • UPnP is the abbreviation for Universal Plug and Play. • "Network Camera" is called "Camera" in this Installation/Troubleshooting. Trademarks • Ethernet is either a registered trademark or a trademark of Xerox Corporation in the United States and/or other countries. •...
-
Page 3: Table Of Contents
Installation/Troubleshooting Table of Contents Before Using ..............4 IMPORTANT SAFETY INSTRUCTIONS........4 1.1.1 User Name and Password Protection............6 1.1.2 Video Recording Notice................6 Camera Feature Locations............. 7 1.2.1 Front View....................7 1.2.2 Bottom View ....................8 1.2.3 Rear View ....................9 Viewnetcam.com Service............. -
Page 4: Before Using
Installation/Troubleshooting Before Using 1.1 IMPORTANT SAFETY INSTRUCTIONS When using this unit, basic safety precautions should always be followed to reduce the risk of fire, electric shock, or personal injury. Read and understand all instructions. Keep these instructions. Heed all warnings. Follow all instructions. - Page 5 Installation/Troubleshooting Network Camera Memo Attach your purchase receipt here. For your future reference Date of purchase Serial Number MAC Address (Found on the rear side of the main unit) (Found beside the Ethernet port of the main unit) Name and address of dealer...
-
Page 6: User Name And Password Protection
Installation/Troubleshooting 1.1.1 User Name and Password Protection The use of a unique User Name and secret Password is an important tool that will help limit unauthorized individuals from accessing the camera. If you choose to disable this tool, and choose not to limit access by use of a User Name and Password, this may result in access to the camera by unauthorized individuals. -
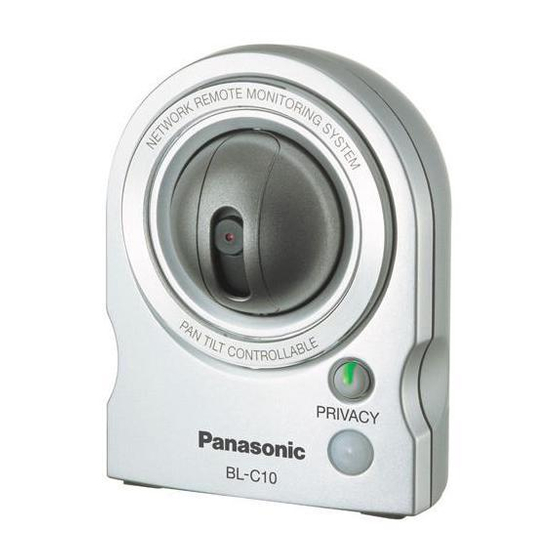
Page 7: Camera Feature Locations
Installation/Troubleshooting 1.2 Camera Feature Locations 1.2.1 Front View Pan/Tilt Part Do not apply pressure to the pan/tilt portion of the camera. Any forced movement can damage the internal mechanism. Indicator/Privacy Button Pyroelectric Infrared Sensor (see Getting Started) Privacy Button To temporarily deactivate the camera, press the privacy button. Once pressed, the button changes from green to red. -
Page 8: Bottom View
Installation/Troubleshooting 1.2.2 Bottom View Tripod Mounting Hole Used when installing the Ethernet ® camera on a tripod. (LAN) port DC IN jack FACTORY DEFAULT RESET Button Resets settings to default (see page 84 of the Operating Instructions in the Setup CD-ROM). Cable Cover After the Ethernet cable and AC adaptor are... -
Page 9: Rear View
Serial number (S/N) is indicated on the label. The MAC address is indicated on the label. Note If the ceiling is made of wood, the camera can be installed on the ceiling. See Panasonic Network Camera support website at http://panasonic.co.jp/pcc/ products/en/netwkcam/ for details. -
Page 10: Viewnetcam.com Service
1.3 Viewnetcam.com Service Viewnetcam.com is our unique service using dynamic DNS to view the image from Panasonic Network Cameras. Since most ISPs switches a global IP address regularly (a dynamic global IP address) instead of using a static one, the camera cannot be accessed with the previous assigned IP address. -
Page 11: Connecting The Camera To A Router Supporting Upnp
UPnP feature following the router manual before you set up the camera. See the PanasonicNetwork Camera support website at http:// panasonic.co.jp/pcc/products/en/netwkcam/ for details. • If the maximum idle time is set in PPPoE or PPTP connection with your ISP, disable it on the router. See the router manual for details. -
Page 12: Connecting The Camera To A Router Not Supporting Upnp
Installation/Troubleshooting 1.5 Connecting the Camera to a Router Not Supporting UPnP™ To allow access from the Internet with a router not supporting UPnP , follow the procedures below. Select [Static] on the Network page. (1) Access the camera (see page 8 of the Operating Instructions in the Setup CD-ROM). -
Page 13: Setting Up The Camera Using The Mac Address On The Setup Program
Installation/Troubleshooting 1.6 Setting Up the Camera Using the MAC Address on the Setup Program The Setup Program may not list any cameras due to your firewall or antivirus software settings on your PC. If you cannot disable your firewall or antivirus software, you can set up the camera using the camera MAC address as shown below. - Page 14 Installation/Troubleshooting Enter the user name and password, and click [Save]. The Enter Network Password window is displayed. Enter the user name and password that were set, and click [OK].
- Page 15 Installation/Troubleshooting When the Single Camera page is displayed, the setup is completed. • If Security Warning window is displayed to install ActiveX Controls, click ® [Yes]. Notes • See page 8 of the Operating Instructions in the Setup CD-ROM for the Single Camera page.
-
Page 16: Troubleshooting
Installation/Troubleshooting Troubleshooting Troubleshooting The Panasonic Network Camera support website "http://panasonic.co.jp/pcc/ products/en/netwkcam/" includes various technical information other than the contents in this troubleshooting section. Access it if problems occur. 2.1 About Indicator Display Problem Cause and Remedy Indicator lights • Ethernet cable is not connected properly. -
Page 17: About Camera Setup
Troubleshooting Installation/Troubleshooting Problem Cause and Remedy Indicator • The camera may be malfunctioning. continues If you cannot access the camera, the camera may be blinking red. malfunctioning. Call our customer call center. Indicator lights • The camera is in privacy mode. red. - Page 18 Installation/Troubleshooting Troubleshooting Problem Cause and Remedy Setup Program • Your firewall or antivirus software is blocking the connection. does not list any To avoid any possible problems, temporarily disable any cameras. firewall or antivirus software, and set up the camera again. If you cannot disable your firewall or antivirus software, you can set up the camera using the MAC address (see page 13).
- Page 19 Troubleshooting Installation/Troubleshooting Problem Cause and Remedy UPnP port • UPnP is disabled on the router. forwarding setup Enable UPnP on the router following the router manual. fails. • The camera is turned on before the router is turned on. Turn the router on first, and then turn the camera on. •...
-
Page 20: About Camera Image And
Installation/Troubleshooting Troubleshooting 2.3 About Camera Image and Page Display Problem Cause and Remedy The Top page is • The camera IP address has changed. not displayed. Enter the new IP address in the address bar of the web browser. • Wrong IP address class is assigned to the camera. IP addresses of the PC and the camera must be in the same private IP address class. - Page 21 Troubleshooting Installation/Troubleshooting Problem Cause and Remedy The Top page is • The default gateway address may be wrong. displayed on the Assign the correct default gateway address (see page 29 of LAN, but not the Operating Instructions in the Setup CD-ROM). displayed from the Internet.
- Page 22 Installation/Troubleshooting Troubleshooting Problem Cause and Remedy Camera image • ActiveX Controls are not installed in Internet Explorer. is not displayed / ActiveX Controls should be installed to display video (Motion or not displayed JPEG) (see page 11 of the Operating Instructions in the properly.
- Page 23 Troubleshooting Installation/Troubleshooting Problem Cause and Remedy Image is out of • The lens has dust, dirt, fingerprints or droplets on it. focus. Clean the lens with a cotton bud (see page 93 of the Operating Instructions in the Setup CD-ROM). •...
- Page 24 • The camera firmware may be broken because the power was Firmware page turned off during the update, etc. is displayed Download the latest firmware from the Panasonic Network when accessing Camera support website and update the firmware. the camera.
-
Page 25: About Privacy Mode
Troubleshooting Installation/Troubleshooting 2.4 About Privacy Mode Problem Cause and Remedy Privacy button • The privacy button is not enabled on the Privacy Mode page. does not work. Enable the privacy button on the Privacy Mode page (see page 73 of the Operating Instructions in the Setup CD-ROM). -
Page 26: About Pyroelectric Infrared Sensor
Installation/Troubleshooting Troubleshooting 2.5 About Pyroelectric Infrared Sensor Problem Cause and Remedy Pyroelectric • You have not enabled the pyroelectric infrared sensor. infrared sensor Enable the pyroelectric infrared sensor image buffer/transfer does not work. (see page 60 of the Operating Instructions in the Setup CD- ROM). - Page 27 Troubleshooting Installation/Troubleshooting Problem Cause and Remedy Pyroelectric • The pyroelectric infrared sensor may malfunction in the following infrared sensor areas. • Where direct sunlight hits the object malfunctioning. • In a greasy or humid place like a kitchen • Where there are sharp temperature changes like near an air conditioner •...
-
Page 28: About Operation Bar
Installation/Troubleshooting Troubleshooting 2.6 About Operation Bar Problem Cause and Remedy Pan/Tilt, click to • Your PC is not connected to the camera. center and Click [Refresh] on the web browser. Confirm that the image preset features refreshes, and operate the pan/tilt functions. do not work. -
Page 29: About Image Buffer/Transfer
Troubleshooting Installation/Troubleshooting 2.7 About Image Buffer/Transfer Problem Cause and Remedy The camera • The default gateway and DNS server addresses are not does not assigned correctly. transfer the Assign them correctly (see page 29 of the Operating image by E-mail Instructions in the Setup CD-ROM). -
Page 30: About Other Features
Installation/Troubleshooting Troubleshooting 2.8 About Other Features Problem Cause and Remedy The firmware is • The firmware updating is not completed due to power off, not updated. network failure or other causes. Update the firmware again following the next procedures. Disconnect the plug of the AC cord of the camera from the outlet, and reconnect it again. - Page 31 Troubleshooting Installation/Troubleshooting Memo...
- Page 32 1-62, 4-chome, Minoshima, Hakata-ku, Fukuoka 812-8531, Japan Copyright: This material is copyrighted by Panasonic Communications Co., Ltd., and may be reproduced for internal use only. All other reproduction, in whole or in part, is prohibited without the written consent of Panasonic Communications Co., Ltd.