
Related Manuals for Miele M 8261


Summary of Contents for Miele M 8261
-
Page 1: Operating Instructions
Operating instructions Microwave oven M 8261 To avoid the risk of accidents or damage to the appliance it is essential to read these instructions before it is installed and used for the first time. M.-Nr. 06 542 960... -
Page 2: Table Of Contents
Modes of operation ..........15 How does the microwave oven function? ....... 15 Operating modes . - Page 3 "door" message..........24 Interrupting or re-starting a programme .
-
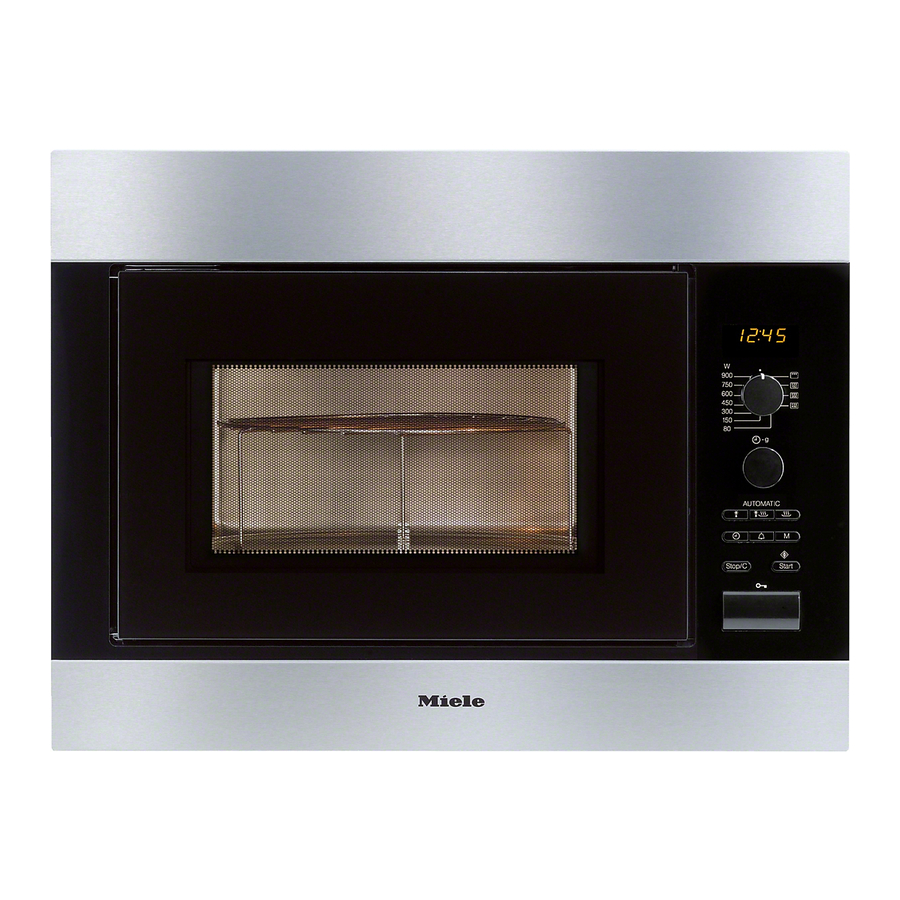
Page 4: Description Of The Appliance
Description of the appliance Oven interior and accessories a Oven door b Door locking mechanism c Grill/browning element d Control panel e Turntable f Grilling rack g Glass tray h Gourmet plate i Cover j Boiling rod... -
Page 5: Control Panel
Control panel Description of the appliance k Electronic timer and clock display l Rotary selector for microwave power, grill and combination programmes m Rotary selector to enter time and weight n Automatic programme buttons o Time of day button m p Minute minder button l q Memory button (to save a 1-3 stage programme sequence) -
Page 6: Accessories Supplied
Microwave-solo mode. To avoid the grilling rack being used inadvertently with Microwave-solo, it should not be kept inside the microwave oven. Glass tray The glass tray is suitable for use with all cooking functions. When grilling directly on the rack, the glass tray should be placed underneath the rack to catch any fat or juices. -
Page 7: Caring For The Environment
Disposal of the packing material The transport and protective packing has been selected from materials which are environmentally friendly for disposal, and can normally be recycled. Ensure that any plastic wrappings, bags, etc. are disposed of safely and kept out of the reach of babies and young children. -
Page 8: Warning And Safety Instructions
Technical safety If the connection cable is damaged, the new cable must be fitted by a Miele approved service technician. Do not use the microwave if - the door is warped. - the door hinges are loose. - Page 9 Do not connect the appliance to the mains electricity supply by an extension lead. Extension leads do not guarantee the required safety of the appliance (e.g. danger of overheating). The electrical safety of this appliance can only be guaranteed when continuity is complete between it and an effective earthing system which complies with local and national safety regulations.
- Page 10 Always remember that times for cooking, reheating and defrosting in a microwave oven are usually considerably shorter than with traditional methods of food preparation. Excessively long cooking times can lead to food drying out and burning, or could even cause it to catch fire.
- Page 11 Never heat undiluted alcohol in the oven as this can easily ignite. Fire hazard. Do not heat up tins in the microwave oven. Pressure can build up and they may explode resulting in injury or damage. Cover any food which is left in the...
- Page 12 See appropriate section. Eggs can only be cooked in their shells in the microwave oven in a specially designed egg-boiling device available from specialist shops. Similarly, hard-boiled eggs should not...
- Page 13 Do not use the appliance for deep frying food, and do not leave it unattended when cooking with oils and fats as these can be a fire hazard if allowed to overheat. Ovenproof earthenware can retain a considerable amount of moisture. Earthenware and porcelain containers with hollow handles and lid knobs must only be used in this oven if they have...
- Page 14 Browning dishes should only be used in a microwave oven, or as a serving dish. In a conventional oven the special glaze would suffer damage.
-
Page 15: Modes Of Operation
How does the microwave oven function? In a microwave oven there is a high-frequency tube called a magnetron. This converts electrical energy into microwaves. These microwaves are distributed evenly throughout the oven interior and rebound off the metal sides of the oven interior to reach the food from all sides. -
Page 16: Operating Modes
Operating modes What can a microwave oven In the microwave oven, food is cooked, reheated or defrosted quickly. You can use your microwave in the following ways: – Food can be defrosted, reheated or cooked by entering a power setting and a time. -
Page 17: Suitable Containers For Microwave Ovens
The heat distribution will be more even. If sparks and arcing occur when using... - Page 18 Glassware Heat-resistant glass or ceramic glass are ideal for use in the microwave oven. Crystal glass contains lead which could cause the glass to crack. Glass dishes with a milled rim are also subject to this risk.
-
Page 19: Testing Dishes For Their Suitability
If in doubt as to whether glass, earthenware or porcelain plates or dishes are suitable for use in a microwave oven, a simple test can be performed: ^ Place the item you wish to test in the centre of the oven, fill a suitable glass with water and also place this in the oven. -
Page 20: The Cover
Alternatively, use lids or covers made of microwave-safe glass or plastic, or use a clingfilm recommended for use in a microwave oven (pierce as instructed by the manufacturer). Heat can cause normal clingfilm to distort and fuse with the food. -
Page 21: Before Using For The First Time
Important: After unpacking, let the appliance stand for approx. 2 hours at room temperature after transporting it to its final location before connecting it to the mains. This is important for the correct electronic functioning of the appliance. ^ Remove all the packaging materials from the appliance. -
Page 22: Time Of Day Display
Time of day display Setting the time of day ^ Connect the appliance to the mains electricity supply. 12:00 and the m symbol will flash in the display until the current time of day is set. Before this, the time of day will start to run from 12:00, as the clock will start as soon as the appliance is connected to the mains... -
Page 23: Operation
To open the door ^ Press the a button to open the door. If the microwave oven is being used, opening the door will interrupt the cooking programme. Placing the dish in the oven Ideally the dish should be placed in the middle of the oven. -
Page 24: Door" Message
Operation When heating up food which cannot be stirred or turned during cooking, as with a plated meal, it is best to use a lower microwave power level. This ensures the heat is distributed evenly. Heat for long enough to cook the food properly. -
Page 25: Interrupting Or Re-Starting A Programme
Interrupting or re-starting a programme At any time you can ..interrupt a programme: ^ Press the Stop/C button, or open the appliance door. The time stops counting down..continue the programme: ^ Close the door and press START. The programme continues. -
Page 26: Quick Start (Programmable)
Operation Quick start (programmable) Pressing the START button c is sufficient to set the appliance operating on maximum power. Three set times are stored in the memory: ^ 30 secs: Press START c once ^ 1 min: Press START c twice ^ 2 min: Press START c three times Pressing the START c button four times in succession will bring back the... -
Page 27: Minute Minder
Minute minder The minute minder can be used to time any activity in the kitchen, e.g. boiling eggs. The time set counts down in one second steps. ^ Press the l button. 0:00 flashes in the display and the l symbol lights up. -
Page 28: Operation - Grilling
Operation - Grilling The grill can be used on 4 settings: by itself, and in combination with the Microwave function at one of three different power levels. If the total grilling time required is less than 15 minutes, the grill should be pre-heated for approx. - Page 29 Combination mode - Microwave + Grill This function is very good for baking and browning. The microwave cooks the food, and the grill browns it. The grill can be combined with one of three different microwave power levels: 150, 300 and 450 Watt. It is possible during the cooking process to switch between the different power levels without interrupting the...
-
Page 30: Gourmet Plate
Gourmet plate The gourmet plate gets extremely hot when in use. Always use oven gloves when handling it to avoid burns. Place it on a suitable heat-resistant mat or pot rest. Before using for the first time Before using the gourmet plate for the first time, fill it with 400 ml water and add 3-4 tbsps vinegar or lemon juice. -
Page 31: Recipes
Recipes Croque monsieur (Serves 3) 6 slices of bread 30 g soft butter 75 g grated Emmental cheese 3 slices of cooked ham Butter the bread. Add the cheese to three of the bread slices in equal amounts and add a slice of ham. Place the remaining three slices of bread on top of the ham with the buttered side face down. - Page 32 Gourmet plate Home-made potato rösti (Serves 2) 400 g peeled potatoes 2 small onions 50 g grated Emmental cheese Salt, pepper 20 g butter Coarsely grate the potato and onion, and mix together with the cheese, salt and pepper. Place the gourmet plate on the turntable, and pre-heat for approx.
- Page 33 Curried chicken (Serves 3) 600 g chicken or turkey breasts 2 tbsp oil 2 tbsp white wine 2 tbsp apple juice 1 tbsp lemon juice Salt, freshly ground black pepper 1 tsp curry powder A pinch of finely chopped rosemary A pinch of ground ginger A pinch of cayenne pepper tsp Tabasco sauce...
- Page 34 Gourmet plate Pineapple cake For the cake: 2 eggs 80 g sugar ripe bananas 30 g chocolate chips 100 g plain flour tsp. baking powder Topping: 1 tin pineapple chunks (drained weight 240 g) tbsp brown sugar tbsp desiccated coconut Beat together the eggs and sugar until frothy.
-
Page 35: Operation - Automatic Programmes
All of the automatic programmes are weight dependent. After selecting a programme, enter the weight of the food. The microwave automatically calculates the time according to the weight given. After cooking, allow the food to stand at room temperature for the suggested number of minutes ("standing time") to allow the heat to be distributed evenly through the food. - Page 36 Operation - Automatic programmes The programmed time can, if necessary, be extended by a few minutes during operation by pressing the START button repeatedly until the time required shows in the display. On all programmes it is only possible to extend the time by a few minutes.
-
Page 37: Saving Your Favourite Programme
One favourite programme can be saved in memory. This programme can have up to 3 stages (e.g.: 1 minute at 600 W, followed by 2 minutes on Grill, and finally 3 minutes at 150 W + Grill). Programming (The example given is for a 3-stage programme.) ^ First select the function for the first stage. - Page 38 Saving your favourite programme To call up your favourite programme ^ Turn the programme selector to the 12 o'clock position. ^ Press the M button. ^ Press the START button. In the event of a power cut, the favourite programme is no longer saved and must be re-entered.
-
Page 39: Changing The Settings
Some of the standard settings for the appliance (which are set at the factory) have an alternative which you can select if required. Please consult the chart for the different options. The factory settings are marked with a star* on the chart. Proceed as follows: ^ Press and hold the m and M buttons at the same time until P I and v light... - Page 40 Changing the settings Setting Night time switch-off S 0* P 2 Automatic warming function P 3 "door" message P 4 Audible tone P 5 Demo mode (for dealer showroom use only) P 0 Factory default Settings available (* factory default) Night time switch-off is deactivated.
-
Page 41: Reheating
Never reheat hard boiled eggs in a microwave oven, even without the shell. The eggs can burst. Food taken straight from the refrigerator will take longer to reheat than food stored at room temperature. -
Page 42: Cooking
Eggs can burst, even after they have been taken out of the oven. Eggs can be cooked without their shells in the microwave oven only if the yolk membrane has been punctured several times first. The pressure could otherwise cause the egg yolk to explode. -
Page 43: Defrosting/Defrosting And Reheating Or Cooking
Defrosting/Defrosting and reheating or cooking Defrosting Select the following microwave power settings to reheat food: – 80 W for defrosting very delicate food, e.g. cream, butter, gateau and cheese. – 150 W for defrosting everything else. Remove the food from its packaging and place in a microwave-proof container. -
Page 44: Some Suggested Uses
Some suggested uses Food Quantity Melting butter and margarine Melting chocolate Dissolving gelatine 1 packet + 5 tbsp water Preparing flan 1 packet + topping/jelly glaze 250 ml liquid Yeast dough Made with 100 g Popcorn 1 tbsp (20 g) popcorn Salad dressings Tempering citrus... -
Page 45: Cleaning And Care
Disconnect the microwave oven from the power supply before cleaning (e.g. switch off at the socket and remove the plug). Oven interior and inside of the door The oven interior can get hot during use. To avoid the danger of being burnt, wait until it has cooled down before cleaning. -
Page 46: Appliance Front And Control Panel
Appliance front and control panel E-Cloth ^ A microfibre "E-Cloth" is available from the Miele UK Spare Parts Department, which is suitable for cleaning surfaces such as stainless steel, glass, plastic and chrome without the use of chemicals. It can be washed 300 times. - Page 47 To help prevent re-soiling, a proprietary conditioning agent for stainless steel such as Neoblank (available from the Miele Spare Parts Department) can be used. Follow the manufacturer's instructions on the packaging.
-
Page 48: Accessories Supplied
Cleaning and care Accessories supplied Boiling rod The boiling rod can be washed in a dishwasher. Cover Wash and dry the cover after each use. The cover can be washed in a dishwasher. However, discolouration caused by natural dyes, e.g. from carrots, tomatoes or ketchup, may occur. -
Page 49: Problem Solving Guide
Repairs to this appliance must only be carried out by a Miele approved service technician in strict accordance with current local and national safety regulations. Repairs and other work by unqualified persons could be dangerous. The manufacturer cannot be held liable for unauthorised work. - Page 50 Cooking can be continued after a cooling-down period. If the microwave oven switches itself off repeatedly, please call the Miele Service Department. If it is not possible to remedy a fault by following the instructions given above, on no account open the appliance casing.
-
Page 51: After Sales Service
In the event of any faults which you cannot remedy yourself, or if the appliance is under guarantee, please contact: – your Miele dealer, or – the Miele Service Department (see back cover for contact details). When contacting your Dealer or the... -
Page 52: Electrical Connection Irl, U.k., Za
Replacement fuses and fuse covers can be purchased from your local electrical supplier. If the connection cable is damaged it must be replaced by a Miele approved Service Technician only. This appliance conforms with European Standard EN 55011 as a Group 2, Class B product. -
Page 53: Electrical Connection Aus, Nz
For extra safety it is advisable to install a residual current device with a trip current of 30 mA. WARNING THIS APPLIANCE MUST BE EARTHED If the connection cable is damaged it must be replaced by a Miele approved Service Technician only. Electrical connection AUS, NZ... -
Page 54: Installation
Installation When building in the appliance, ensure that the vent outlets at the front of the appliance are not hindered, and that there is adequate ventilation to the rear of the housing unit by leaving a large enough gap (see diagram: 50 mm x unit width). Do not block the ventilation gaps with any objects. - Page 55 ^ Draw a line inside the housing unit to mark the middle of the unit as illustrated. ^ Position the fitting bracket on this middle line. Use the indented mark on the bracket to guide you. ^ Fit one screw a into the centre of the first long slot.
- Page 56 Installation ^ Connect the appliance to the electricity supply. ^ Then push the appliance right back into the housing unit as described above.
- Page 60 Alteration rights reserved/ 1606 M.-Nr. 06 542 960 / 04 gb - GB M 8261...