Advertisement
Available languages
Available languages
Quick Links
2-659-624-14(1)
B
AC/DC Adaptor/Charger
AC Adaptor/Charger
Adaptateur/Chargeur CA/CC
Adaptateur/Chargeur CA
Operating Instructions
Mode d'emploi
AC-VQ1050D
AC-VQ1050B
© 2005 Sony Corporation Printed in Japan
C
Owner's Record
The model and serial numbers are located on the bottom of the unit.
Record the serial number in the space provided below.
Refer to these numbers whenever you call upon your Sony dealer
regarding this product.
Model No. AC-
Serial No.
WARNING
To reduce fire or shock hazard, do not
expose the unit to rain or moisture.
This symbol is intended to alert the user to the presence
of uninsulated "Dangerous voltage" within the
product's enclosure that may be of sufficient magnitude
to constitute a risk of electric shock to persons.
This symbol is intended to alert the user to the presence
of important operating and maintenance (servicing)
instructions in the literature accompanying the
appliance.
D
CAUTION
You are cautioned that any changes or modifications not expressly
approved in this manual could void your authority to operate this
equipment.
NOTICE FOR THE CUSTOMERS IN THE U.S.A AND CANADA
The Graphical Symbols with Supplemental Marking is located on the
bottom of the unit.
Note:
This equipment has been tested and found to comply with the limits for a
Class B digital device, pursuant to Part 15 of the FCC Rules. These limits
are designed to provide reasonable protection against harmful interference
in a residential installation. This equipment generates, uses, and can
radiate radio frequency energy and, if not installed and used in accordance
with the instructions, may cause harmful interference to radio
communications.
However, there is no guarantee that interference will not occur in a
particular installation. If this equipment does cause harmful interference to
radio or television reception, which can be determined by turning the
equipment off and on, the user is encouraged to try to correct the
interference by one or more of the following measures:
– Reorient or relocate the receiving antenna.
– Increase the separation between the equipment and receiver.
– Connect the equipment into an outlet on a circuit different from that to
which the receiver is connected.
– Consult the dealer or an experienced radio/TV technician for help.
NOTICE FOR THE CUSTOMERS IN THE UNITED KINGDOM
A moulded plug complying with BS 1363 is fitted to this equipment for
your safety and convenience.
Should the fuse in the plug supplied need to be replaced, a fuse of the
same rating as the supplied one and approved by ASTA or BSI to BS1362
(i.e., marked with
or
mark) must be used.
If the plug supplied with this equipment has a detachable fuse cover, be
sure to attach the fuse cover after you change the fuse. Never use the
plug without the fuse cover. If you should lose the fuse cover, please
contact your nearest Sony service station.
E
A
1
6
7
8
Thank you for purchasing the Sony AC/DC Adaptor/Charger.
2
AC-VQ1050D/AC-VQ1050B is the model name for the AC-VQ1050 and its
9
accessories.
3
0
Before operating the unit, please read this manual thoroughly and retain it
for future reference.
qa
The AC-VQ1050 AC Adaptor/Charger can be used as follows:
4
qs
The AC-VQ1050 AC Adaptor/Charger can be used in your home or car.
5
Connect the power cord (supplied) to a wall outlet, or connect the car
battery cord DCC-VQ1 to the cigarette lighter socket in your car. (For
qd
qj
negative (-) grounded vehicles only.)
qk
• Connection cords are included with this unit to operate Sony equipment
VCR/CAMERA
• For charging Sony rechargeable battery packs (L series).
qf
WARNING
BATTERY LIFE
ql
The following functions are available when charging "InfoLITHIUM"
TIME TO CHG
qg
battery packs:
NORMAL FULL
h
m
– Quick charging
w;
qh
– Approximate charging time and battery life can be displayed.
What is "InfoLITHIUM" ?
"InfoLITHIUM" is a lithium ion battery pack which can exchange data with
compatible electronic equipment about its battery consumption. We
recommend that you use an "InfoLITHIUM" battery pack (L series) with
electronic equipment that has the
"InfoLITHIUM" is a trademark of Sony Corporation.
AC-VQ1050D(Gb/Fr).2-659-624-14(1)
WARNING
To reduce fire or shock hazard, do not expose the unit to rain or moisture.
1
3
To avoid electrical shock, do not open the cabinet.
Refer servicing to qualified personnel only.
2
The AC Power cord must only be changed at a qualified service shop.
CAUTION
Replace the battery with the specified type only. Otherwise, fire or injury
may result.
DCC-VQ1
PRECAUTION
The set is not disconnected from the AC power source (mains) as long as it
2
is connected to the wall outlet, even if the set itself has been turned off.
3
4 4
1
2
To remove
Notes on Use
This unit does not have dust-proof, splash-proof or water-proof
specifications.
Caution on battery life (Read carefully before
The contents of the display window change each time you
press the DISPLAY change button.
use.)
While charging the battery pack, this unit shows the battery life if used with
your video equipment, etc. so long as the following conditions are met.
• Using the "InfoLITHIUM" battery pack
• Using electronic equipment with the
1
Make sure that you use a battery pack with the
1
in the instruction manual supplied with your video equipment whether it is
2
"InfoLITHIUM" compatible.
If you use a battery pack with electronic equipment that does not have the
* The indication may not be accurate due to the conditions and environment of use.
1
2
Warranty for Recorded Content
2
Contents of the recording cannot be compensated if recording or playback
is not made due to a malfunction of the battery pack, AC Power Adaptor,
AC Power Adaptor/Charger, etc.
We cannot provide compensation for image
1
content
3
2
We cannot provide compensation for recorded content such as images and
sound, if images are not recorded or played back due to a malfunction in
the AC Adaptor/Charger, etc.
Charging
1
Use only a lithium ion type battery pack. This unit cannot be used to
4
charge a Ni-Cd/Ni-MH type battery pack.
2
• Attach the battery pack firmly.
• Charge the battery pack on a flat surface without vibration.
Charging temperature
1
• For maximum battery efficiency, the recommended temperature range
5
2
• Although this unit enables quick charging, charging outside the
1
6
2
Others
• A negligible amount of electric current will flow into the AC Adaptor/
Charger as long as it is plugged into a wall outlet.
• Unplug the unit from the wall outlet if it will not be used for an extended
period of time. To disconnect the cord, pull it out by the plug. Never pull
the cord itself.
3
• Do not operate the unit with a damaged cord or if it has been dropped or
damaged.
2
• Use this unit close to a wall outlet. This ensures that the power plug can
be quickly unplugged from the wall outlet to turn off the power if a
malfunction occurs during use.
• Only use this car battery Charger with a car that has a 12 or 24 volt
battery.
DCC-VQ1
• Some cars are negatively grounded and others are positively grounded.
This unit is for negatively grounded cars only.
• Use the unit with the car engine running. If you use the unit with the car
4
engine stopped, the car battery may go flat.
• Unplug the car battery cord from the cigarette lighter socket when not in
2
use. To disconnect the cord, pull it out by the plug. Never pull the cord
itself.
3
• The nameplate indicating the operating voltage, power consumption, etc.
is located on the bottom.
• Make sure that nothing metallic comes into contact with the metal parts of
1
the unit or connecting plate. If it does, a short may occur.
• Always keep the metal contacts clean.
• Do not disassemble or convert the unit.
• Do not apply mechanical shock or drop the unit.
• The unit becomes warm when in use. This is not a malfunction.
• Keep the unit away from AM receivers, otherwise it may disturb AM
reception.
4
• Do not place the unit in a location where it is:
— Extremely hot or cold
— Dusty or dirty
1
2
— Very humid
— Vibrating
• Placing this unit in locations subject to direct sunlight such as on
dashboards or near heating apparatus may cause the unit to deform or
malfunction.
If any difficulty should arise, unplug the unit and contact your nearest Sony
dealer.
Troubleshooting
5
5
Video equipment does not
work.
1
2
English
The battery is not charged.
Power immediately turns
off even though there is
sufficient battery life, or the
displayed battery life
differs from the actual
battery life.
The display is not changed.
Quick charging is not
performed.
(camcorder, etc.).
(Faster than charging with your camcorder, etc.)
• For charging lithium ion type battery packs. Cannot be used to
recharge Ni-Cd or Ni-MH type batteries.
• Cannot be used with some models of equipment (camcorder, etc.).
Confirm the compatibility of your equipment before use.
The CHARGE lamp blinks
• Some L series batteries may not have an L mark on the battery pack.
and "WARNING" is
displayed in the display
window.
mark.
Remove the battery pack from the unit and then reinstall it.
If the CHARGE lamp flashes
again:
Install a different
"InfoLITHIUM" battery pack.
If the CHARGE lamp flashes
again:
There is a problem with the
unit.
Disposal of Old Electrical & Electronic Equipment
(Applicable in the European Union and other European
Please contact your nearest Sony dealer regarding the product that has a
countries with separate collection systems)
problem.
This symbol on the product or on its packaging indicates that
this product shall not be treated as household waste. Instead it
shall be handed over to the applicable collection point for the
Specifications
recycling of electrical and electronic equipment. By ensuring
this product is disposed of correctly, you will help prevent
AC-VQ1050
potential negative consequences for the environment and
Power requirements
human health, which could otherwise be caused by
inappropriate waste handling of this product. The recycling of
materials will help to conserve natural resources. For more
Output voltage
detailed information about recycling of this product, please
contact your local Civic Office, your household waste disposal
service or the shop where you purchased the product.
Operating temperature
Storage temperature
Dimensions
Mass
DCC-VQ1
Input voltage
Fuse rating
Cord length
Mass
Included items
AC/DC Adaptor/Charger AC-VQ1050D
mark
mark. Check
mark, the battery life will not be indicated in minutes.*
AC Adaptor/Charger AC-VQ1050B
Design and specifications are subject to change without notice.
Note
AC-VQ1050B is not supplied with Connecting cord (DK-415) and Car
battery cord (DCC-VQ1).
Use a commercially available AC plug Adaptor (not supplied), if necessary,
depending on the design of the wall outlet.
Do not connect this unit to a voltage Adaptor (travel converter) for
when charging is +10 °C to +30 °C (+50 °F to +86 °F).Charging becomes
overseas travel. This may result in overheating or other malfunction.
more difficult at lower temperatures.
recommended temperature range may lead to a longer charging time in
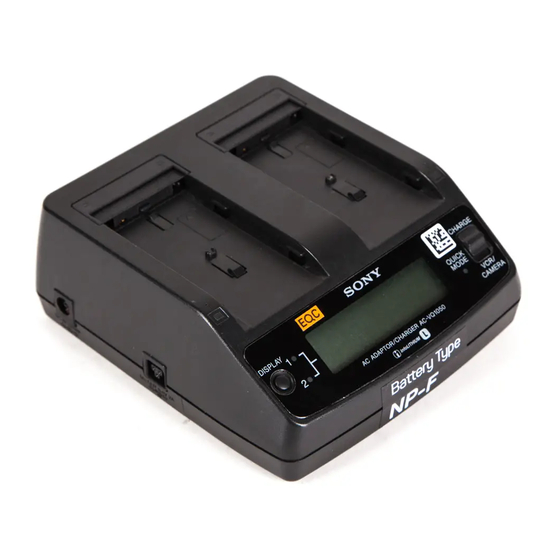
Identifying the parts
order to protect the battery pack. Once the charging time has been
extended, quick charging will not be restored even if the temperature is
brought within the recommended temperature range. Remove and
1 Terminal shutter
reinstall the battery to recharge it again.
2 Slot 1
3 DC IN connector
(only for DCC-VQ1)
4 DC OUT connector
5 CHARGE lamp 1
6 Slot 2
7 CHARGE lamp 2
8 Mode change switch
9 QUICK MODE lamp
q; Display window
qa Slot indicator lamp
qs DISPLAY change button
To Charge the Battery Pack
When the AC Power cord and car battery cord DCC-VQ1 are connected
at the same time, power input from the battery cord is given priority.
Also refer to the instruction manual of your video equipment.
1 Set the mode change switch to CHARGE.
2 Connect the AC Power cord or the car battery cord to this unit.
3 Connect the AC Power cord to a wall outlet or a cigarette
lighter socket.
There is a beep and the display window comes on.
4 Install the battery pack.
Charging begins. When the battery life indicator becomes
CHARGE lamp lights up, normal charge is completed. The QUICK
MODE lamp lights up during quick charging.
For a full charge, which allows you to use the battery slightly longer
than a "normal charge", leave the battery pack installed until the battery
life indicator becomes
Remove the battery pack when required. It can be used even if charging
is not completed.
5 When charging is complete, remove the battery pack.
Installing two battery packs simultaneously
This unit allows installation of two battery packs simultaneously.
Charging starts with the battery pack installed in Slot 1.
When two battery packs are installed but not simultaneously, charging
starts with the battery pack installed first regardless of whether it is in
Slot 1 or 2.
Note
Symptom
Cause/Solution
This unit cannot charge two battery packs simultaneously.
• The power plug is disconnected from the
PRECAUTION
wall outlet.
The set is not disconnected from the AC power source (wall outlet) as long
• The car battery cord DCC-VQ1 is
as it is connected to the wall outlet, even if the set itself has been turned off.
disconnected from the cigarette lighter
socket.
To install the battery pack
t Insert into a wall outlet or cigarette lighter
socket.
• The connector cable is not properly
1 Place the battery pack on this unit with the b b b b b mark facing the
connected.
t Connect properly.
2 Slide the battery pack in the direction of the arrow.
• The mode change switch is set to CHARGE.
t Set the mode change switch to VCR/
CAMERA.
• The mode change switch is set to VCR/
To remove the battery pack
CAMERA.
t Set the mode change switch to CHARGE.
• Fully charge again.
Slide the battery pack in the direction of the arrow and lift it straight out.
t The battery life will be correctly
Notes
displayed.
• Do not lift the unit by holding the battery pack.
• When installing the battery pack, be sure not to hit it against the terminal
shutter.
• Be careful not to pinch your fingers while installing or removing the
t Refer to "Caution on battery life (Read
battery pack.
carefully before use.)".
Charging time
Quick charging is only performed with
"InfoLITHIUM" battery packs.
The following table shows the charging time for a main battery pack that
The display shown below may appear if a
has been completely discharged.
battery pack is charged outside of the
Quick Charge
recommended charging temperature range of
+10 °C to +30 °C (+50 °F to +86 °F). Charging
can still be performed in this case, but in order
Normal charge
to protect the battery pack, quick charging is
not performed.
Full charge
• For how to check the battery life, refer to the instruction manual of your
video equipment.
• The charging time may differ depending on the condition of the battery
pack or the ambient temperature.
t Check through the following chart.
• The approximate times shown are when charging an empty battery pack
with this unit at +25 °C.
Notes
• If the mode change switch is set to VCR/CAMERA during charging,
charging stops.
• If the CHARGE lamp does not light up or flash, check that the battery
pack is correctly attached to the AC Adaptor/Charger. If it is not attached
correctly, it will not be charged.
• Quick charging is only performed with "InfoLITHIUM" battery packs.
• If anything goes wrong during charging, the charge lamp blinks and
"WARNING" appears on the display. For details, see "Troubleshooting".
AC-VQ1050D(Gb/Fr).2-659-624-14(1)
To Check Charging
You can check the charging time on the display during charging. About one
If the CHARGE lamp lights up
minute after charging starts, BATTERY LIFE lights up on the display. The
and does not flash again:
battery life displayed is the approximate time remaining for taking
If the CHARGE lamp goes out
photographs using the viewfinder. The battery life is shorter if the LCD
because the charging time has
display is used.
passed, there is no problem.
The battery life may not be displayed with certain video equipment. For
details, refer to "Caution on battery life (Read carefully before use.)".
If the CHARGE lamp lights up
Press DISPLAY during charging.
and does not flash again:
Once about one minute has passed after installing the battery pack, the
If the CHARGE lamp goes out
contents of the display window change each time you press the DISPLAY
because the charging time has
change button. The slot indicator lamp shows the slot number for the
passed, there is a problem with
battery information displayed. When two battery packs are installed
the first battery pack installed.
simultaneously, the time display of the battery pack not being charged
returns automatically after about 10 seconds to the time display of the
battery pack being charged.
Here is an example of installing a battery pack in Slot 1 followed by
another in Slot 2. The slot indicator lamp corresponds to the slot number.
1 Battery life if the first installed battery pack is installed in your
"InfoLITHIUM" electronic equipment.
The battery life is not displayed if it is less than five minutes.
100 V - 240 V AC 50/60 Hz 22 W
2 Remaining time until normal charging of the first installed
12/24 V DC
battery pack is complete.
(only for negative grounded cars)
The normal charge time is not displayed after normal charging is
DC OUT: 8.4 V 2.0 A in operating mode
complete.
Battery charge terminal: 8.4 V 1.8 A in charge
mode
3 Remaining time until full charging of the first installed battery
0 °C to +40 °C (+32 °F to +104 °F)
pack is complete.
–20 °C to +60 °C (–4 °F to +140 °F)
The full charge time is not displayed after full charging is complete.
Approx. 123 × 53 × 135 mm (w/h/d)
(4
7
/
× 2
1
/
× 5
3
/
inches)
4 Battery life if the last installed battery pack is installed in your
8
8
8
Approx. 390 g (13.8 oz.)
"InfoLITHIUM" electronic equipment.
The battery life is not displayed if it is less than five minutes.
DC 12/24 V
5 Remaining time until normal charging of the last installed
125 V 4 A
battery pack is complete.
Approx. 1.5 m
Approx. 80 g (3.0 oz.)
The normal charge time is not displayed after normal charging is
complete.
6 Remaining time until full charging of the last installed battery
AC Adaptor/Charger (AC-VQ1050) ................. (1)
pack is complete.
Connecting cord(DK-215) ................................... (1)
The full charge time is not displayed after full charging is complete.
(DK-415) ................................... (1)
AC Power cord ................................................... (1)
Notes
Car battery cord (DCC-VQ1) .............................. (1)
Set of printed documentation
• The time display shows the approximate time when charging at +25 °C.
The time display may differ from the actual charging time due to the
environment of use.
AC Adaptor/Charger (AC-VQ1050) ................. (1)
• The time display of the battery pack on the side not being charged may
Connecting cord (DK-215) .................................. (1)
take some time to appear.
AC Power cord ..................................................... (1)
• The time display may show "– – – –" in the following cases. This is not a
Set of printed documentation
malfunction.
– The battery life is less than 5 minutes.
– There is a difference between the displayed time and actual charging
time. Even if this happens, continue charging.
– When charging a battery other than an "InfoLITHIUM" battery pack
(Battery life display and other functions are not available.)
• Full charging requires about one hour after normal charging is complete.
If you remove the battery pack between normal charge and full charge,
the charging time may not be displayed properly in the next charging.
• When charging a battery that has not been used for a long time, the
displayed battery life and full charge time sometimes differ from the
Wall outlet
actual times. This is not a malfunction. If this happens, fully charge the
battery pack. The correct times can then be displayed.
AC-VQ1050
• If you install a fully charged battery pack in this unit, "TIME TO CHG
FULL 1h" may appear on the display. This is not a malfunction.
AC plug Adaptor (not supplied)
• It may take some time after pressing DISPLAY for the time to be
displayed.
• To display the battery life of a new battery, first install it in your video
camera recorder and use it for about 20 seconds, and then charge it with
this unit.
• It may take some time for the time to be displayed for the battery pack
that is not being charged. Sometimes the time may not be displayed at all
due to the condition of the battery pack. Neither case is a malfunction.
See illustration A.
• In the following cases, some deviance may occur in the time displayed.
This is not due to any malfunction.
Display window
– If the battery pack is removed from this unit after normal charge is
qd "InfoLITHIUM" indicator
finished but before full charge is finished. (It takes about one hour from
qf WARNING indicator
when normal charge is complete to when full charge is complete.)
qg TIME TO CHG (charge) indicator
– When charging a battery pack that has not been use for a long time.
qh Time indicator
(Fully charge once first.)
qj BATTERY LIFE indicator
qk VCR/CAMERA indicator
To Operate Video Equipment
ql Full charge indicator
w; Battery life indicator
For details of connection, refer to the instruction manual of the video
equipment.
1 Set the mode change switch to VCR/CAMERA.
2 Connect the AC Power cord or car battery cord to this unit.
3 Connect the AC Power cord to a wall outlet or cigarette lighter
See illustration B-1.
socket.
4 Connect the connecting cord to the DC OUT connector of this
unit.
5 Connect the connecting cord to the video equipment.
When using the connecting cord DK-215 (ill.D-1)
When using the connecting cord DK-415 (ill.D-2)
Notes
• Setting the mode change switch to CHARGE while operating the video
equipment cuts the power supply to the video equipment.
and the
• You cannot charge a battery pack installed in this unit when in VCR/
CAMERA mode.
• Keep this unit away from your video equipment if the image is distorted.
• The DK-415 connecting cord is only for use with devices compatible with
Rechargeable battery packs (L series). Confirm the compatibility of your
and the CHARGE lamp goes out.
device.
• The connecting cord supplied with this unit may be unusable with your
video camera. In this case, use the connecting cord supplied with your
video camera.
• The illustrated example is of connection to an HDR-FX1 digital HD video
camera recorder.
Fuse Replacement
If this unit does not work properly while using DCC-VQ1, check to see if
the fuse has blown. If it has, replace it as follows.
1 Twist the end of the plug and remove it.
2 Remove the blown fuse.
3 Insert a new fuse and twist the end of the plug to tighten.
Notes
• Replace the fuse with a fuse with the same rating (4 A, 125 V).
• If your car's cigarette lighter socket is dirty with ash, etc., the plug part
See illustration B-2.
can become hot due to a poor connection. Always clean before use.
• Do not replace the fuse with anything except a fuse with the specified
terminal shutter.
rating.
• If the new fuse blows soon after replacement, consult your nearest Sony
Press the battery pack until the terminal shutter completely enters the
dealer.
unit.
Contact your car dealer about the polarity of your car's grounding, the
voltage of your car battery, etc.
See illustration B-2.
NP-F970
NP-F770
NP-F570
NP-F730
250 min
170 min
85 min
100 min
310 min
230 min
145 min
160 min
See illustration C.
See illustration D.
See illustration E.
AC-VQ1050D(Gb/Fr).2-659-624-14(1)
Advertisement

Related Manuals for Sony AC-VQ1050B


Summary of Contents for Sony AC-VQ1050B
- Page 1 A moulded plug complying with BS 1363 is fitted to this equipment for This unit allows installation of two battery packs simultaneously. your safety and convenience. If any difficulty should arise, unplug the unit and contact your nearest Sony Charging starts with the battery pack installed in Slot 1. Fuse Replacement dealer.
- Page 2 (série L). Vérifiez la L’appareil reste connecté à la source d’alimentation secteur (prise secteur) Le nom AC-VQ1050D/AC-VQ1050B est le nom de modèle désignant l’ L’appareil vidéo ne •La fiche d’alimentation est débranchée de la compatibilité...