Table of Contents
Advertisement
Advertisement
Table of Contents

Related Manuals for Opel mobile TouchFlip


Summary of Contents for Opel mobile TouchFlip
-
Page 2: Table Of Contents
Table of Contents Safety Information ........................4 Overview of the phone ......................... 7 Quick Setup Guide ........................8 Quick User Guide ........................11 Phonebook ..........................15 Messages ........................... 26 Photo contacts ........................... 39 WhatsApp ..........................44 Call logs ............................. 48 Camera ............................ - Page 3 Security and Location ........................ 98 System ............................. 100 Troubleshooting and support ....................102 The Bluetooth® word mark and logos are registered trademarks owned by Bluetooth SIG, Inc. and any use of such marks by 3 Feet Solutions Pty Ltd is under license. Other trademarks and trade names are those of their respective owners.
-
Page 4: Safety Information
**For body worn operation, this phone has been tested and meets the RF exposure guidelines when used with the Opel Mobile accessories supplied or designated for this product. Use of other accessories may not ensure compliance with RF exposure guidelines... - Page 5 How to handle and preserve your device? • Trying to modify, disassemble or repair the device or the charger yourself will make the warranty invalid. Only certified repairers may install or repair phone equipment. • Avoid hitting or shaking your phone. •...
- Page 6 • Be careful when handling the battery. The lithium-ion battery can be put into use immediately after being unpacked. Use only the Opel Mobile battery that came with the device. We recommend charging the battery as soon as possible once the phone has been switched on.
-
Page 7: Overview Of The Phone
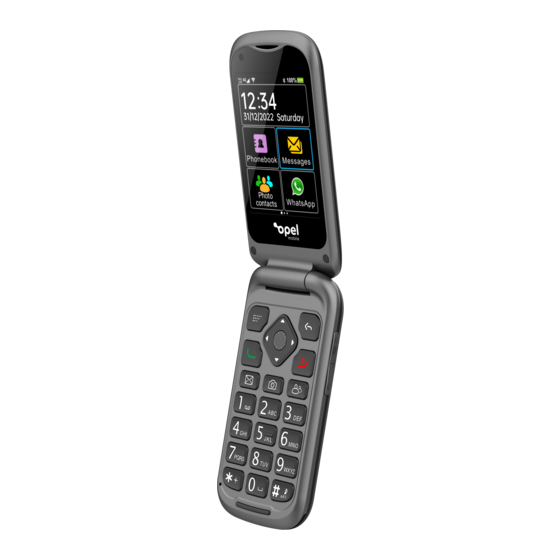
Overview of the phone Earpiece Front camera Cursor and OK keys Left selection key Answer key Messages shortcut key Camera shortcut key Numeric keypad * (star) / + (plus) key Right selection key Volume up button / Torch (press and hold for 3 seconds to turn it on/off) Power / end call key... -
Page 8: Quick Setup Guide
Volume down button Photo contacts shortcut key # (hash) / silent mode shortcut key Low battery / charging indicator Unread messages indicator Missed calls indicator Loudspeaker Main camera LED Torch SOS button (press 3 times in quick succession) Battery cover 3.5mm headphone jack Micro-USB charging connector Charging cradle connector... - Page 9 3. Remove the battery from the phone by lifting from the top and pulling out. 4. Slide your SIM card into the SIM tray (sliding in until it does not go in any further), ensure the gold plates are facing downwards and the cornered edge is in the lower left-hand corner. Please note: This phone supports a Nano sized SIM card.
- Page 10 5. If you wish to insert an optional SD memory card for extra phone storage, insert it into the SD card slot, ensure the gold plates are facing downwards when inserting it into the phone. 6. Re-insert the battery back into the phone. Ensuring the gold plates on the battery and the phone are aligned 7.
-
Page 11: Quick User Guide
Quick User Guide Answer a call To answer an incoming call, flip open the phone and the call will be answered. You can turn off the “Flip answer” function in the Settings menu. If this is turned off, to answer a call press the green “Answer”... - Page 12 Typing Letters (en/En/EN/EnKT9 modes) 1. To type in letters, press the “Hash” # key to choose between abc, Abc, ABC, R9. 2. R9 is the predictive text mode (See predictive text below). 3. abc/Abc/ABC are standard text modes. E.g., When in this mode to type the letter “c,” press the “2 ABC”...
- Page 13 1. Use the keypad to type the word without pressing the same key multiple times. E.g., To type “hello,” press the “4, 3, 5, 5, 6” keys once and the word “hello” will show up for selection. It also suggests other word options like what has been typed in. 2.
- Page 14 Notification bar and system shortcut buttons To access the notifications and system shortcut buttons, press-and-hold the left selection key, or swipe down from the top of the screen using your finger. To clear a notification, swipe left or right on it using your finger.
-
Page 15: Phonebook
Phonebook To access Phonebook, scroll across the home screen using the cursor keys and press OK key on the Phonebook menu icon. Adding a contact 1. To add a contact, press the left selection key and select Add contact from the menu. Then select saving the contact To Phone or To SIM memory. - Page 16 Edit a contact 1. To edit a contact, highlight the contact using the cursor keys then press the OK key, and select to Edit from the menu. 2. You can add or amend any information on that contact. Once completed, highlight Save button and press the OK key to save this contact.
- Page 17 Delete a contact To delete a contact, highlight the contact using the cursor keys then press the OK key, and select to Delete from the menu. Then select Yes to confirm deletion. Delete multiple contacts To delete multiple contacts, press the left selection key and click Select to delete from the menu.
- Page 18 Searching contacts To search for a contact, highlight the search box using the cursor keys then type in the name of the contact’s name you wish to find. It will then show you contacts with that name.
- Page 19 Calling and Messaging Contacts To call or message a contact, highlight the contact using the cursor key then press the OK key, and select to Call or Send SMS from the menu. Pin favourite contact to the top To set a contact as favourite and pin it to the top of the phonebook, highlight the contact using the cursor keys then press the OK key, and select Set as favourite from the menu.
- Page 20 Speed Dial Speed Dial is a quick and easy way to call the people that you may contact on a regular basis. Up to 8 contact shortcuts can be added to Speed Dial. To setup Speed dial, press the left selection key and select Speed dial settings from the menu.
- Page 21 2. Remove a speed dial To remove a phone number from speed dial, highlight it and press OK key to select Clear to remove it. 3. Call a speed dial To call any of your Speed dial contacts from the home screen, press and hold down the respective keypad number for 3 seconds, it will then call that number.
- Page 22 1. Add a number to blacklist To add a phone number to blacklist, press the left selection key to Add a phone number and then select OK to save. 2. Remove a number from blacklist To remove a phone number from blacklist, highlight it and press OK key to remove it.
- Page 23 Import/Export contacts To copy/import/export contacts, press the left selection key and select Copy/Import/Export from the menu. 1. Copy To copy all contacts between SIM card and phone’s internal memory, select “Copy from phone to SIM” or “Copy from SIM to phone” from the menu.
- Page 24 2. Import Within Import, you can import contacts from your internal file system or external memory card to phone’s internal memory.
- Page 25 3. Export Within Export, you can export all contacts from the phone’s internal memory or SIM card memory to internal file system or external memory card.
-
Page 26: Messages
Messages To access SMS and MMS messages, scroll across the home screen using the cursor keys and press OK key on the Messages menu icon, or simply press Messages shortcut key on the keypad. Here you can view previous conversations and messages or create new messages to message your friends and family. - Page 27 3. Type in the name or phone number of the person you wish to message using the keypad. Or select a contact from the Phonebook by using the right cursor button to select the “Add recipient” icon. 4. Then scroll down to type your message using the keypad.
- Page 28 5. To send the message, use the right cursor keys and select the “Send” icon. View messages To view a new message or a previous conversation, press the OK key on the conversation you wish to view. Once opened you can scroll up and down the message conversation to read or view attachments that have been sent to you.
- Page 29 View or save the attachments of MMS messages To view the image, video or audio of an MMS message that has been sent to you, open the message that contains the item, and then touch the attachment on the screen to view it. To save the image, video or audio of an MMS message that has been sent to you, press-and- hold the message that contains the item using the OK key, and then select Save attachment.
- Page 30 Reply messages To reply to a message, scroll down to the “Type text message” box then type the message using the keypad. Once complete use the right cursor keys to select the “Send” icon. Forward a message To forward a message, press-and-hold the message using the OK key to open the Message options menu.
- Page 31 Delete messages 1. To delete a message, press-and-hold the OK key on it to open the Message options menu and select “Delete.” 2. To delete multiple messages, press the left selection key to open the menu and then select “Select message.” You can select multiple messages to delete by the OK key and press the left selection key again and select Delete to confirm deletion.
- Page 32 3. To delete multiple message threads, while at the main interface of Messaging, select them by holding the OK key until the tick icon appears, and then touch upper right button on the screen and select Delete to confirm deletion.
- Page 33 4. To delete all message threads, while at the main interface of Messaging, press the left selection key to open the menu, and then select Delete all threads.
- Page 34 SMS/MMS Message options When writing a message, press the left selection key to open the menu to select various options, such as: Insert quick text, attach a picture, video or audio, or add a subject. 1. Insert quick text – Choose a predefined quick text by pressing the OK key. 2.
- Page 35 3. Attach – Attach a picture, video or record an audio clip, or capture a picture/video for attaching to the message. The maximum size of an attached object is 300KB (network dependence). Message settings To open message settings, while at the main interface of messages, press the left selection key to open the menu and select Settings.
- Page 36 You can adjust the SMS and MMS settings, change the notification options, message font size options and configure cell broadcast. 1. Settings – Text Message (SMS) – You can turn on and request a delivery report for each message you send, manage your SIM card messages, edit, and add quick text options (to add just type in the quick text you want to add and click Add icon), and change the SMS storage location.
- Page 37 2. Settings – Multimedia Message (MMS) – You can enable group messaging, request delivery reports for each message you send, request a read report, send a read report, turn auto- retrieve messages on or off, turn on/off roaming auto-retrieve messages and adjust the size limit of MMS messages.
- Page 38 3. Settings – Notification settings – You can turn on/off notifications, select ringtone for message notifications, turn on/off vibrate, turn on/off popup notification. 4. Settings – General settings – You can change message font size, delete old messages when size limits are reached and configure cell broadcast.
-
Page 39: Photo Contacts
Photo contacts To access Photo contacts, scroll across the home screen using the cursor keys and press OK key on the Photo contacts menu icon, or simply press the Photo contacts shortcut key on the keypad. - Page 40 You can have 8 Photo contacts to make it easier to contact your most common or regular contacts. 1. To set up or edit a Photo contact, scroll across the home screen using the cursor keys and press OK key on the Photo contact menu icon. Using the cursor keys to highlight a Photo contact position and press the left selection key to Edit or Import from phonebook.
- Page 41 2. To delete a Photo contact, highlight the Photo contact, press the left selection key and select Delete from the menu. 3. To dial a Photo contact, highlight the Photo contact, press the left selection key and select Call from the menu.
- Page 42 Or press the Photo contacts shortcut key on the keypad, then press the number key of the photo contact you want to dial. 4. To send a message to a Photo contact, highlight the Photo contact, press the left selection key and select Send SMS from the menu.
-
Page 44: Whatsapp
WhatsApp To access WhatsApp, scroll across the home screen using the cursor keys and press OK key on the WhatsApp menu icon. Notes: WhatsApp can be operated with touch screen only, with the help of keypad for text typing. The green “Answer” key and red “End call” key is not functional in WhatsApp. Mobile data or Wi-Fi connection is required. - Page 45 2. Send messages Touch the new chat button on the screen and select a contact from the contact list to send messages.
- Page 46 3. Send voice notes Touch and hold the voice note button on the screen to send a voice note. 4. Video calls To start a video call, touch the video call button on the screen. To answer a video call, touch the answer button on the screen when the phone is ringing.
- Page 47 5. Voice calls To start a voice call, touch the voice call button on the screen. To answer a voice call, touch the answer button on the screen when the phone is ringing.
-
Page 48: Call Logs
Call logs To access Call logs, scroll across the home screen using the cursor keys and press OK key on the Call logs menu icon, or simply press green Answer key at the first page of the home screen. Here you can view all your previous call logs. Call from call logs To call from call logs, highlight the person you want to call and press the green Answer key or press the OK key to select Call. - Page 49 Send message from call logs To send a message from call logs, highlight the person you want to send and press the OK key to select Send SMS. Delete from call logs 1. Delete all – Press the left selection key and select Delete all from the menu to clear the call logs.
- Page 50 3. Delete individual – Highlight the call log you want to delete, then press OK key and select Delete. Add call log number to blacklist Highlight the call log you want to add, then press OK key and select Add to the blacklist.
-
Page 52: Camera
Camera To access the camera, scroll across the home screen using the cursor keys and press OK key on the Camera menu icon, or simply press Camera shortcut key on the keypad. Within the camera you can take still shot photos and videos. The phone has 2 cameras, one located on the back of the phone, and one located on the inside of the phone above the LCD screen. - Page 53 2. To take a video, press the right cursor keys to change to video mode, then press the OK key to begin recording a video, and press it again to stop recording. 3. To switch between main and front cameras, press the # (hash) key. 4.
- Page 54 5. To access the camera settings, click on the left selection key and use the cursor keys select the options. You can turn on/off the flash, choose self-timer settings, go to the gallery, change where to save the photos and videos, switch between main and front cameras and change the photo quality.
-
Page 55: Gallery
Gallery To access Gallery, scroll across the home screen using the cursor keys and press OK key on the Gallery menu icon. Within the gallery you can view and share photos and videos. To view an image or video, scroll using the cursor keys until the image or video is highlighted. Then press the OK key to open it. - Page 56 1. Share – The image can be shared via Messages, WhatsApp or Bluetooth. Sharing via Messages or WhatsApp will bring up the messaging app to share this image with your contact. Sharing via Bluetooth will search for nearby Bluetooth devices to share the image with, connect to that device to share the image.
- Page 57 3. Delete – Delete the image from the device. 4. Crop – The cursor keys are used for moving the cropped area. The “2” and “8” number keys are used for adjusting the top and bottom of the cropped area, and the “4” and “6” number keys are used for adjusting the left and right side of the cropped area.
- Page 58 5. Details – You can view the file size, resolution and date taken of the image. 6. Slideshow – Selecting slideshow will automatically begin to slideshow all your images and videos. 7. Settings – Under settings you can adjust the display size of pictures and videos, change the sort order of pictures, confirm deletion message, slideshow interval settings, slideshow transition options, repeat slideshow options and shuffle slideshow settings.
-
Page 60: Multimedia
Multimedia To access FM Radio, Sound Recorder, Music Player and Video Player, scroll across the home screen using the cursor keys and press OK key on the Multimedia menu icon. FM Radio To fine tune the frequency of the current radio station, press the left and right cursor keys. Press the left selection key to open a menu for Auto seach and save channels, Pause the radio and Switch output to the earphone. -
Page 61: Recorder
Recorder Here you can record your voice or any sound and store them in the phone. Use the cursor keys to select the on-screen buttons and press OK key to confirm the actions, e.g., Record, Stop, Pause, save recording, Cancel saving and Open recording file list. -
Page 62: Music
Music Here you can play your stored music files. We suggest using a SD memory card for storing music on the device. You can search your music by Song, Artist or Album. Press the left selection key to open the music player for you to play your stored music. Video Here you can play your stored video files. -
Page 63: Alarm
Alarm To access Alarm, scroll across the home screen using the cursor keys and press OK key on the Alarm clock menu icon. In the Alarm clock app, you can set up and modify the alarms to wake you in the morning or for other events or reminders. 1. - Page 64 2. Press the left selection key to add, edit, delete or change the alarm settings. 3. New alarm – You can add a new alarm by adjusting the time, alarm name, whether it should repeat daily, change the alarm sound and whether vibrate or not. Once complete press the Save button using the left selection key.
- Page 65 4. Edit – To edit an existing alarm, highlight the alarm you want to edit then press the left selection key and select Edit to modify it. 5. Delete – To delete an alarm, highlight the alarm you want to delete then press the left selection key and select Delete to delete it.
-
Page 66: Tools
6. Settings – Within alarm settings you can adjust the sound volume of the alarm and snooze time length. Tools To access Calendar, Calculator, Note, File Manager and Magnifier, scroll across the home screen using the cursor keys and press OK key on the Tools menu icon. -
Page 67: Calendar
Calendar In the Calendar app, you can create events and reminders for specific dates. 1. To create an event, press the OK key on a specific date, and then press the left selection key and select Add Event. You can type in the event title, whether it is an all-day event, choose the start/end date/time, whether to set a reminder for it, and its location and notes. - Page 68 2. To edit or delete an event that has been created, press the OK key on a specific date and press OK key again on the specific event. Once you have opened the event, press the left selection key and select Edit or Delete on that specific event to change it.
- Page 69 3. To change to different views of the event list, press the OK key on a specific date, and then press the left selection key and select Day/Week/Month views. 4. To go to a specific date directly, press the left selection key to choose a date using the cursor keys.
-
Page 70: Calculator
Calculator This is just like any normal calculator. Press the numbers on the keypad and use the Left/Right/Up/Down and OK keys for the calculations. The * (star) key is a decimal point, and the # (hash) key is a backspace. -
Page 71: Note
Note The Note app let you type in and save your note. 1. To create a new note, press the left selection key and type in your note. Once complete press the left selection key to save. 2. To edit or delete a note that has been saved, press the OK key on it and select View, Edit or Delete. -
Page 72: File Manager
File Manager Within the file manager, you can view all files and folders that are stored on your device. To navigate and view the folders and files, use the cursor, OK and Back keys. You also can highlight folders and files by press-and-holding the OK key, and then press the left selection key to open a menu for various actions on the highlighted folder or file, such as Share, Delete, Copy, Cut, Paste, Rename and View Details. -
Page 73: Magnifier
Magnifier The Magnifier app zooms in the objects by using the camera to enlarge the image, it helps you to read the newspapers, magazines or books more easily. Press the * (star) and # * (hash) keys to zoom in/out the image and press the OK key to turn on/off flashlight. -
Page 74: Apps
Apps To access Facebook, watch YouTube videos and browse Internet, scroll across the home screen using the cursor keys and press OK key on the Apps menu icon. Notes: The Internet Apps can be operated with touch screen only, with the help of keypad for text typing. - Page 75 1. To create a new memo, press the left selection key and select Add. You can type in the Subject, record your own reminder voice, due date and time, memo repeat interval, numbers of time for playing the recorded voice and reminder interval. Once complete press the left selection key to save.
- Page 76 2. To view, edit or delete a memo that has been saved, press the OK key on it and select View, Edit or Delete.
-
Page 77: Emergency / Sos
Emergency / SOS The SOS feature is designed for people who may need the function to easily contact their family or close friends if they are ever in need of help. When the SOS feature is activated, it will send a text message to all your SOS contacts that you need help. - Page 78 to pick up a GPS signal. Please ensure you have mobile data settings turned on for this feature to work). After it sends out the text messages it will then attempt to ring your SOS contacts until someone answers the call. To activate the SOS feature, tap the SOS button on the back of the phone 3 times in quick succession until you hear the SOS feature activate.
- Page 79 3. If you do not wish to hear the siren sound while activating the SOS feature, press the OK on Warning tone to turn it off.
- Page 80 4. Emergency message (SMS) – You can turn on and off SMS message sending by pressing the OK key on the Send message option. If you wish to modify the Emergency message you can press the OK key and then type in your new message. 5.
-
Page 81: Settings
PLEASE NOTE: This device is not intended to be a life saving device; If you are in a life-threatening medical emergency, we recommend you call emergency 000 immediately. Settings Under settings you can adjust the phone settings, like network and internet, Bluetooth, battery options, display settings, sound settings, storage options, security and location settings and system settings. -
Page 82: Main Settings
Main settings Airplane mode – Turning on/off flight mode. This will deactivate all the phone functions including, phone reception, Bluetooth and Wi-Fi. WLAN (Wi-Fi) – Turning on/off Wi-Fi network. Mobile Data – Turning on/off mobile data services provided by your SIM card. Bluetooth –... - Page 83 Talking keys – Turning on/off talking keypad while dialling a phone number. Common Functions – Including Call settings, Display, Language, LED settings: 1. Call Settings Within call settings you can adjust Wi-Fi calling, voicemail, fixed dialling numbers, call forwarding, call barring, caller ID and call waiting. Voicemail –...
- Page 84 Call Barring – You can select to bar certain calls such as all outgoing calls, international outgoing calls, International outgoing home calls, all incoming calls, incoming calls while roaming and cancel all options. Select the options you wish to Additional settings – Within additional settings you can adjust the caller ID settings and call waiting options.
- Page 85 Brightness level – Here you can adjust the brightness level of the phones screen. Press ok on this function, scroll left or right using the navigation keys to adjust the screens brightness level. Sleep – Here you can adjust the screen timeout timer. Press ok and then highlight the preferred timer and press ok to save that timer.
- Page 86 Special functions – Low battery notification – When battery capacity is lower 10%, the phone will automatically send a text message to the 3 Notified Contacts you have saved, to ask them to remind the phone user to charge the phone. Menu Visibility –...
-
Page 87: Android System Settings
Android system settings Network and Internet Here you can select Wi-Fi options, mobile network settings, data usage options, hotspot and tethering and aeroplane mode. 1. Wi-Fi – Press the OK key on Wi-Fi to open the Wi-Fi menu. Then press the OK key on on/off to turn the Wi-Fi option on or off. - Page 88 2. Mobile Network settings – Here you can turn on/off data roaming settings, choosing the preferred network type, turn on/off Enhanced 4G LTE mode (VoLTE) and change Access Point Names (APN).
- Page 89 3. Data usage – In Data usage you can set data usage warnings, turn data saver mode on or off and turn mobile data settings on or off.
- Page 90 4. Hotspot and tethering – Here you can turn your phone into a Wi-Fi hotspot, so you are able to connect another device to your phone to use the network as a Wi-Fi connection. You can connect other devices via USB, Bluetooth or via Wi-Fi. To connect via USB, connect the USB from your phone to your other device and turn this feature on.
- Page 91 5. Aeroplane mode – You can turn aeroplane mode on and off by pressing ok on this feature. This will deactivate all the phones functions including, phone reception, Bluetooth and Wi-...
-
Page 92: Connected Devices
Connected devices Here you can connect to other devices via Bluetooth, Printing, or USB cable to transfer files, play music and more. 1. Connect via Bluetooth – Press the OK key on Bluetooth and turn Bluetooth on by pressing the OK key. Click ok on Pair a new device to search for nearby devices. - Page 93 2. Connect via USB – To connect to a device like a computer to transfer files, connect the USB to the device you want to connect to then connect the micro USB to the phones charging port. Once connected it will show it is charging, press the ok key to change to transfer files or transfer photos.
-
Page 94: Apps & Notifications
Apps & notifications Here you can adjust your app and notification settings. You can turn notifications on or off and manage app permissions. -
Page 95: Battery
Battery Within the battery menu, you can see the battery usage and performance. You can also change and adjust intelligent power savings, turn battery saver mode on or off, and turn battery percentage view on or off. Display In the display menu you can adjust the screen brightness and change the screen sleep timer. 1. -
Page 96: Sound
Sound Within the sound menu you can adjust the media volume, alarm volume, ring volume, notification volume, adjust vibrate for calls, Do Not Disturb preferences, change phone ringtones, notification sound, alarm sound, screen touch sound, and turn sound enhancement on or off. 1. -
Page 97: Storage
2. Vibrate for calls – Press the OK key on it to turn vibration on or off. 3. Do Not Disturb preferences – Change the preferences of Do Not Disturb mode. 4. Phone ringtone – Press the OK key on phone ringtone, using the up and down cursor keys you can scroll through all the available ringtones, press the OK key to select your preferred ringtone then select OK to confirm. - Page 98 Security and Location Within this folder you can create a screen lock, turn location services on or off, turn show passwords on or off and modify SIM card lock features. 1. Screen Lock – Here you can choose to have no screen lock, or a PIN password lock. Press the OK key on the lock feature you wish to choose for your device.
- Page 99 3. Show Passwords – Press the OK key on show passwords to turn this feature on or off. Turning it off will not allow you to see passwords when you are typing them. 4. SIM Card Lock – Here you can turn SIM Card lock on or off. Press the OK key and type in the password to turn this feature on and off.
- Page 100 System Within system, you can adjust the language and input options, date, and time settings, reset options and view information about the phone. 1. Languages and input – Here you can change the language on your device. Press the OK key on languages and highlight the language you wish to use then press the OK key to confirm.
- Page 101 3. Reset options – Here you can reset Wi-Fi, Bluetooth and app preferences to factory default. You are also able to Factory Reset your device which will erase all data and bring the phone back to the orginal factory/default settings. Please Note: Erase all data (Factory Reset) cannot be undone once selected.
- Page 102 Troubleshooting and support If you are experiencing difficulties with your mobile phone, please go through the following troubleshoots: The Mobile Phone will not power on 1. Ensure the battery is inserted correctly. 2. Ensure you have removed the battery sticker from the gold connection pins. 3.
- Page 103 2. Your SIM card may be damaged or dirty. Ensure you replace your SIM with your network provider if this error occurs. Failure to connect to the network 1. Your network signal may be weak or out of range. Contact your network provider or try the phone in a different location to check your signal.
- Page 104 3. Ensure you have inserted the micro-USB cord into the phone correctly. 4. Ensure there is no dirt or dust accumulated in the phones power socket. 5. Ensure you have left the phone on charge for at least 10 minutes as the battery may have run out of charge completely.
Need help?
Do you have a question about the TouchFlip and is the answer not in the manual?
Questions and answers
sms sending messges are failing
SMS messages may fail to send on the Opel mobile TouchFlip due to the following reasons:
1. Weak or no network signal.
2. Damaged, invalid, or incorrectly inserted SIM card.
3. No credit on the network provider’s account.
4. Incorrect SMS settings.
Check the SIM card, ensure enough credit, verify network signal, and review SMS settings under Message Settings.
This answer is automatically generated
@Mr. Anderson
@Robyn Carol Leigh
the phone does not ring when incomming call shows
The Opel TouchFlip phone may not ring during incoming calls because:
1. The phone may stop ringing and playing notification sounds after charging overnight, requiring a reset to restore sound.
2. The phone could be in flight mode.
3. The phone may have insufficient signal strength.
4. The SIM card may not be properly installed.
5. The phone might be muted or the volume set too low.
These issues can prevent the phone from ringing even when receiving calls.
This answer is automatically generated
How do i review SMS settings under Message Settings
To review SMS settings on the Opel mobile TouchFlip:
1. From the main Messages interface, press the left selection key to open the menu.
2. Select "Settings."
3. Choose "Text Message (SMS)."
4. You can now:
- Turn on delivery reports.
- Manage SIM card messages.
- Edit or add quick text options.
- Change the SMS storage location.
This answer is automatically generated
sms messages being sent are failing
SMS messages may be failing to send on the Opel mobile TouchFlip due to the following reasons:
1. The SIM card may be damaged, invalid, or has no credit—contact your network provider for support.
2. There may be a weak or no network signal—try using the phone in a different location or contact your network provider.
3. The phone may be locked due to incorrect password entries and require a PUK code—contact your network provider to unlock the SIM.
This answer is automatically generated
What does “silent mode” mean
green message light keep flashing
How do I find drafts
my phone is locked on mute how do i unmute
How do I change from 3 rings to more rings before the call goes to voicemail?