Advertisement
Available languages
Available languages
Table of Contents
Advertisement
Table of Contents

Summary of Contents for Stealth Cam STC-CRV43
- Page 1 INSTRUCTION MANUAL SD Card Reader/Viewer Model: STC-CRV43 V.01 ...
- Page 2 **IMPORTANT NOTE** To ensure the product is being utilized to its full potential, we recommend checking our website for new product updates. If your unit is having trouble, please check the website to determine you are using the latest firmware or software version. ...
-
Page 3: Specifications
Specifications SCREEN SIZE: 4.3” Color TFT 480x272 RGB Interface VIDEO RESOLUTION: 1280x720@30fps IMAGE FORMATS: JPEG – Still Photos AVI – Digital Video AUDIO OUTPUT: ... -
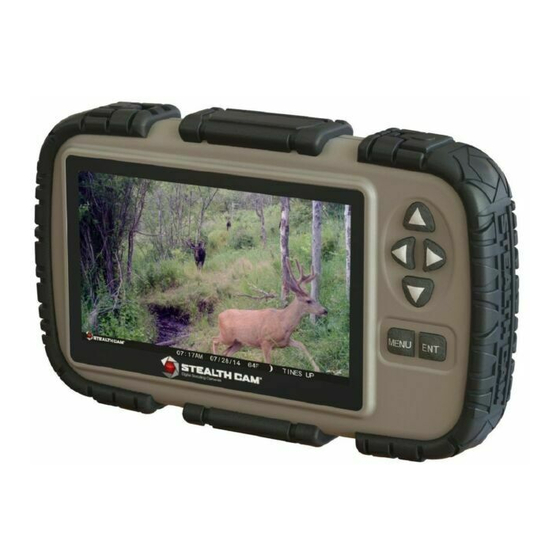
Page 4: Product Controls
Product Controls AUDIO/TV POWER BUTTON JACK FLAP LEFT/RIGHT DOWN ENTER MENU SD CARD/ MICRO USB (4) "AAA" BATTERIES RESET RESET BUTTON 4 www.stealthcam.com Page 877-‐269-‐8490 ... -
Page 5: Getting Started
Getting Started Carefully remove two screws from back cover plate. Insert the four AAA batteries (not included) according to the directions labeled on the inside of the compartment. Replace back cover plate and carefully screw the screws back into place. Carefully insert the SD Card into the slot on the bottom of the viewer. -
Page 6: Viewing Photos
Viewing Photos Select the Photos icon from the Main Menu using the arrow keys and then press the ENTER button this will put you in the Picture Index mode. The first (6) six photos on the SD card will be displayed. As well as a count of how many ... -
Page 7: Viewing Videos
Viewing Videos Select the Video icon from the Main Menu using the arrow keys and then press the ENTER button this will put you in the Video Index mode. The first (6) six videos on the SD card will be displayed. As well as a count of how many ... -
Page 8: Audio Playback
Audio Playback Select the Audio icon from the Main Menu using the arrow keys and then press the ENTER button this will put you in the Audio Index mode. The first (4) four audio files on the SD card will be displayed. As well as a count of how ... -
Page 9: Setting Features
Setting Features This screen will allow you to change the settings for the features below. Highlight the feature you want to change and press the ENTER button. Brightness – This allows you to change the brightness of your screen. There are 5 levels of brightness. -
Page 10: Advanced Settings
Advanced Settings This screen will allow you to change the settings for the features below. Highlight the features you want to change and press the ENTER button. Power Off Timer – This setting tells the viewer when to power off after no activity. The time goes from 1 –... - Page 11 FCC COMPLIANCE GSM ...
- Page 12 LIMITED WARRANTY INFORMATION Your Stealth Cam product is covered by a 365 Day Limited Warranty on parts and labor from the date of original purchase, and purchases must be made through an authorized ...
-
Page 13: Manuel D'instructions
MANUEL D'INSTRUCTIONS Lecteur de cartes SD / Viewer Modèle: STC-CRV43 V.01 13 www.stealthcam.com Page 877-‐269-‐8490 ... - Page 14 **NOTE IMPORTANTE** Pour vous assurer que le produit soit utilisé à son plein potentiel, nous vous recommandons de vérifier notre site Web pour obtenir les nouvelles mises à jour du produit.
-
Page 15: Caractéristiques
Caractéristiques Taille d'écran: 4.3 "couleur TFT Interface RVB 480x272 Résolution vidéo: 1280x720 @ 30fps Formats d'image: JPEG -‐ Photos Nature AVI -‐ Vidéo numérique Sortie Audio: ... - Page 16 Product Controls Audio/TV Bouton d’alimentation Jack Flap en haut Gauche Droite vers le bas Entrer Menu Carte SD/ Micro USB 4 piles ‘AAA’ RESET Bouton De Réinitialisation 16 ...
-
Page 17: Menu Principal
Commencer 1. Retirez délicatement les deux vis de la plaque arrière de couverture. 2. Insérez les quatre piles AAA (non incluses) selon les instructions marquées à l'intérieur du compartiment. 3. Replacer le couvercle et revisser soigneusement les vis en place. 4. -
Page 18: Affichage Des Photos
Affichage des photos ! Sélectionnez l'icône Photos dans le menu principal à l'aide des touches fléchées, puis appuyez sur la touche ENTRER Cela vous mettra dans le mode Photo Index. ! La première (6) six photos sur la carte SD seront affichés. Ainsi que le décompte du nombre de photos sont sur la carte et l'indicateur Indice image apparaîtra à... - Page 19 Affichage des photos Sélectionnez l'icône Photos dans le menu principal à l'aide des touches fléchées, puis appuyez sur la touche ENTRER Cela vous mettra dans le mode Photo Index. ! Les premiers (6) six vidéos sur la carte SD seront affichés. Ainsi que le décompte du nombre de photos sont sur la carte et l'indicateur Indice vidéo apparaîtra à...
-
Page 20: Lecture Audio
Lecture audio ! Sélectionnez l'icône Audio dans le menu principal à l'aide des touches fléchées, puis appuyez sur la touche ENTRER Cela vous mettra dans le mode Index Audio. Les quatre (4) premiers fichiers audio sur la carte SD seront affichés. Ainsi que le décompte du nombre ... - Page 21 Configuration Caractéristiques ! Cet écran vous permettra de modifier les paramètres pour les fonctions ci-‐dessous. Sélectionnez la fonction que vous souhaitez modifier et appuyez sur la touche ENTRER. Luminosité - Cela vous permet de modifier la luminosité de votre écran. Il ya cinq niveaux de luminosité.
-
Page 22: Paramètres Avancés
Paramètres Avancés ! Cet écran vous permettra de modifier les paramètres pour les fonctions ci-‐dessous. Sélectionnez les fonctionnalités que vous souhaitez modifier et appuyez sur le bouton ENTRER. Power Off Timer - Ce paramètre indique le spectateur lorsque l'alimentation après aucune activité. - Page 23 CONFORMITÉ FCC GSM STC-‐CRV43 Cet équipement a été testé et se conforme aux exigences des appareils numériques de classe B, conformément à la partie 15 des Règles FCC. Ces limites sont conçues pour fournir ...
- Page 24 RENSEIGNEMENTS SUR LA GARANTIE LIMITÉE Votre appareil photo d'exploration Stealth Cam est couverte par une garantie limitée de 365 jours sur les pièces et la main-‐d'œuvre à partir de la date d'achat initial, et les achats ...
Need help?
Do you have a question about the STC-CRV43 and is the answer not in the manual?
Questions and answers
even though sd card has pictures card readers says no file
The Stealth Cam STC-CRV43 SD card reader may say "no file" if the SD card is inserted after the device is powered on, as it may not recognize the card. It is important to insert the SD card before turning on the device. Also, if the card is reformatted by the device, all existing pictures will be lost.
This answer is automatically generated
can the reader download pictures to a pc?