
Summary of Contents for NCD Taralist
- Page 1 ATIONAL ONTROL EVICES Taralist Quick Start Guide Time Activated Relay Controllers...
- Page 2 N A T I O N A L C O N T R O L D E V I C E S Taralist Time Activated Relay Controllers National Control Devices, LLC PO Box 455 Osceola, MO 64776 Phone 417.646.5644 • Fax (866) 562-0406 ©...
- Page 3 IMPORTANT : Taralist firmware has been re-written. If your controller is identified as a ‘Taralist Enhanced’ in Base Station software, then your controller is capable of accepting commands at high communications speeds. Older versions of the firmware will require a 1ms delay between communication bytes.
-
Page 4: Table Of Contents
Adding/Removing Events ............... 12 Defining Time ..................13 Midnight Backup Buffer ................14 Editing Protected Data ................15 Computer Control of Taralist ............16 Command Set ................ 18 Relay Logic ................23 Electrical Specifications ............26 Maximum Rating ..................26 Technical Support ..... - Page 5 Notice: This manual will guide you through the setup and use of all Taralist Series relay controllers. Following this manual in the sequence outlined is absolutely essential to proper understanding and use of Taralist Series Controllers. Please review the entire manual BEOFRE contacting NCD technical support. NCD technical support...
-
Page 6: Introduction
It’s that easy. Once the Taralist is configured, it will run through the list of events sored in it’s on board memory every second to look for a match with the current time. If a match with the current time and a configured event is discovered, it will execute the event. - Page 7 Order of Operations There is a general process to learning and using a Taralist Series relay controller, this manual will follow the two sequences, covering the Learning Cycle and the Usage Cycle. Optionally, users may want to consider exploring the Advanced Applications to unlock some of the most powerful features.
-
Page 8: Hardware Reference
Before contacting NCD technical support, make sure that you have thoroughly read this guide. Most questions will be covered in this guide and NCD technical support staff has been instructed to direct your questions to this manual when appropriate. -
Page 9: Onboard Batter Backup
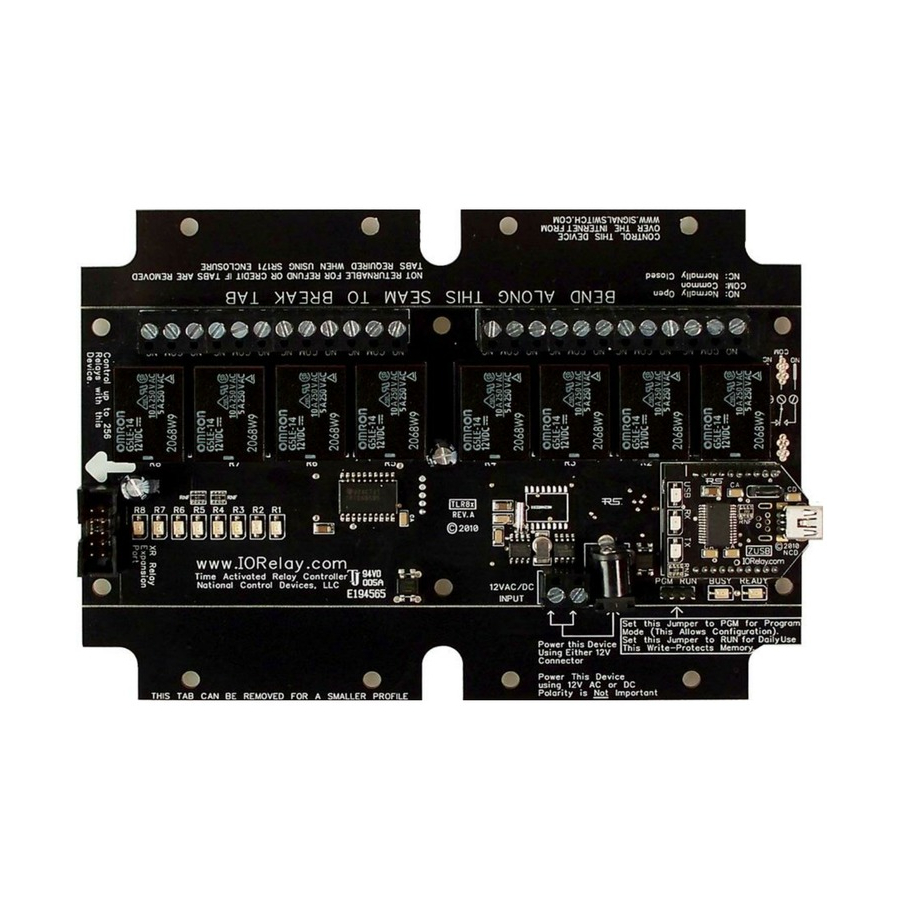
Taralist clock running if power is disconnected; otherwise, every time you unplug and move the controller you would have to reset the time in it. This battery will keep the Taralist clock running for up to two months, cut there are some things you need to know. - Page 10 Taralist Controllers are capable of controlling up to 256 Relays from only one Taralist CPU. These controllers are available with 1, 2, 4, 8, 16, 24, and 32 relays on a printed circuit board as well as a small controller with only an XR expansion port instead of relays.
-
Page 11: Controlling Relays
2. A Relay can be controlled from a computer such as a ZigBee wireless interface, Ethernet Interface, or USB interface. A computer can take control of any or all relays on a Taralist controller at any time. Once taken over, the Taralist logic will not be able to switch a relay. The computer MUST return control of the relay back to the Taralist Logic for stand- alone operation. -
Page 12: Break Away Tabs
Break Away Tabs Physically, most Taralist controllers are actually 2 sizes. When you receive your Taralist controller, the shape and size ensures the controller can fit into a standard enclosure. Optionally, you can make the controller smaller by breaking away the outer tabs. -
Page 13: Taralist Configuration
The guides may be found on our website: www.controlanything.com. Your Taralist controller CANNOT be configured, and it will not be possible to proceed through these instructions without knowing the current COM port assignment. Please refer to the Quick Start Guide for your Interface to determine this information. - Page 14 Note: Some users may find the Taralist controller particularly suitable for a specific application. Once you have created a Configuration file that matches your needs, you may email your Taralist configuration file to us, and we can build and ship any number of Taralist controllers with your configuration built in! This will save you time and allow you to order a controller that is customized for your exact application at no additional cost.
- Page 15 Now that communications are established between your computer and the Taralist controller, we are ready to move onto configuring the device. To start, there are a few things to understand when it comes to Taralist Logic. We will start with Events.
-
Page 16: Understanding Events
Understanding Events Events are scheduled times when a relay or group of relays are turned on or off. They are defined by the user by time: Year, Month, Day of Month, Day of week, Hour, Minute, and Second. By having these options you have the ability of switching relays on or off at very specific times. -
Page 17: Adding/Removing Events
We recommend sorting your list periodically when entering events to the list. The Taralist controller scans through all events in the list from top down to the bottom so events at the end of the list may override events at the top of the list. -
Page 18: Defining Time
Taralist Controller what time it is. You may do this manually or you can Sync the time with your PC. The settings for this are located on the right side of the ‘TARALIST Time Activated Relay Configuration’... -
Page 19: Midnight Backup Buffer
Configuration’ tab. You may also modify the status of the Midnight Backup Buffer stored inside the Taralist controller. This is helpful if you are working with brand new controller and it has nothing stored in the Midnight Backup Buffer. If... -
Page 20: Editing Protected Data
Editing Protected Data Protected Data is best described as a form of BIOS for a Taralist controller. Under most circumstances, it is not necessary to Edit Protected Data, but there are circumstances that may require this operation. Protected Data holds important parameters regarding the Taralist Relay controller you are using. -
Page 21: Computer Control Of Taralist
ProXR series relay controllers, then the command set should be easy to understand. We will provide a summary of all Taralist commands in this manual, but for now, let’s explore some of the computer control features. - Page 22 Who Has Control of the Relays? It is important to know if the Taralist device or your computer has control of the relays. Use the ‘Who Has Control of Relays?’ section on the right to read who has control of each individual relay.
-
Page 23: Command Set
Baud Rate can be set to 9600 Baud for RS-232 Version IMPORTANT: Taralist firmware has been re-written. If your controller is identified as a ‘Taralist Enhanced’ Base Station Software, then your controller is capable of accepting commands at high communications speeds. Older versions of the firmware will require a 1ms delay between communication bytes. - Page 24 Example to Activate Relay 1: 1. Clear Serial Receive Buffer 2. Send Byte 254 (Hex 0xFE) 3. Wait 1ms (Original Taralist firmware ONLY, Skip this Step if using Taralist Enhanced) 4. Send Byte 108 (Hex 0x6C) 5. Wait 1ms (Original Taralist firmware ONLY, Skip this Step if using Taralist Enhanced) 6.
- Page 25 Command Set Summary The following commands may be sent to the Reactor Series Relay Controllers to take control of relays and process other functions and inquiries. Commands may be sent in Decimal values ( ) or may be converted to Hex depending on as shown the preferred format of your programming language.
- Page 26 Command Header Byte Code Parameter Description Return Byte Get Device ID Data 4-Bytes Reboot Controller No Return Bank Set Control of Relay 1 to Device Bank Set Control of Relay 2 to Device Bank Set Control of Relay 3 to Device Bank Set Control of Relay 4 to Device Bank...
- Page 27 Header Command Byte Code Parameter Description Return Byte Set the Control Status of All Relays in Status Bank Selected Bank Halt Event Processing Resume Event Processing Get Current Time from Controller 7 Bytes + Checksum 7 time Plus 85 Successful Set Current Time from Controller Bytes Checksum...
-
Page 28: Relay Logic
Chapter Relay Logic Sample 1 This sample demonstrates how a relay can be used to activate a light bulb. When the relay turns on, the light comes on. Only one power wire is switched with this sample using the COM (common) and NO (normally open) connections of the relay. - Page 29 (as shown in the diagram) with a physical light switch. This will allow a computer/Taralist to control a light as well as manual operation of a light. Properly used, this can be one of the most valuable diagrams we offer on this...
- Page 30 Sample 8 This sample demonstrates how to control the direction of a DC motor using 2 relays. Braking is accomplished by connecting both motor terminals to a common power connection (Faraday’s Law). The capacitors shown may not be required for small motors, but if you experience problems with relays shutting themselves off, the inductions suppression...
-
Page 31: Electrical Specifications
Chapter Electrical Specifications Maximum Rating Absolute Maximum Ratings Minimum Rated Input Voltage Requirements VDC 14.5 Amperage Requirements Standby (No Relays On, No Communications Module 31ma ZUSB USB Communications Module Installed 33ma XBee 1mw Communications Module Installed 32ma* XBee 100mw Communications Module Installed 32ma* Each 5A/10A Relay Activated Adds to Consumption 32ma... - Page 32 Base Station Software can be used to Test you device. Run Base Station software Choose the appropriate Com Port and click ‘OK’. Click on ‘Taralist Relay Quality Control and Diagnostics’ to start testing your device. Test your controller with the...
- Page 33 Events button as documented on page 10. It is important to know that events at the top of the list have lowest priority. The reason for this is the Taralist controller scans through all events in the list from the top to the bottom before it refreshes the relays, so events at the bottom of the list can override events at the top of the list.
-
Page 34: Technical Support
Technical Support echnical support is available through our website, controlanything.com. Support is the way we connect NCD engineers to our customers. Click on the Support tab at the top of any page on our website to be taken to the Forum page. Here you can publicly post or review problems that customers have had, and learn about our recommended solutions. -
Page 35: Contact Information
Like “National Control Devices” on Facebook, and follow us on Twitter @ControlAnything. All orders must be placed online at our website, www.controlanything.com Notice: The only authorized resellers of NCD products are www.controlanything.com www.relaycontrollers.com www.relaypros.com All other websites are not authorized dealers; we have noticed some retailers offering our products fraudulently.
Need help?
Do you have a question about the Taralist and is the answer not in the manual?
Questions and answers