Advertisement
Quick Links
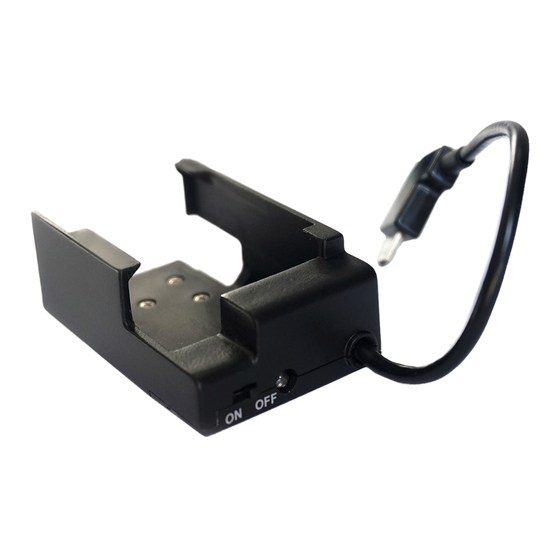
The NP‐FW50 Cradle C allows connecting an additional NP‐FW50
battery to the camera, thereby providing extended battery life. The
cradle unit connects to the camera Micro USB port and can be mounted
on the camera hot‐shoe mount for a secure position inside the housing.
For compatibility information, please visit www.fantasea.com
IMPORTANT NOTICES
* Images provided in this instruction manual feature the Sony a6500
camera. However, the NP‐FW50 Cradle C can be used with other cameras equipped with a Micro USB port and
enable operation when connected to a charger.
** Images provided in this instruction manual feature the Fantasea FA6500 Housing. However, the NP‐FW50 Cradle
C can be used with other housing models offering sufficient space to accommodate the cradle, either when mounted
on the camera hot‐shoe or secured elsewhere in the housing.
*** The NP‐FW50 Cradle C blocks the camera hot‐shoe connection if mounted on the camera hot‐shoe. Depending
on the housing model, the cradle can be secured elsewhere and without blocking the camera hot‐shoe if sufficient
space is available.
**** NP‐FW50 battery not included.
SPECIFICATIONS
Material: Polycarbonate
Main unit dimensions (L x W x H): 55 x 37 x 25 mm / 2.16 x 1.46 x 0.98 inch
Weight: 20 g / 0.7 oz
Manufacturer's warranty
INSTRUCTIONS FOR USE
1.
Install a fully charged NP‐FW50 battery inside the cradle by gently sliding it in. Make sure the battery is
installed with the electrical socket opposite the cradle plug (Fig.1).
2.
Gently push the battery all the way in, until the cradle plug is fully inserted inside the battery electrical
socket (Fig.2). Do not use any force in order to avoid distortion of the plug.
1
Fantasea Line
NP‐FW50 Cradle C
Instruction Manual
Fig.1
(Cat. No. 6583)
NP‐FW50 Cradle C Instruction Manual 20190807
Fig.2
Advertisement

Related Manuals for Fantasea Line NP-FW50 Cradle C


Summary of Contents for Fantasea Line NP-FW50 Cradle C
- Page 1 Fantasea Line NP‐FW50 Cradle C (Cat. No. 6583) Instruction Manual The NP‐FW50 Cradle C allows connecting an additional NP‐FW50 battery to the camera, thereby providing extended battery life. The cradle unit connects to the camera Micro USB port and can be mounted on the camera hot‐shoe mount for a secure position inside the housing. For compatibility information, please visit www.fantasea.com IMPORTANT NOTICES * Images provided in this instruction manual feature the Sony a6500 camera. However, the NP‐FW50 Cradle C can be used with other cameras equipped with a Micro USB port and enable operation when connected to a charger. ** Images provided in this instruction manual feature the Fantasea FA6500 Housing. However, the NP‐FW50 Cradle C can be used with other housing models offering sufficient space to accommodate the cradle, either when mounted on the camera hot‐shoe or secured elsewhere in the housing. *** The NP‐FW50 Cradle C blocks the camera hot‐shoe connection if mounted on the camera hot‐shoe. Depending on the housing model, the cradle can be secured elsewhere and without blocking the camera hot‐shoe if sufficient space is available. **** NP‐FW50 battery not included. SPECIFICATIONS Material: Polycarbonate Main unit dimensions (L x W x H): 55 x 37 x 25 mm / 2.16 x 1.46 x 0.98 inch Weight: 20 g / 0.7 oz Manufacturer’s warranty INSTRUCTIONS FOR USE Install a fully charged NP‐FW50 battery inside the cradle by gently sliding it in. Make sure the battery is installed with the electrical socket opposite the cradle plug (Fig.1). Gently push the battery all the way in, until the cradle plug is fully inserted inside the battery electrical socket (Fig.2). Do not use any force in order to avoid distortion of the plug. ...
- Page 2 To make sure that the battery has been properly installed inside the cradle, turn the cradle on using the power switch. If a charged battery has been properly installed, the indicator light will turn on (Fig.3). If possible, it is recommended to mount the cradle on the camera hot‐shoe in order to secure it within a fixed position and to ensure all camera and housing functions are Fig.3 accessible. To do so, hold the cradle opposite the camera hot‐shoe with the cradle hot‐shoe connector pointed down and the cable pointed leftwards and towards the Micro USB port of the camera (Fig.4). Then gently slide the cradle hot‐shoe connector forwards all the way through the camera hot‐shoe mount until reaching a point of minimal resistance (Fig.5). Fig.4 Fig.5 If the cradle cannot be mounted on the camera hot‐shoe since the hot‐shoe is already being used with a different accessory or since there is no sufficient space inside the housing to accommodate the cradle in this position, the cradle can be secured elsewhere inside the housing. Either way, when positioning and securing the cradle, make sure it doesn’t interfere with housing and camera operation and that it doesn’t interrupt the watertight seal of the housing. Open the camera connections slot cover (Fig.6). Connect the cradle cable to the camera Micro USB port (Fig.7). Make sure you’re inserting the cable into the port in the correct direction and do not use any force. If exists, the camera charge lamp (or any other indication of charging on the camera) should turn on a few seconds after the cable has been connected and the cradle has been turned on (see example on Fig.8). ...
- Page 3 Turn the camera on and look for a charging icon or any other indication that usually appears on your camera when connected to a charger (see example on Fig.9). Note that occasionally, such icons disappear after a few seconds and should appear again if depressing the shutter release halfway. Install the camera inside the camera housing following the instructions provided with the housing (Fig.10). Make sure the Cradle and cable do not interrupt with proper installation of the camera. If the cradle isn’t mounted on the camera hot‐shoe, secure it within a position that does not interrupt with proper operation of camera and housing controls, as well as the watertight seal of the housing. Fig.9 Fig.10 Prior to closing the housing, roll and fold the cable to make sure it doesn’t get caught in the way of the housing seal (Fig.11). Make sure the cradle is turned on and close the camera housing following the instructions provided with the housing. Upon installing the battery Cradle Cnd prior to the dive, it is important to test the watertight seal of the housing in a shallow body of water to make sure that the housing is properly sealed. IMPORTANT NOTICE When the battery cradle is connected to the camera and turned on, the camera battery power indicator (usually displayed on the Fig.11 LCD screen) refers to power provided by both batteries . That is to ...
- Page 4 Fig.14 Fig.13 CARE & MAINTENANCE Please use the utmost care and do not use excessive force when assembling and disassembling the different parts, in order not cause any damage to the products. Keep the battery cradle away from extreme high temperatures, as under direct sunlight. Keep the battery cradle away from water. After the dive and prior to opening the housing, make sure to dry it well in order to prevent water from dripping on the cradle once the housing has been opened. Do not clean the battery cradle with any chemical solvents or other materials, which might cause damage to the product. When storing the battery cradle and during transportation, make sure that it is properly protected in order to prevent any damage to the product. Do not store the battery cradle in presence of chemicals, solvents or fuels. FANTASEA PRODUCT CONSUMER LIMITED WARRANTY “Fantasea” warrants this Fantasea Line branded product against defects in materials and workmanship under reasonable use for a period of ONE (1) YEAR, (two years, where required by law as determined by the origin of the authorized dealer). This warranty is effective from the date of retail purchase from Fantasea or an authorized Fantasea dealer, by the original end‐user purchaser (“Warranty Period”). This warranty does not cover any commercial use of the product. If a product defect arises and a valid claim is received within the Warranty Period, at its option, Fantasea, or its authorized service facilities will either (1) repair the product defect at no charge, (2) exchange the product with a product that is new or which has been manufactured from new or serviceable used parts and is at least functionally equivalent to the original product. The warranty will not extend beyond the original warranty period. Your Fantasea Product should be registered within 30 days of purchase. You must keep the proof of purchase which indicates the date on which the purchase was made; as you may be required to show proof of purchase if you need warranty service. The following conditions apply: 1. This warranty extends to the original purchaser only. It is not assignable or transferable. 2. The warranty does not cover damage resulting from misuse, abuse, negligence, or accidents. Proper maintenance of the Product is the responsibility of the owner. 3. The warranty does not cover damage directly or indirectly resulting from the use of unauthorized replacement ...