Advertisement
Quick Links
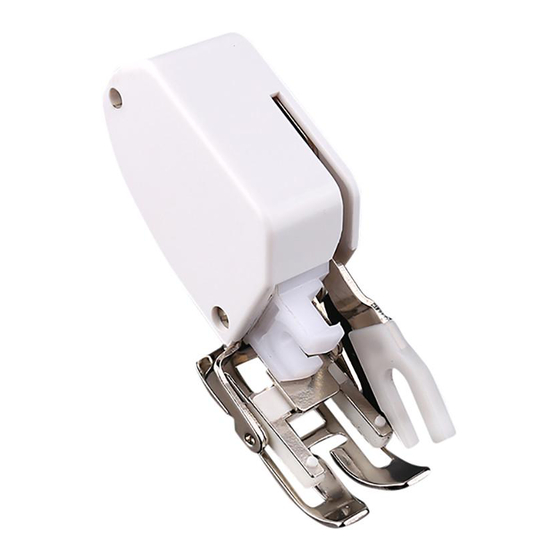
Walking Foot
Pied double-entraînement
Stoffobertransport
Prensatela acompañante
Boventransportvoet
Piedino doppio trasporto
ウォーキングフット
5mm
■ Names of sections
■ Noms des pièces
■ Bezeichnungen der Teile
1
1 Forked part of operation lever
2 Presser bar attachment section
1 Partie fourchée du levier de
commande
2 Partie de fixation de la barre du
2
pied
1 Gegabelter Betätigungshebel
2 Nähfuß-Stangenhaltersektion
3. Exchange the needle fixing screw with the included screw when using the sewing machine with the needle clamp B.
3. Exchange the needle fixing screw with the included screw when using the sewing machine with the needle clamp B.
3. Exchange the needle fixing screw with the included screw when using the sewing machine with the needle clamp B.
A
B
• Use the metal disk or screw driver to tighten the screw firmly
• Utilliser le disque métallique ou un tournevis pour serrer la vis
convenablement.
• Ziehen Sie die Schraube mt der fallschelbe oder einen Schraub entziehen
ner qut test.
Cautions: / Attention : / Achtung:
• Be sure to rotate the hand wheel slowly in your direction before sewing and make sure that the (retainer) needle is not contacting it.
• When using the walking foot, sew between low and mid speed to avoid equipment damage or injury.
• Tourner le volant à main lentement vers soi avant de coudre et s'assurer que l'aiguille ne touche pas le pied de biche.
• Coudre à vitesse lente à moyenne afin de ne pas endommager les pièces ni de se blesser.
• Immer das Handrad langsam vor dem Nähen in Ihre Richtung drehen und sicherstellen, daß die (Rückhalter) Nadel keinen Kontakt aufweist.
• Bei Verwendung des Stoffobertransports zwischen niedriger und mittlerer Geschwindigkeit nähen, um Schäden oder Verletzungen zu vermeiden.
Application: / Applications: / Anwendung:
For improved results when sewing or quilting on fabrics which tend to stick to the bottom of a presser foot or sheer fabrics that are difficult to control. A walking foot assists in keeping the lines matched
on multiple layers of plaid fabrics.
Pour la couture ou le matelassage de tissus qui ont tendance à coller au pied de biche ou de tissus difficiles à coudre. Le pied double -entraînement permet de maintenir l'alignement des carreaux
lors de la couture de plusieurs épaisseurs de tissus écossais, par exemple.
Für bessere Ergebnisse beim Nähen oder Steppen auf Stoffen, die dazu neigen, an der Unterseite des Nähfußes festzusitzen oder Scherstoffen, die schwer zu kontrollieren sind. Ein Stoffobertransport hilft,
den auf mehreren Schichten von Lagenstoffen angebrachten Linien zu folgen.
This can be used for only 5 mm (stitch width) and top-load bobbin type machines.
Il ne peut être utilisé qu'avec les machines de type à canette à chargement supérieur et une longueur de point de 5 mm.
Dieser Stoffdrückerfuß kann nur für Stichbreiten von 5 mm und für Nähmaschinen mit Spulenzuführung von oben verwendet werden.
■ Sewing machine settings / Réglages de la machine à coudre / Nähmaschinen-Einstellungen
● Sewing patterns / Motifs de couture / Nähmuster
Straight stitch (left), (center)
Sewing length: 2-4
Zig-zag width: 0
Zig-zag
Sewing length: 1-3
Zig-zag width: 2-5
1. Lift up the presser foot and needle and turn the power OFF.
1. Relever le pied de biche et l'aiguille et éteindre la machine.
1. Den Nähfuß anheben und die Maschine ausschalten.
● Sewing machines with needle up-down switch:
● Machines à coudre avec bouton de positionnement d'aiguille:
● Nähmaschinen mit Nadel-Auf/Ab-Schalter:
• Press the needle up-down switch to raise the needle and then
raise the presser lever.
• Turn the power OFF.
• Appuyer sur le bouton de positionnement d'aiguille pour lever
l'aiguille, puis lever le levier de pied de biche.
• Eteindre la machine.
• Den Nadel-Auf/Ab-Schalter drücken, um die Nadel anzuheben,
und dann den Nähfußhebel heben.
• Die Maschine ausschalten.
● Needle fixing screw for walking foot
● Vis de fixation d'aiguille
● Nadel-Befestigungsschrauben
• You can use this screw in place of normal fixing screw.
• You can use this screw in place of normal fixing screw.
• You can use this screw in place of normal fixing screw.
Points droits (gauche), (centre)
Geradstich (links), (Mitte)
Nählänge: 2-4
Longueur du point: 2-4
Largeur de zigzag: 0
Zickzackbreite: 0
Zigzag
Zickzack
Nählänge: 1-3
Longueur de couture: 1-3
Largeur de zigzag: 2-5
Zickzackbreite: 2-5
● Sewing machines without a needle up-down switch:
● Machines à coudre sans bouton de positionnement d'aiguille :
● Nähmaschinen ohne Nadel-Auf/Ab-Schalter:
• Lift up the presser lever.
• Rotate the balance wheel toward you to raise the needle to its
highest position.
• Turn the power OFF.
• Lever le levier de pied de biche.
• Tourner le volant vers soi pour mettre l'aiguille en position haute.
• Eteindre la machine.
• Den Nähfußhebel anheben.
• Das Handrad in Ihrer Richtung drehen, um die Nadel in höchste
Position anzuheben.
• Die Maschine ausschalten.
4. Attach the walking foot.
4. Fixer le pied d'entraînement.
4. Den Stoffobertransport anbringen.
• Slip the forked part of operation lever 1 located on the right side of the walking foot onto the needle clamp. At the same time check to see the
presser bar attachment section 2 on the left is set on the presser bar.
• Lower the presser foot and tighten the screw on the presser bar.
• Mettre la partie fourchée du levier de fonctionnement 1 sur la droite du pied d'entraînement sur l'attache d'aiguille. Vérifier en même
temps si la partie de fixation de la barre du pied 2 sur le côté gauche est sur la barre du pied.
• Baisser le pied de biche et serrer la vis de la barre du pied.
1
• Die Gabelsektion am Betriebshebel 1 an der rechten Seite des Stoffobertransports auf die Nadelstangenklammer schieben. Gleichzeitig
2
prüfen, ob die Nähfuß-Stangenhaltersektion 2 an der linken Seite auf die Nähfuß-Stange gesetzt ist.
• Den Nähfuß absenken, und die Schraube an der Nadelstange festziehen.
* Remove stray threads at the start and finish of sewing. Pull the thread ends to the
reverse side of the fabric to remove them for more pleasing results.
* Retirer l'excès de fils au début et à la fin de la couture. Tirer les extrémités des fils
de l'autre côté du tissu pour les cacher.
* Lockere Fäden am Begin und Ende des Nähens entfernen. Die Fadenenden zur Rück-
seite des Stoffes ziehen, um schönere Ergebnisse zu erhalten.
Caution:
Cannot be used with stitches other than those listed at left.
Attention:
Ne peut être utilisé que pour la couture des points mentionnés à gauche.
Achtung:
Kann nicht mit anderen als den Links aufgeführten Stichen verwendet
werden.
2. Remove the presser foot and the presser foot holder.
2. Retirer le pied de biche et le support de pied de biche.
2. Den Nähfuß und den Nähfußhalter entfernen.
• Lift up the presser foot lever and press the lever on the back of the presser foot holder to remove the
presser foot.
• Loosen the screw on the presser foot holder and remove the snap-on presser foot holder.
• Lever le pied de biche et appuyer sur le levier à l'arrière du support de pied de biche pour
détacher le pied de biche.
• Desserrer la vis sur le support de pied de biche et retirer le support.
• Den Nähfußhebel anheben, und den Hebel an der Rückseite des Nähfußhalters drücken, um
den Nähfuß zu entfernen.
• Die Schraube am Nähfußhalter lösen, und den Anschnapp-Nähfußhalter entfernen.
XC3036-001
Advertisement

Related Manuals for Brother SA107


Summary of Contents for Brother SA107
- Page 1 Application: / Applications: / Anwendung: Walking Foot For improved results when sewing or quilting on fabrics which tend to stick to the bottom of a presser foot or sheer fabrics that are difficult to control. A walking foot assists in keeping the lines matched on multiple layers of plaid fabrics.
- Page 2 Aplicación: / Gebruik: / Applicazioni: / 用途 Para mejorar los resultados cuando cosa o borde tejidos que tiendan a adherirse a la parte inferior del prensatela o tejidos finos que resulten difíciles de controlar. El prensatela acompañante ayuda a Walking Foot mantener parejas las líneas en múltiples capas de tejidos plegadas.