Miele G 7883 Operating Instructions Manual
Laboratory glassware washer
Hide thumbs
Also See for G 7883:
- Operating and installation instructions (80 pages) ,
- Operating instructions manual (76 pages) ,
- Operating instructions manual (68 pages)

Related Manuals for Miele G 7883


Summary of Contents for Miele G 7883
-
Page 1: Operating Instructions
Operating Instructions Laboratory Glassware Washer G 7883 To prevent accidents and machine damage read these instructions installation or use. M.-Nr. 05 893 860... -
Page 2: Table Of Contents
........... 12 Setting the water softener . - Page 3 The machine should only be installed, maintained and repaired by a Miele authorized service technician. Repairs by unqualified persons could be dangerous. Do not install the machine in an area where a danger of explosion or freezing may be present.
- Page 4 Only use cleaning agents formulated for special processes and approved by Miele for use with this machine. Use of unsuitable cleaning agents could adversely affect the components of the machine.
- Page 5 For pre-treatment and / or cleaning, only use low-sudsing detergents and disinfecting agents which have been approved by Miele. Suds can have an adverse effect on the cleaning process. When a chemical additive is recommended on technical...
- Page 6 Only genuine Miele parts or accessories should be used with the Laboratory Glassware washer. The performance and safety of non-genuine parts or accessories cannot be guaranteed, and use of such parts or items may void the machine warranty. If you have specific questions about machine options or accessories, please call Miele.
- Page 7 The G 7883 is the "industry standard" undercounter washer designed to handle the vast majority of glassware cleaning applications.
- Page 8 a "On/Off" button b "Door" button c Display d "Display" indicator e "Drying" indicator f "Start" indicator g "Start" button h "Drying" button i "Display" button (toggles between the elapsed time, active wash blocks and actual temperature displays) j "Add liquid detergent" indicator * k "Add rinse aid"...
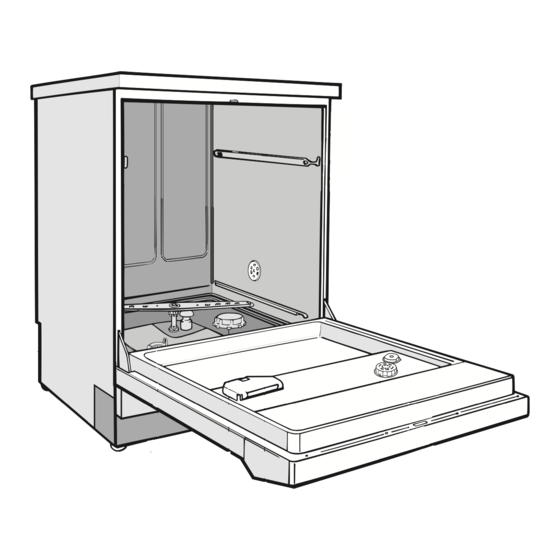
- Page 9 a Connection for optional DOS-Module b Filter combination c Salt reservoir (water softener) d Powdered detergent dispenser e Rinse aid reservoir (with dosage selector) f Rinse aid level indicators...
- Page 10 The machine is equipped with an electric door lock. The door can only be opened when the electrical supply to the machine is turned on, and the "On/Off" button is pressed. ^ Press the "Door" button in as far as it will go.
- Page 11 The emergency release should only be used when the door cannot be opened normally, e.g. in the event of a power failure. ^ Turn the program selector to "Stop" ^ Press the "On/Off" button to turn the machine off. ^ Take precaution against pressure wave release (rapid opening of the door).
-
Page 12: Setting The Water Softener
Before using the machine for the first time, the water softener should be programmed. The water needs to be softened to avoid calcium deposit buildup on the items being cleaned and in the machine itself. To ensure a steady supply of soft water: 1. - Page 13 gr/gal 1 - 30 factory setting CaCO gr/gal 31 - 60 CaCO 1010 1030 1040 1060 1080...
- Page 14 ^ Turn off the machine with the "On/Off" button. ^ Turn the program selector to the "Stop" f position. ^ Press and hold the "Start" 6 and "Display" ß buttons . Turn the machine on with the "On/Off" button. The current program status "P..." will appear in the display.
-
Page 15: Filling The Salt Reservoir
Only special, coarse-grained reactivation salt* should be used in this machine. *Available from Miele’s Professional Customer Service Department. Please see back page for more information. Do not use other types of salt, e.g. table salt, agricultural or gritting salt. These... - Page 16 When the salt reservoir is empty the "Recharge Softener" indicator, b, illuminates to remind you to fill the reservoir. Reactivation takes place automatically during a program. The "Recharging" indicator, a, illuminates while this is occurring.
- Page 17 If rinse aid is required, the rinse aid dosage must be activated with assistance from Miele Technical Service. Rinse aid (e.g. Mielclear) is filled in the storage container and dispensed automatically. The storage reservoir holds about 180 ml. Inadvertently filling the storage reservoir with detergent will damage the reservoir.
- Page 18 The dosage adjuster (see arrow in the illustration) in the opening has settings adjustable from 1 to 6 (1 - 6 ml). It is preset to "3" (3 ml). ^ Use a flat headed screwdriver to turn the dial to the correct setting. If spots remain on the items, use a higher setting.
- Page 19 Guide" - DOS 3) cannot be started until the dispensing system has been primed. (This function can only be canceled by a Miele Service Engineer.) ^ Place the container of neutralizer (red) next to the machine. When the "Add neutralizer" indicator...
-
Page 20: Drying
^ Turn the program selector to "Stop" ^ Turn the machine off. ^ Press and hold the "Display" ß and "Start" 6 button. turn the lab washer on by the main switch The display shows the current program status "P...". - Page 21 ^ Access the programming mode level 2 (see "Adding neutralizer - To access the programming mode"). ^ Turn the program selector to "Universal". "do3" appears in the display. ^ Press the "Display" ß button. The dosage system will be primed automatically.
- Page 22 To ensure trouble-free operation, the following regular maintenance should be carried out by a Miele approved service technician. Replace the dispensing hoses in the DOS modules Take care when handling liquid agents and additives.
-
Page 23: At The End Of A Program.
If you are using must be placed in the detergent container prior to every program, except for "Rinse" and "Drain". ^ Press the opening catch on the container forward. The flap will spring open. The flap is always open at the end of a program. - Page 24 The following instructions relate only to basic preparation and loading of glassware. There are additional requirements for particular applications. ^ Empty all glassware before loading into the machine. Ensure that no acid or solvent residues, especially hydrochloric acid or chlorides, get into the wash cabinet.
- Page 25 Make sure that the spring adapter for the water connection engages correctly when a basket or injector unit is inserted into the machine. It must be 4 - 5 mm higher than the water connection inlet in the machine. If this is not the case, adjust the adapter by performing the following steps: ^ Loosen the locking ring.
- Page 26 For various inserts. For narrow necked glassware, 15 injectors, 160 mm high; 18 injectors, 220 mm high. (Upper basket) For direct injection of narrow necked glassware, 34 injectors,160 mm high.
- Page 27 For various inserts. Stainless steel half insert to accommodate 21 beakers up to 250 ml, Erlenmeyer flasks, round flasks etc. Stainless steel half insert with 28 spring hooks in 2 different heights for various glassware, e.g. narrow necked flasks, graduated cylinders, medicine bottles, etc.
- Page 28 The upper basket can be adjusted above and below the middle position by 2 cm. (measurements do not include inserts) Upper Upper basket basket height position inches Upper 15.5 " Middle 17.5 " Lower 19.5 " ^ Pull out the upper basket, lift from the runners and remove.
- Page 29 X = Sections included in a program (with temperature/temperature holding time) Temperature or temperature holding time changeable (see "Programming special functions"). DOS 2 = Rinse aid dosage possible (needs to be programmed by the Miele Technical Service). DOS 3 = Neutralizer dosage...
- Page 30 X = Sections included in a program (with temperature/temperature holding time) Temperature or temperature holding time changeable (see "Programming special functions"). DOS 2 = Rinse aid dosage possible (needs to be programmed by the Miele Technical Service). DOS 3 = Neutralizer dosage...
- Page 31 ^ Close the door. ^ Press the "On/Off" button. When the program selector is at the "Stop" f position, a point lights up in the display. ^ Turn the program selector clockwise or counterclockwise to the required program. The temperature of the first rinse of the program selected (except for "Pre-Wash"...
- Page 32 "Drying" 0 may be selected as an additional feature once a program has been selected (except in the "Rinse" and "Drain" programs). Drying is phased over 10 minutes. The total running time of the program lengthens accordingly. A wrongly selected program may be changed as described below.
- Page 33 ^ Turn the program selector to the "Stop" f position (the program will stop after approximately 2 seconds). ^ Open the door. Caution: Water and items in the machine may be hot. Danger of burning or scalding. ^ Arrange the load securely. Wear protective gloves where necessary, and observe appropriate health and safety regulations relating to...
- Page 34 For future servicing, please document any alterations to the standard factory settings. Program selector positions that have not been allocated to a function are indicated in the middle part of the display by a bar (-). The programming level is called up via the "Stop"...
- Page 35 Before performing any of the following special functions, the programming mode of the controller needs to be accessed. See "Accessing the programming level". ^ Access the programming level E02 of the controller (see "Accessing the programming level"). Set the dosage concentration according to the detergent manufacturer’s recommendations.
- Page 36 ^ Turn the program selector to "Custom". "do1" appears in the display. ^ Press the "Display" ß button. The dosage system will be primed automatically. The priming is done if the display shows "0". ^ Press the "Start" 6 button. "SP" appears in the display.
- Page 37 Before performing any of the following special functions, the programming mode of the controller needs to be accessed. The dosage is factory set at 0.10, you may or may not be required to adjust it. Set the dosage concentration according to the detergent manufacturer’s recommendations.
- Page 38 ^ Turn the program selector to "STOP" ^ Turn the machine off. ^ Press and hold "Display" ß and "Start" 6. lab washer on with the "On/Off" button. The displays shows the current program status "P...". The "Fill/Drain" indicator will illuminate.
- Page 39 Press and hold the "Drying" 0 button until "E09" appears in the display. Press and hold the "Drying" 0 button until "E12" appears in the display. ^ Turn the program selector to the program to be changed. The current value appears in the display after ^ Press and hold "Display"...
- Page 40 ^ Turn the program selector to "STOP" Press and hold "Drying" 0 until "E22" appears in the display. Press and hold "Drying" 0 until "E25" appears in the display. ^ Turn the program selector back to the program to be changed. The current value appears in the display after ^ Press and hold "Display"...
- Page 41 ^ Turn the program selector to "STOP" ^ Turn the machine off. ^ Press and hold "Display" ß and "Start" 6. lab washer on with the "On/Off" button. The displays shows the current program status "P...". The "Fill/Drain" indicator lights.
- Page 42 ^ Turn the program selector to "STOP" ^ Turn the machine off. ^ Press and hold "Display" ß and "Start" 6. lab washer on with the "On/Off" button. The displays shows the current program status "P...". The "Fill/Drain" indicator lights.
- Page 43 The machine must not be used without all the filters in place. The filters protect the circulation pump from damage caused by foreign objects. The filter combination in the base of the wash cabinet should be inspected regularly and cleaned if necessary.
- Page 44 If water has not been pumped away at the end of a program, the drain pump or the non-return valve may be blocked. ^ Turn off the washer. ^ Remove the filter combination from the wash cabinet. ^ Tilt the locking clamp to the side.
-
Page 45: Cleaning Filters In Water Inlet
Filters are incorporated in the screw connection of the water inlet hose to protect the water inlet valve. If these filters become dirty, they need to be cleaned, otherwise insufficient water flows into the wash cabinet. The plastic housing of the water connection contains an electrical component. -
Page 46: Troubleshooting
The Miele control unit includes a wide range of fault codes to indicate specific errors. These fault codes are indicated on the display by a flashing F. . . (Ranging from F1 up to F30.) If one of these codes appears, please contact the Miele Technical Service Department at 1-800-991-9380 for assistance. - Page 47 – The drain hose is kinked. – The drain pump is blocked. This machine has a resettable heater limiter, which will switch off the heater in case of over-heating. This could be caused if large articles cover the heating elements, or if the filters in the wash cabinet are blocked.
- Page 48 – see "Opening and closing the door." – Turn the program selector to "Stop" f (the fault code goes out). – Press the "On/Off" button to turn the machine off. – Turn the machine on again and reselect the program.
- Page 49 In the event of a fault which you cannot correct yourself please contact the Miele Technical Service Department 1-800-991-9380 techserv@mieleusa.com 1-800-565-6435 service@miele.ca Please quote the model of your machine. This information can be found on the machine’s front panel.
- Page 51 INSTALLATION INSTRUCTIONS...
- Page 52 The protective packing materials are environmentally safe and can be recycled. Ensure that any plastic wrappings, bags, etc. are disposed of safely and kept out of the reach of children. Danger of suffocation! Appliances contain materials which can be recycled. Please contact your local authorities about recycling in your area.
- Page 53 Depending on the requirements for an undercounter installation, a steam deflector can be ordered from the Miele Technical Service Department. The underside of the countertop is protected from steam damage by a stainless steel plate.
- Page 54 If necessary, remove the lid from the machine to make installation possible. ^ Open the door. ^ Remove the fixing screws on the left and right sides using a phillipshead screwdriver. ^ Pull the machine lid approx. 5 mm forwards, lift it upwards and remove. ^ To prevent countertop damage by steam, the supplied self adhesive protective foil (25 x 58 cm) must be...
- Page 55 ^ The machine must be connected to the water supply in accordance with local and national regulations. ^ The washer is constructed so it may be connected to a supply without an extra non-return valve, unless required by code. ^ An acceptable water pressure (flow rate) is 10 - 147 psi.
- Page 56 The machine comes with a standard connection for a pressure-resistant system. The recommended water pressure (flow rate) is 25 - 60 psi however, water pressure of 10 - 147 psi is acceptable. ^ The DI pressure-tested hose (marked "H O pure") with a "...
- Page 57 ^ The machine should preferably be connected to a system onsite. If separate drainage is not available contact your Miele application specialist for advice. The onsite drain connection point should be located between 1 ft. (0.3 m) and 3 ft. (1 m) If it is lower than 1 ft.
- Page 58 2 x 30 A ^ Connection should be made via a suitable isolator, with an "On/Off" button easily accessible for servicing work. ^ A damaged power cord must only be replaced with a genuine Miele cord by a Miele service technician.
- Page 59 ^ The ground lead must be connected to the screw connection point (marked with the ground symbol 8) at the back of the machine. The machine must only be operated with the voltage, frequency and fusing shown on the located on the rear of the machine, and on the plinth (behind the service panel).
- Page 60 Height: Width: Depth: Voltage: Power cord Water pressure (flow rate): Recommended Acceptable Cold or Hot water connection DI-Water connection Recommended Acceptable Delivery head: Drainage length: Water intake hose Drain hose: Noise level in dB (A): Sound pressure level LpA Free stand unit: Built under counter: "...
- Page 64 All rights reserved / 1104 This paper has been bleached without the use of chlorine. M.-Nr. 05 893 860 / 01 M.-Nr. 05 893 860 / 01...